How to Manually Install WordPress – The Ultimate Guide
 Although you can easily install WordPress on most web hosts with the click of a button, there are times when you may need to manually install WordPress on your server.
For instance, you may want to have more control over the installation process, and avoid the extras that often get added when you use an installer.
In other cases, you may want to have a local installation for testing purposes or you want to build your site locally before pushing to a live server.
Regardless of your reasons, WordPress lets you do just that. In this ultimate guide, we will show how to manually install WordPress in four simple steps.
In addition, we will show you how to install and migrate WordPress from a local host to a live server.
Content:
- Requirements to Install WP Manually
- How to Manually Install WP
- Manually Install WordPress Using XAMPP
- Conclusion
Requirements to Install WordPress Manually
WordPress is the most popular Content Management System available, powering over 40% of the total websites on the internet. The reason for this is the ease of installation and the beginner-friendly user interface.
Before installing WordPress, you need to have a domain name ready to use for your website. A domain name is the address users will use to access your website such as mysite.com.
Also, you need to have a hosting account where you will upload your WordPress sites’ files. There are many hosting services available, such as VPS hosting, managed WordPress hosting, dedicated server, or shared hosting plans.
You can check our list of recommended WordPress hosting providers to help you choose the right one for your website.
Lastly, you will need access to an FTP client such as FileZilla. FTP makes transferring files between your computer and your web server easy. However, if you have access to cPanel, you can use that instead.
How to Manually Install WordPress
Surprisingly, this process is not as hard as many people believe it to be. We will show you how to manually install WordPress on a hosting server in 4 steps.
Step One – Download WordPress
WordPress is a software application and to use it, you need to download the WordPress package into your computer.
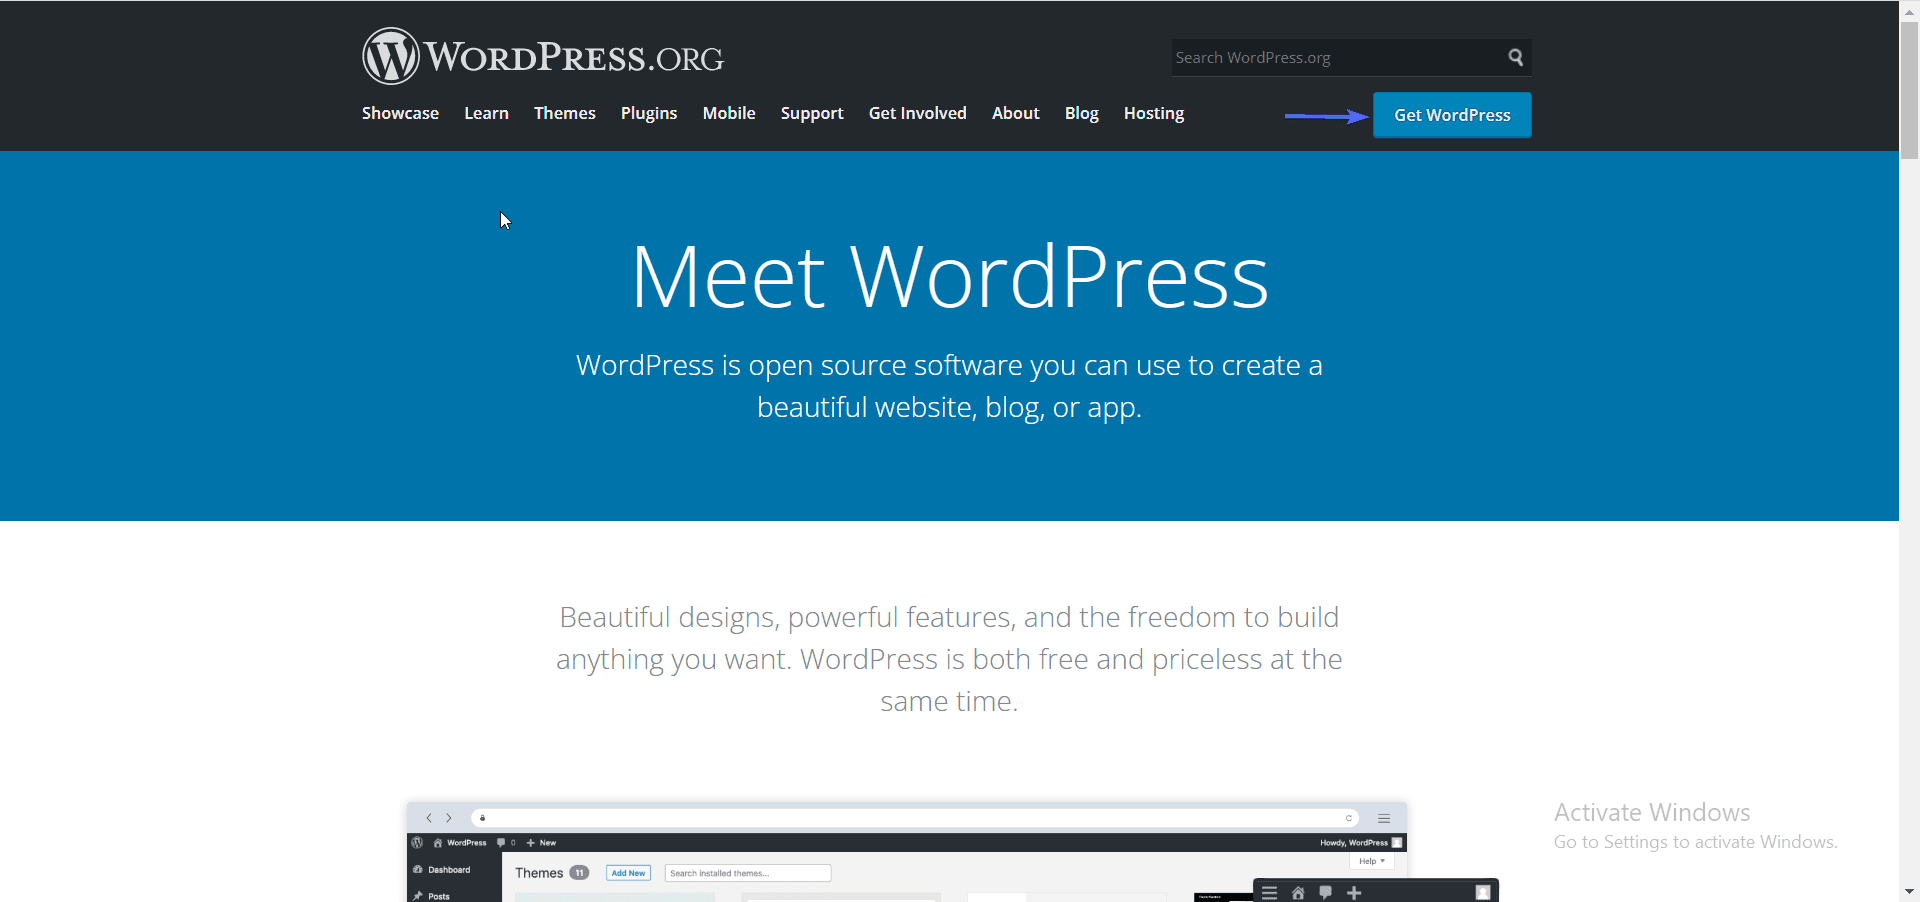
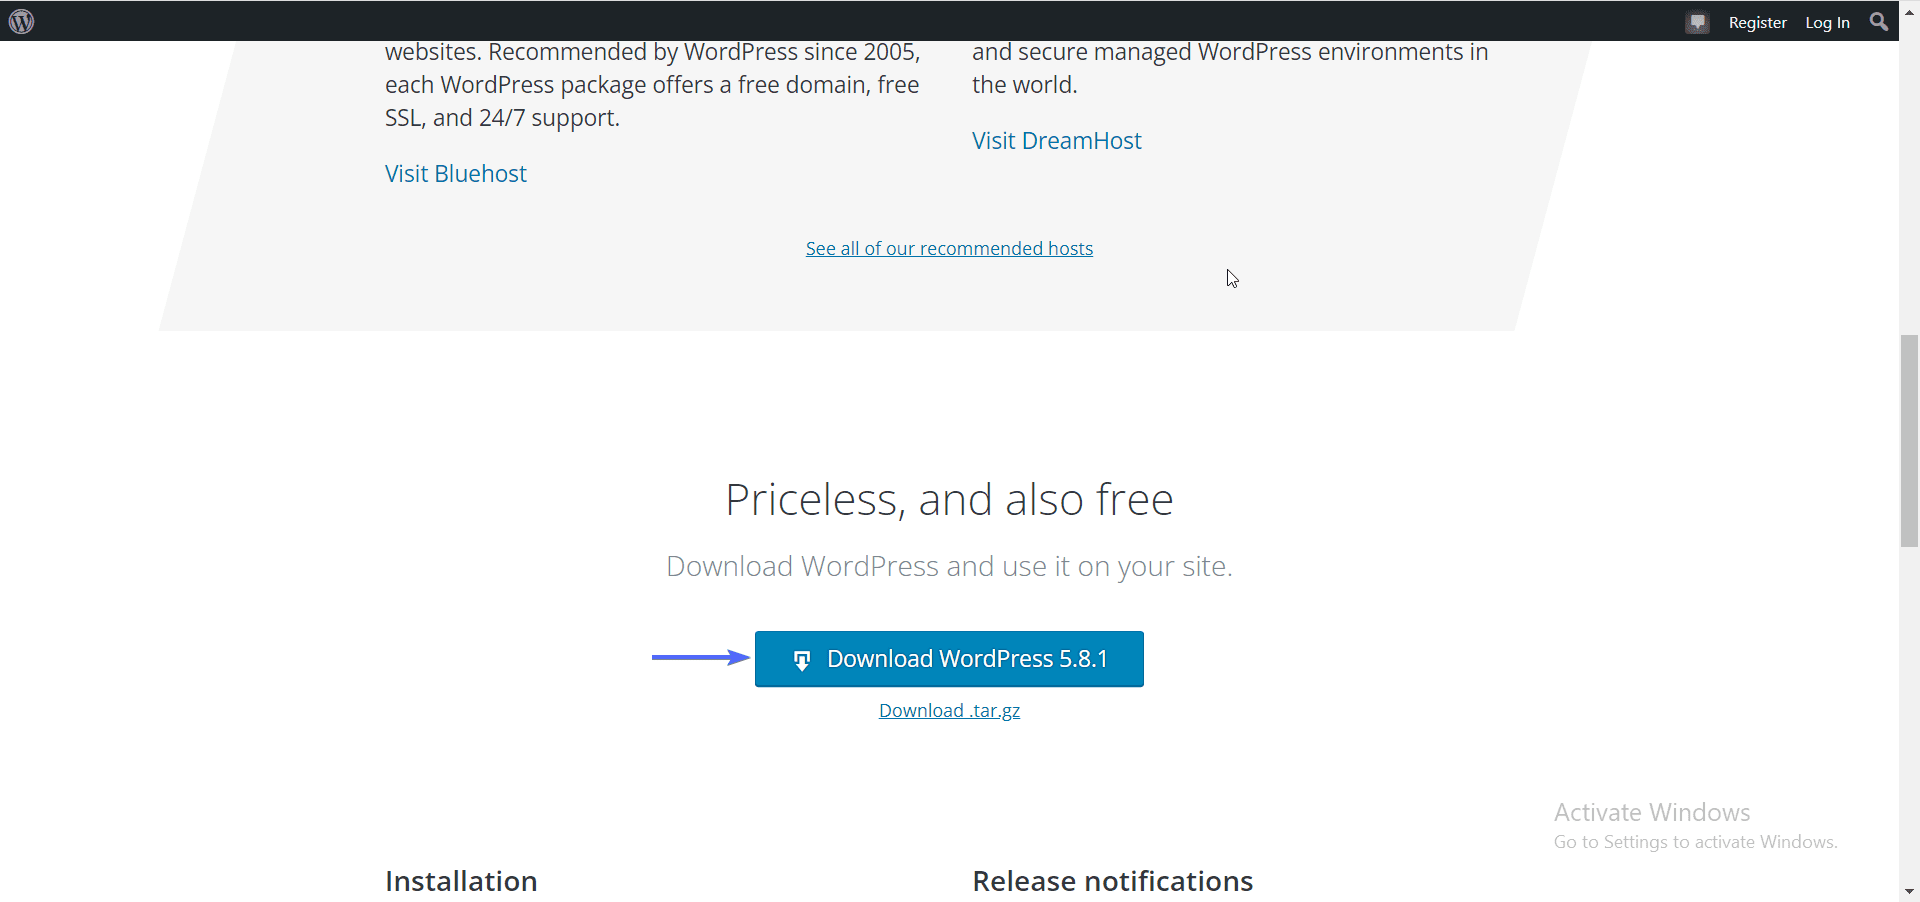
To download the software, simply head over to the official WordPress website and click on the Get WordPress button.
On the next page, scroll down and download the latest version of WordPress. Select the zip version.
Step Two – Upload WordPress to Your Server
After downloading the WordPress package, you need to upload the content of the zip file to your hosting server via FTP or through cPanel. Here, we will show you how to use both of them.
Upload Your Files with an FTP Client
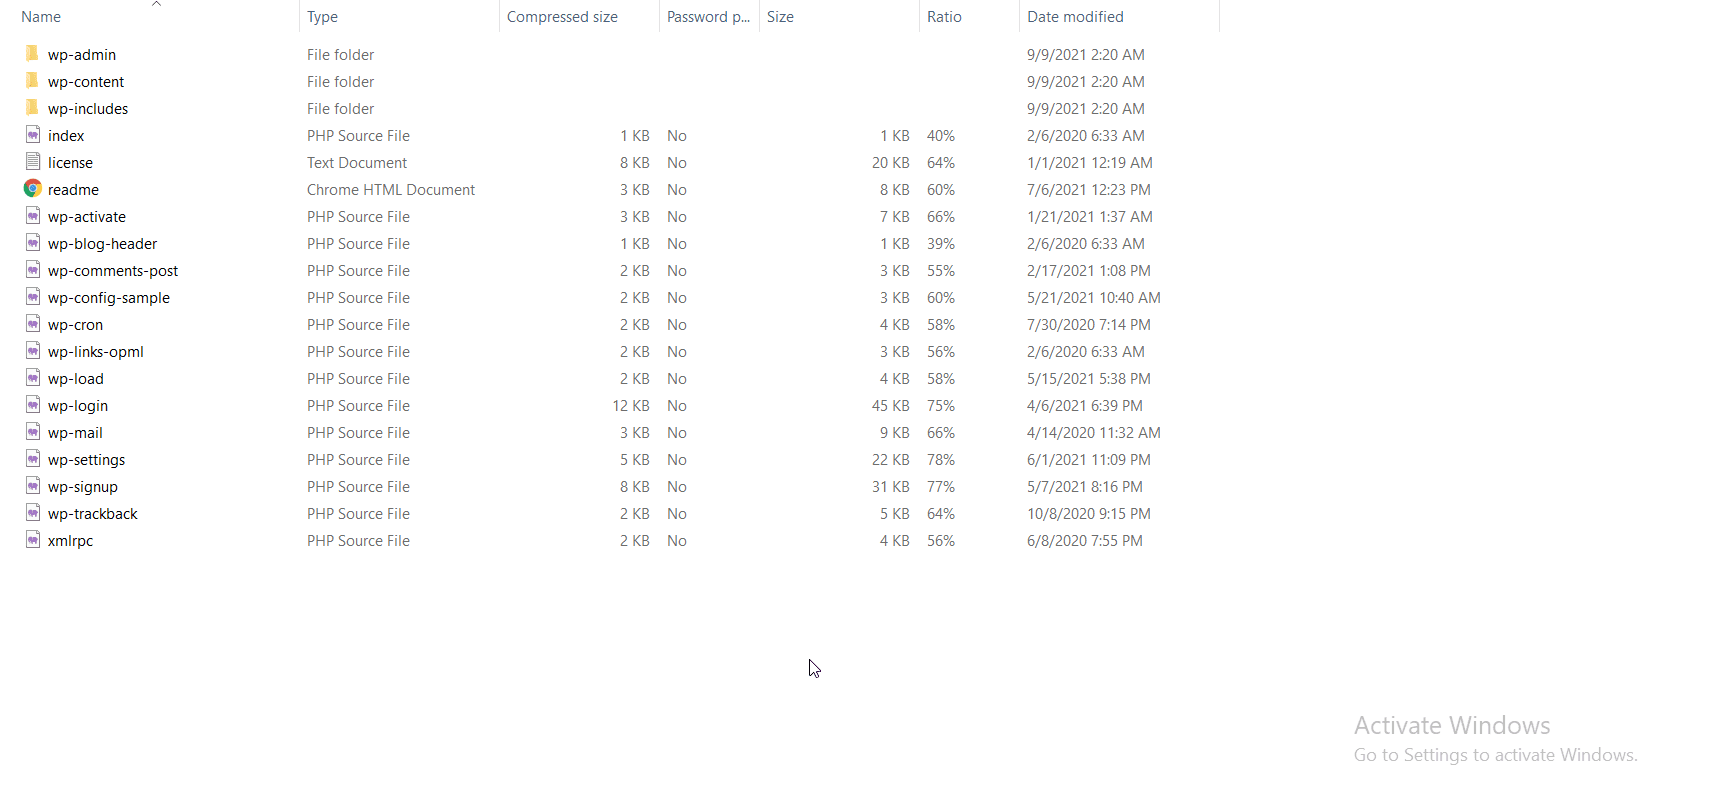
Before proceeding, you need to extract the content of this file into your computer. You should see the files and directories similar to the one below.
Now, you will need to connect to an FTP client. FTP is short for File Transfer Protocol, a method that helps you send and retrieve files from your server using your computer.
We recommend using FileZilla for this process. You can check our guide to learn how to use FTP.
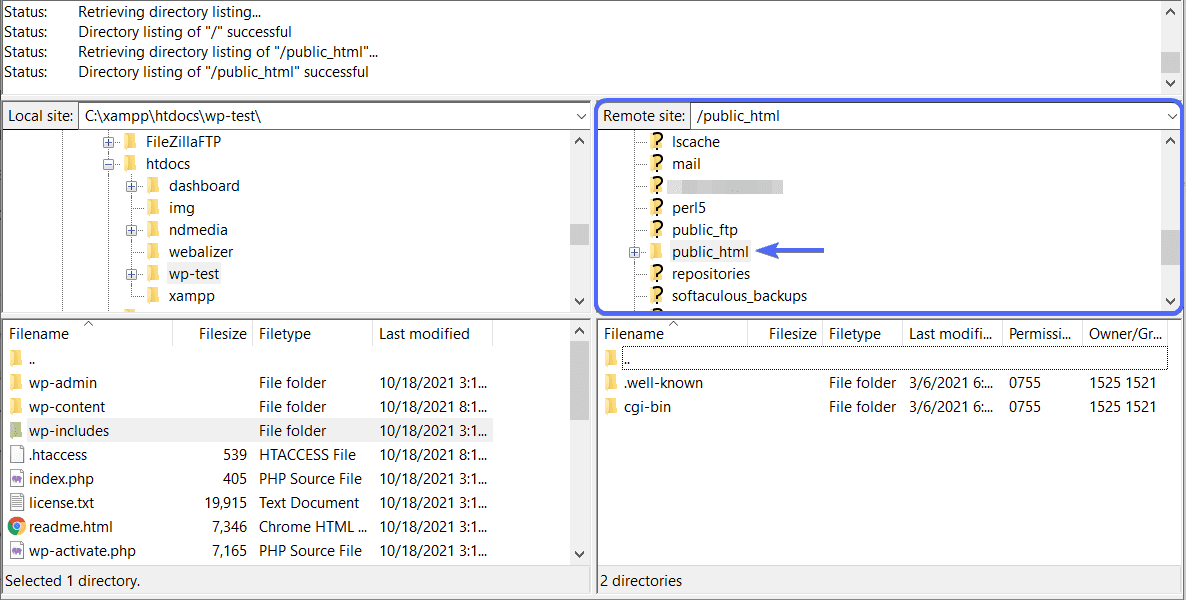
After connecting to your web server using FileZilla, on the right, you will see the files on your server. From there, navigate to the folder where you want to install WordPress. This is usually the public_html directory.
Side note: If your site is to be installed on another domain or directory, then navigate to that folder instead. It is usually in this format mysite.com, where mysite is your domain name.
Now, on the left side, you will see all the files on your computer. Here, navigate to the directory where you extracted the WordPress files.
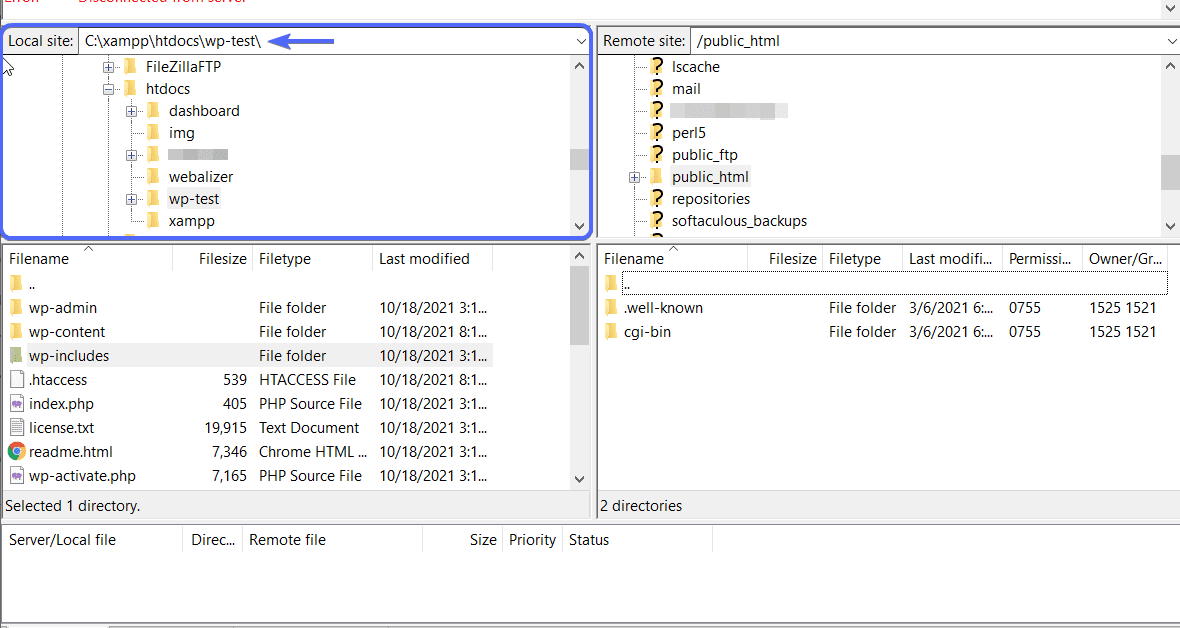
After that, select all the files in the directory using Ctrl + A (or cmd + A for mac users). Now right-click on a file and select Upload.
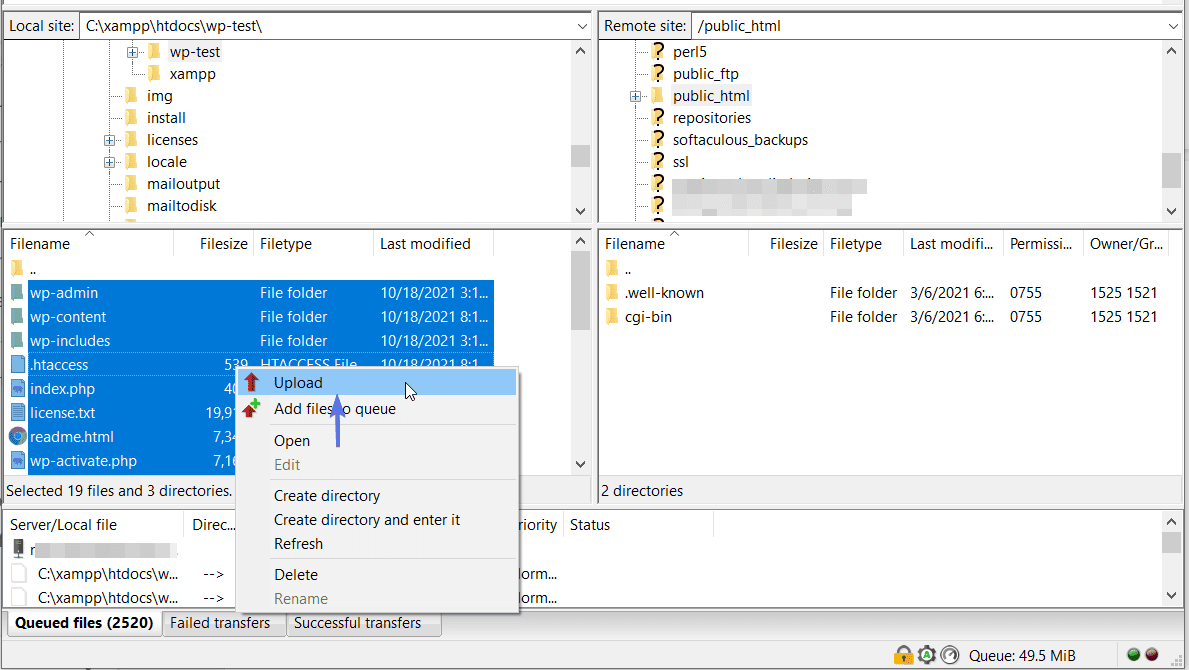
This will upload the WordPress files to your server. You should sit back and relax as this might take some time.
Once the upload is completed, you can proceed to step three of this procedure.
However, if you prefer using cPanel, follow the steps below to upload WordPress to your server.
How to Upload Your Files with cPanel
cPanel provides a user-friendly interface to manage your web hosting server. With it, you can upload files to the server, create databases and install software such as WordPress to your domain.
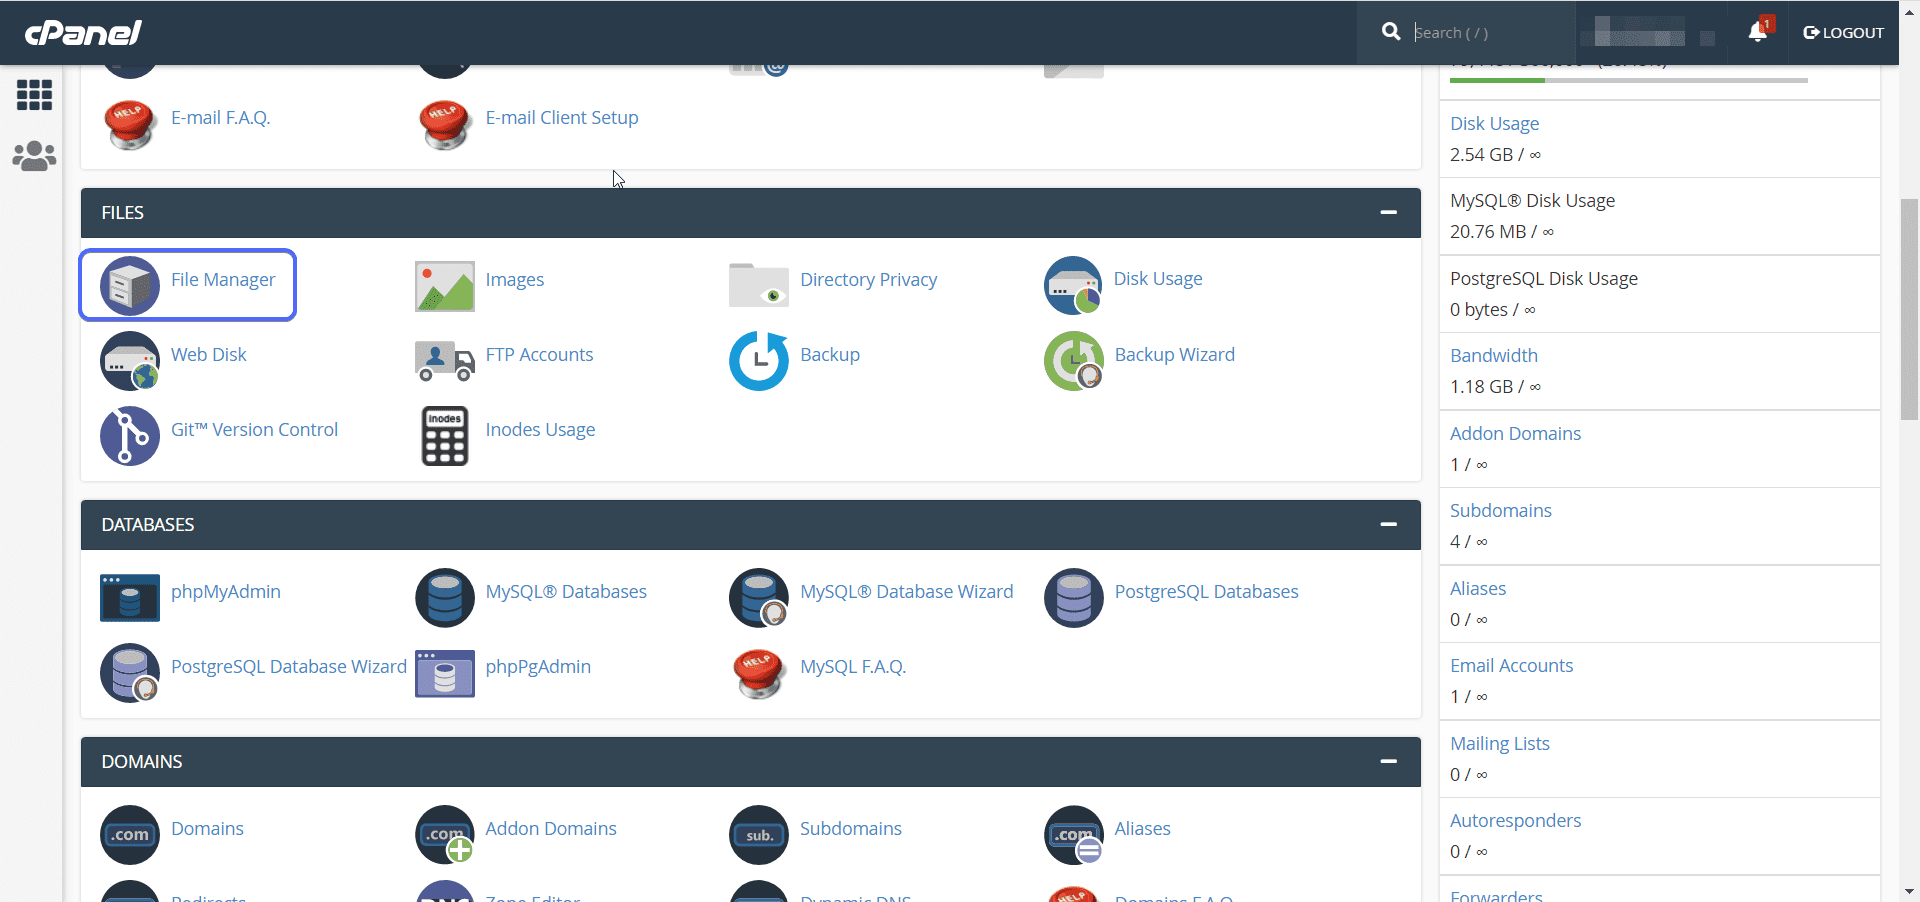
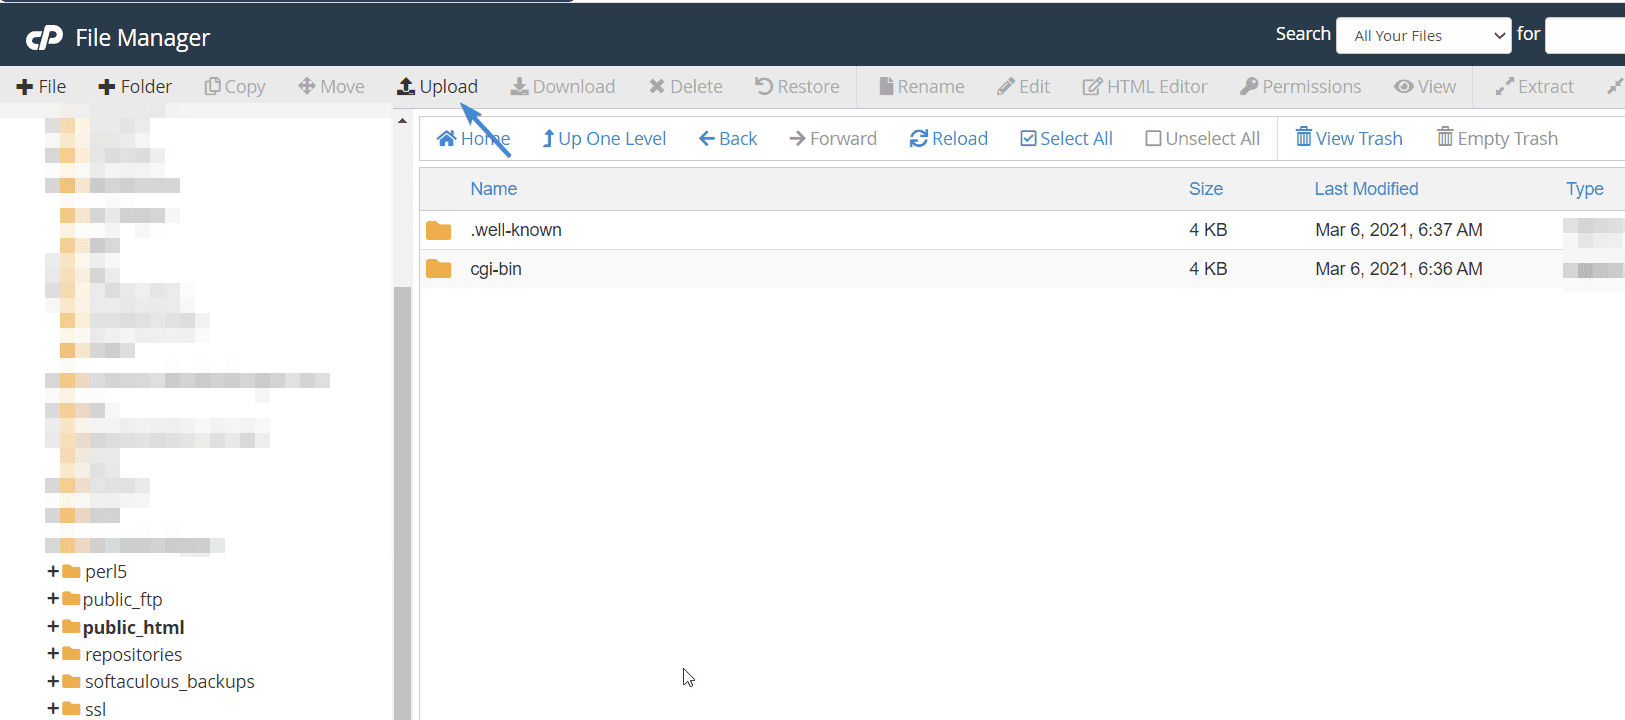
To start, login to cPanel and then click on the File Manager icon.
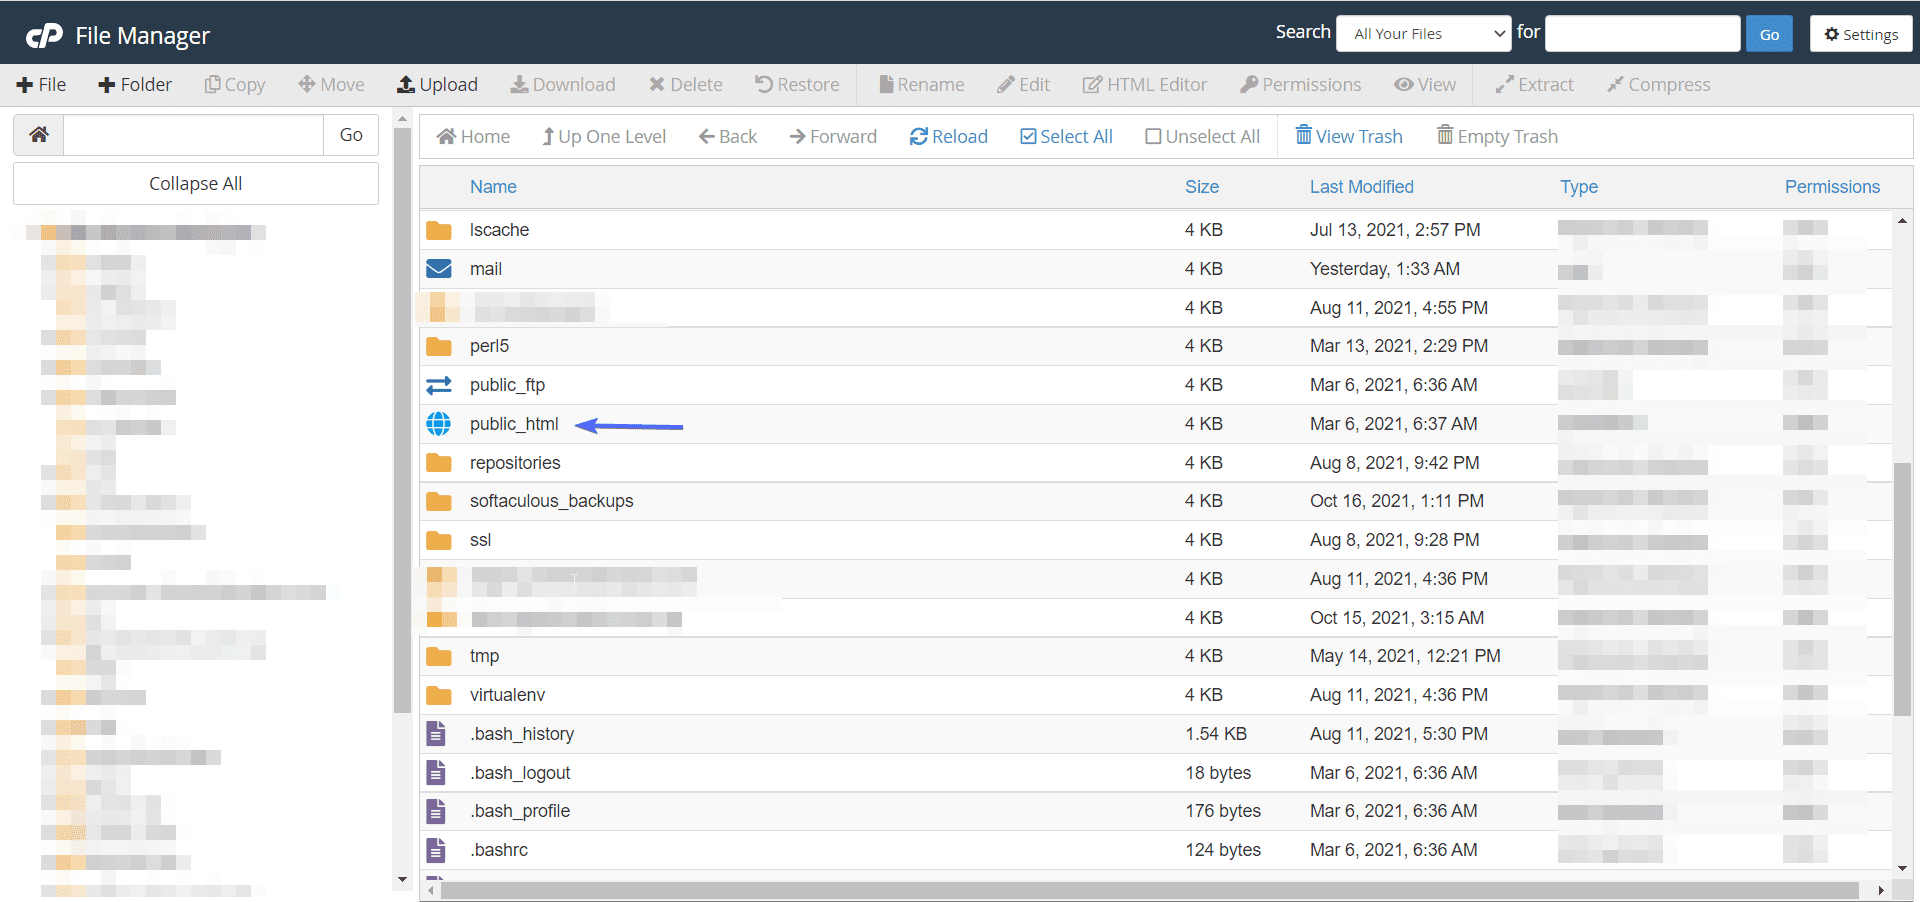
Here, navigate to the folder you wish to install WordPress (usually public_html).
Next, click on the Upload icon to upload the WordPress files.
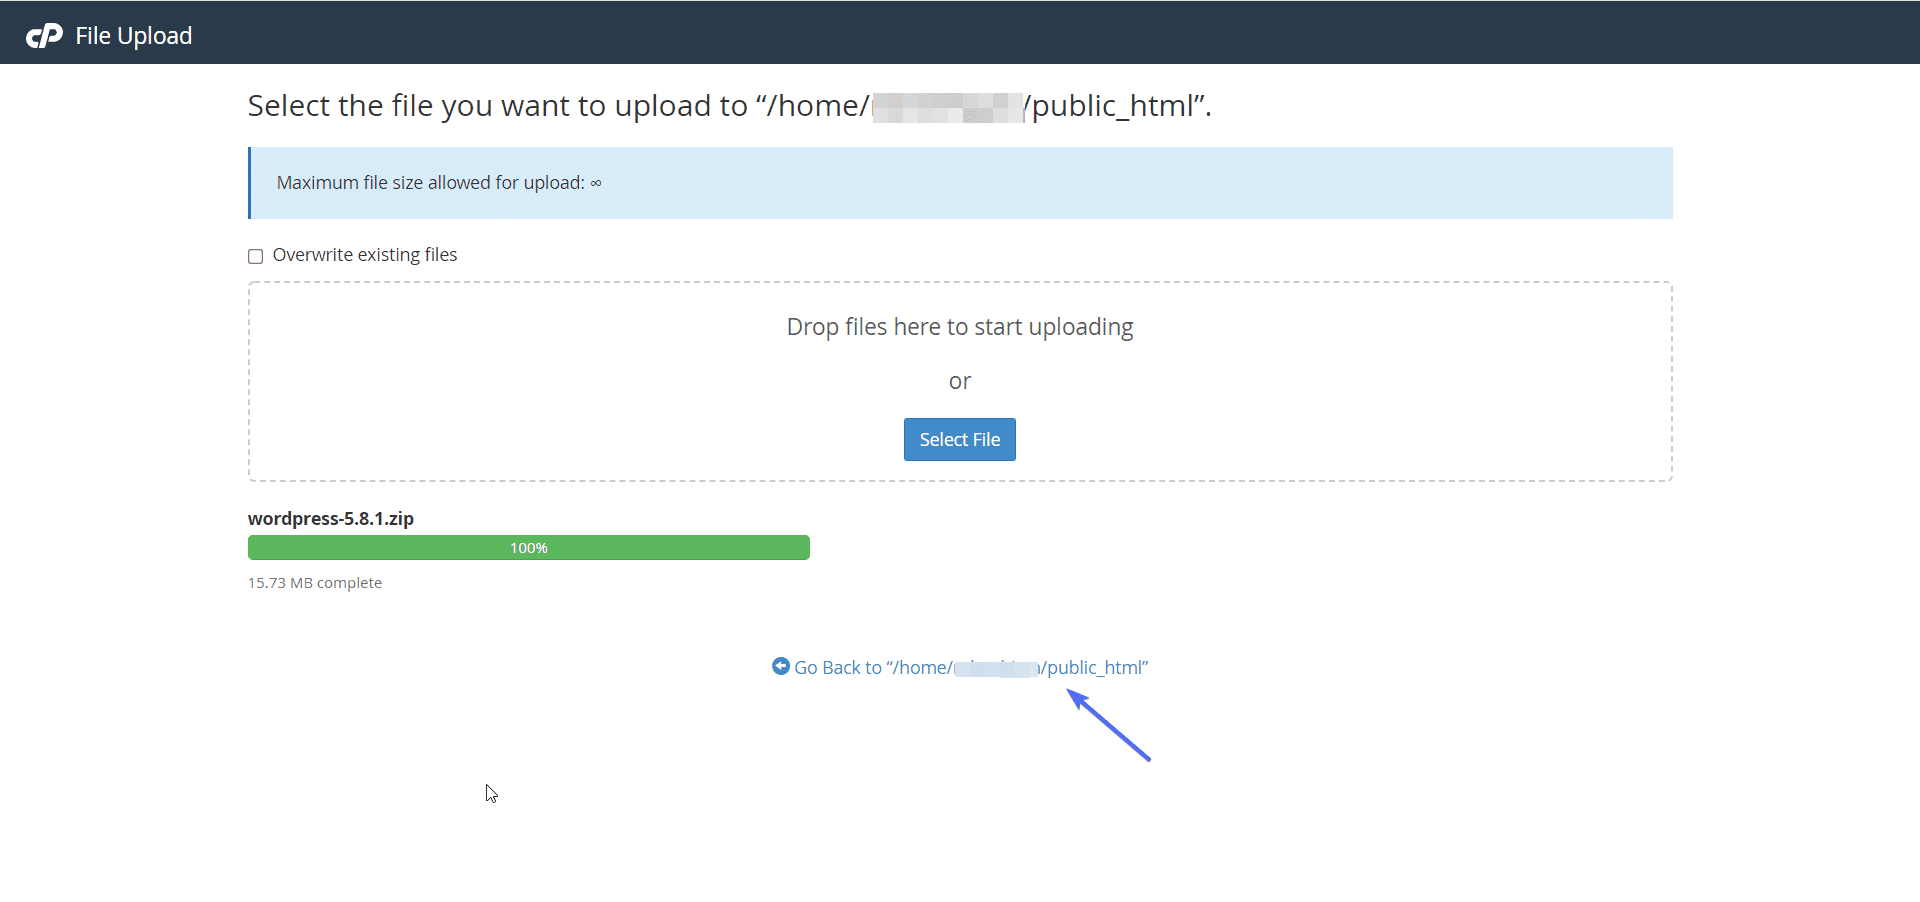
On the new window, click on the Select File button and then choose the WordPress zip file you just downloaded.
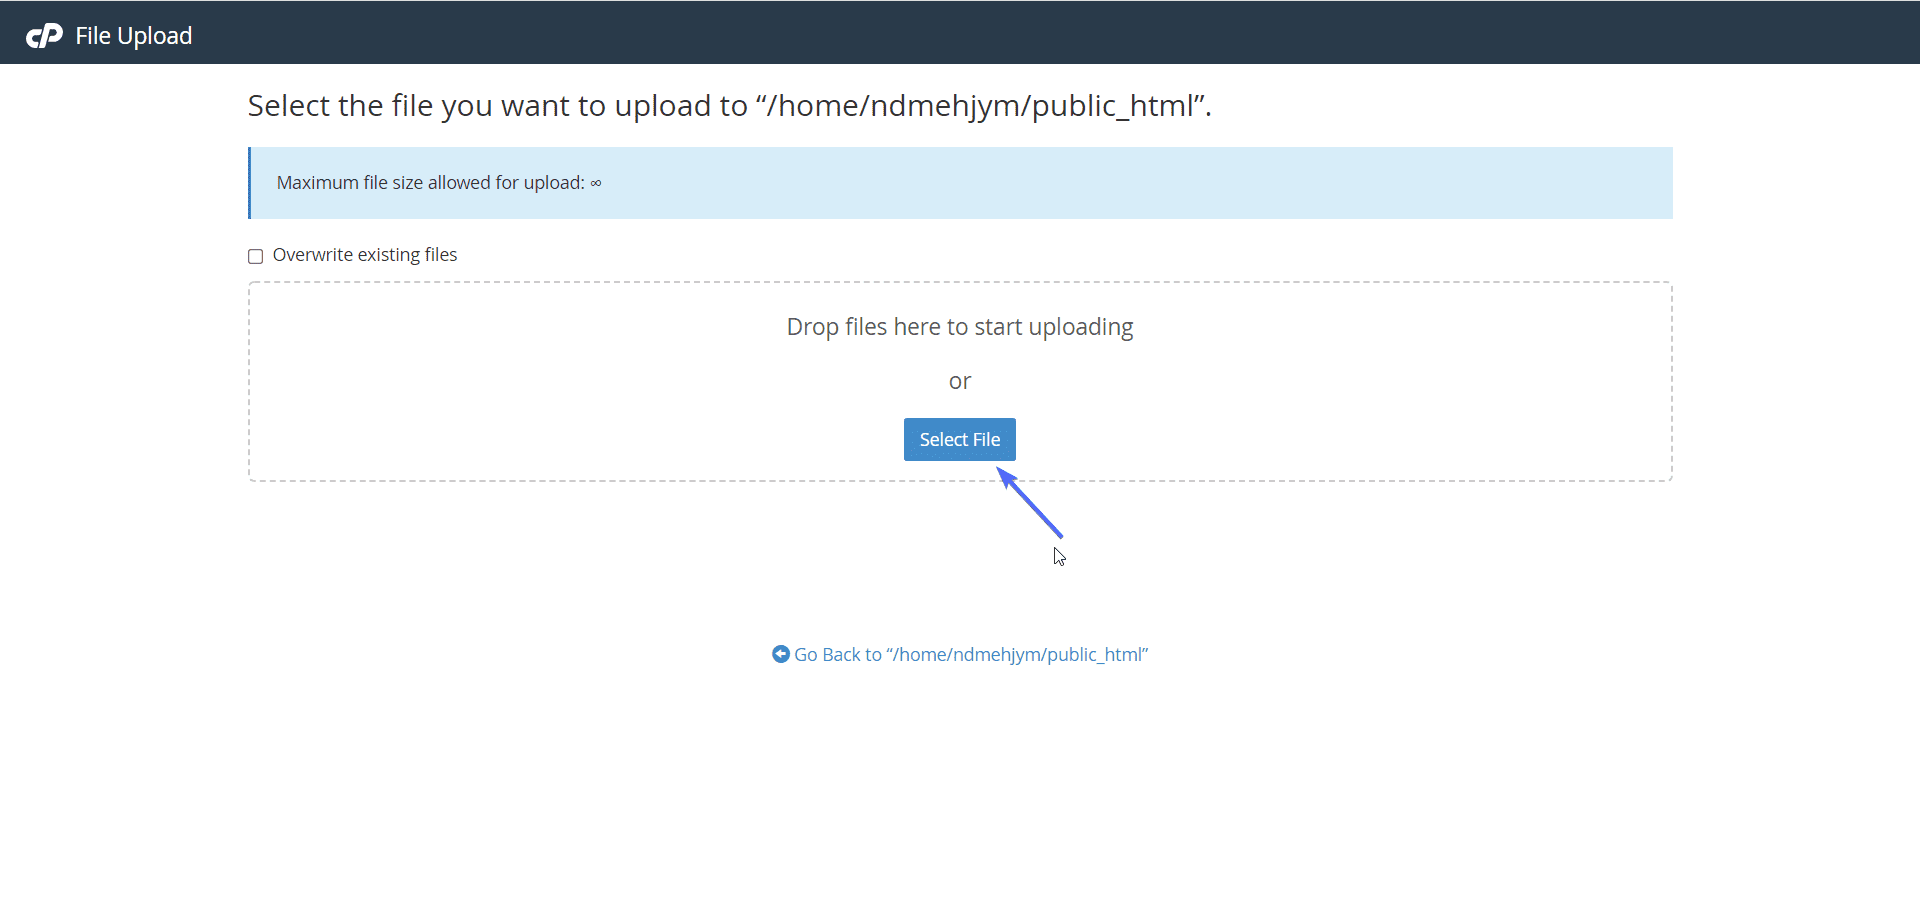
After the upload is complete, select go back to return to the previous directory you were in.
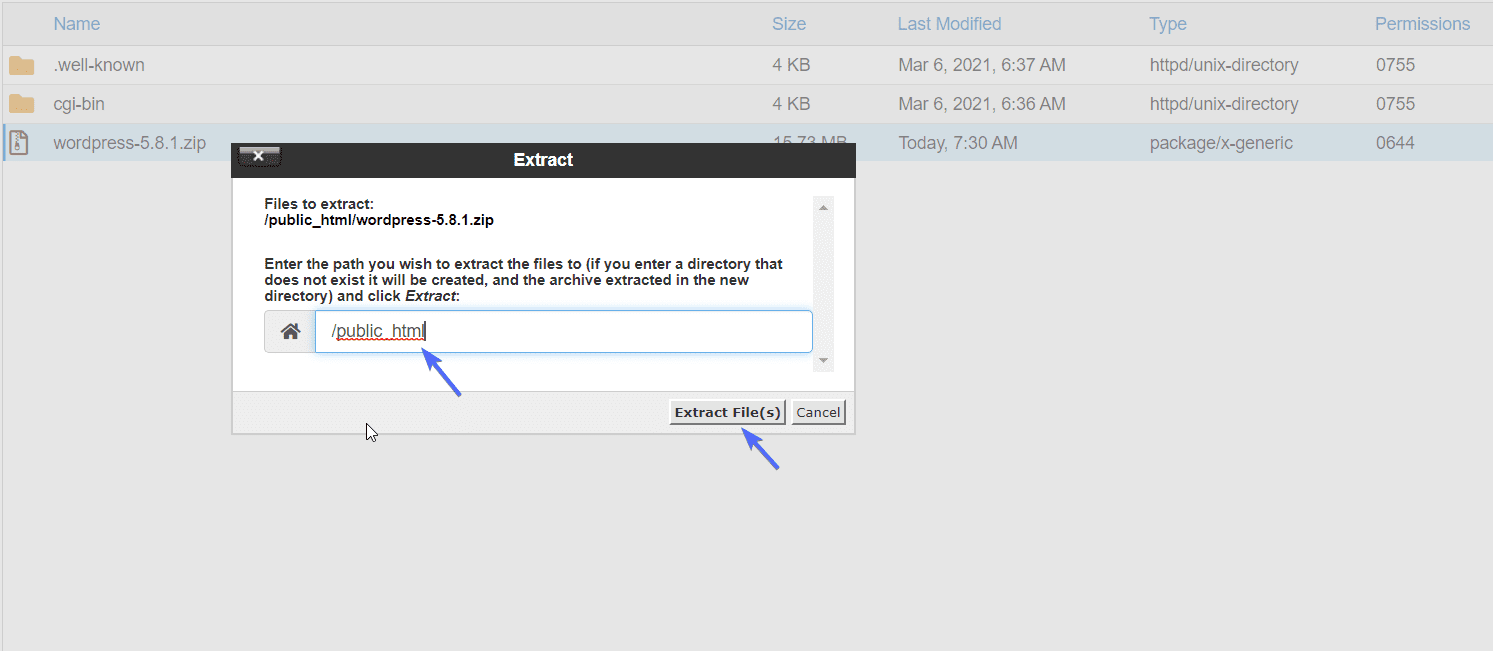
Now, you need to unzip the WordPress files into the public_html folder. For this, right-click on the WordPress zip file and then select Extract.
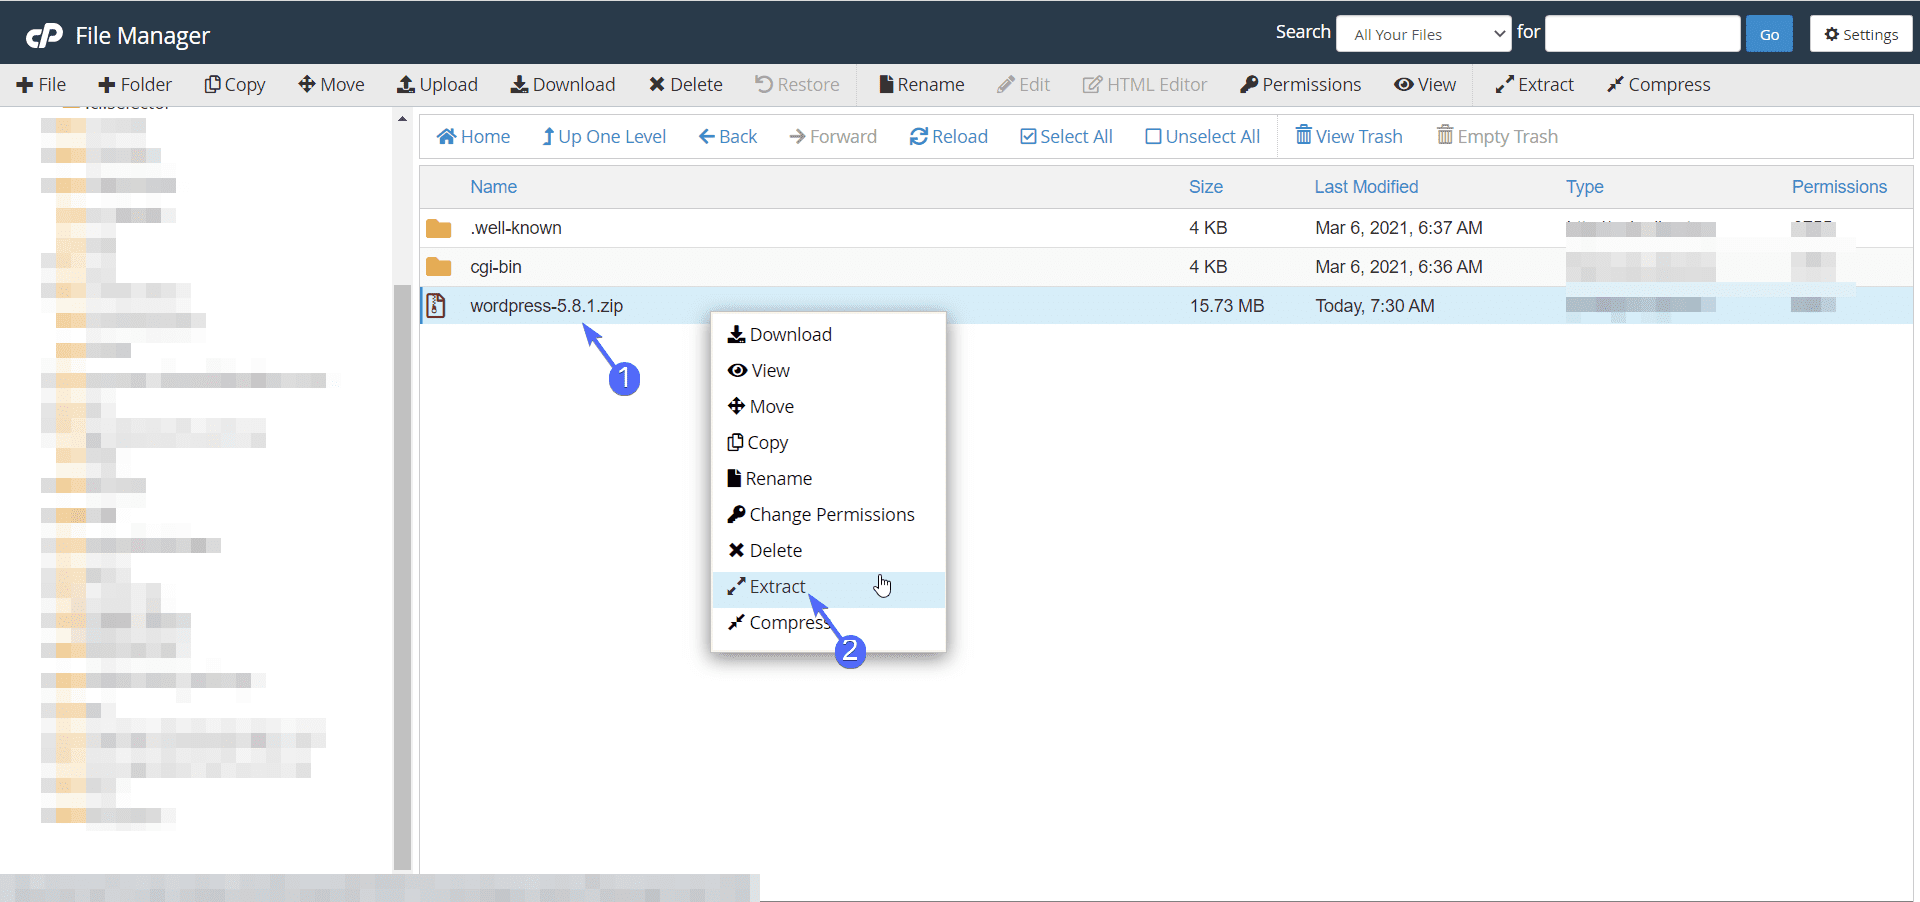
You can leave the directory to the default option. Lastly, click on Extract File(s).
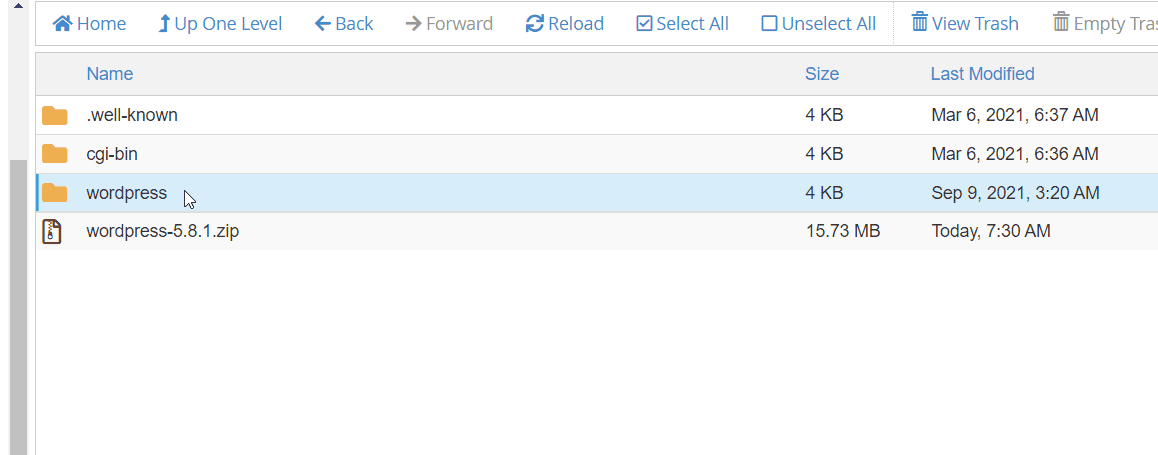
The files are extracted into the WordPress folder, meaning your file path will look like this; “public_html/wordpress/”. The problem with this is that when you install WordPress, your site will be available at yoursite.com/wordpress/ by default.
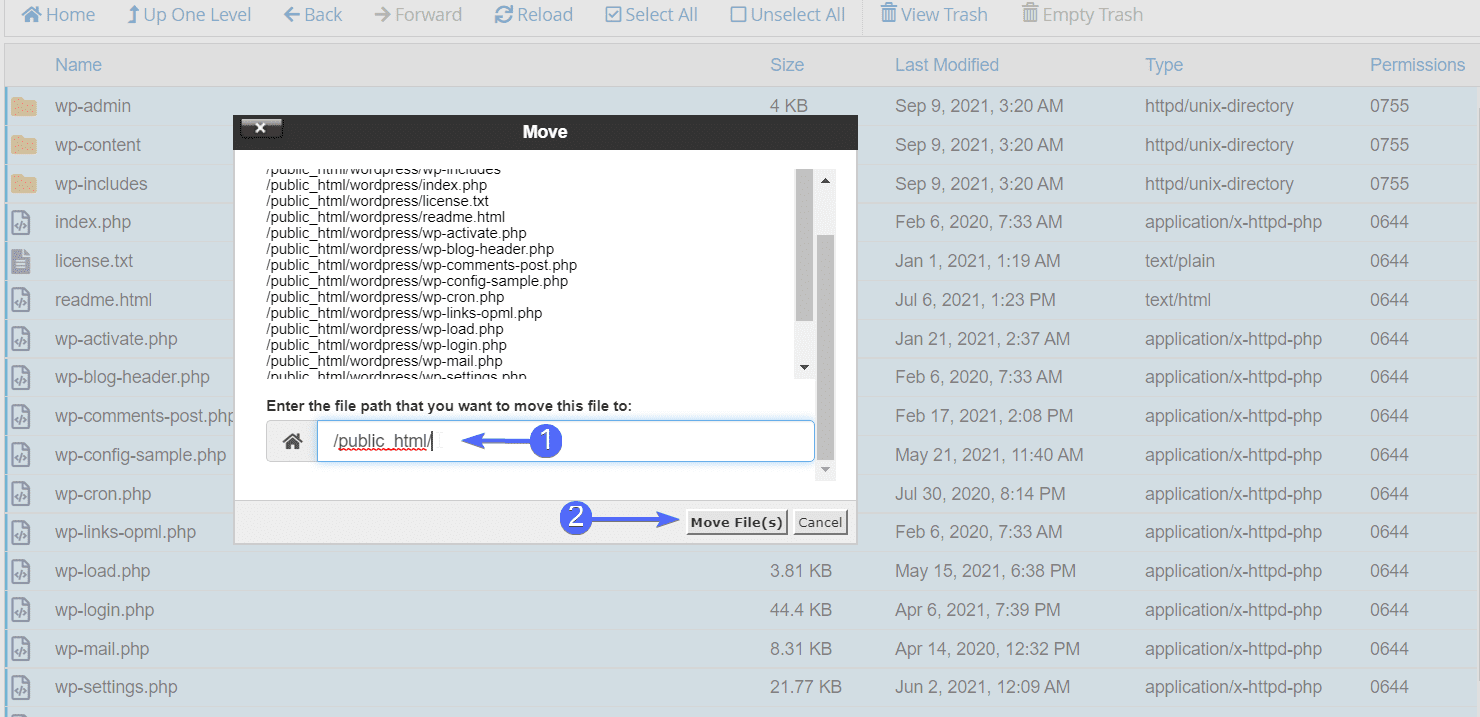
To fix this, you need to move all the files from the WordPress subfolder into the public_html directory. Here’s how to do it.
First, navigate into the WordPress folder and then click on Select All. Next, click on the Move icon.

Now, change the file path to be “/public_html” and then click on Move File(s).
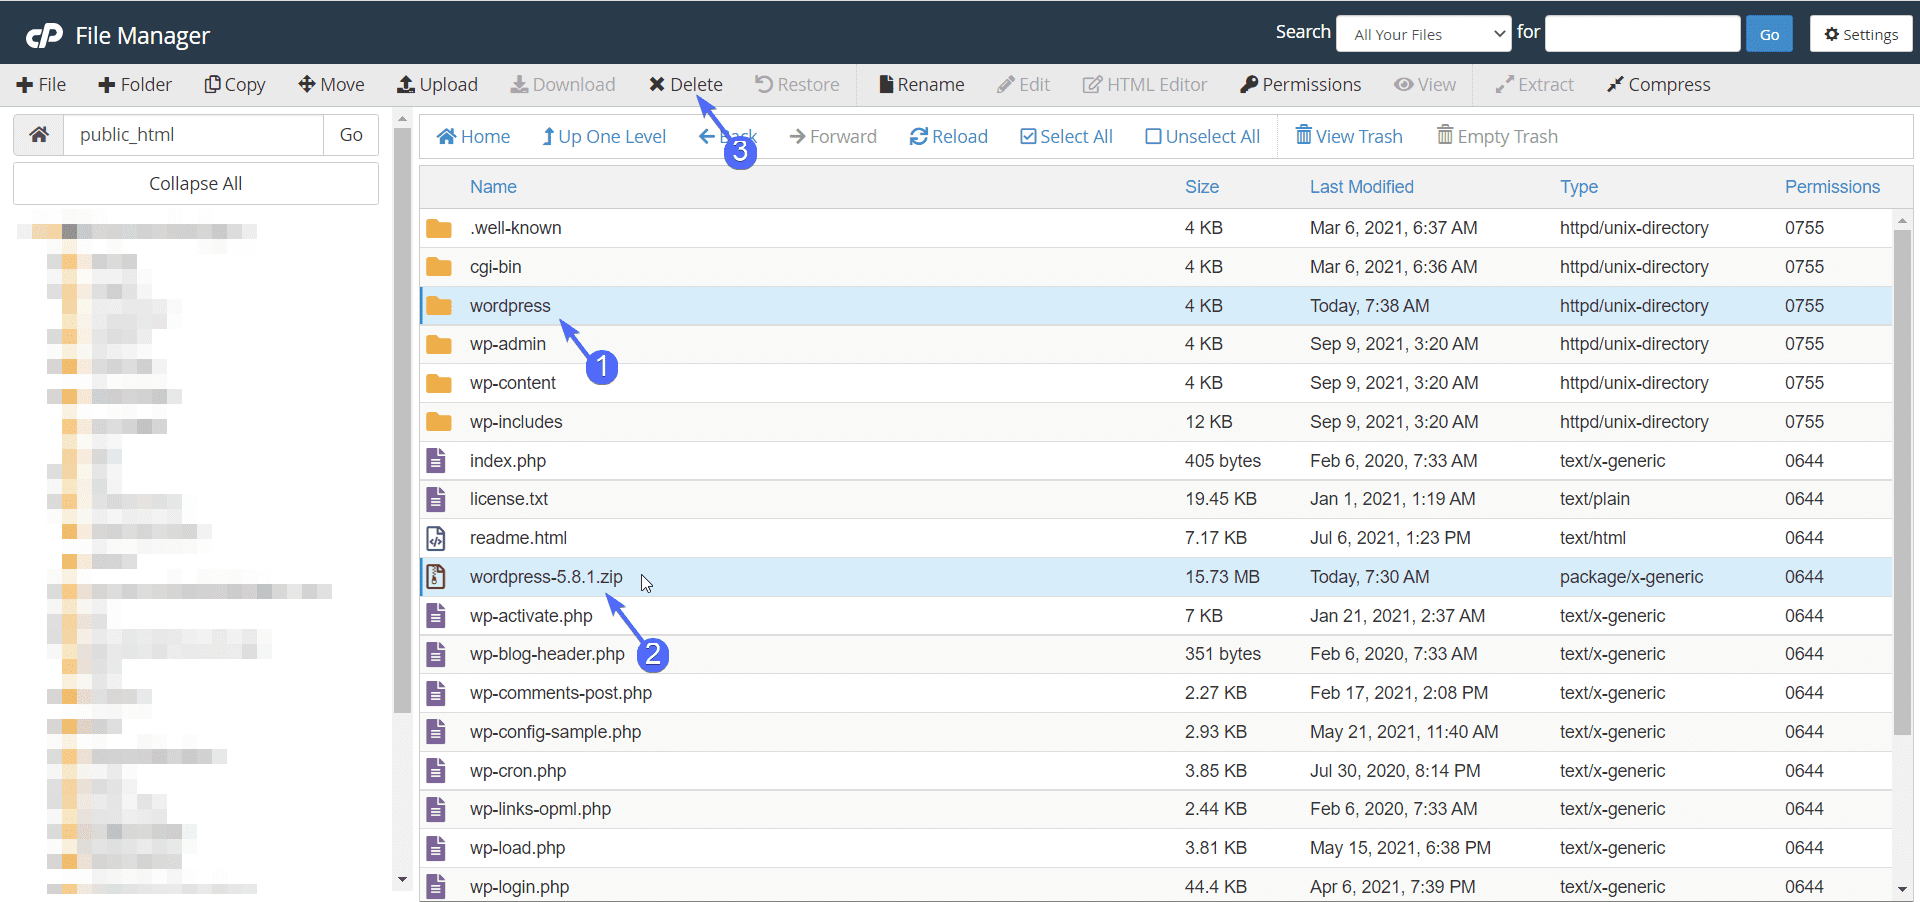
To free up your server storage, you can delete files that are not needed, which are the WordPress folder and the WordPress zip file. For this, select the files you want to delete and then click on Delete.
Step Three – MySQL Database Configuration
WordPress uses a database to store all the content of your website such as posts data, site settings, and users.
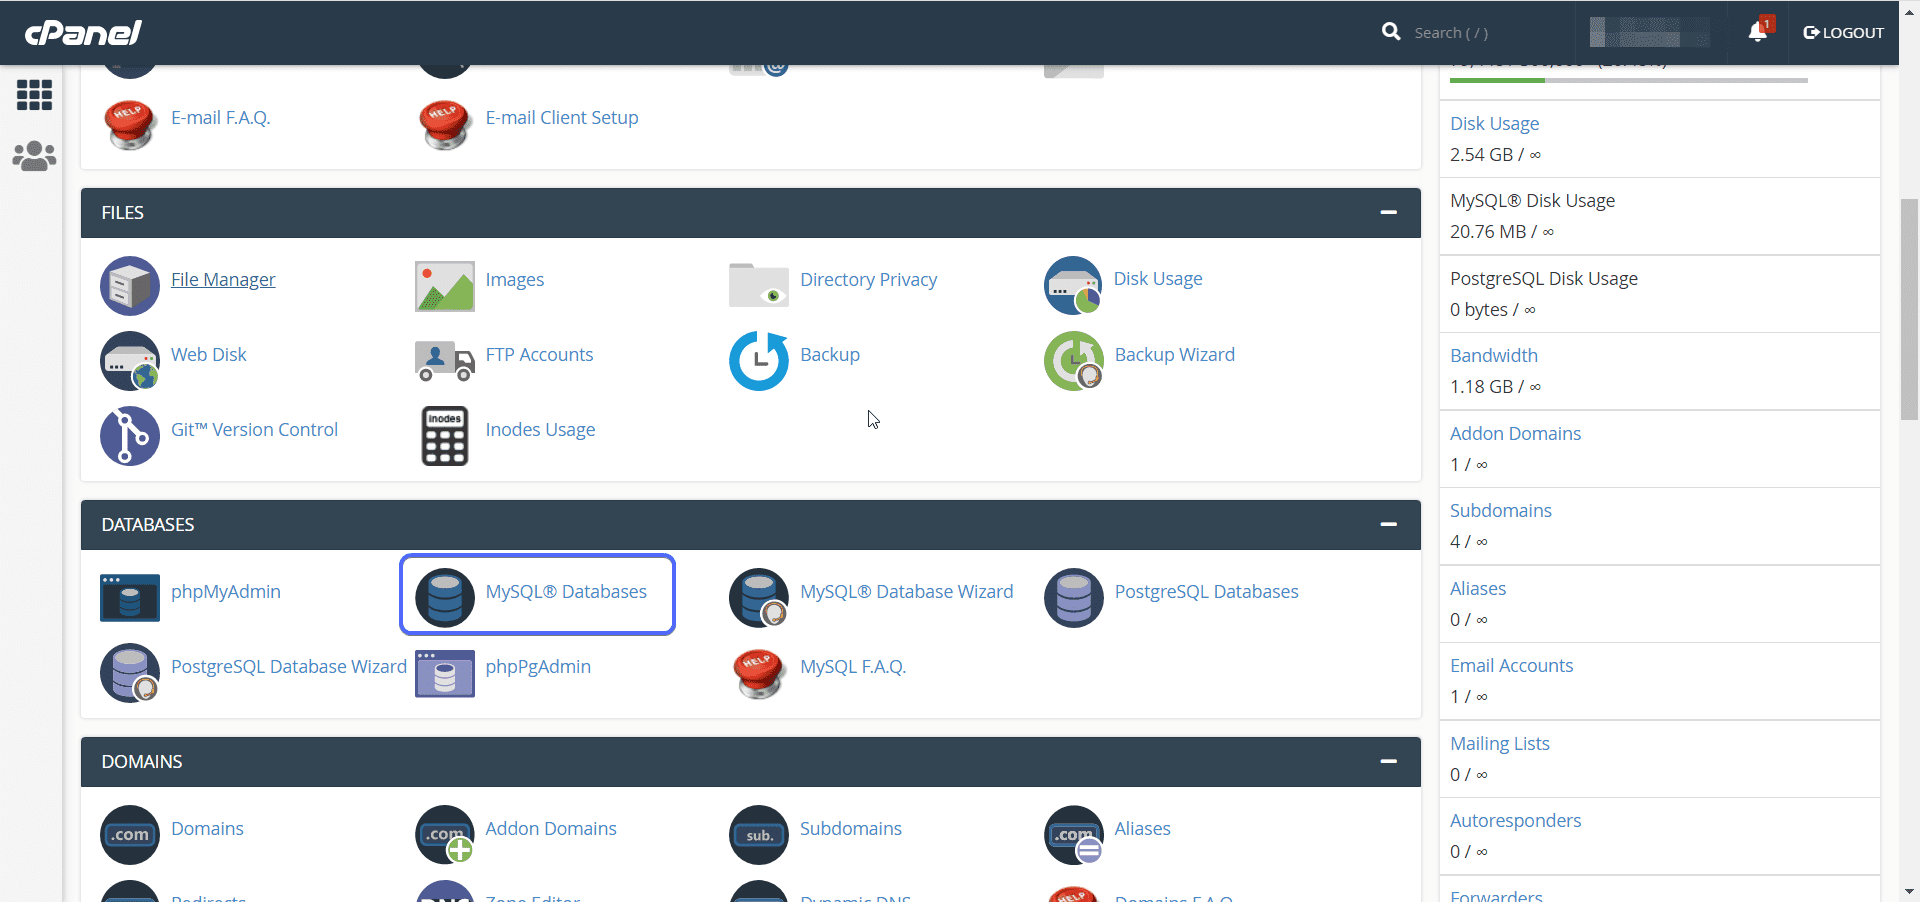
To create a database, login to cPanel and then scroll to the “Databases” section. Here, click on MySQL Databases.
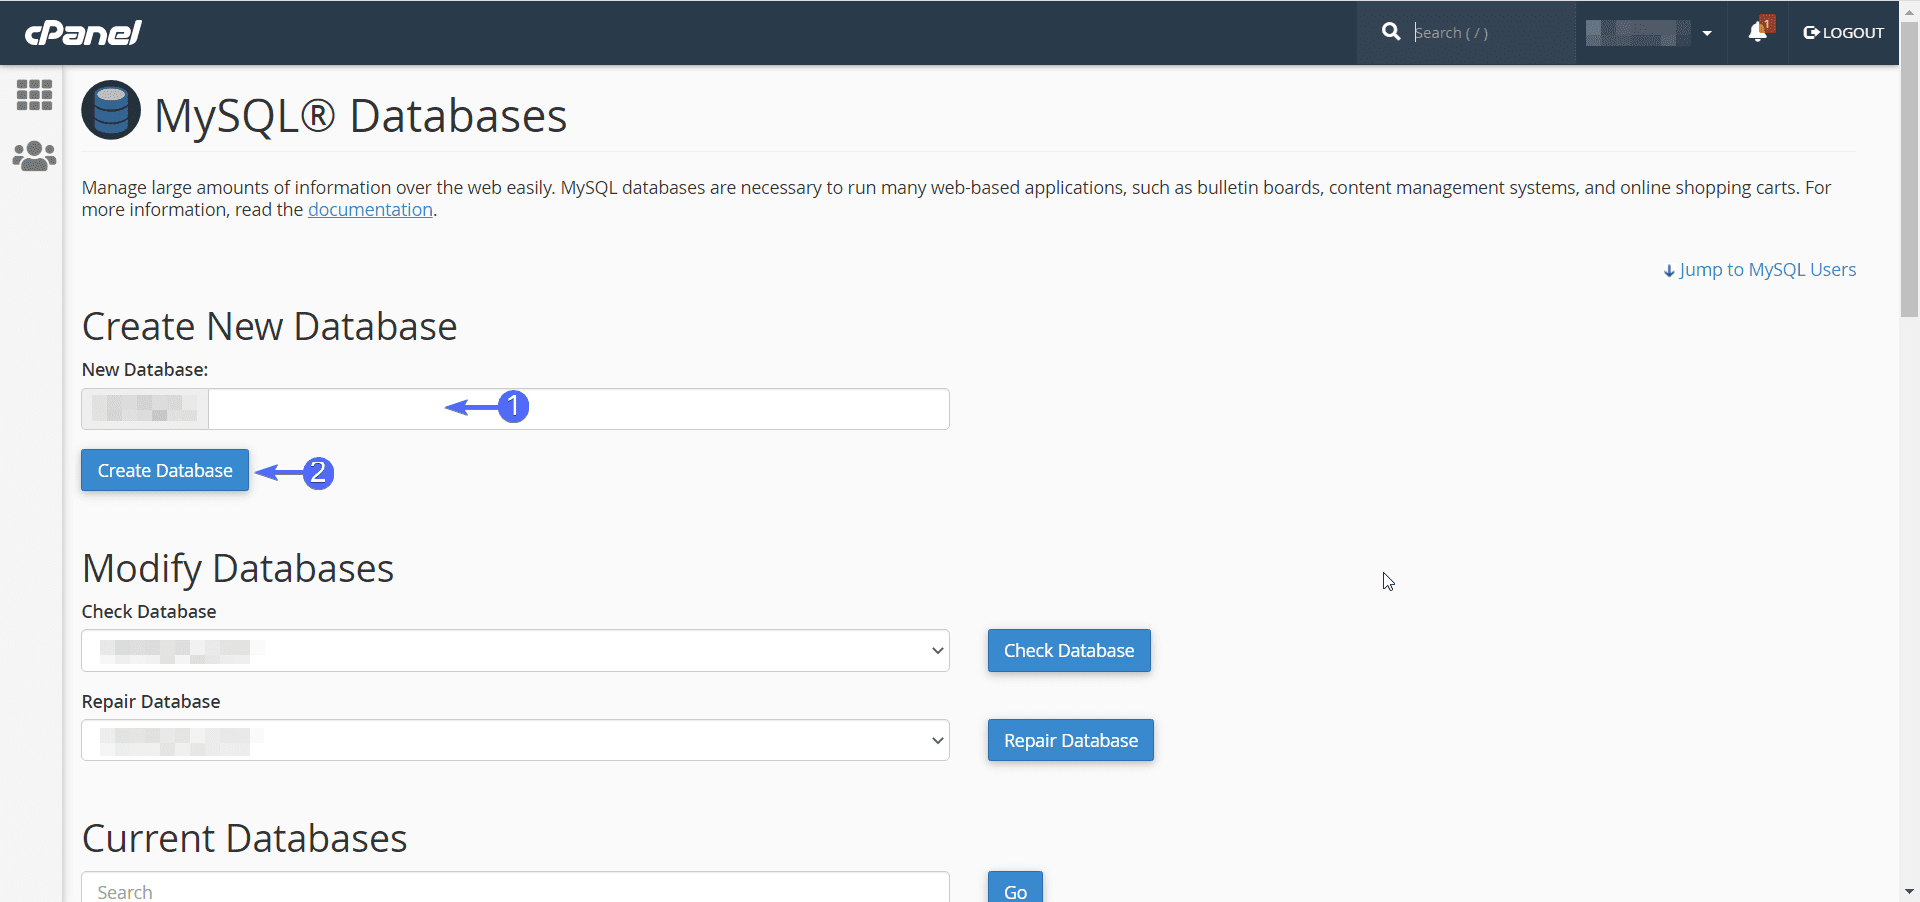
Under “Create New Database”, enter the name of the database you want to create and then click on the Create Database button.
Now, scroll down to the “Add New User” section, here, enter the username and password for the user you are creating.
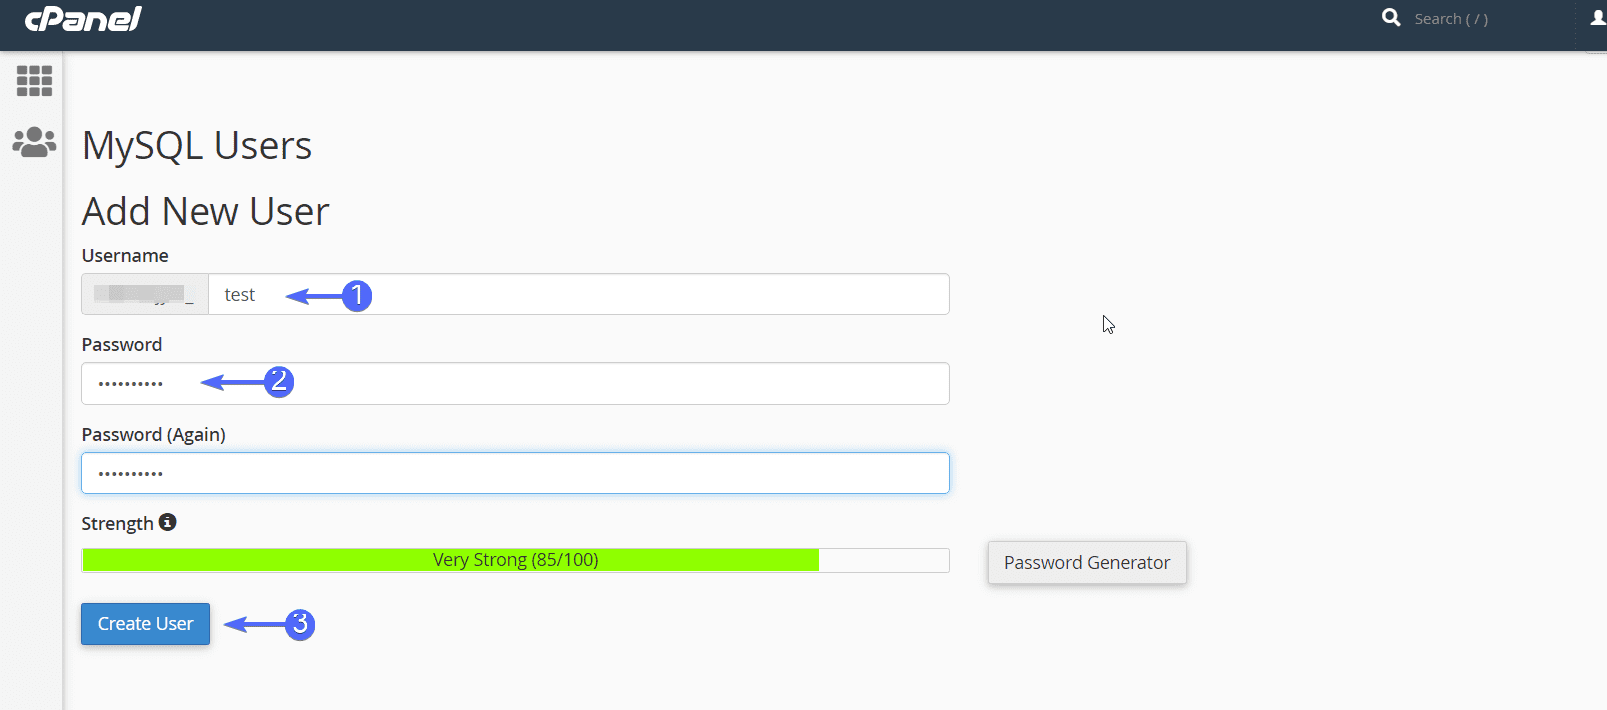
Hit the Create User button once done.
Sidenote: The database name and user you just created will be used when installing WordPress on your site. Ensure you store them in a safe location.
After creating the database and the user, you need to associate the user to the database and grant permissions for that user.
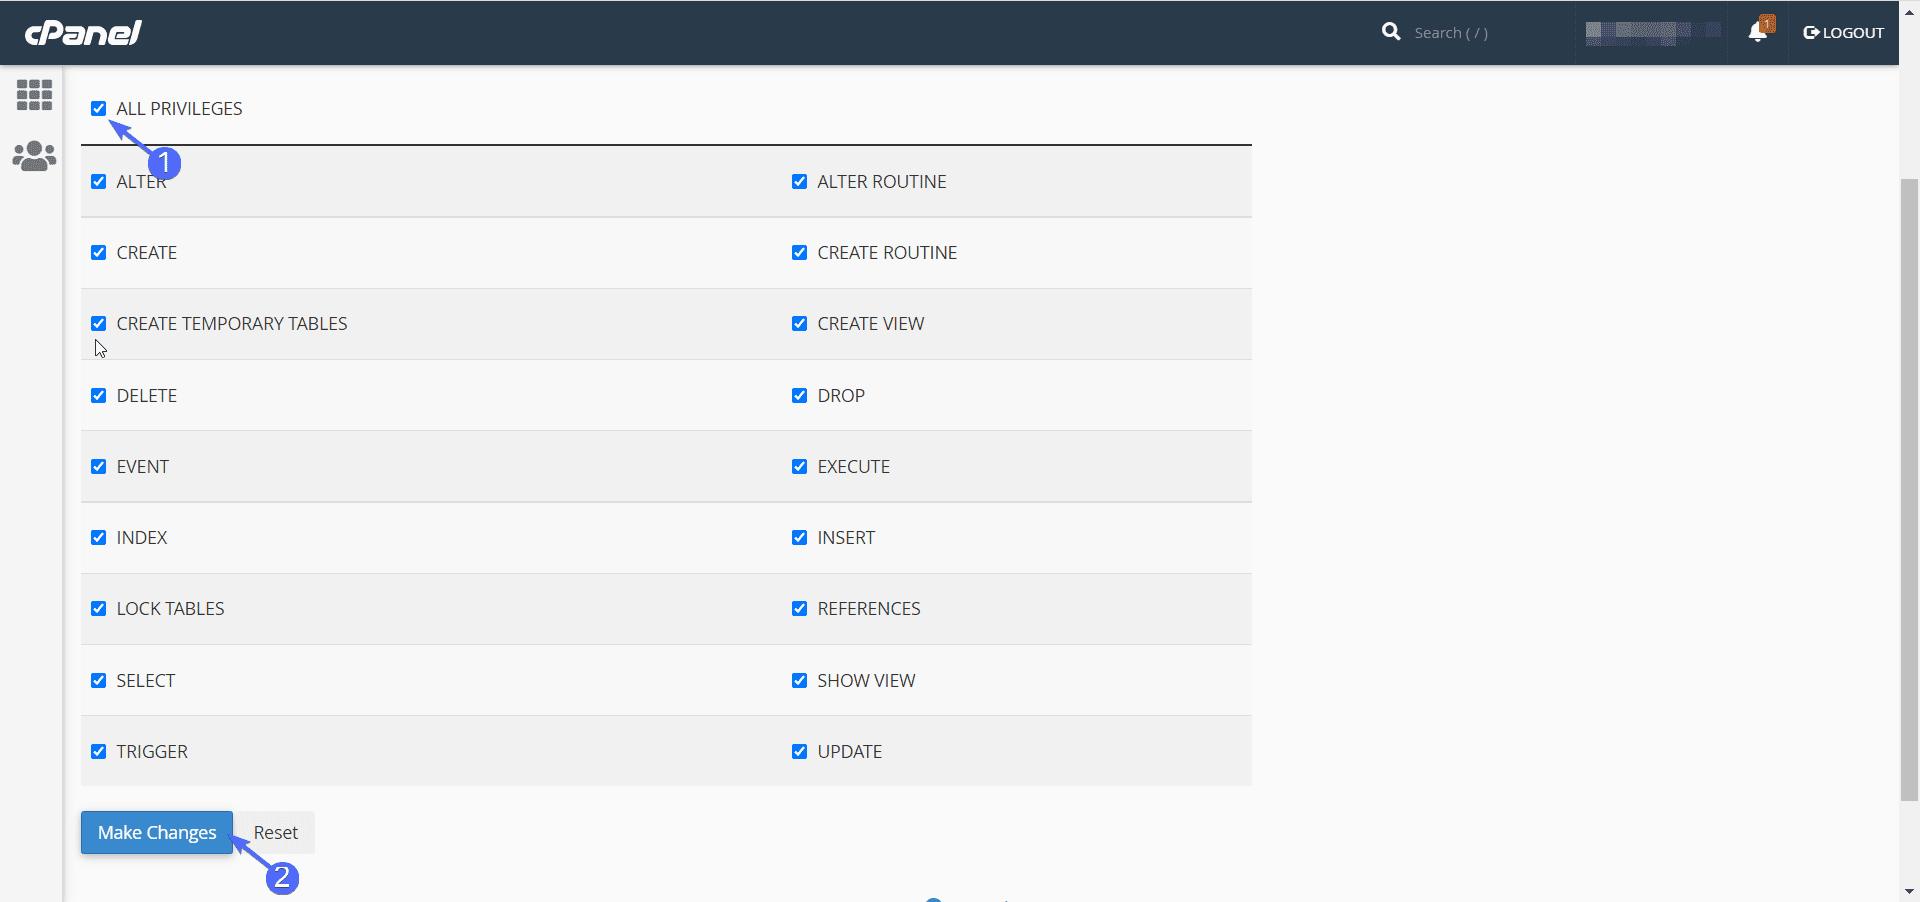
For this, scroll down to the “Add User to Database” section. Next, select the user and the database you just created under the “User” and “Database” box respectively.
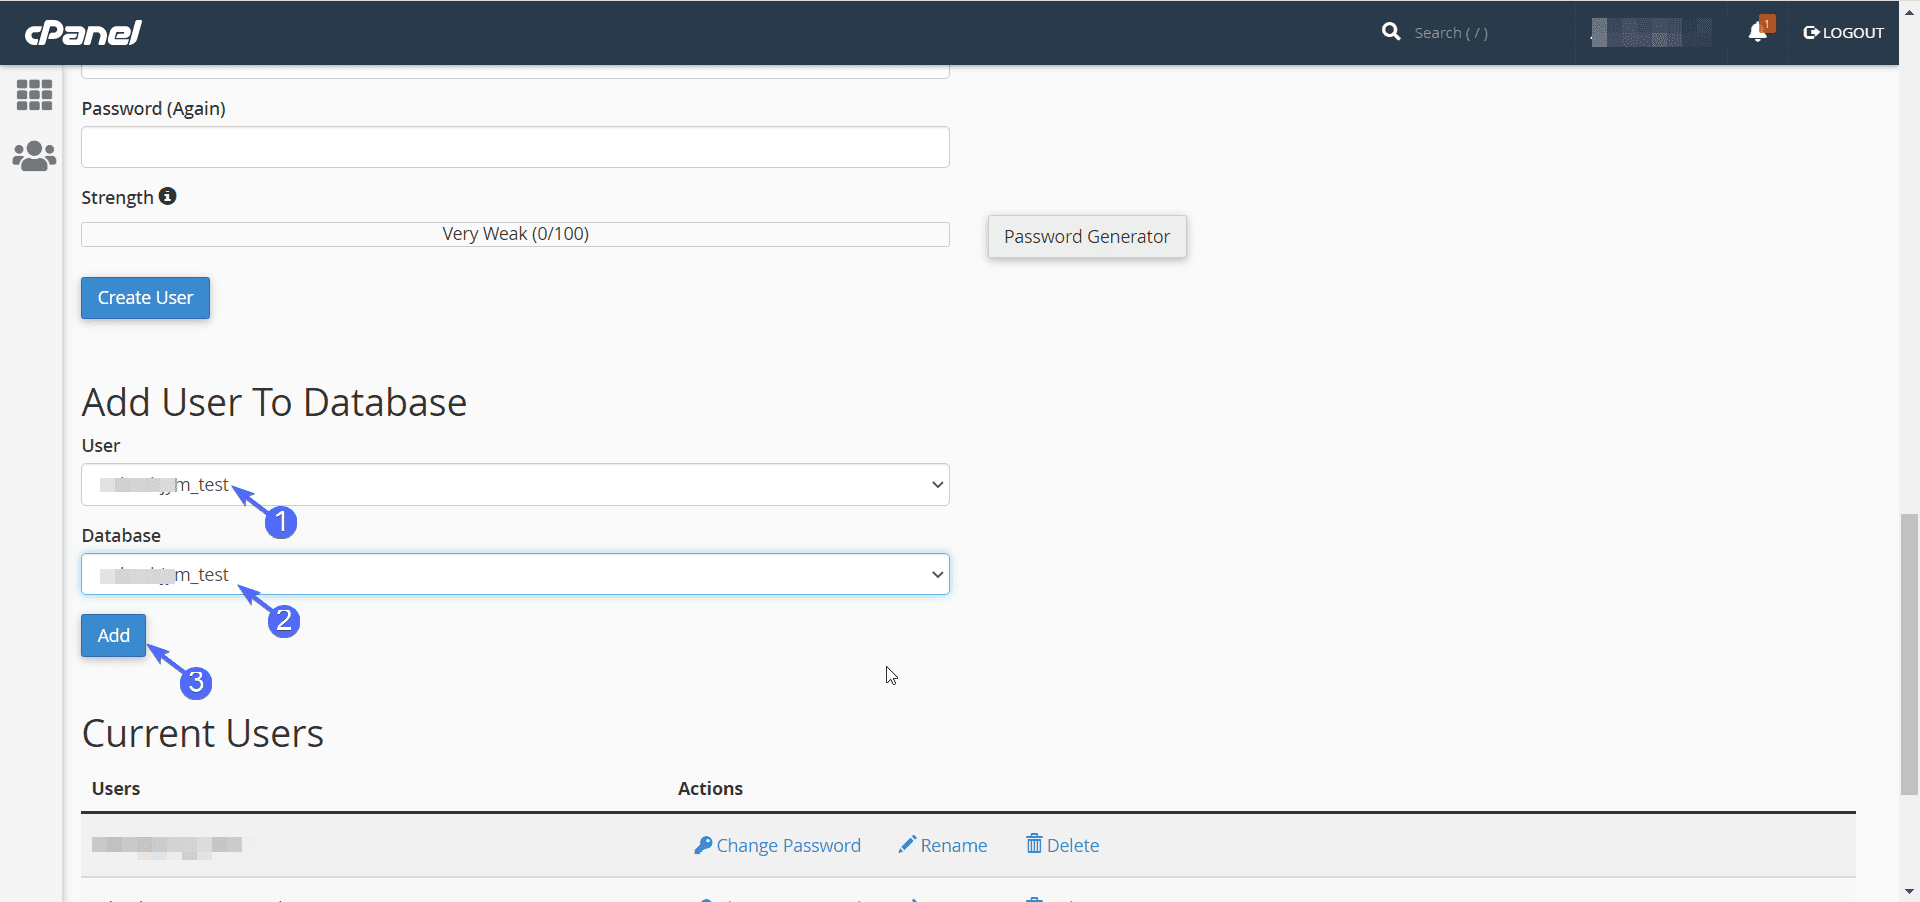
After that, click on the Add button. On the next page, you need to set the permissions for this user. Simply tick the All Privileges option and then click on Make Changes.
The database configuration is complete. Now we will install WordPress on the website.
Step Four – Run the Installation Script to Manually Install WordPress
To begin the installation process, open your website address on the browser. For example, if your domain name is mysite.com, simply type in the address on your browser.
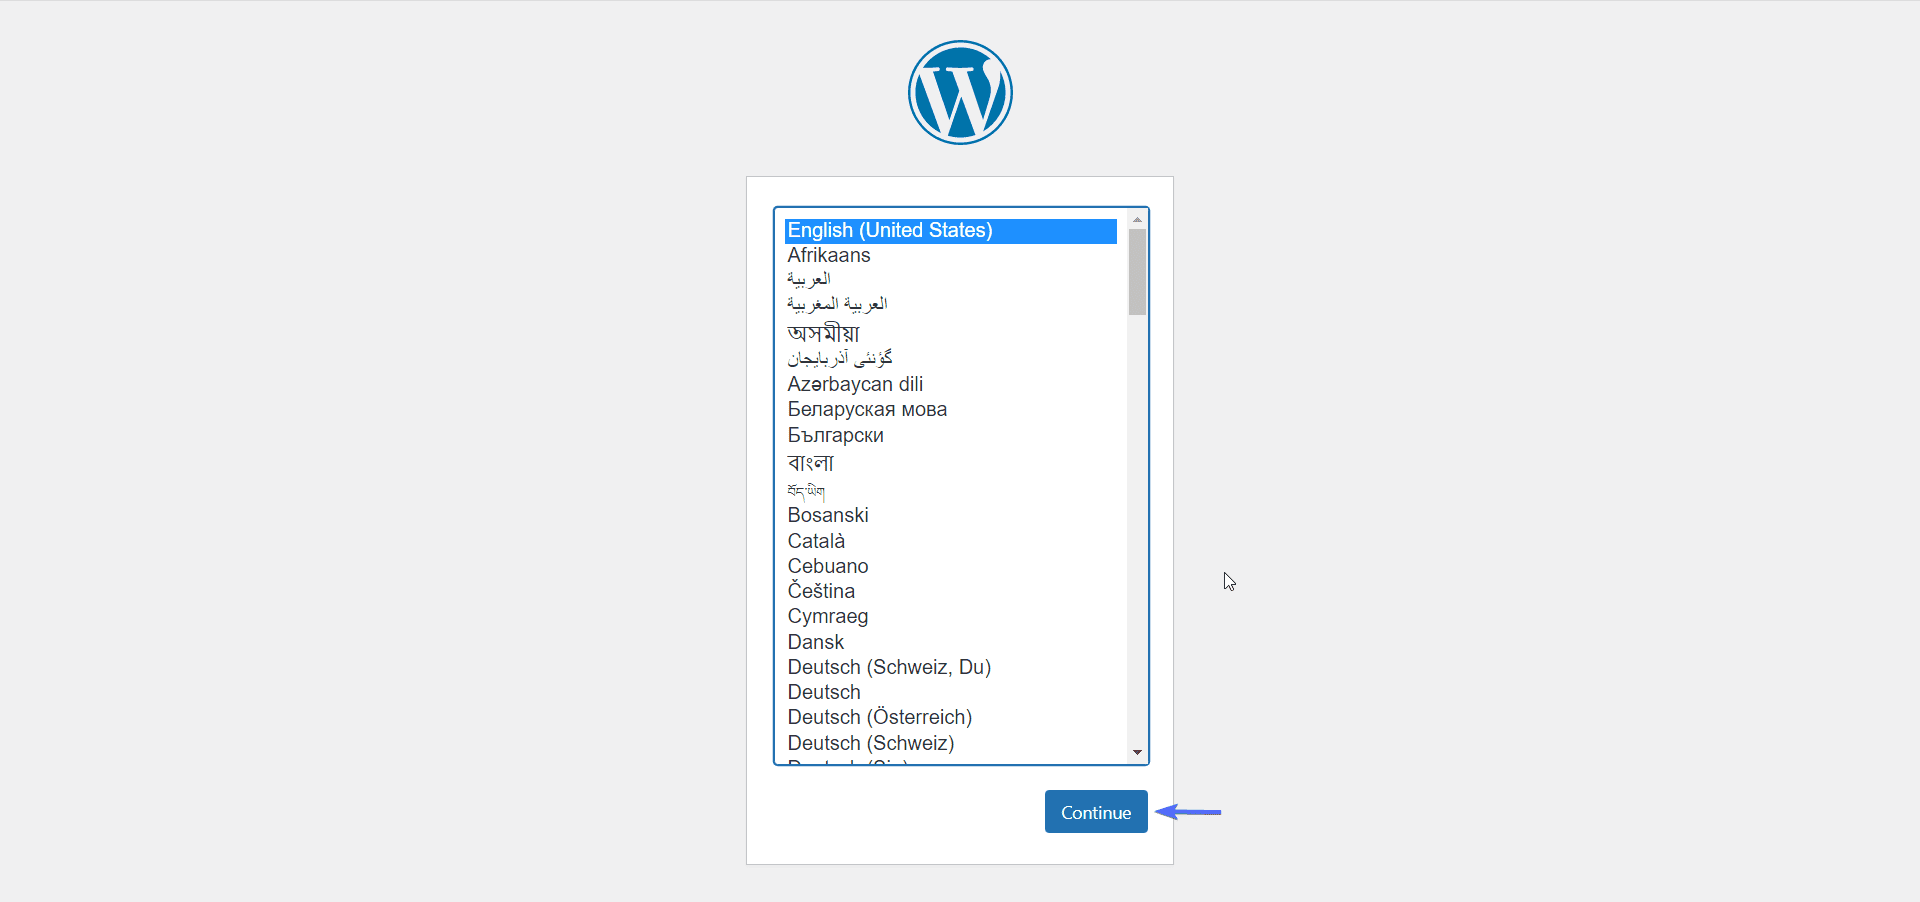
This will bring up the WordPress installation script. First, you need to select a primary language for your website. Click on Continue after making your selection.
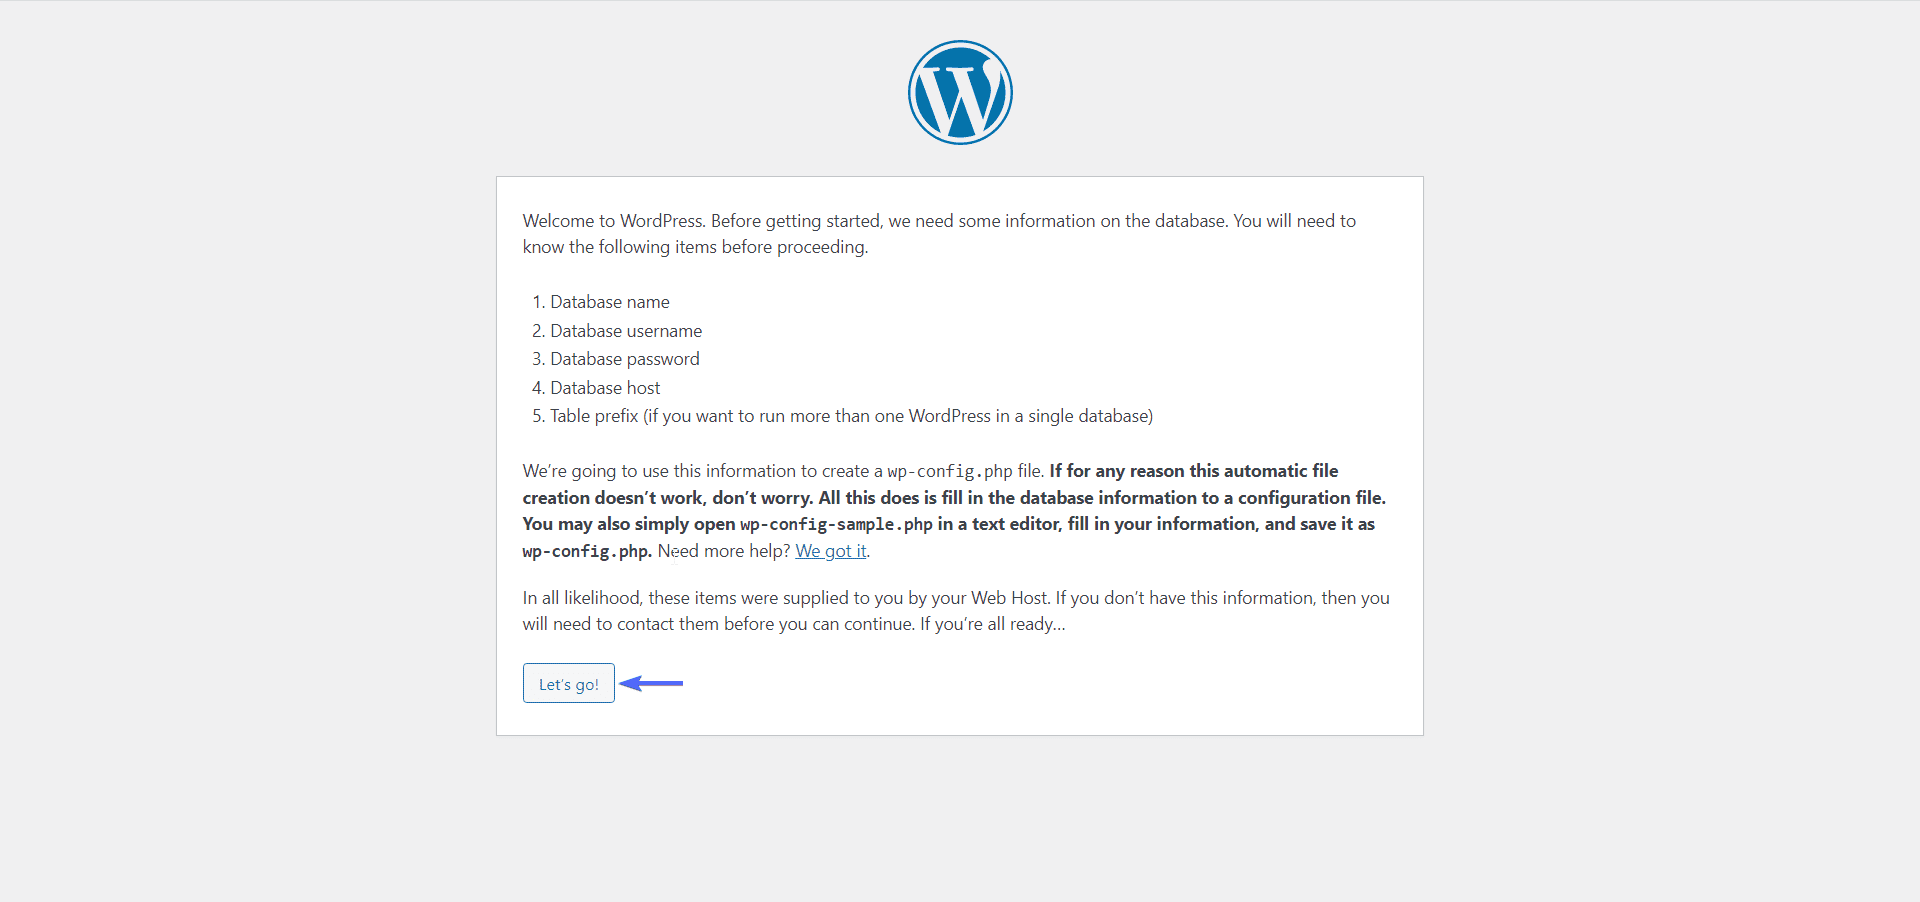
Next, WordPress will show you the details needed to create your configuration file. This is where we will use the database name, database user, and password we created initially. Click on the Let’s go! button to continue the installation.
Now, enter the database name, user name, and password in their respective boxes. You can leave the host set to “localhost”. You can also leave the table prefix set to “wp” (only change this if you plan on having multiple WordPress sites in one database).

Once done, click on the Submit button to continue. You should see a message similar to the one below. Click on Run the installation to complete the setup process.

Installing WordPress Manually
On the next page, you need to enter information about your new WordPress site. Enter the site title, admin username, password, and email address.
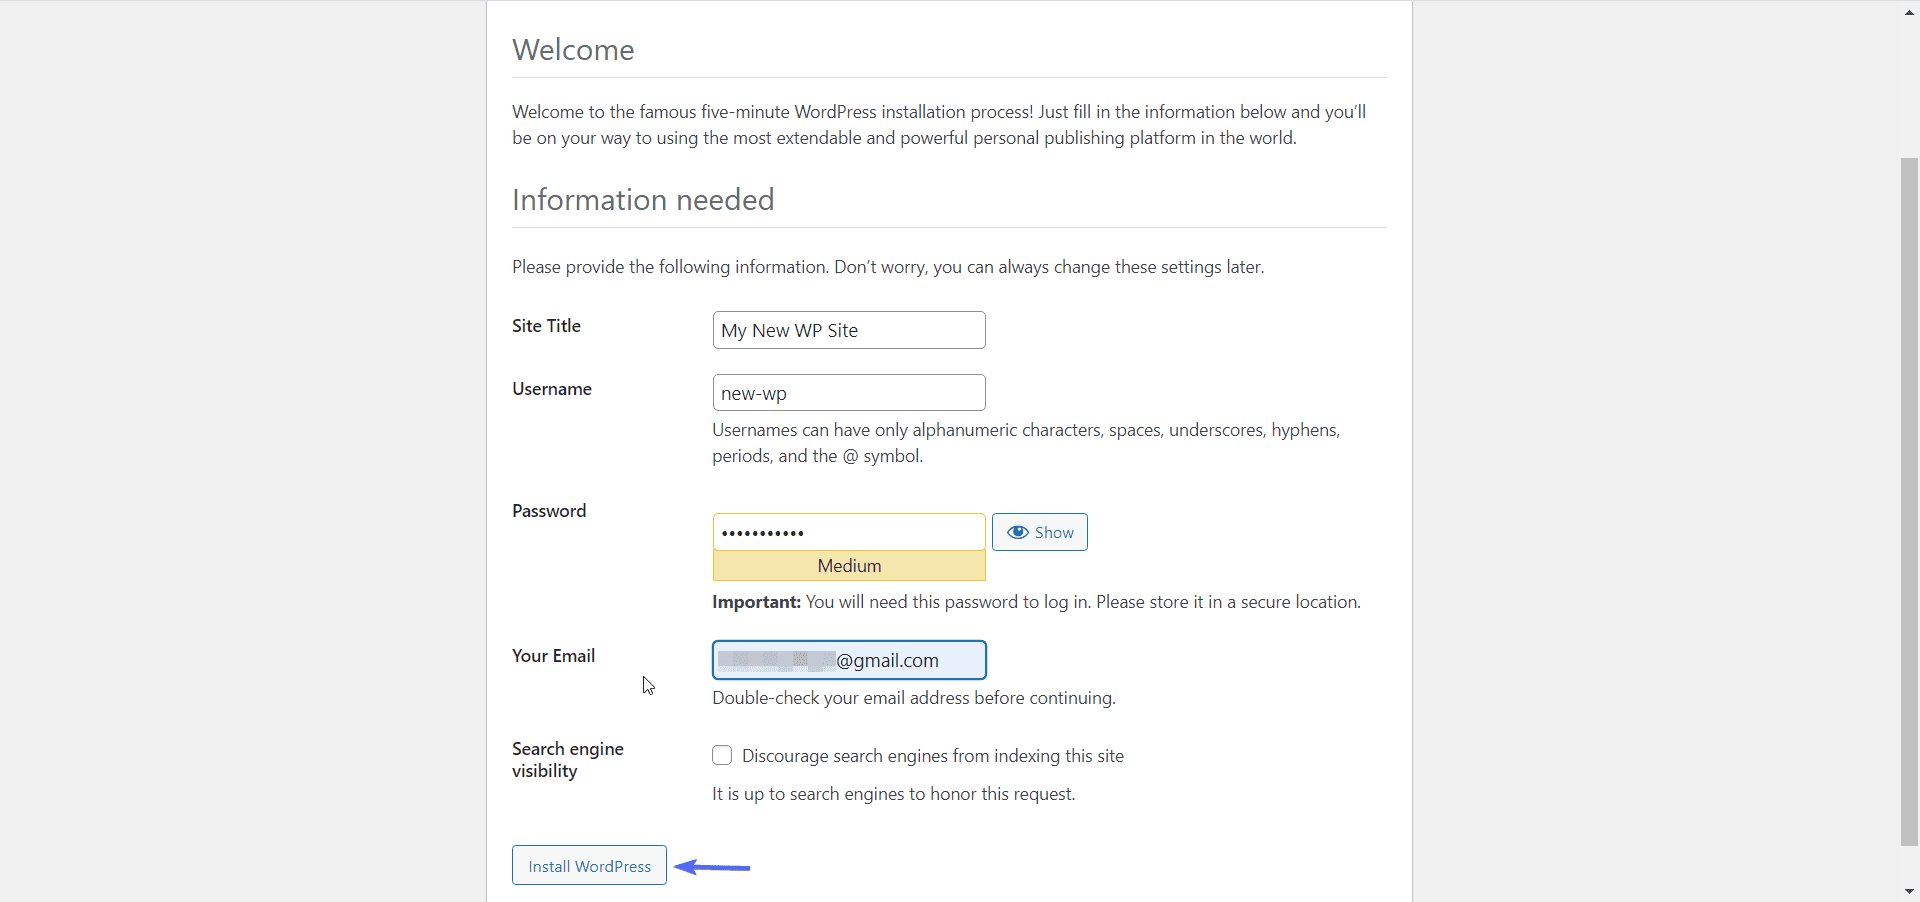
The username and password are the credentials you will use to access the admin dashboard of your WordPress website. Ensure you do not use a generic username such as ‘admin’, ‘user’, etc. Using any of these makes your site vulnerable to attackers.
For the email address, ensure you use a working email address. This is because WordPress sends important updates and error logs to the email address you specify. Also, if you forget your password, WordPress will send details on how to reset it to your email address.
After entering all the required details, click on the Install WordPress button to complete the setup.

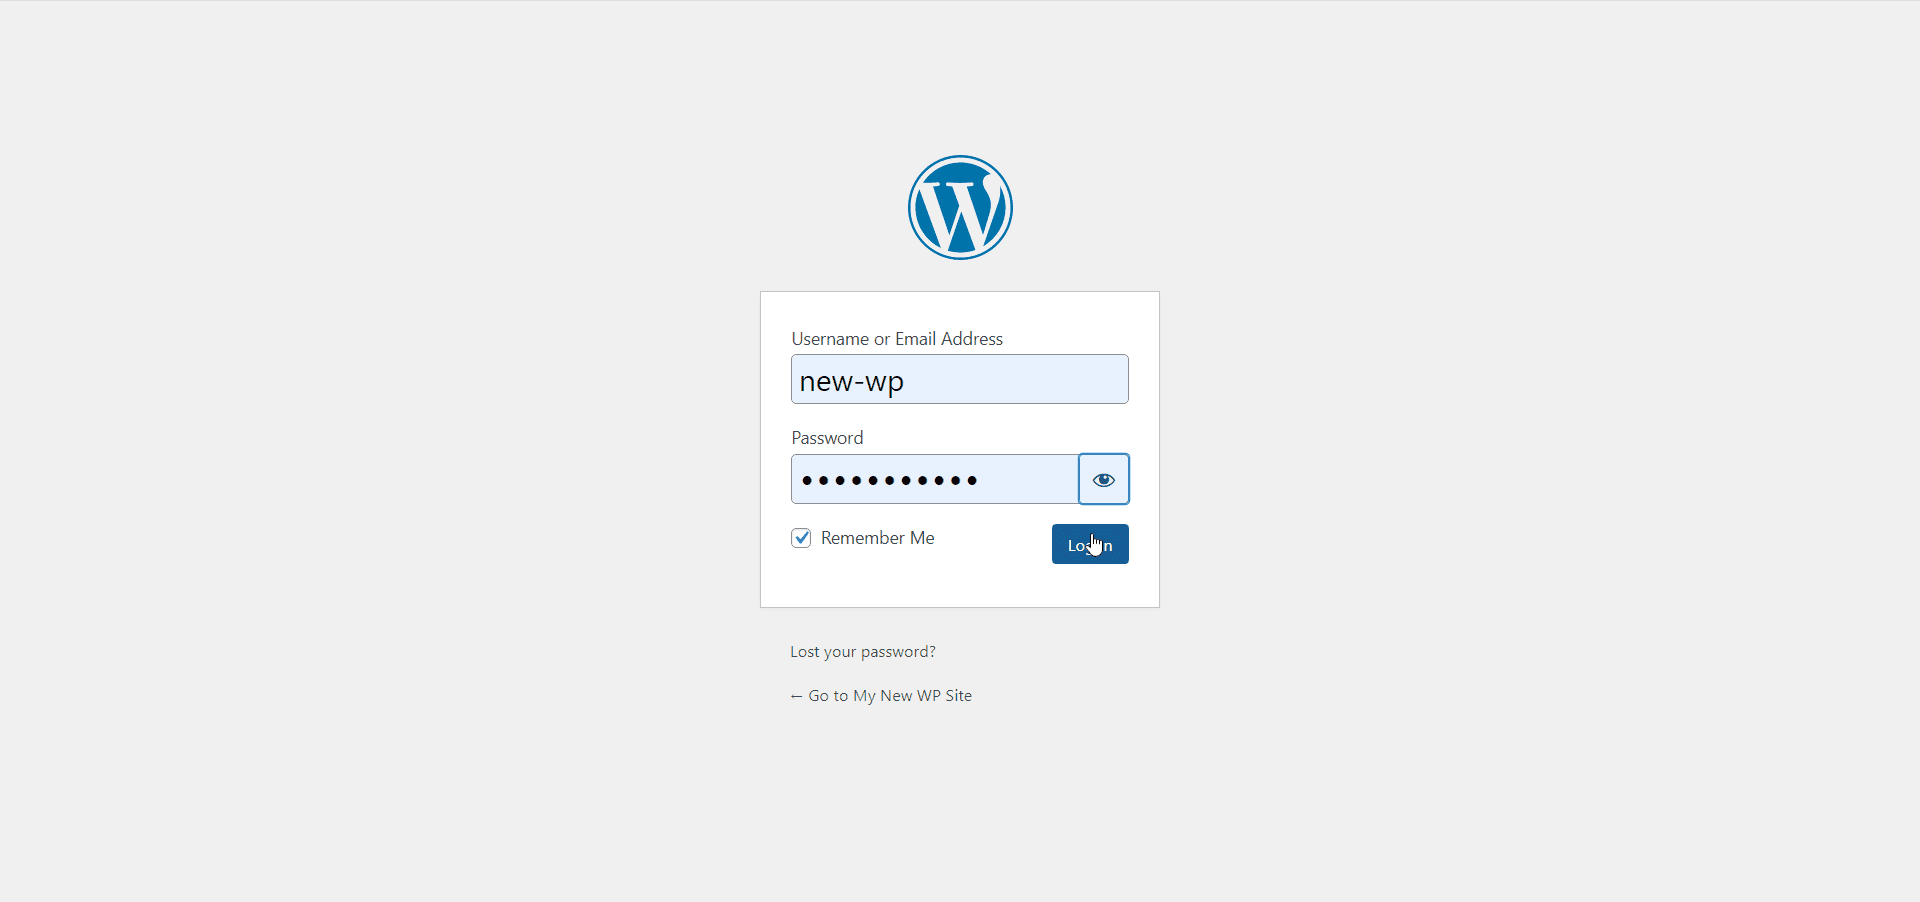
If you receive the Success notification as seen above, congratulations, your WordPress site is ready to use. You can click on the Login button to access your WordPress dashboard.
You need to enter the username and password you specified when installing WordPress. Once done, click on Login.
Upon login, you should be taken to the admin dashboard.
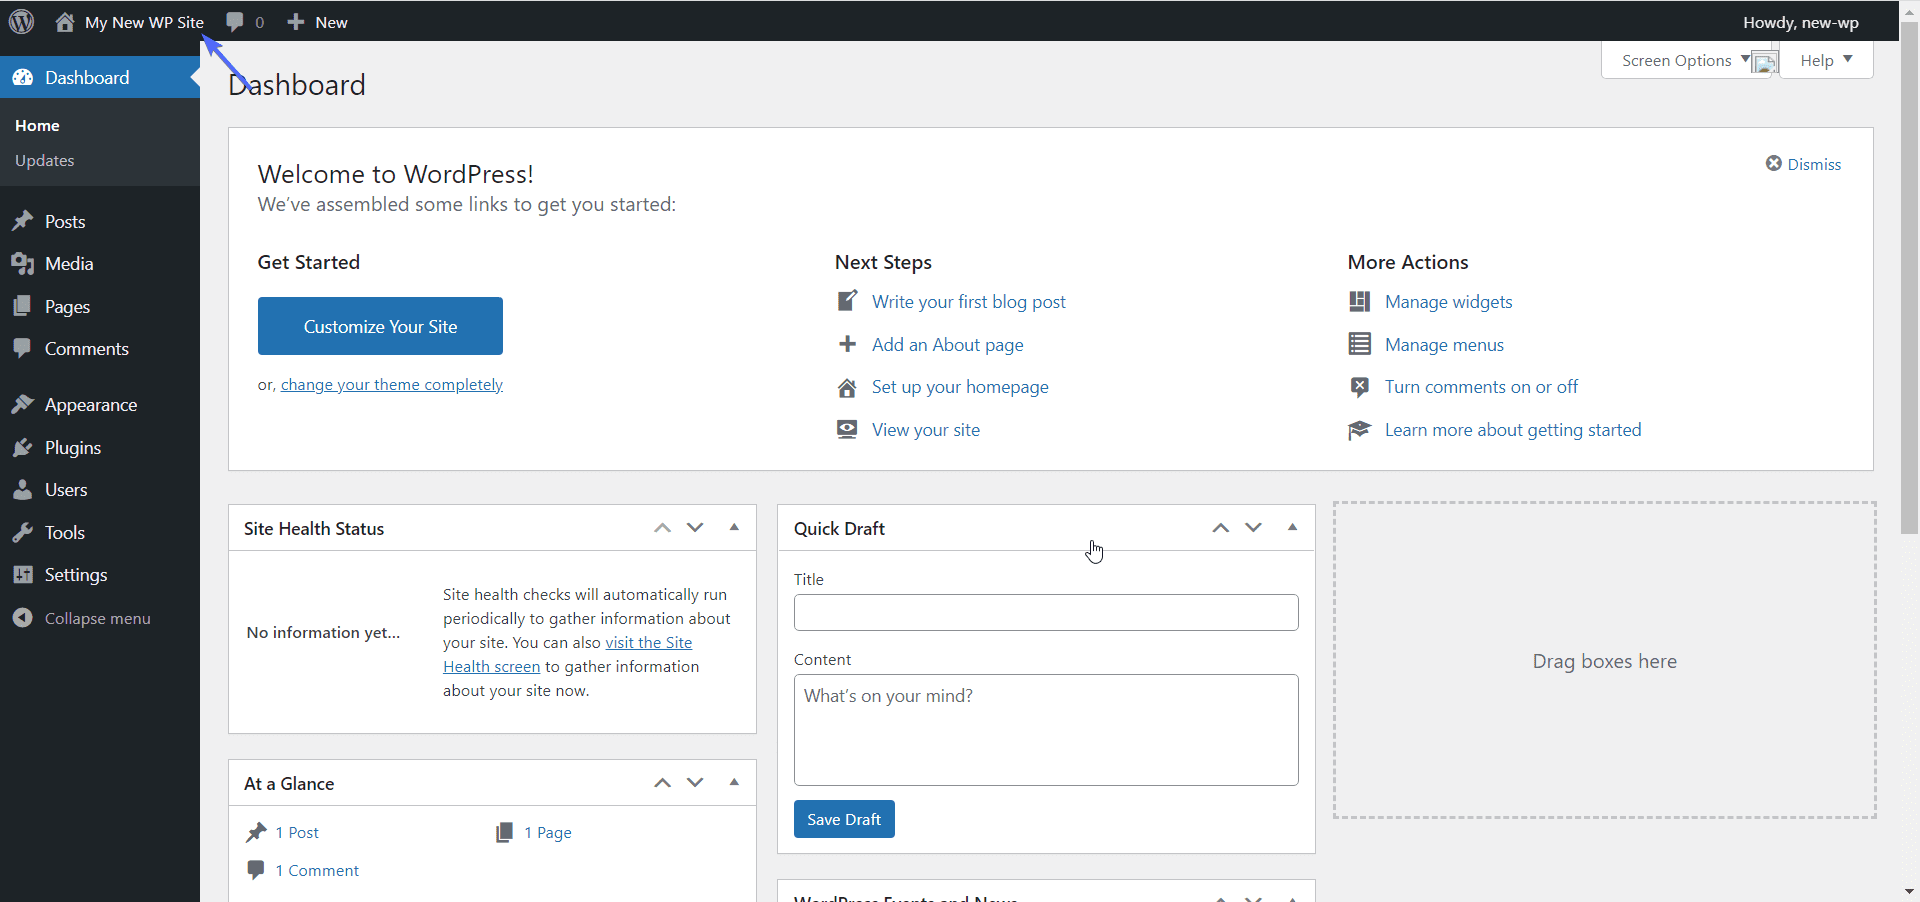
From here, you can begin customizing your WordPress site. To visit the front end of the site, click on the home icon on the top navigation bar and select Visit site.
If you are a new WordPress user, then check this guide to learn how to navigate the wordpress admin dashboard.
Additional Information: Manually Install WordPress using XAMPP
Some people prefer to set up a local server and install and customize their WordPress website before publishing on a live server.
If you prefer this approach, you can install WordPress on your local computer server. There are many options available, but we recommend using XAMPP. The software is available for both Windows and Mac OS.
After installing the software, you need to install WordPress on the local server. Fortunately, we have a detailed guide on WordPress Local Installation. Please follow this link to learn how to install WordPress in XAMPP.
Assuming you are done with customizing your site locally, you need to upload it on a live server while retaining the customizations you made locally. We will show you how to do that below.
Backup Your Database – Manually Install WordPress
First, you need to download a backup of your database file. For this, open your browser and type in ‘localhost/phpmyadmin’ in the address box.
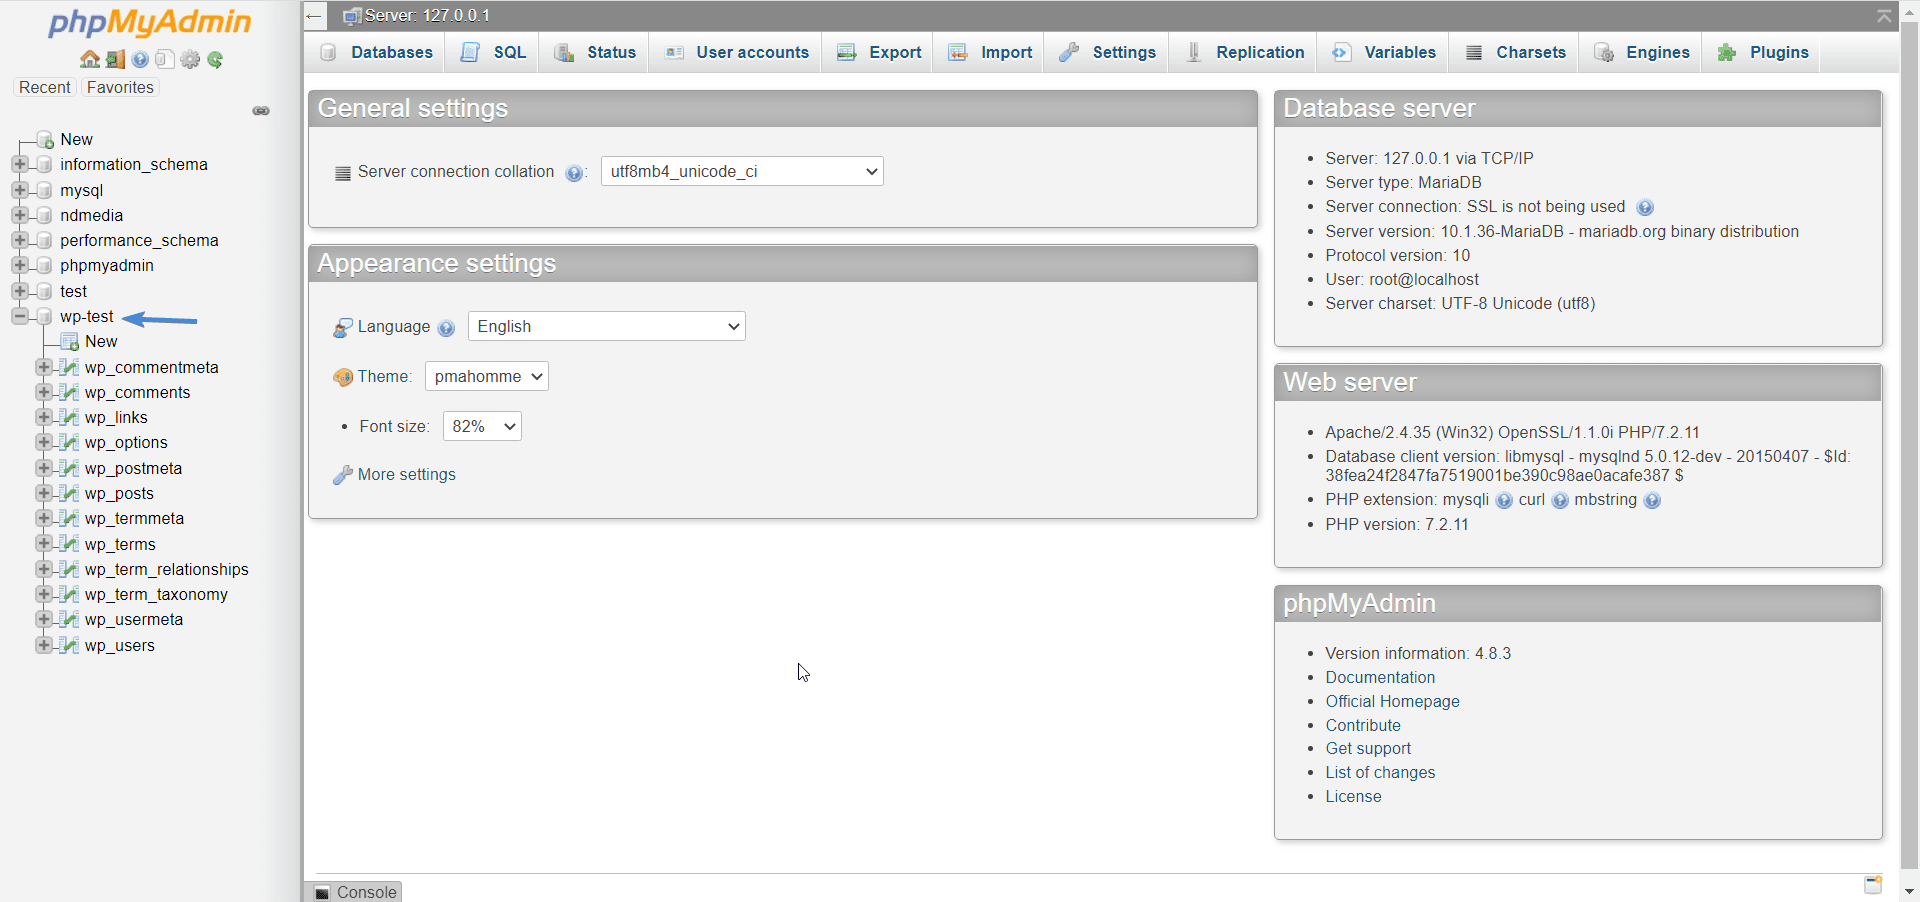
On the left sidebar, select the database of your local WordPress site. Now, click on Export to download a copy of the database.
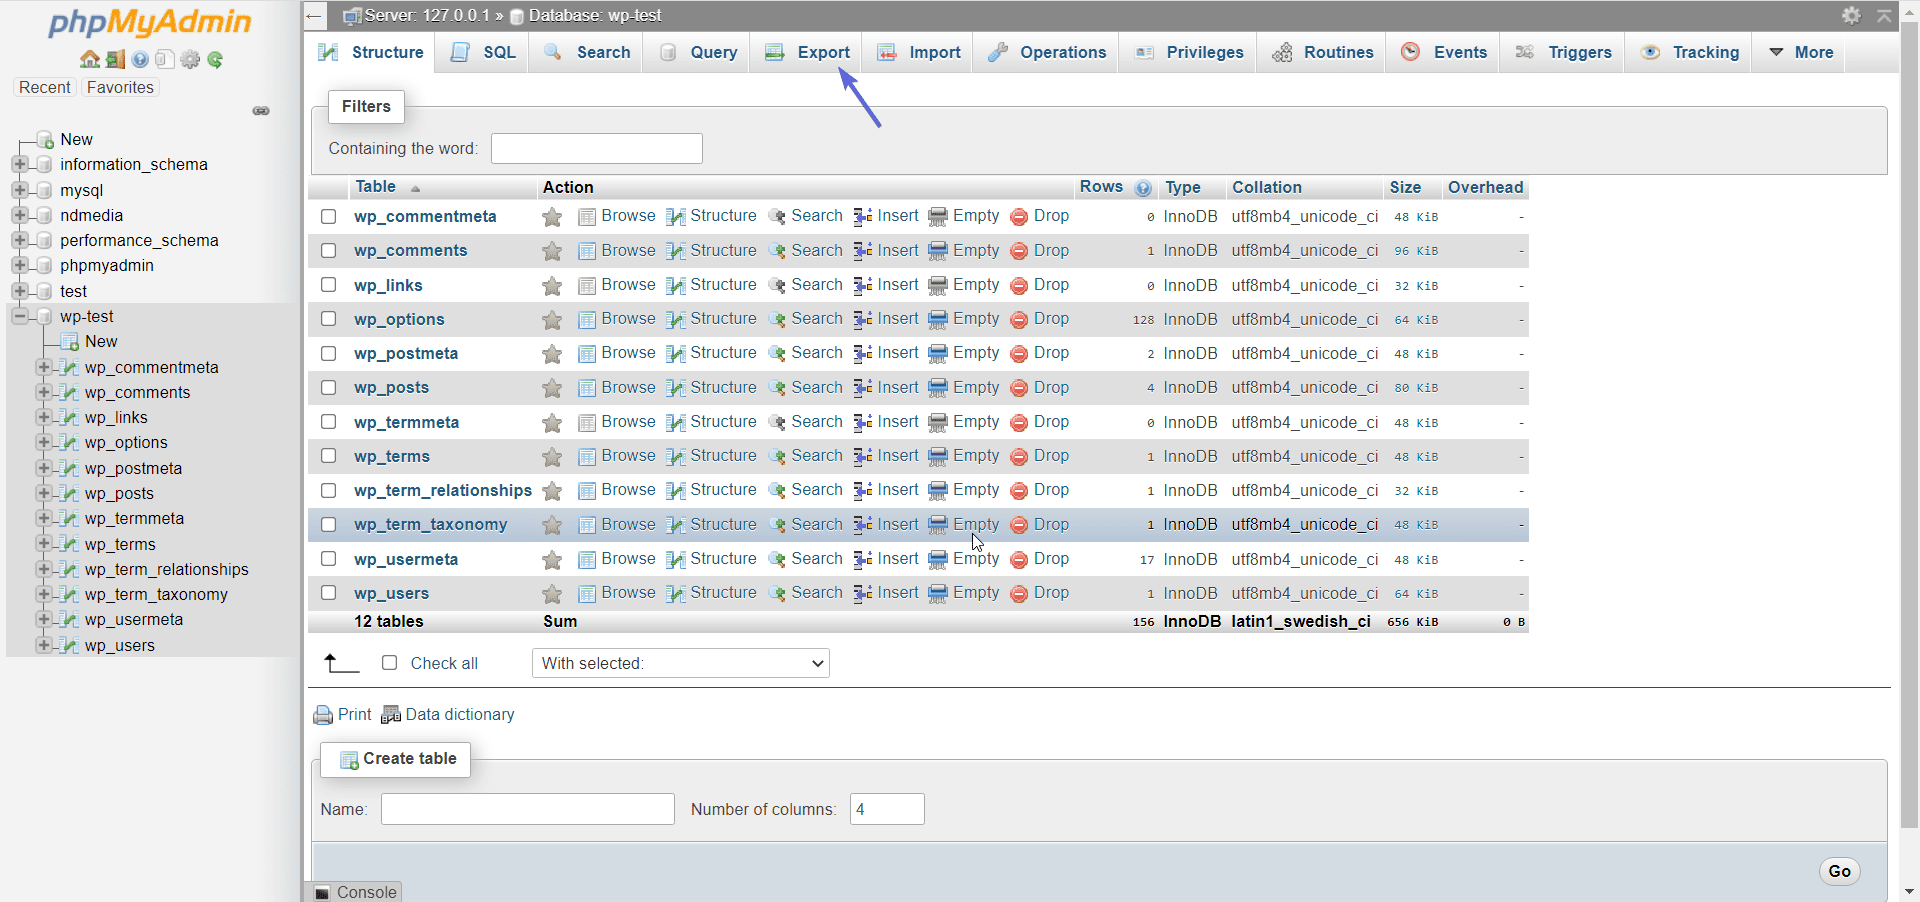
You can use the default export options and just hit the Go button.

Once the download is complete, you need to update your primary site address before importing it to your hosting server.
For this, open the file using a text editor. Now use Ctrl + F to open the find and replace option.
On the find box, enter the address of your local site (e.g. http://localhost/wp-test/). Next, enter your new website address (example https://mysite.com) on the replace box. Lastly, click on the Replace All icon.
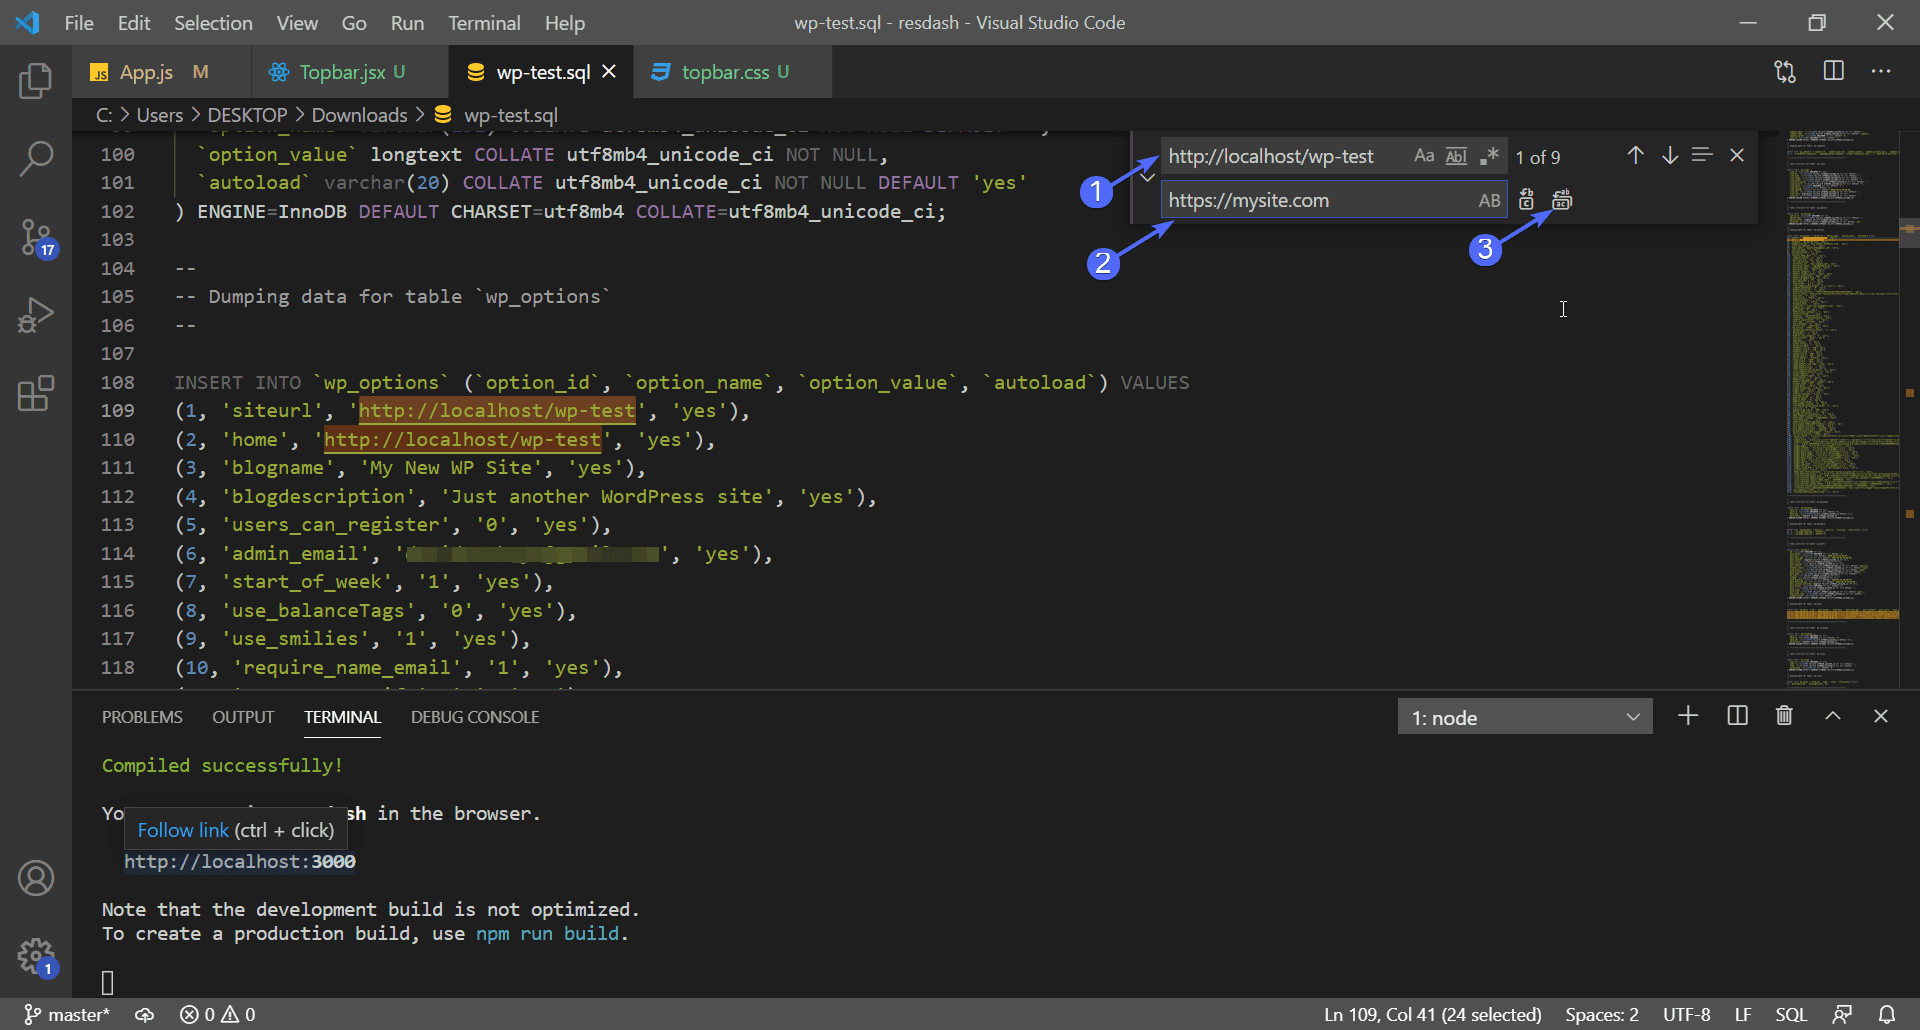
Ensure you save the file after updating the database information.
Now, you need to upload your WordPress sites’ files into the live server. There are two ways you can do it, either using an FTP client or through the cPanel of your hosting server.
Uploading WordPress Files to Server
The FTP procedure is similar to the one we explained above. In this case, however, you are uploading the local site that has been customized.
This means the path on the left side of FileZilla should be ‘/Xampp/htdocs/wp-test’ (assuming wp-test is the folder within which you installed WordPress). The right side should be navigated to the directory you want to install WordPress to on your live server. Once done, you can now drag and drop your site files to the server.
Similarly, if you are using cPanel to upload the website files, the process is the same as we explained above. However, you need to compress your WordPress site files before uploading them to your server.
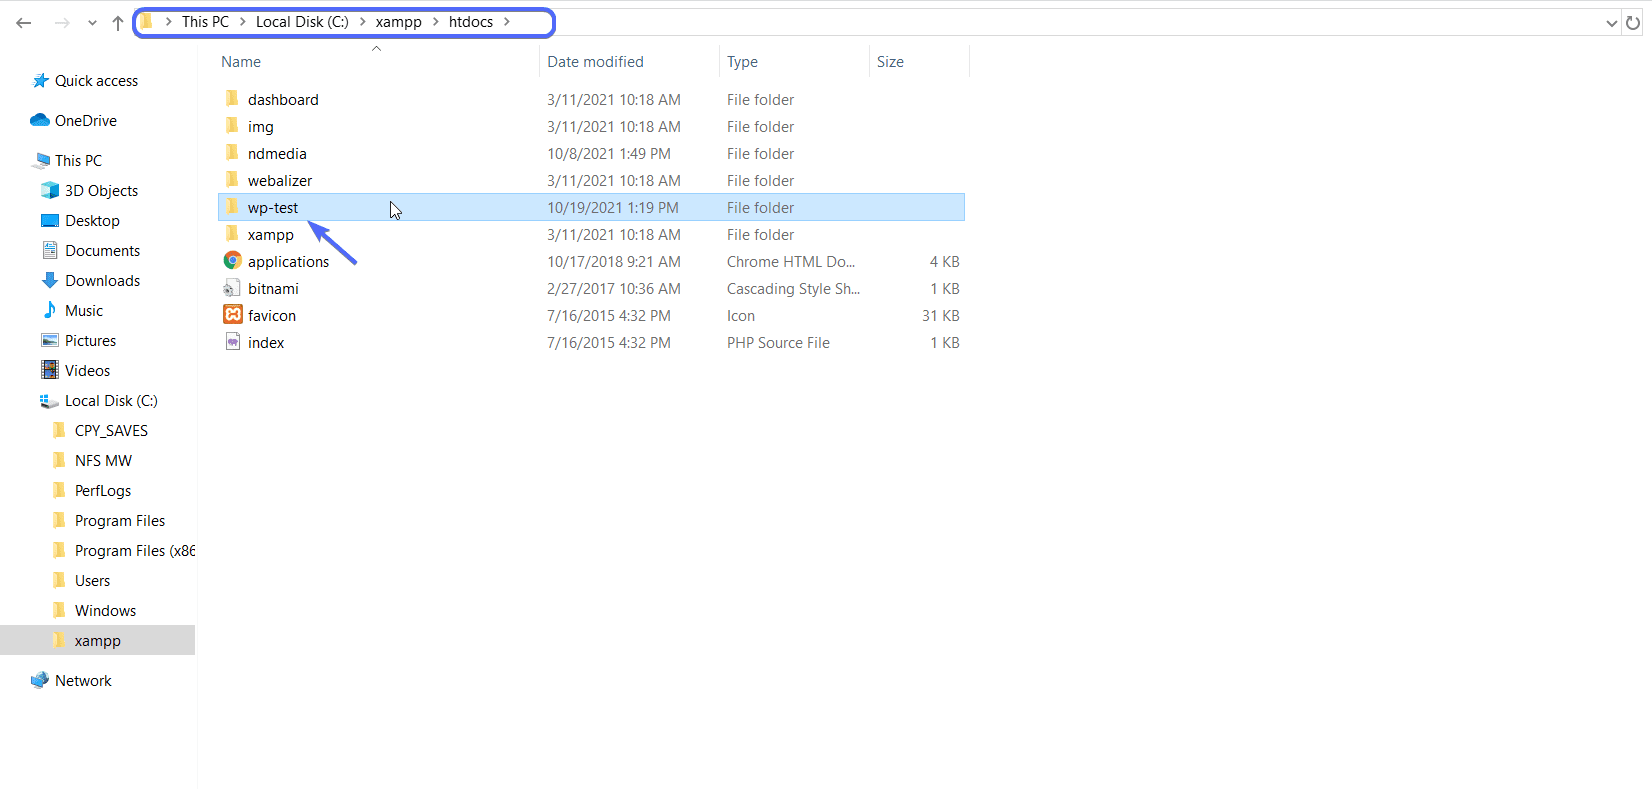
For this, open your computer menu and then go to Xampp >> htdocs.
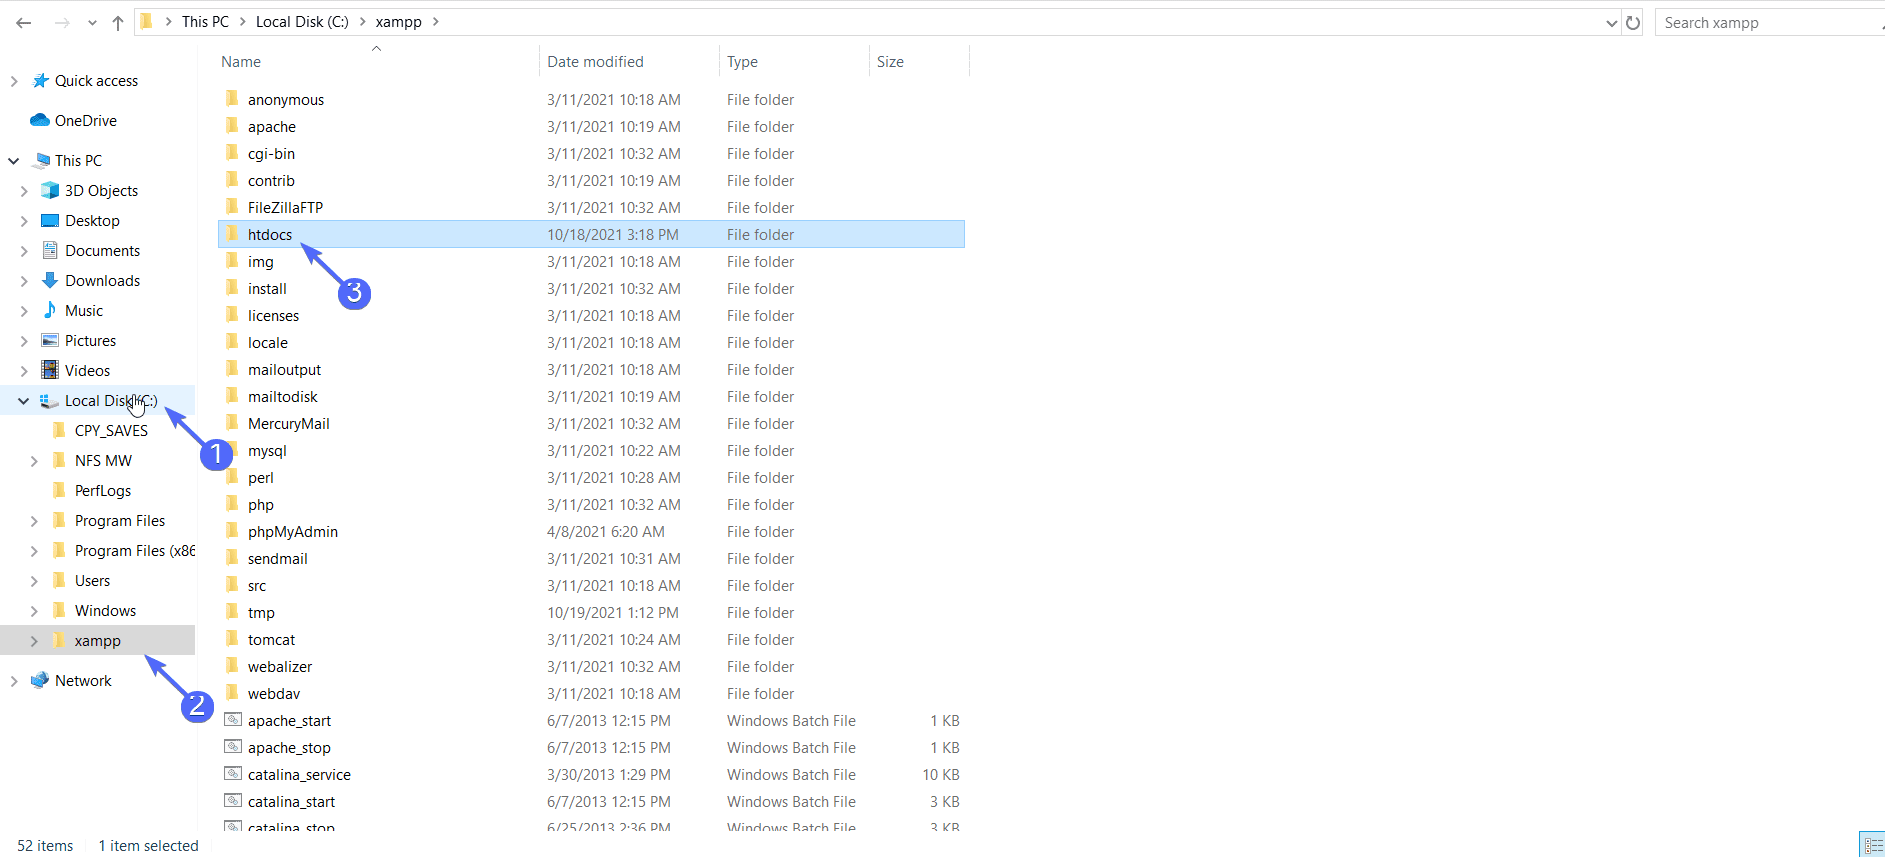
Here, you will find all the sites you have been working on locally. Next, open the directory containing your site files. In my case, this is the wp-test directory.
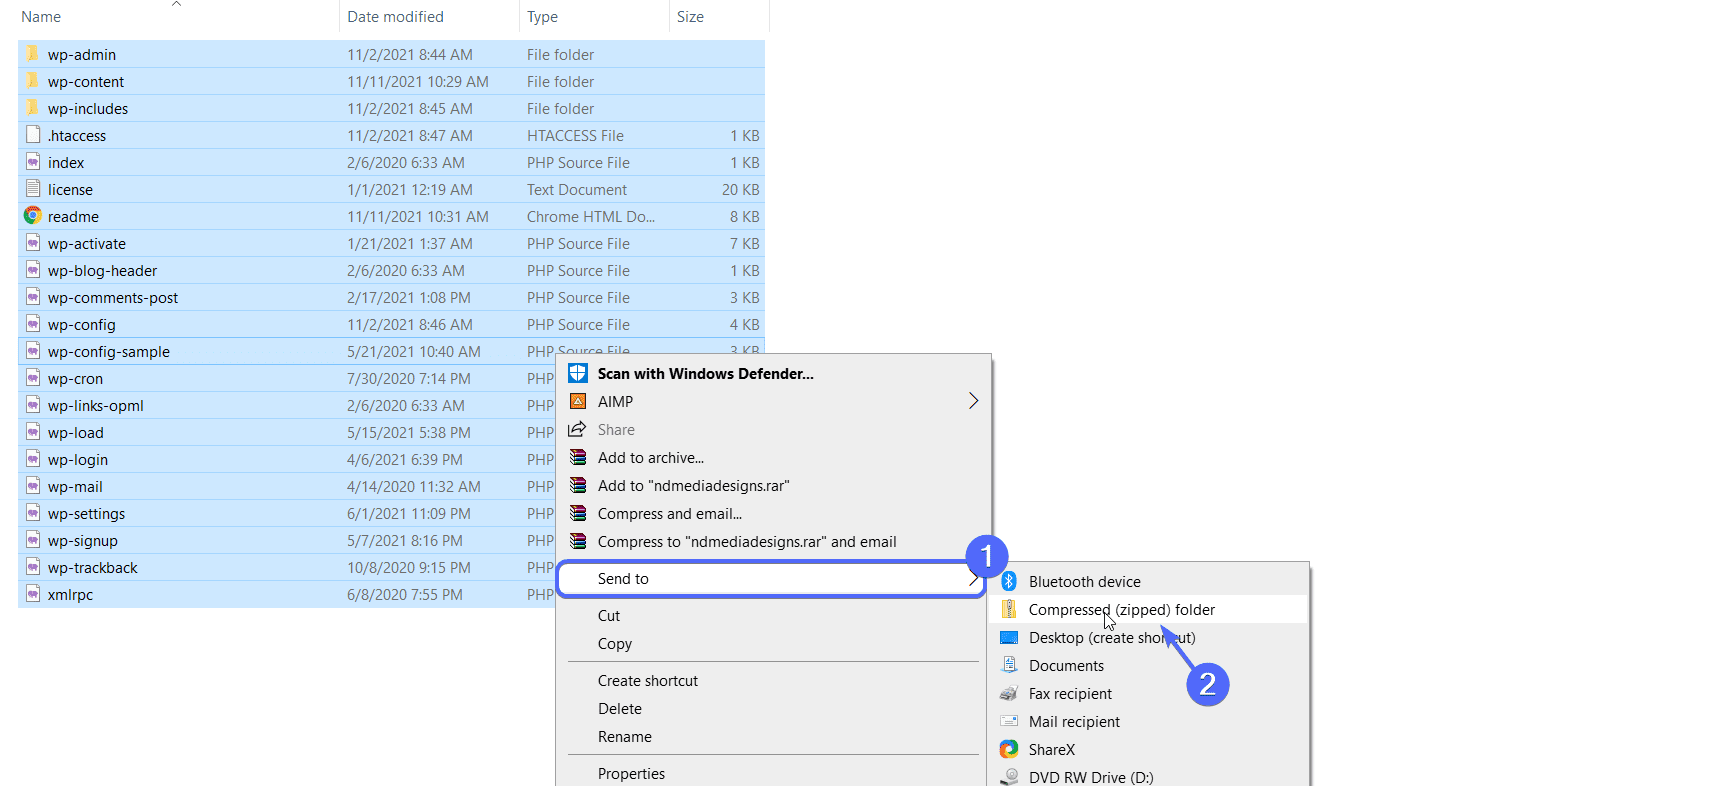
On the directory, select all the files (using Ctrl + A or Cmd + A). After that, right-click and then select Send to >> Compressed (Zipped) folder.
After compressing the files, you need to upload them to your server using the method we explained above.
Importing Local Database to the Server
Once the upload is complete, you need to create a new database and a database user for your WordPress site. The process can be found in step three above.
After creating the database, the next step is to import the local database from your computer into your live hosting server. This can be done using PHPMyAdmin from your cPanel dashboard.
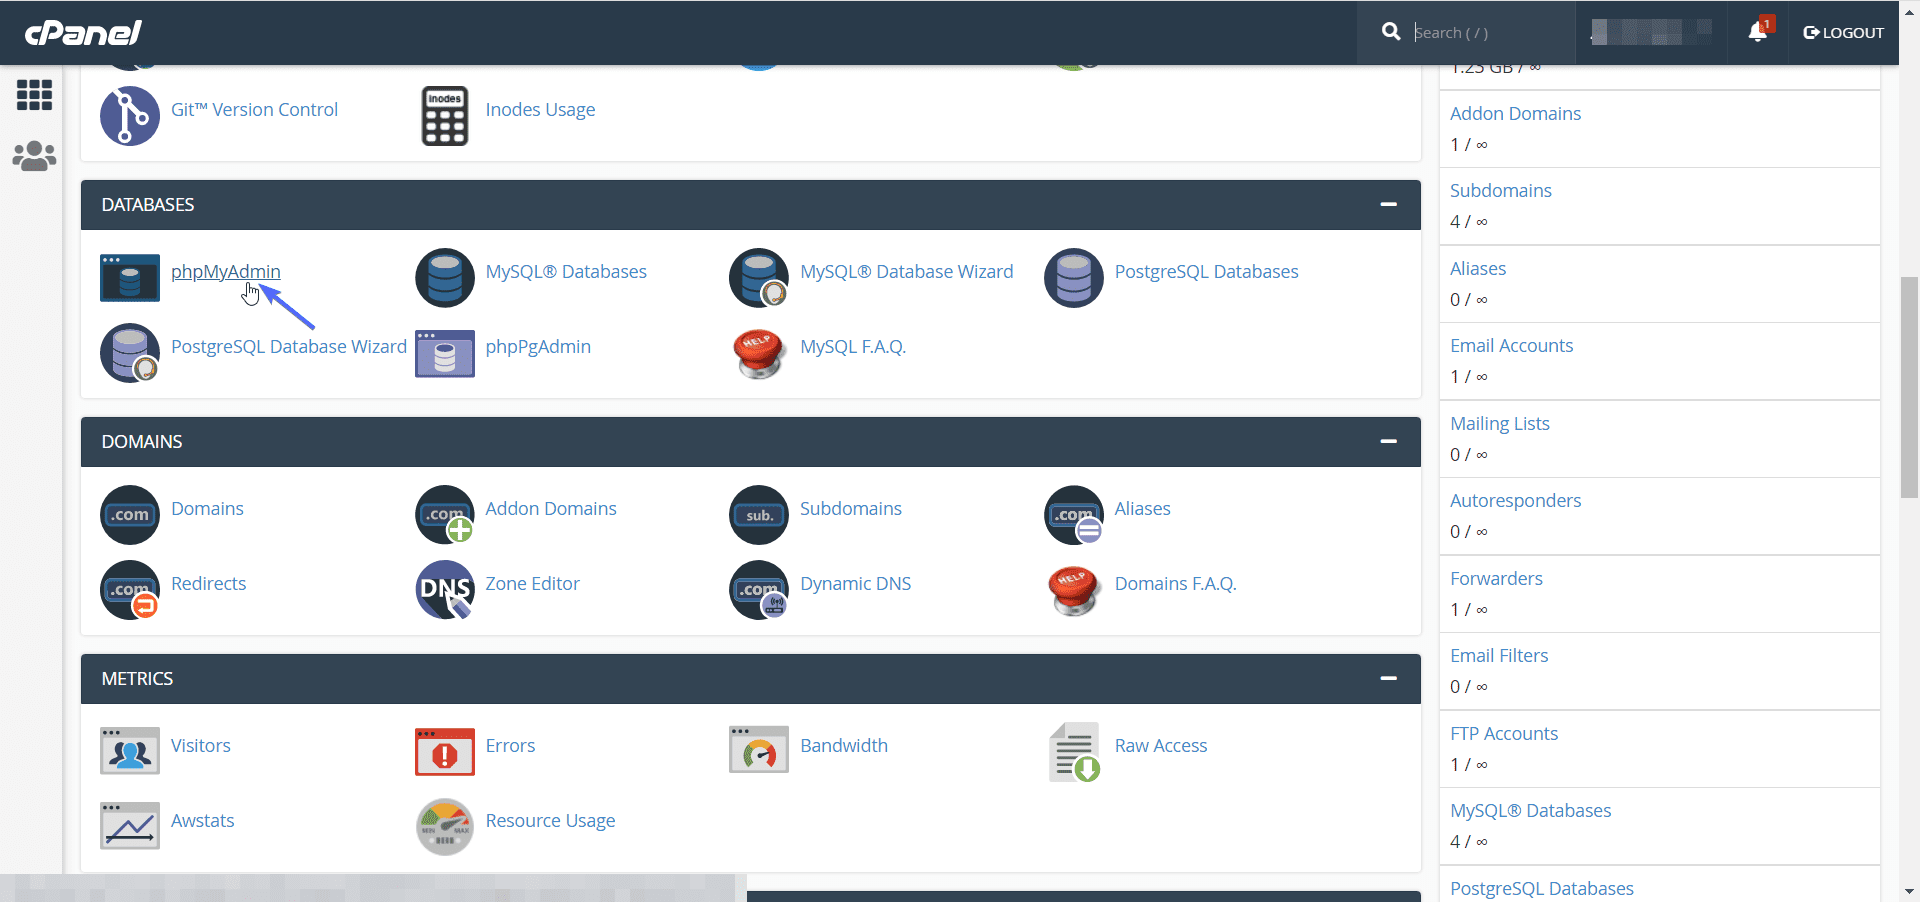
To start, login to cPanel, locate the “Databases” section and then select PHPMyAdmin.
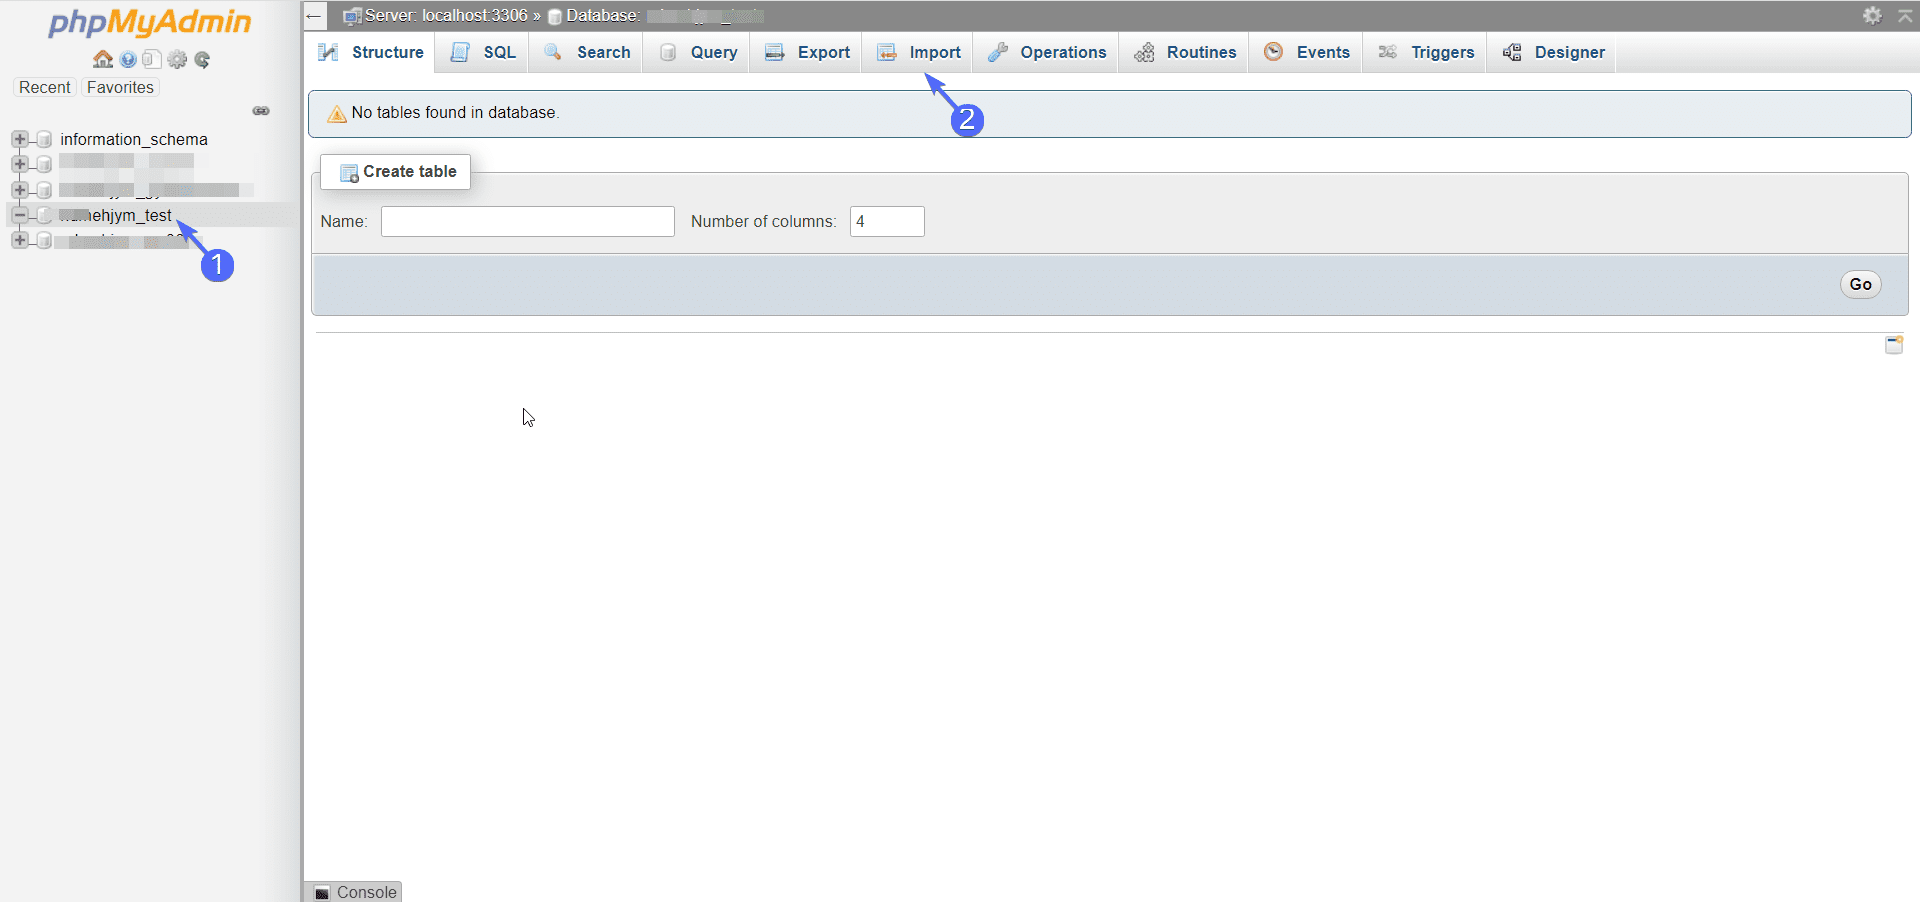
Next, select the database you created and click on Import.
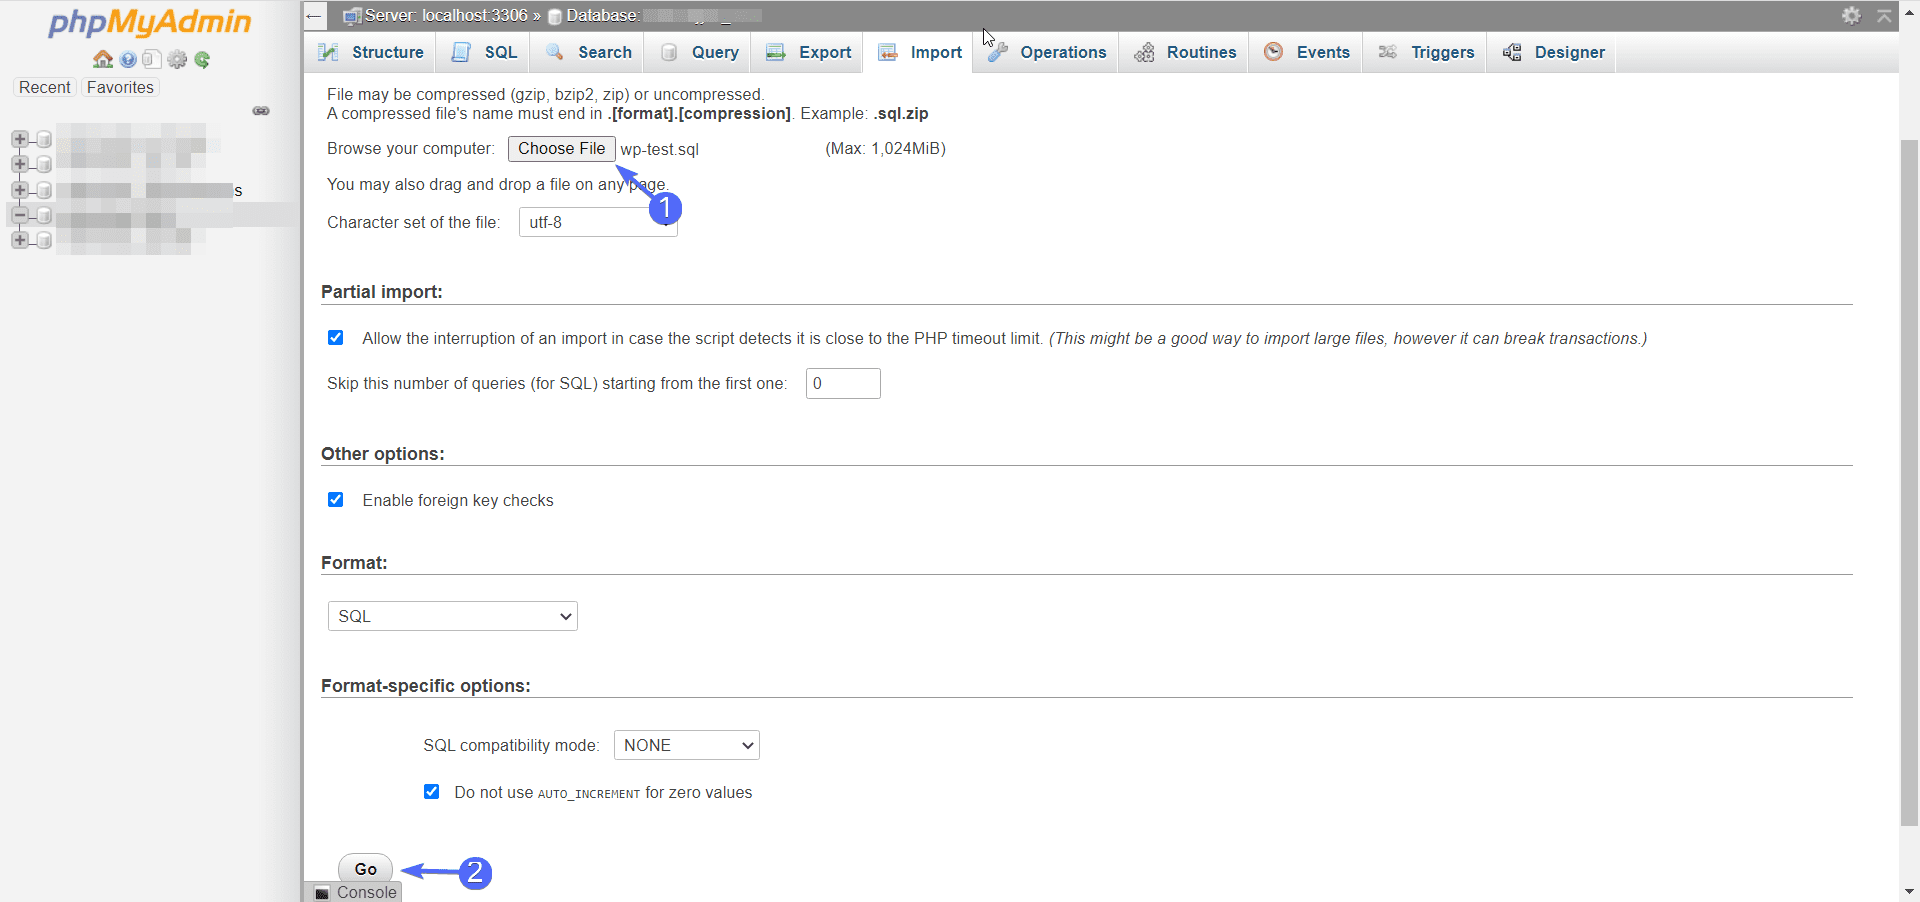
After that, click on the Choose File button and select the local database file. Click on the Go button to import your database.
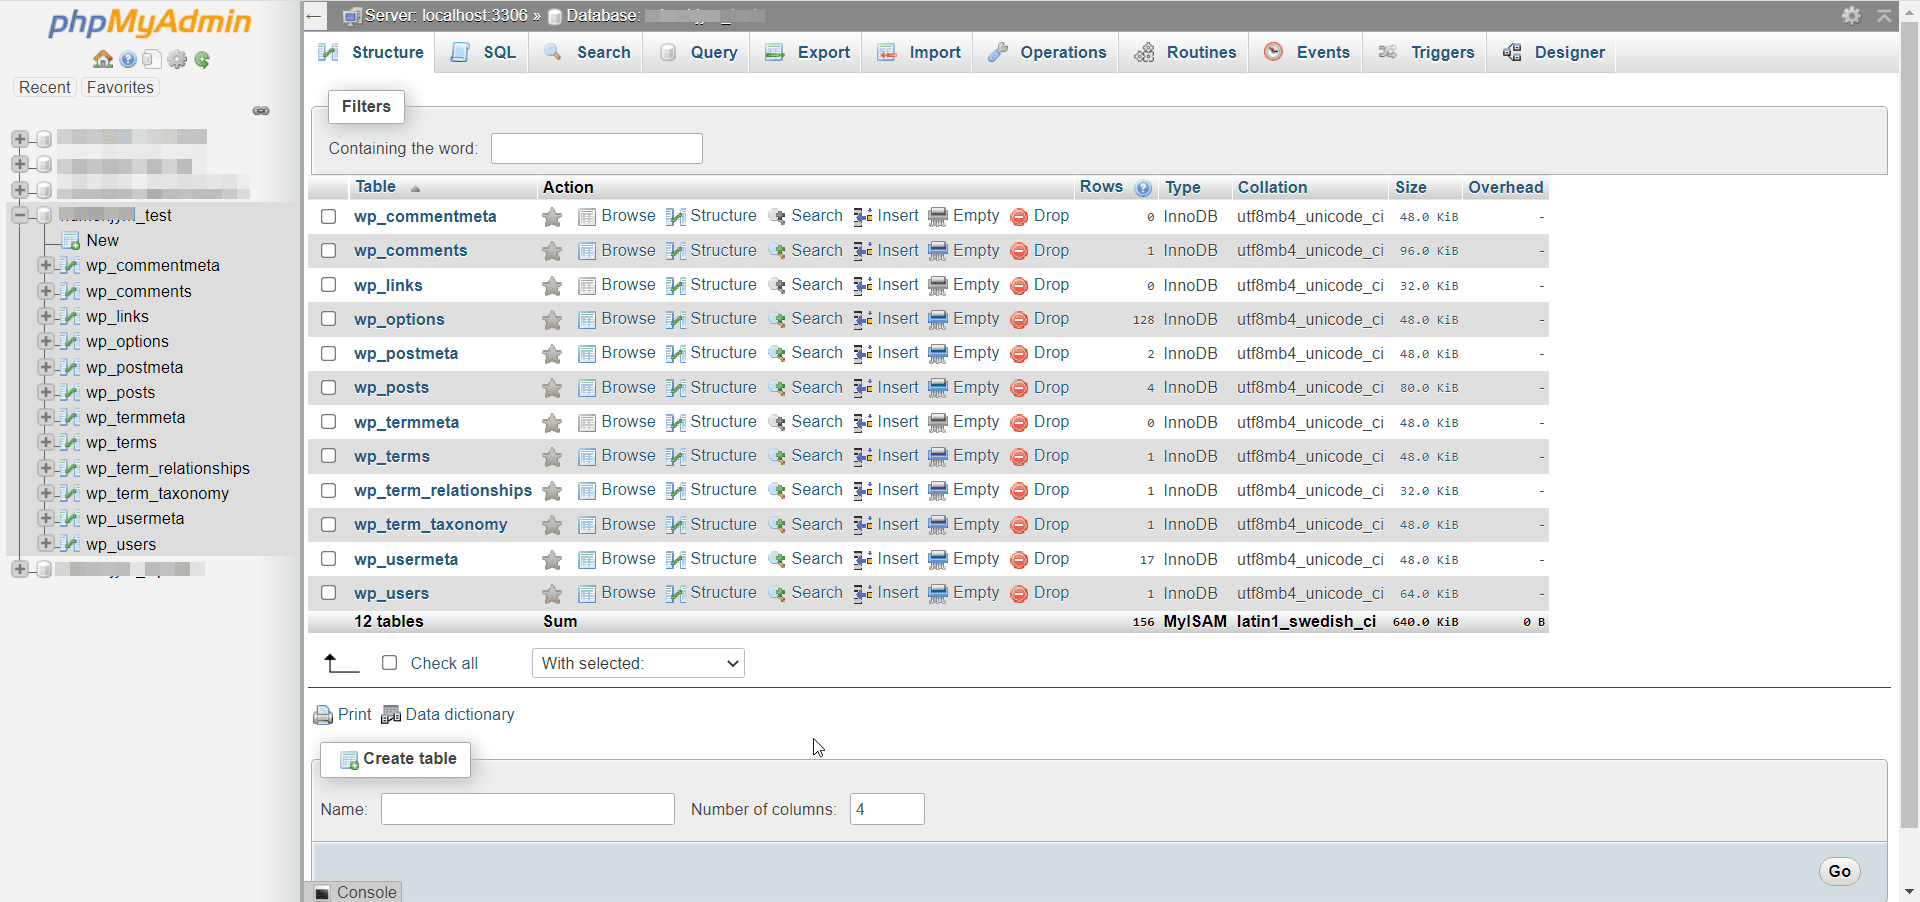
Your database should be populated with the files from your local database.
The last step in this installation is to edit the wp-config file to reflect the new database.
Editing wp-config File
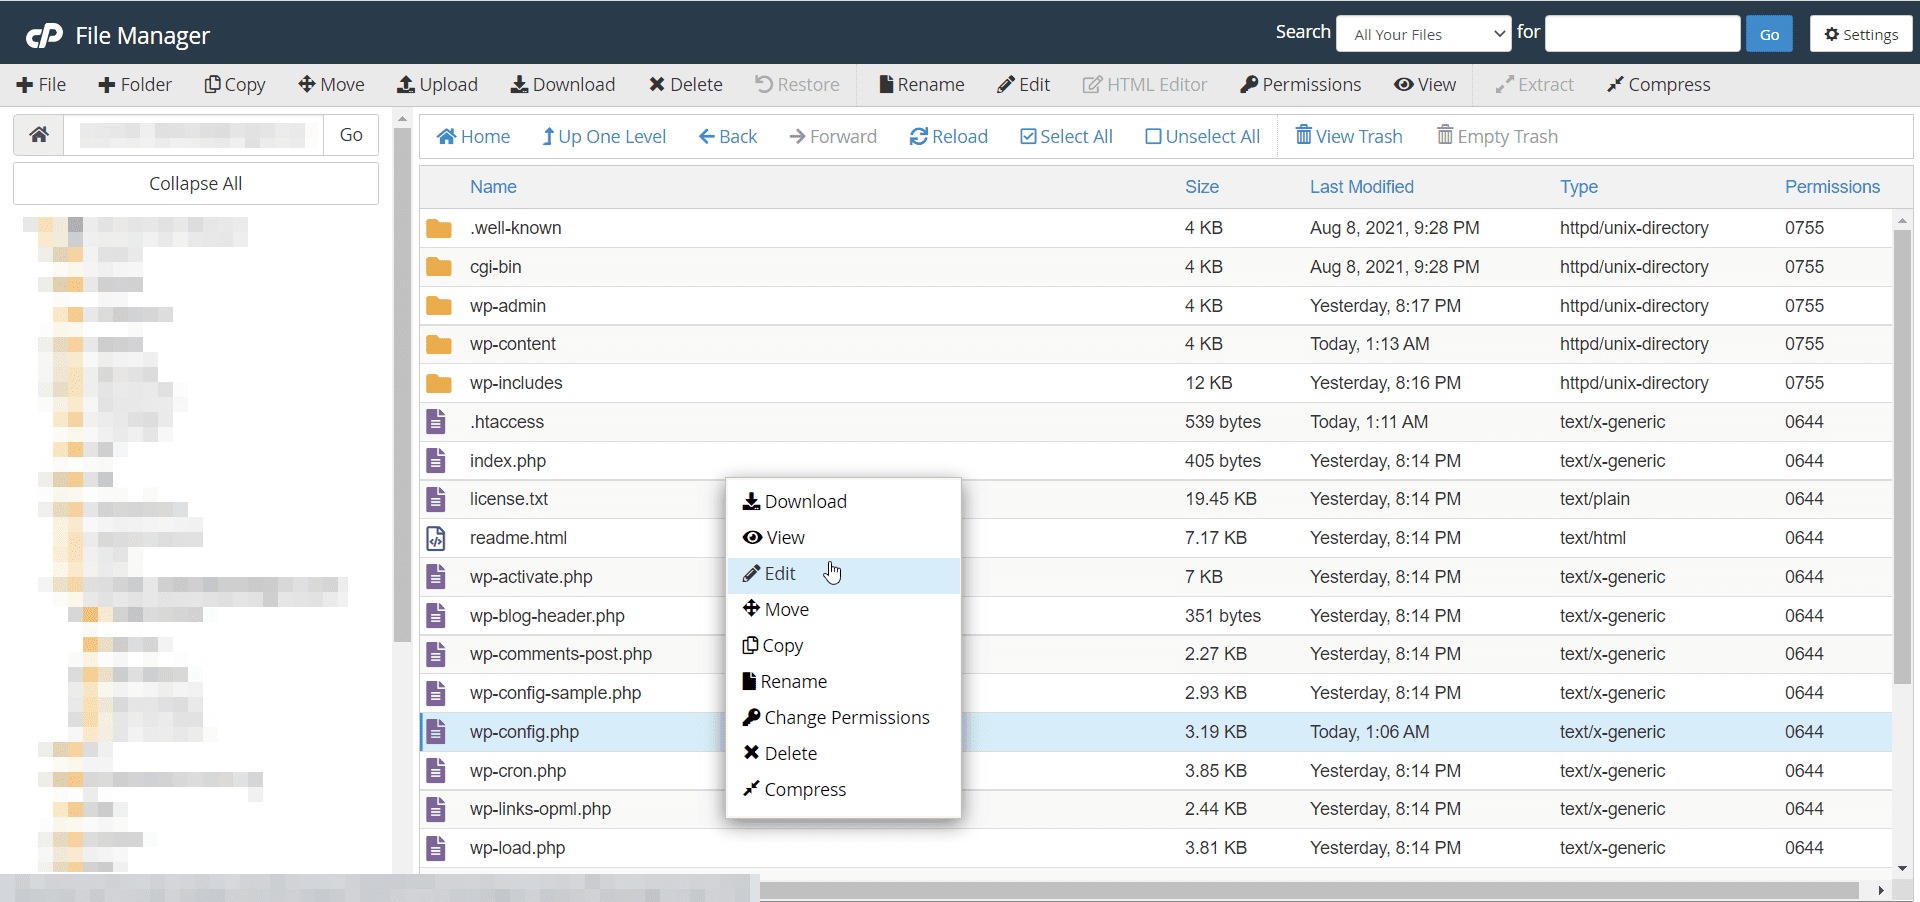
For this, click on the File Manager menu from your cPanel.
After that, navigate to the directory containing your website files. Here, right-click on the wp-config.php file and then select Edit.
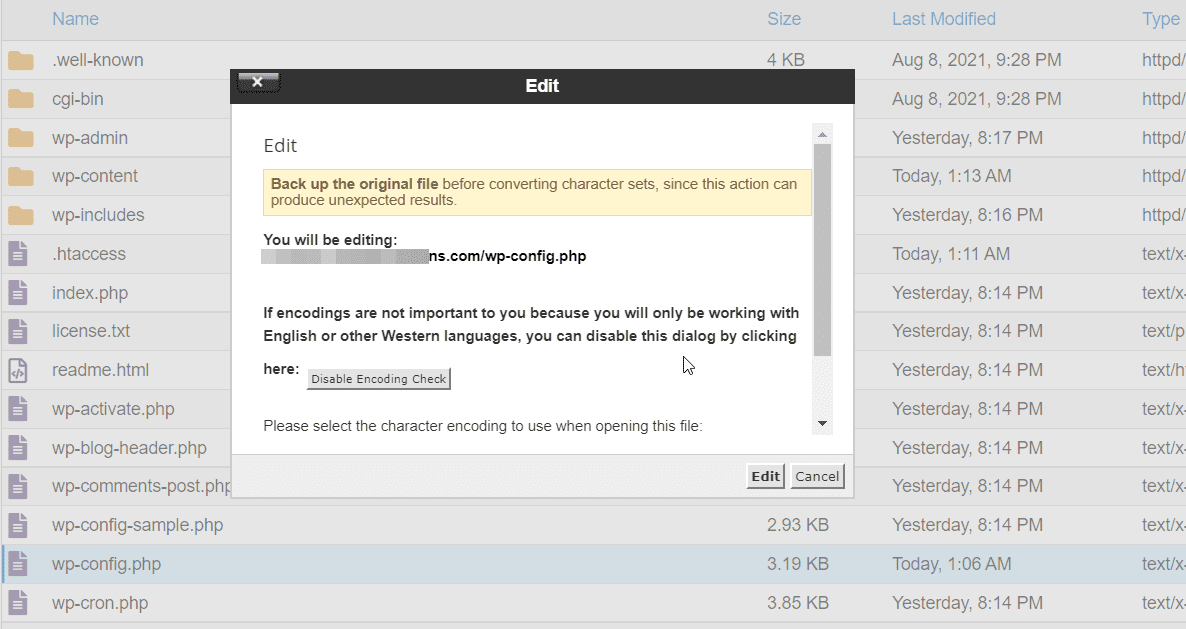
You will be prompted to backup the file before making any changes. You can skip this by clicking on the Edit button.
On the text editor, update the config file with the new database name (DB_NAME), the username (DB_USER), and password (DB_PASSWORD) in their appropriate lines.
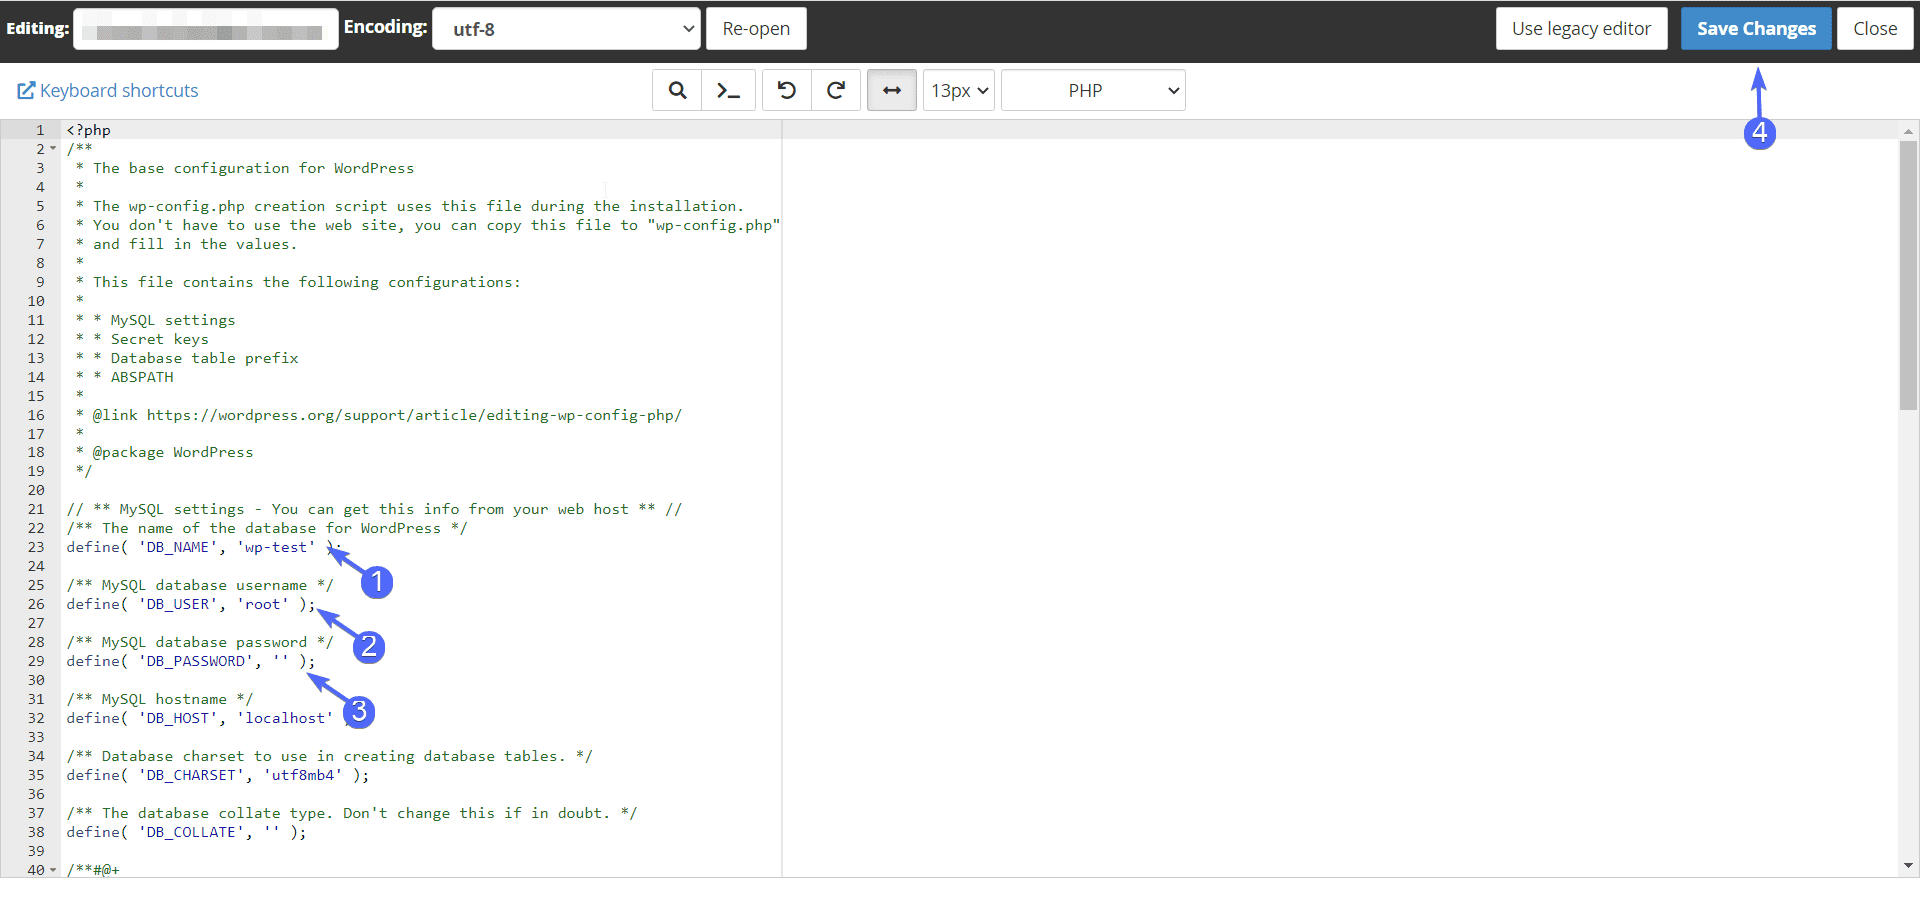
Click on the Save Changes button once done.
With this, you have successfully moved your WordPress site from a local server into a live server. You can now access the site by entering your website address on your browser.
What’s Next After Manually Installing WordPress?
WordPress is a complete CMS that can be extended to suit any kind of website you want to build. For instance, if you want to build an ecommerce website, you can use the popular WooCommerce plugin to achieve that.
After installing WordPress manually, you need to customize your website to make it stand out. WordPress provides over 8000 free themes that you can use to customize your site.
In addition, there are over 50000 plugins available in the WordPress directory to help you add functionalities to your website.
To learn more on how to customize your website, feel free to check this guide on how to use WordPress for complete beginners.