How To Set Up A WordPress Intranet Site
 When it comes to running a company, a lot goes on backstage, most of which involve collaboration between co-workers. An effective platform through which teammates can work together is thus required for many businesses. And one great tool for this is a WordPress intranet site.
In this guide, we’ll discuss a bit on what intranets really are and why you need to set up one using WordPress. Then, we’ll take a full dive into how to create one.
Content:
What Is WordPress Intranet?
In a nutshell, intranets are private networks that only users within an organization can access. It is like a private version of the internet.
A typical intranet has the following features:
- Employee messaging and networking tools
- A company calendar
- Forum
- Staff directory
- Gamification
- Internal knowledge bases with training materials, etc.
When an intranet is built with WordPress, it’s called a WordPress intranet. It could be a standalone site or a part of an already existing WP website. So, why should you build an intranet with WordPress when there are several other options?
Why Should You Build A WordPress Intranet?
A lot of intranet software has emerged over the years. They include Microsoft SharePoint, Workplace from Facebook, Staffbase, Yammer, and several others. Even then, intranets builts with WordPress have some advantages. Here are a few of them:
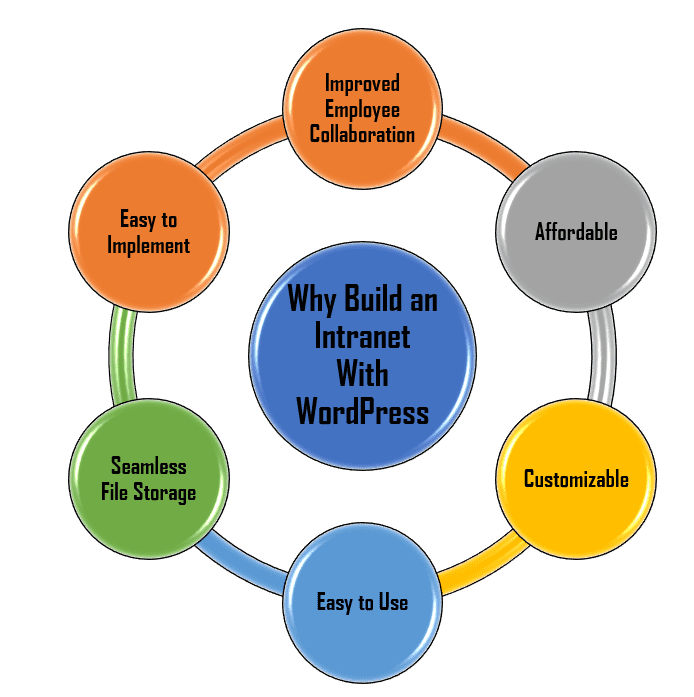
1. WordPress is easy to Use
WordPress is simple to learn and use. This is one major reason why it is such a popular content management system. You do not need to learn how to code, nor do you need to be a geek.
A few of our WordPress tutorials and probably some expert advice are all you need. You also do not need to train your staff on how to navigate the intranet website. They can find their way around the website without your help.
2. It is affordable
Even though we understand the value of having a company intranet, you do not need one that eats into the company’s profit. When it comes to affordability, WordPress tops the list and has an edge over other platforms.
Since WordPress is open-source, you wouldn’t need to pay for the software. You may need to pay for your hosting or get a few plugins and themes to add some extra features to your intranet. However, the latter payment is optional. There are free alternatives you can try out.
3. Improves Employee Collaboration
Collaboration among workers is simply the sharing of ideas and points of view in order to reach a goal. This is important to the growth of any business.
With WordPress plugins, users can create profiles similar to social media profiles. They can create groups, also similar to Facebook groups. This makes it easy to share ideas on how to take the company to the next level.
4. Customizable
Here is how WordPress works: get the basic WP install and plug in the features you need with the help of plugins. Afterward, you can tailor your intranet to fit the needs of your company, removing features you do not need and adding the needed ones.
This could save you from incurring unnecessary costs.
5. Seamless File Storage
As your business grows, you’ll have more files. More files mean more clutter. More clutter would lead to reduced productivity. Instead of having files everywhere – on your desk, on your hard drives, emails, and Google Drive, you can store them all on your WP intranet. This makes it easy to access at any time you need them.
6. Quick Implementation
With WordPress, you can get your website intranet running in a short time. This is because WordPress requires no coding on your part (except you need some customizations). You do not need to wait for months to develop a platform.
Methods of Creating An Intranet With WordPress
There are two methods of setting up an intranet with WordPress. They include:
- Using a localhost solution like XAMPP or WAMP.
- Using a hosted WordPress install with plugins like All-In-One Intranet.
Method 1: How To Set Up WordPress Intranet Using a Localhost
Using this approach, you’ll run a WordPress installation on your computer without purchasing a hosting plan. You only need to download a localhost solution like XAMPP (this will enable your device to play the role of a server). However, the only person who can view the website is you. It’s more like a private website.
Developers use this method when they need to test out a theme or plugin without breaking the real website. Beginners may also use it to learn how WordPress works without purchasing a hosting plan.
You can use this method to create a WP intranet as well. Afterall, it’s private.
Only users on your network will be able to access the intranet.
Here is an advantage: you wouldn’t have to bother about controlling user roles or restricting access (as far as you have a secure network).
However, there are a few drawbacks, users can only access the network when:
- The local host is running.
- Users are connected to the local server.
Step 1: Install XAMPP And WordPress On Your Computer
If your intranet needs are not elaborate with only a handful of people accessing it, you do not need anything extraordinary. An old desktop or laptop will suffice.
Simply download and install XAMPP on the computer. Wampserver, AMPPS, MAMP are other localhost servers you can use.
The next thing to do is to create a fresh WordPress install on the localhost. We have a complete guide on that. See how to install WordPress on a local server here. Additionally, ensure that you connect the computer to your network router using a cable.
Step 2: Set Up A Virtual Host
After installing WordPress and Xampp on your device, you should set up a virtual host in your apache httpd-vhosts.conf file. This step allows your server to handle requests for an actual URL (e.g. intranet.local).
It’s fine if you do not understand the above statement. Simply open the Xampp folder on your local disk. You’ll see a bunch of other folders. Open Apache. A new set of folders will appear, click conf, and then extra. Finally, click to edit the httpd-vhosts file.
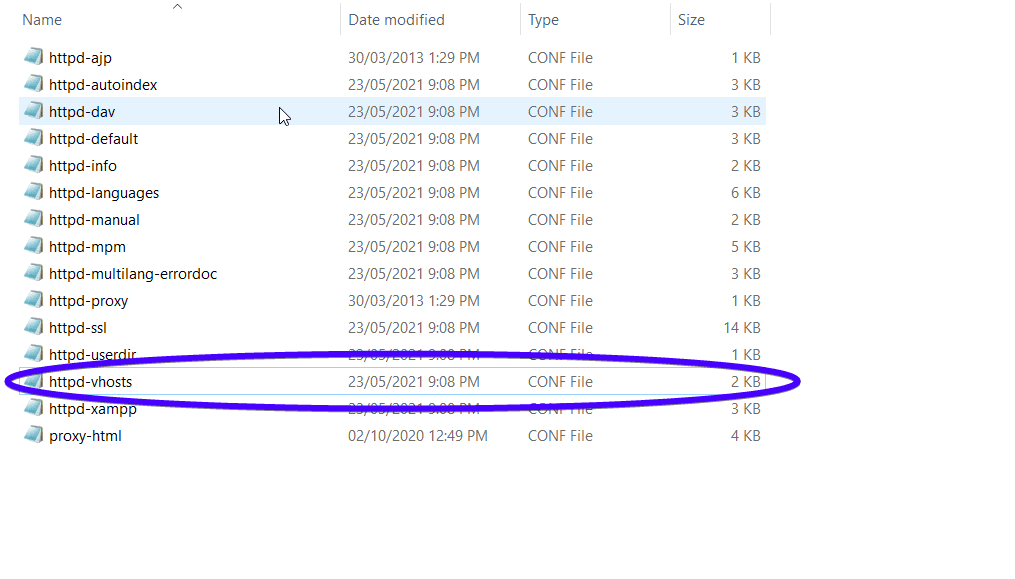
When the file opens, add this code snippet to the end of the file.
<VirtualHost *:80>
DocumentRoot "\xampp\htdocs\wordpress"
ServerName intranet.local
</VirtualHost>
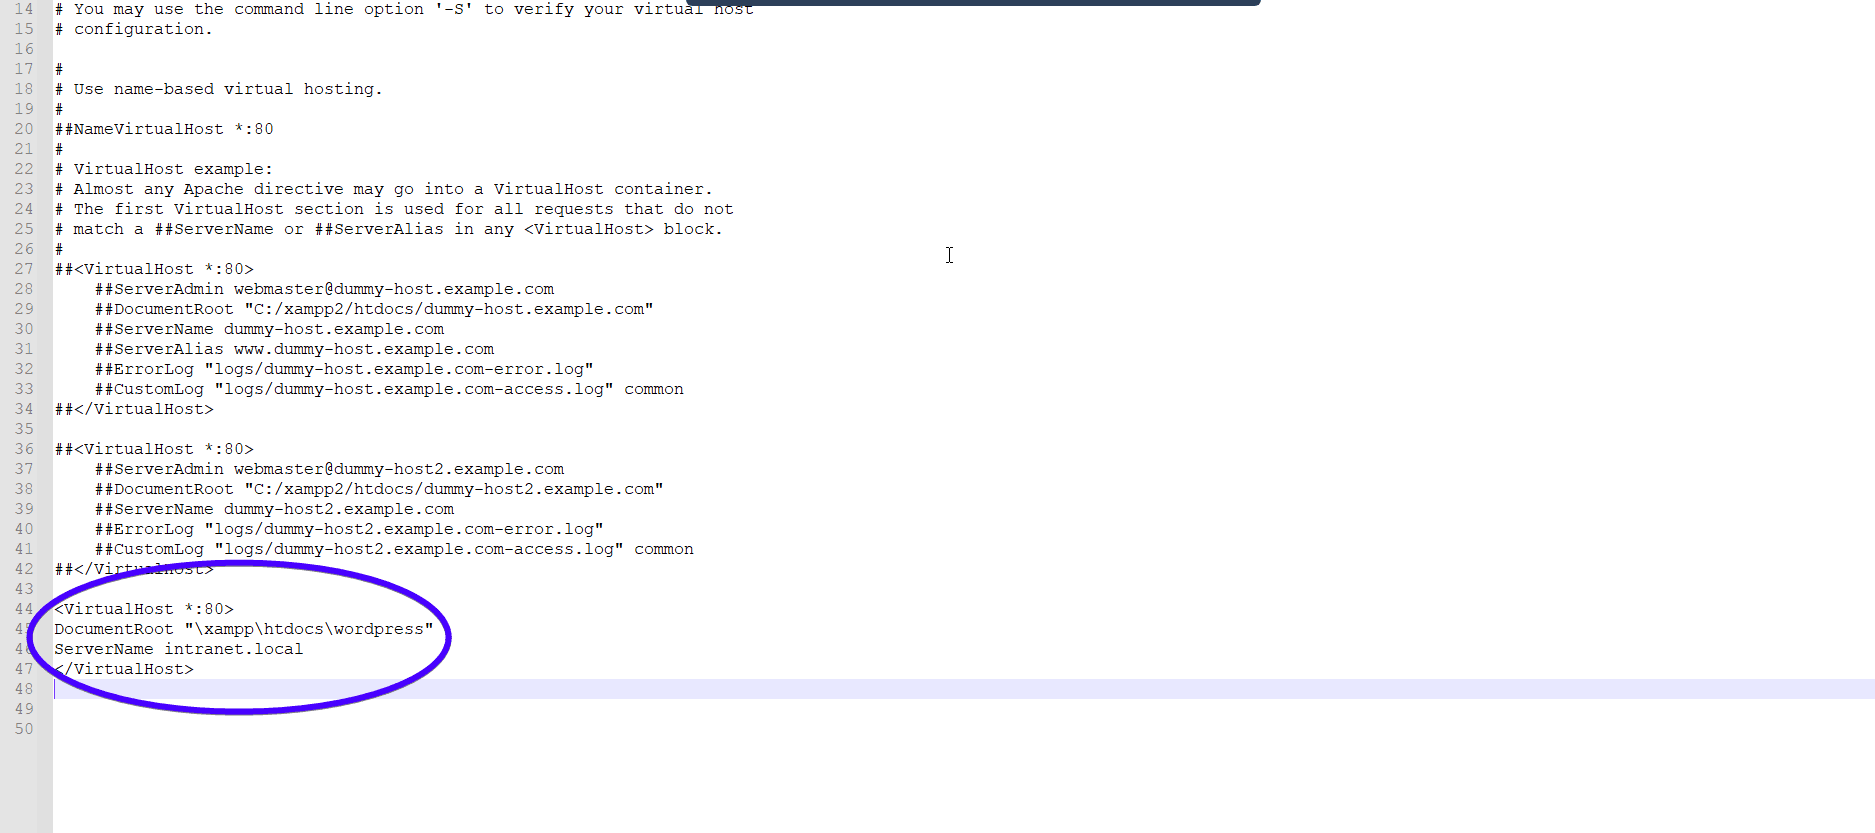
Take note of the line:
DocumentRoot "\xampp\htdocs\wordpress"
\xampp\htdocs\wordpress is the actual folder directory where we installed WordPress. If you installed WordPress in a different file folder directory, use it instead.
Also, take note of this line of code:
ServerName intranet.local
We have used ‘intranet.local’ as our ServerName. You can use another name.
Step 3: Find The IP Address For Localhost Server
At this point, your WP site is fully running on XAMPP. It’s time to find the IP address of the computer hosting the WP site. It is through this address that other users on your network can access the WP install. Here’s how to find the IP address on Windows 10.
With Xampp running and your server started:
- Right-click on the Windows Start button. This will reveal the hidden quick access menu.
- Next, select Windows PowerShell (Admin).
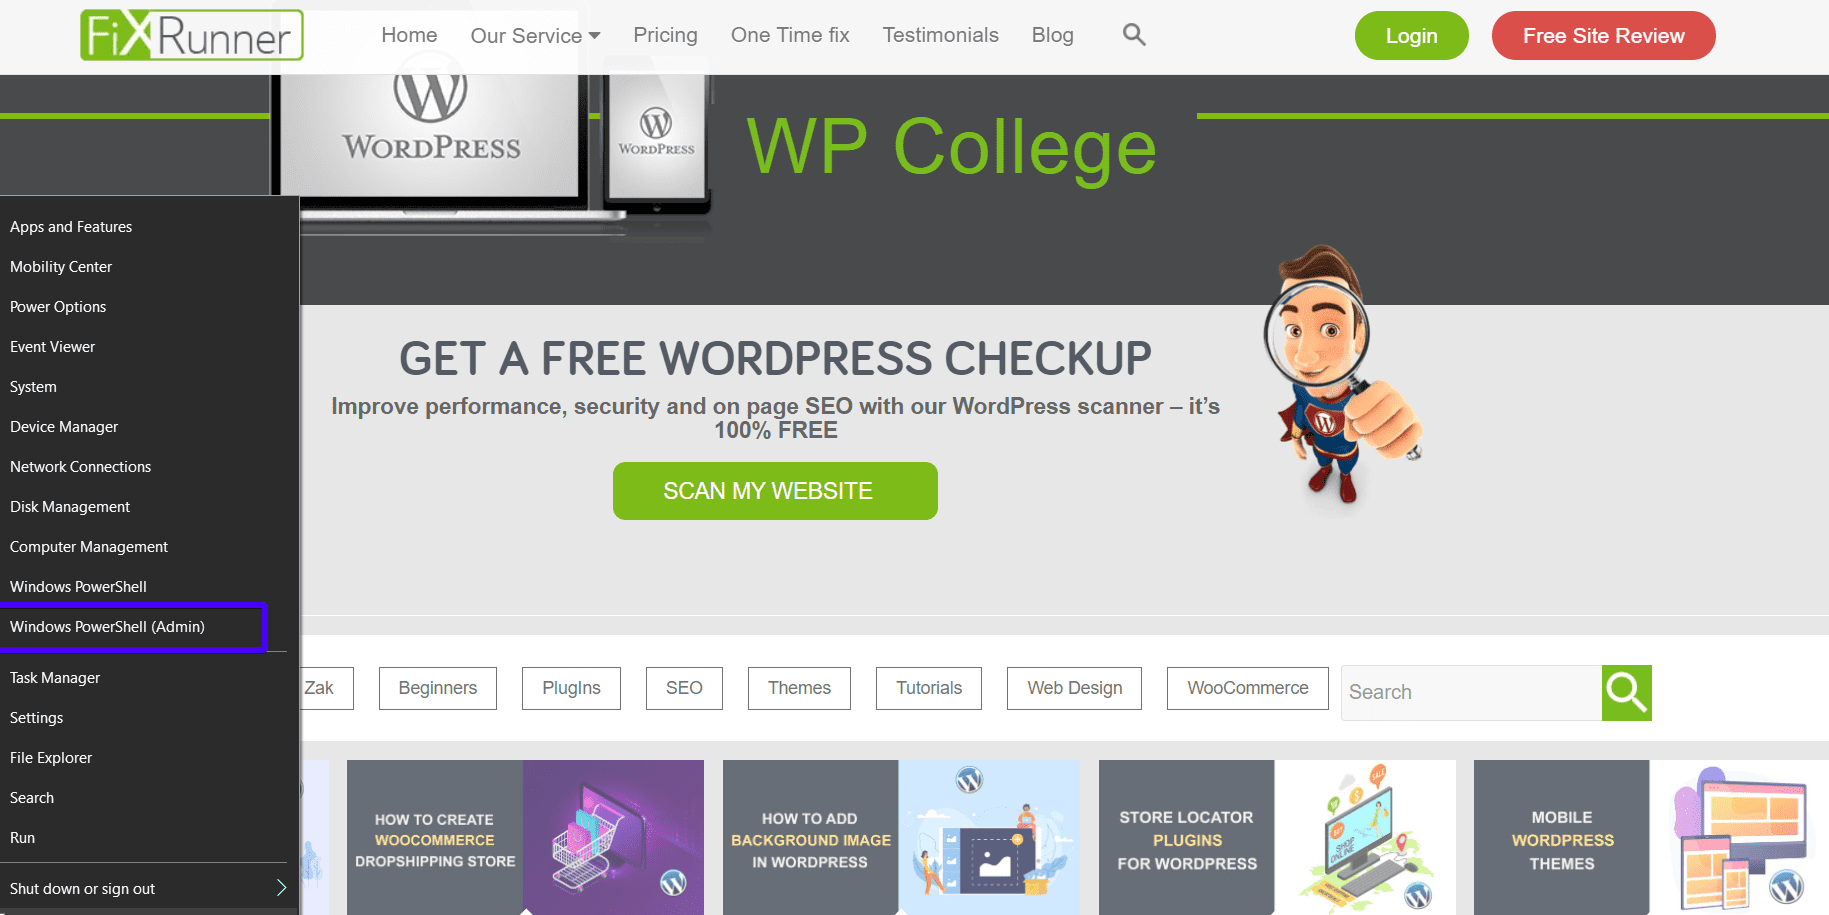
- When it opens, type ipconfig and press ‘Enter’ on your keyboard.
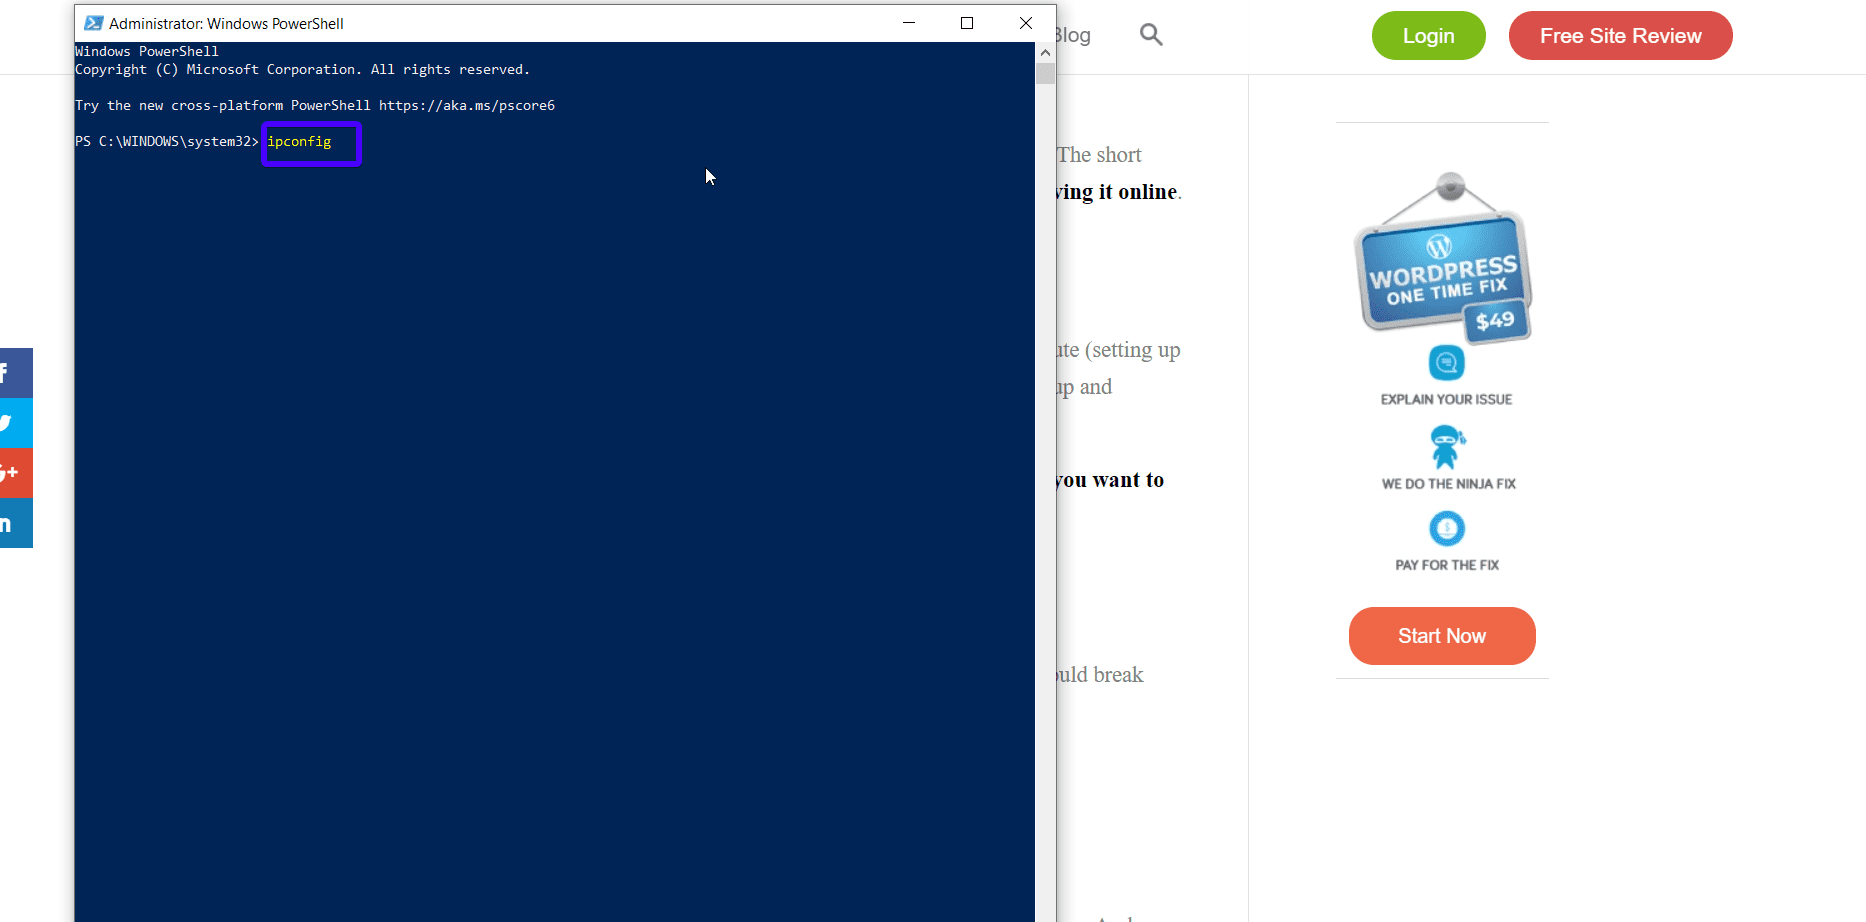
- After that, check through the text that appears and look for IPv4 Address. Copy its value.
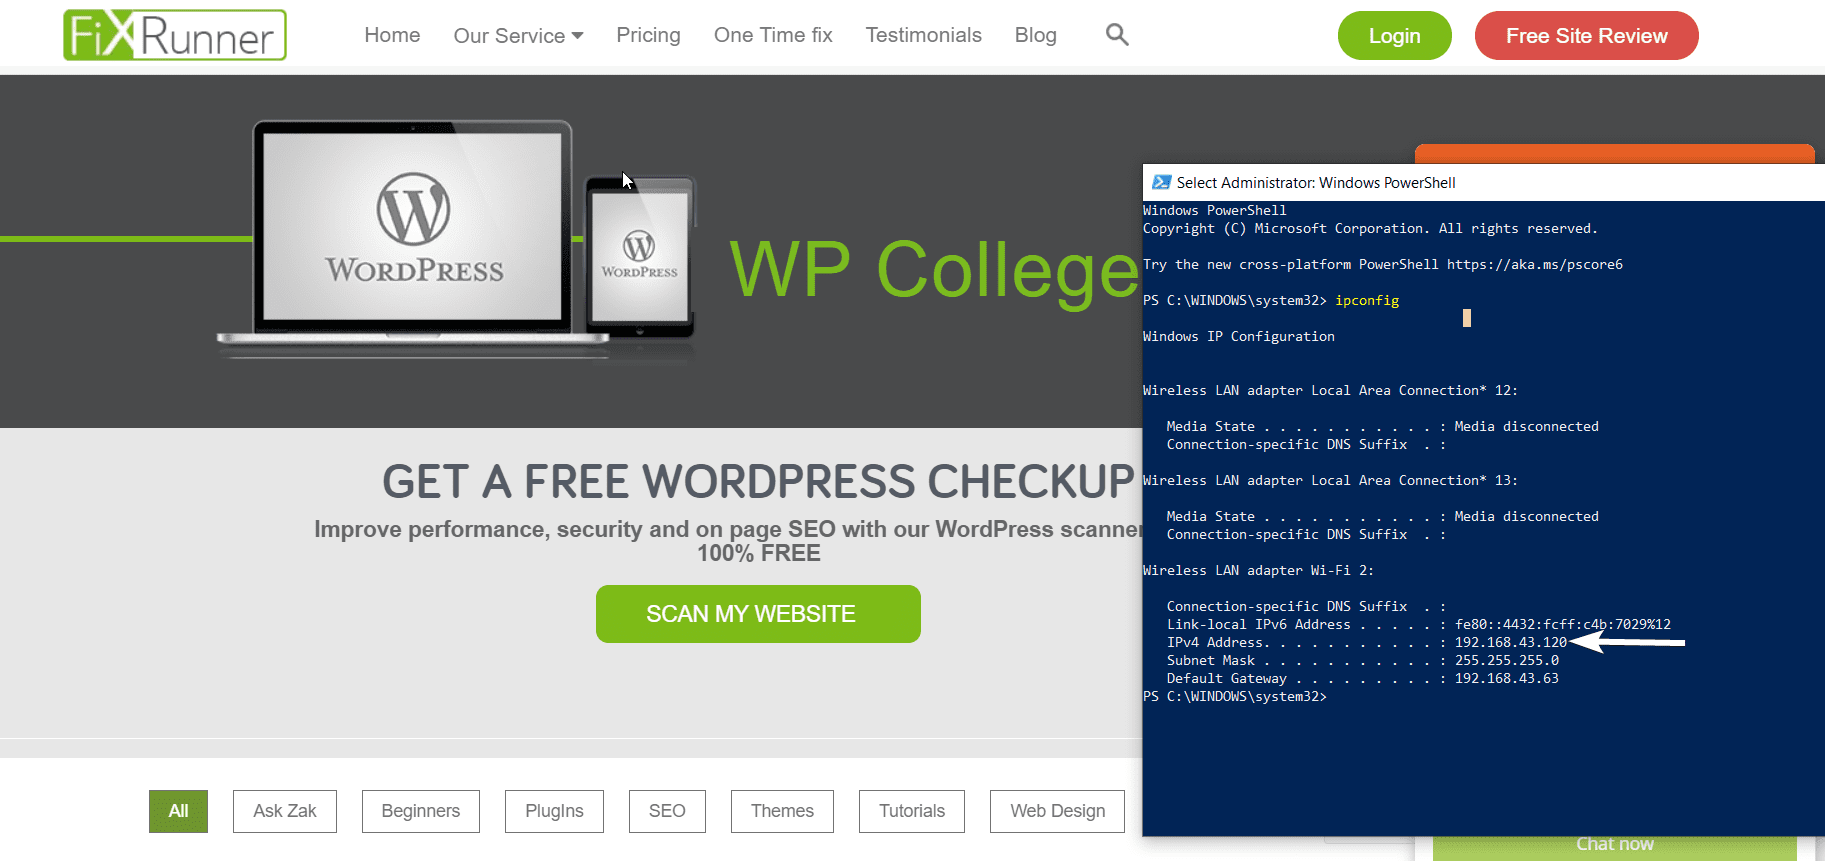
Subsequently, any user who needs to access your WordPress intranet will need to type this IP address into their browser’s address bar.
However, instead of 192.168.1.xxx (your IP address), you can change it to a more user-friendly link like intranet.local . The next step explains how to do that in detail.
Step 4: Edit Host File To Create Prettier Links
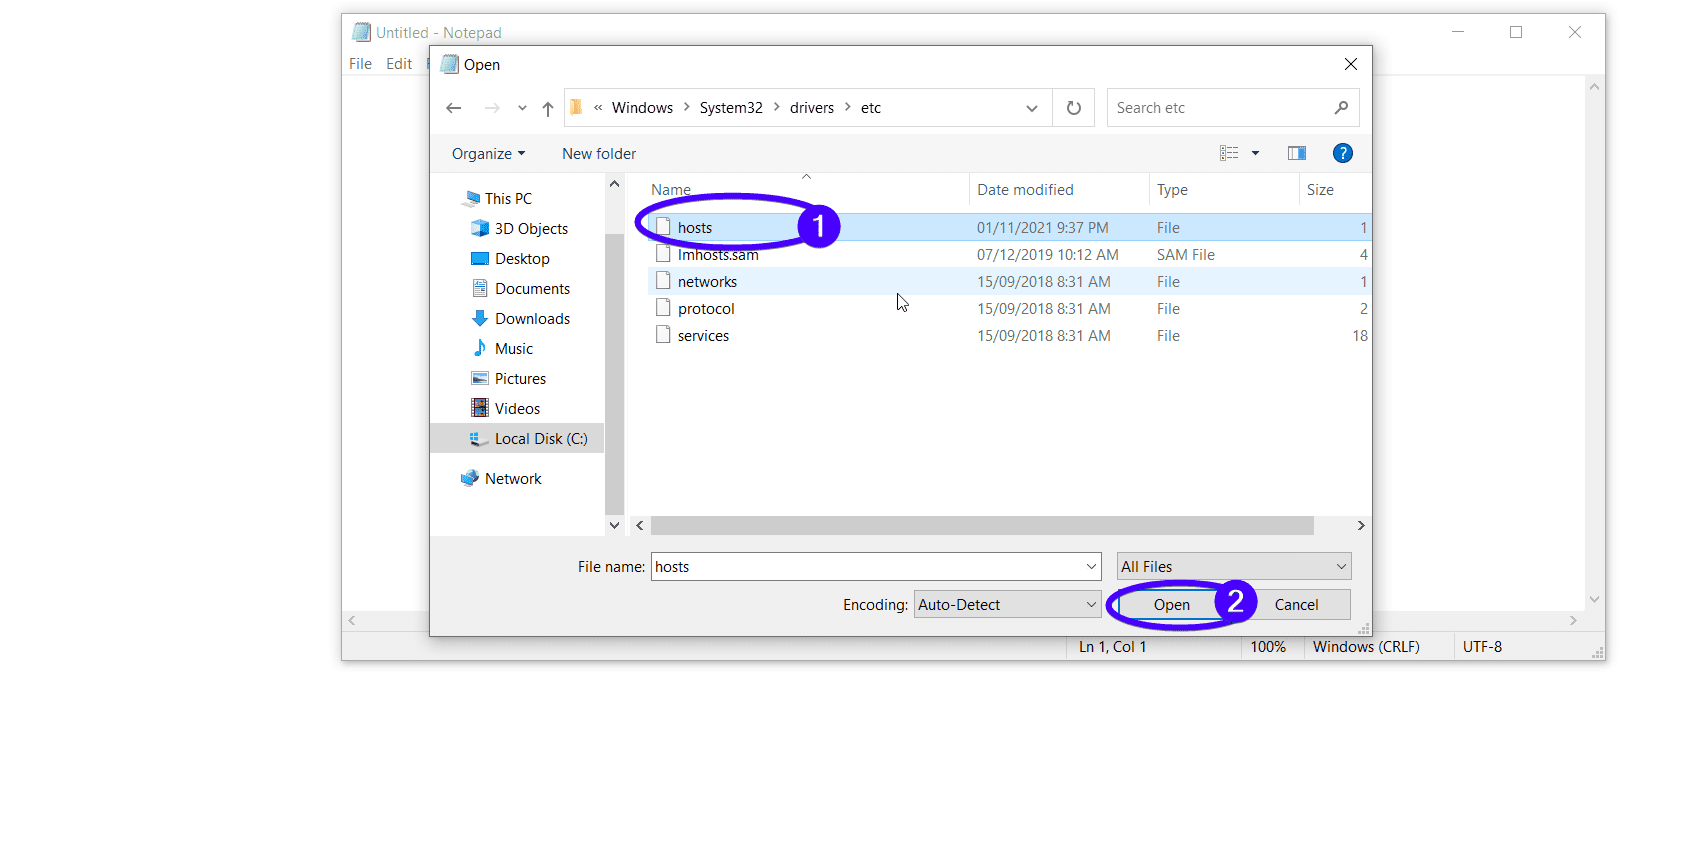
If you use Windows, follow these directions to edit your hosts file:
- Firstly, click on the Windows button and search for Notepad.
- Secondly, right-click and select “Run as Administrator”.
- Further, give the app permission to make changes on your device by selecting ‘Yes’.
- When Notepad opens, click File at the top left corner of the window. Then select Open.
- Go to this directory- C:\Windows\System32\drivers\etc\hosts. Click Open.
 If you are a Mac user, your host file is located here: /private/etc/hosts
Finally, add this snippet to the hosts file.
192.168.1.xxx intranet.local
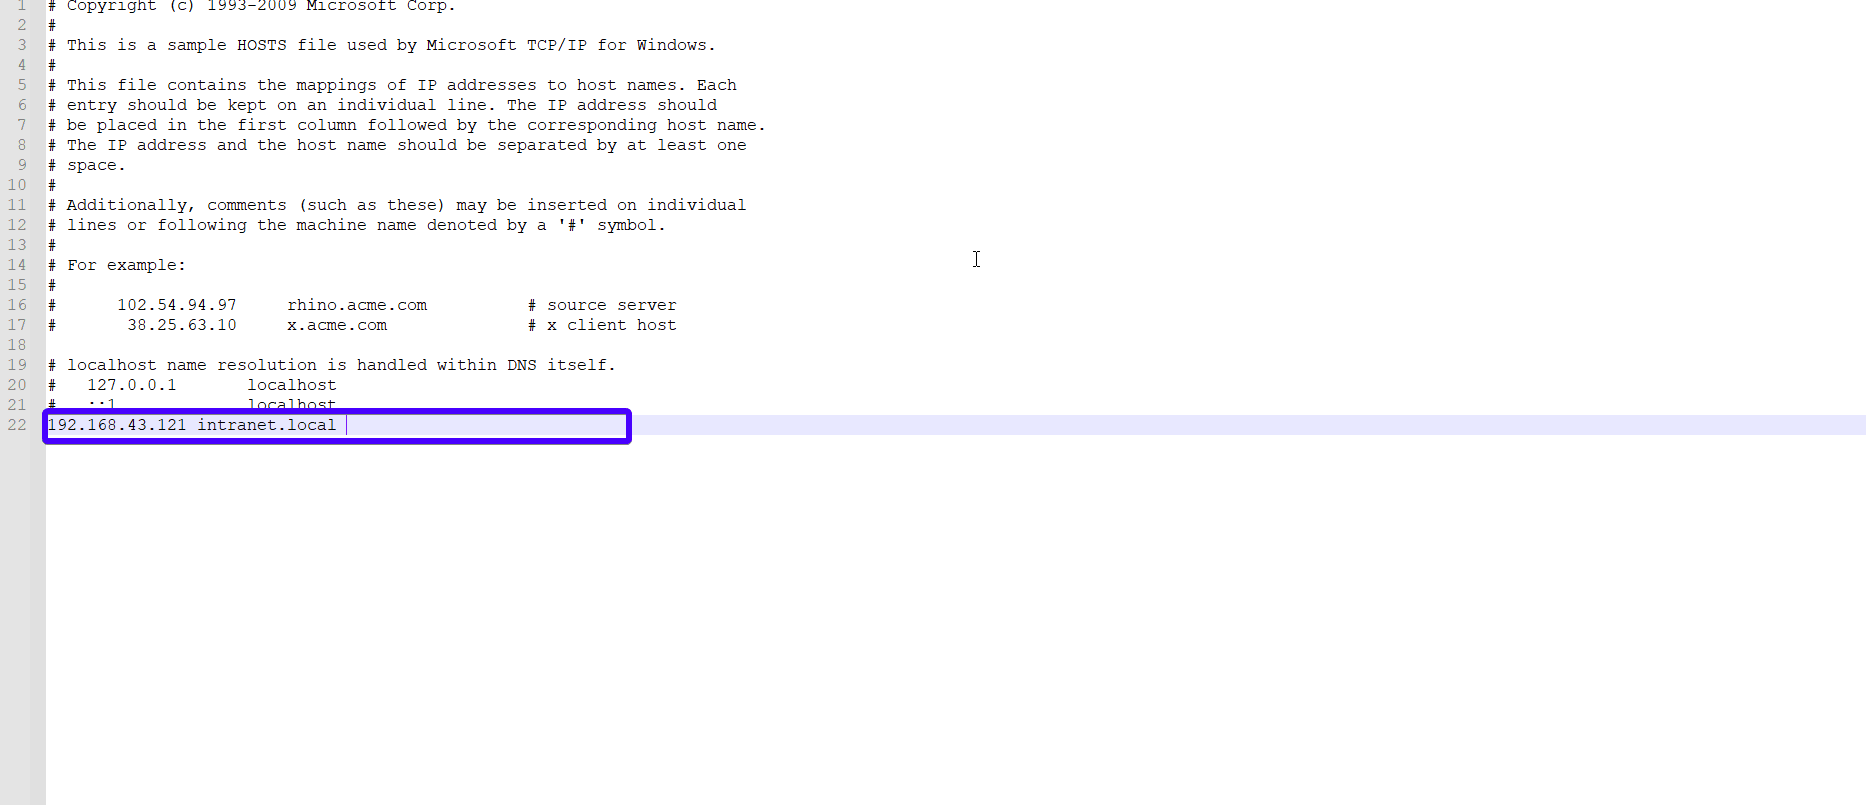
Remember to replace 192.168.1.xxx with your own IP address and save your changes.
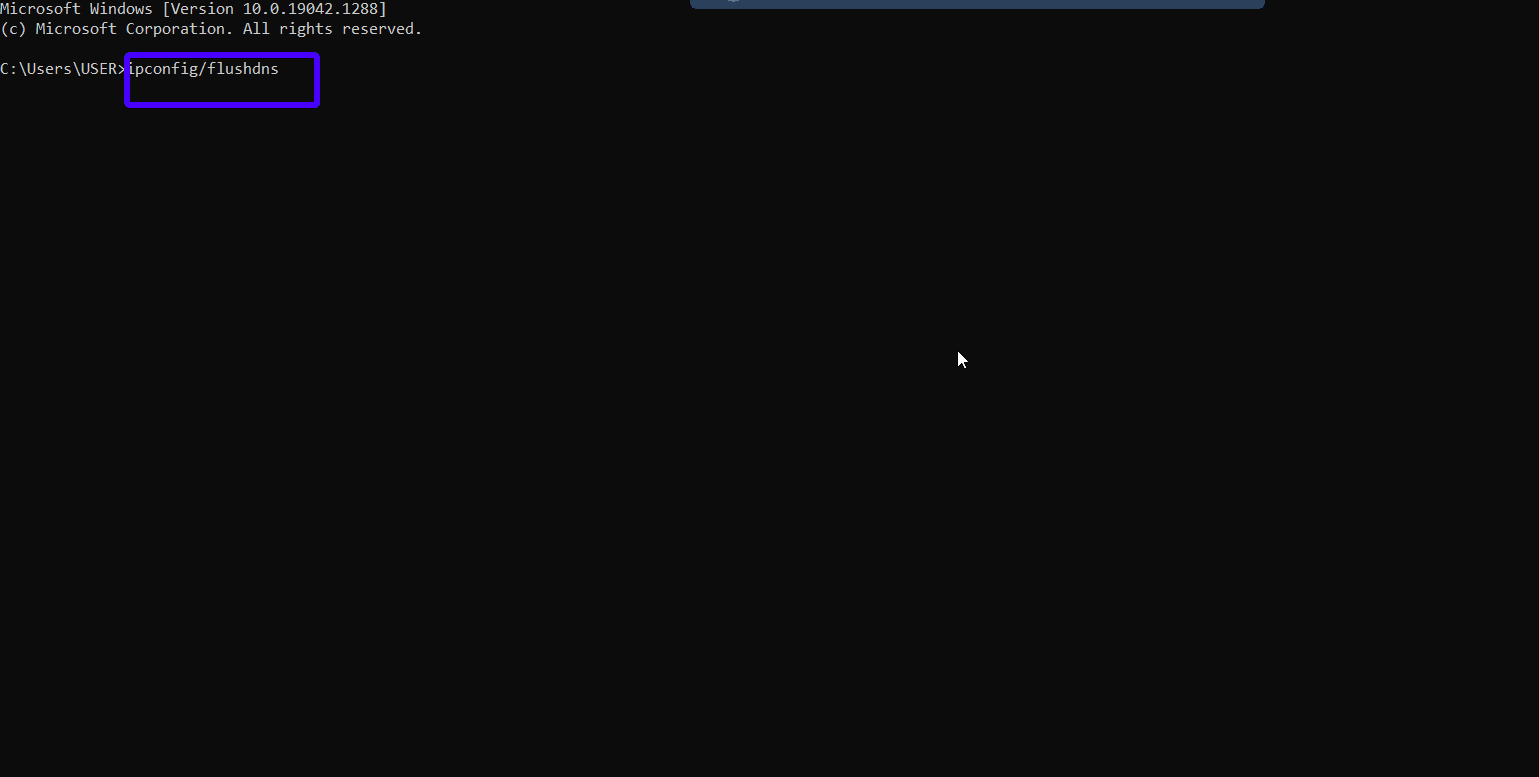
Finally, flush your DNS cache. This allows your device to recognize the changes you have made. To do this, click on the Windows button. Then, search for ‘command prompt’.
Type in the following and press Enter
ipconfig/flushdns
Now, users who are connected to your network can access your WordPress intranet site by typing intranet.local in their browsers.
Step 5: Customize your New WordPress Intranet Site
You can finish things up by installing an intranet theme, as well as plugins that will help you get the functionalities you need. We’ll talk more on intranet themes and plugins to try.
Method 2: Setting Up WordPress Intranet Using A Plugin
This second method is ideal if you want users to log in from anywhere they are in the world.
Using this approach, you’ll need to install WordPress on an online server like you normally would.
Step 1: Create a Regular WP Site
To get started with this method, you need to create a regular WordPress site. You’ll have to purchase hosting, get a domain name and install WordPress. Learn how to install WordPress using the 1-click install.
Step 2: Install the All-In-One Intranet Plugin
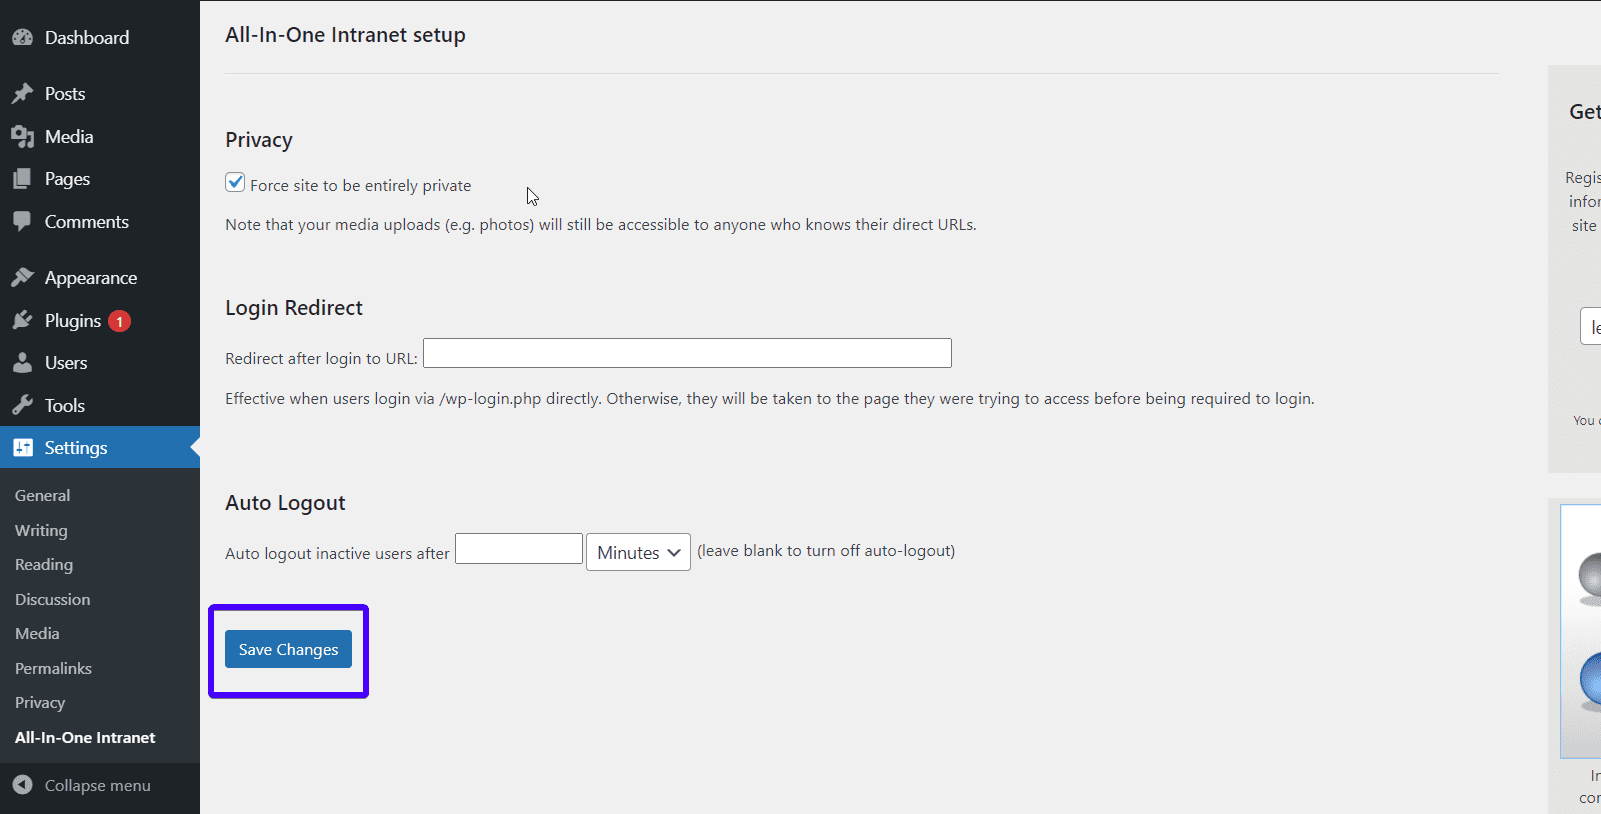
After installing WordPress, install and activate the All-In-One Intranet plugin. This will keep your WP site private and only available to employees.
To configure the plugin, go to Settings >> All-In-One Intranet.
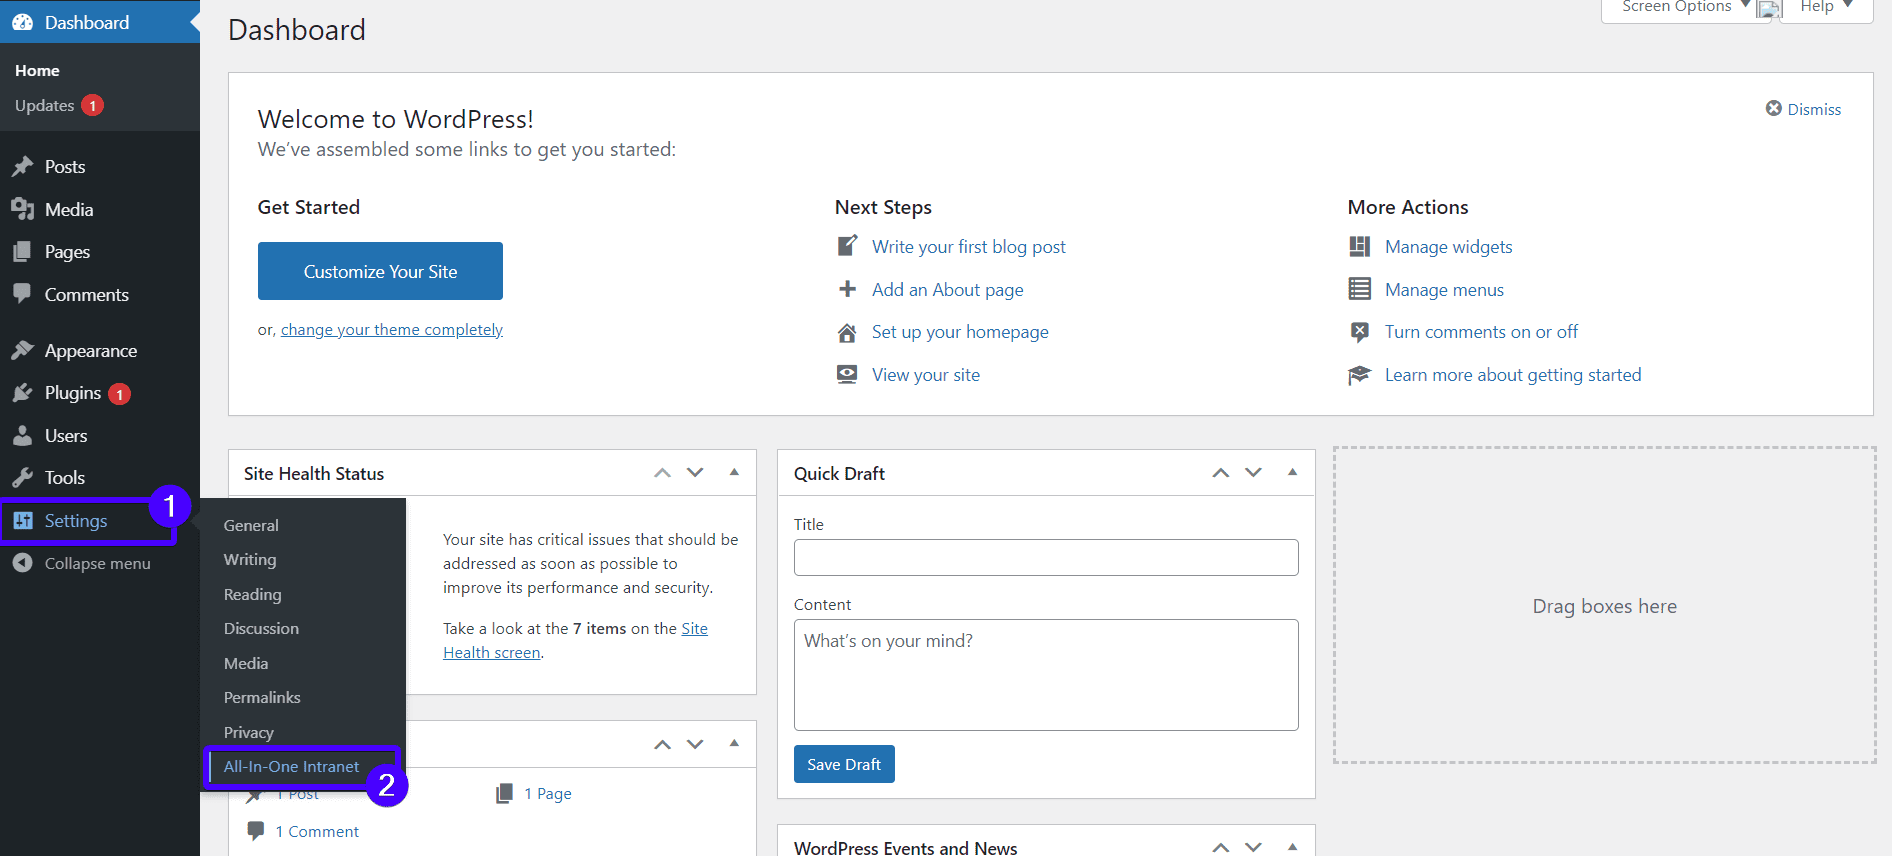
On the configuration page, you can set how long an inactive user remains logged in. You can also set where they will be directed after signing in.
Finally, click Save changes.
Now you have a basic WordPress intranet. You can add more features as you want.
WordPress Plugins For Your Intranet Site
Plugins can extend the functionality of your WP intranet. Therefore, we’ll show you some plugins you can install to enhance your website.
BuddyPress: Turns your Website into a Social Network
BuddyPress is a simple yet powerful social network software built by WordPress developers. Here are some of the things you can achieve with it.
- You’ll be able to invite people to register on the network.
- Users can follow themselves and send direct messages on the network.
- You can create groups for each department in the company.
- Each user can have a profile.
To get started with this plugin, install and activate it on your WP site. Then, go to Settings >> BuddyPress to configure it.
Note that BuddyPress isn’t the only social network plugin available, there are others. They include WP Symposium Pro, UltimateMember, UserPro, BBPress, etc. However, BuddyPress remains the most popular one.
WPForms: Take Surveys on Your WordPress Intranet
Even though BuddyPress already does an amazing job with social networking, you may need to do a survey and collect information privately. Plugins like WPForms can help with this.
WPForms is a drag and drop form builder that allows you to build contact forms, online surveys, order forms, etc, in minutes.
Not only does it collect data from users, but it also saves all the responses in its database. You may export the responses in a CSV file, print them, and share them with each member of staff.
Wordfence: Improve WordPress security
If you use a public server to host your website, you shouldn’t take security lightly. Malicious DDoS attacks are launched daily. While WordPress security involves several activities, you can begin by installing a security plugin.
Wordfence is one popular WordPress plugin to use.
It helps to prevent unauthorized users from accessing your website. It also removes malware and prevents future attacks.
Other Plugins to Enhance Your Intranet
As you know, plugins can add extra features to your WP site. When you need a new feature on your website, look out for a plugin that you can use. For instance, if you need to:
-
- Create beautiful photo galleries, Envira gallery can help.
- Embed Google Drive documents in your WordPress intranet, use the Google Drive Embedder.
- Add some branding and change the way your login page looks, use the Admin Custom Login plugin.
WordPress Intranet Themes
Although you can create your WP intranet with any theme, there are specific themes that were built specially for Intranets. These themes are loaded with features that can improve your intranet’s performance.
Here are 3 WordPress intranet themes to try out:
1. Cera
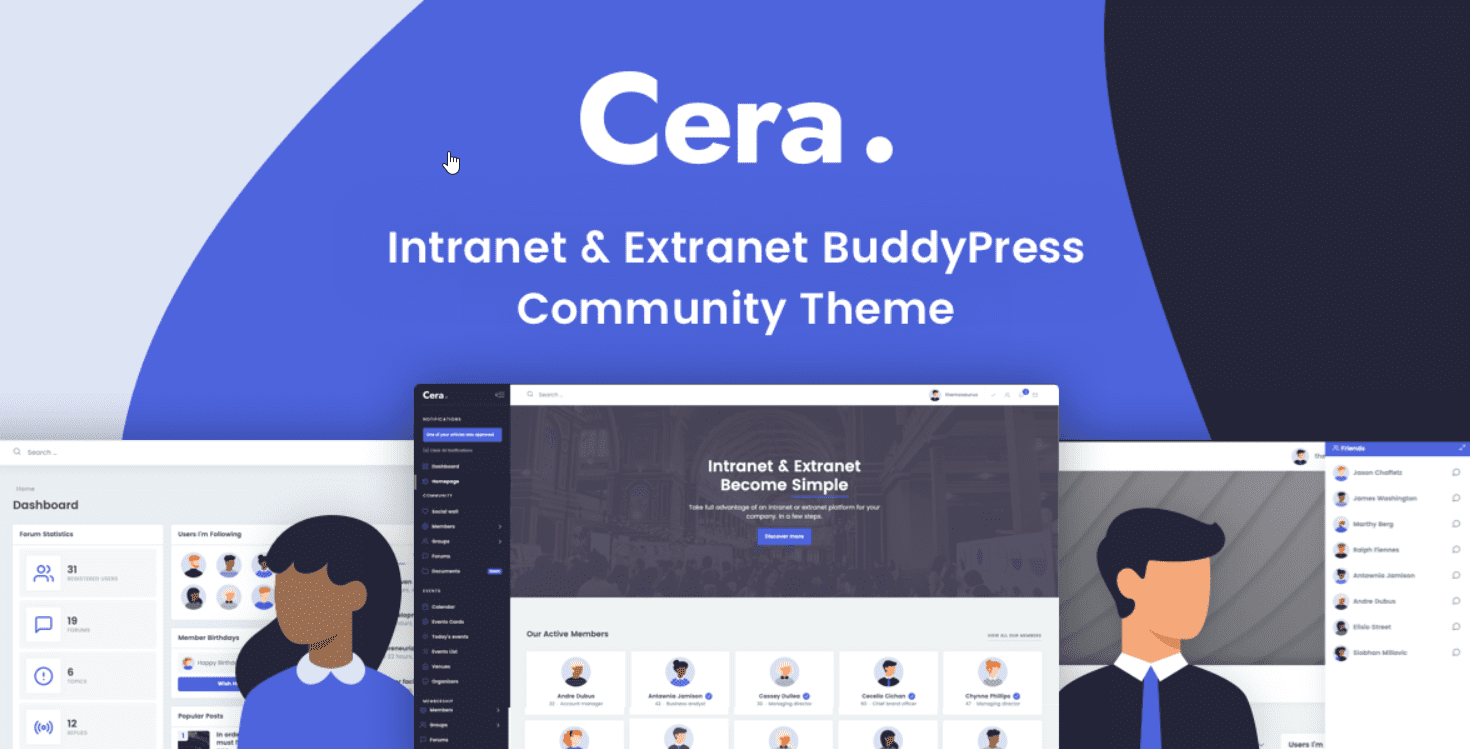
Cera is a popular intranet theme that comes with a bucketload of features built into it.
To help you create your intranet portal easily, Cera has templates for the various pages your site may need. You can find templates for the user dashboards, member and group directories, private messaging systems, and a lot more.
Cera works seamlessly with the BuddyPress plugin and allows you to install BuddyPress add-ons on your site with a few clicks.
2. Woffice
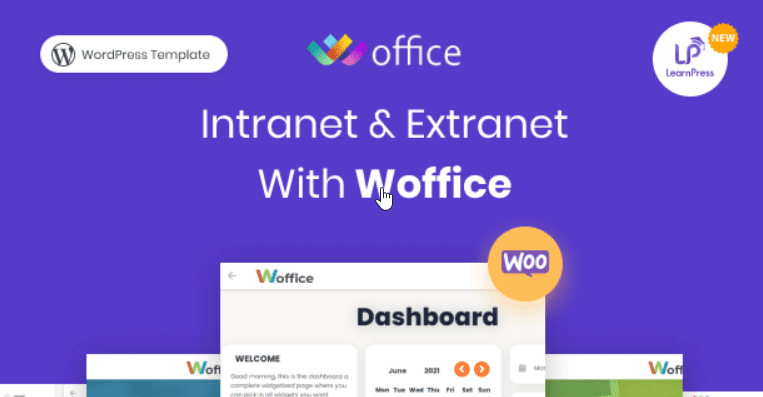
Woffice is another popular intranet theme that comes with some fantastic features. It allows you to publish content on your internal wiki, manage online projects, and add events to the calendar without the use of an extra plugin.
With 5 demos and a quick installation process, you can set up your intranet effortlessly. You’ll also receive periodic updates to keep your intranet up and running.
3. BuddyApp
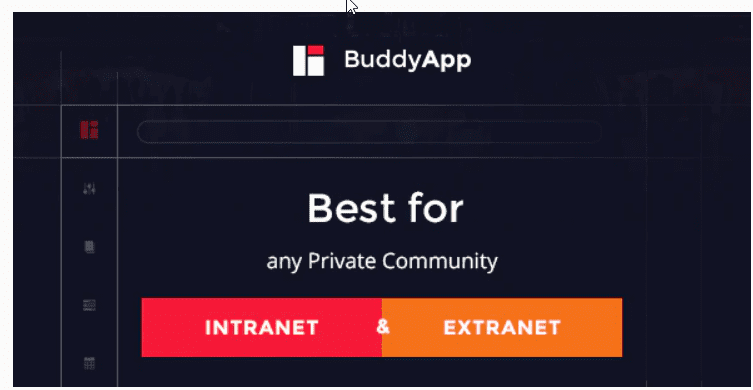
If you are looking for a mobile-friendly theme, BuddyApp is a sure theme to install. It is a mobile-first community WP theme helpful for creating WP intranets and interactive sites.
Your users can access the intranet portal and view their notifications while in motion. Some other features that would make your intranet valuable include a live search feature, discussion forum, and a live chat tool for instant messaging. With the live chat feature, users can locate content easily.
Conclusion
To sum up, we cannot overemphasize the value of having a solid communication strategy in the workplace. It is central to the success of any business.
In this article, we have discussed the two methods of setting up an intranet with WordPress. They include:
- Using a Localhost solution.
- Setting up a regular WP site and installing the all-in-one plugin.
Finally, if you have any issues using WordPress, please seek help from any of our trained WP experts. We’ll be glad to assist.