
Do you want to add schema markup to your WordPress content? Schema Markup provides additional information about the content of a page on SERPs (Search Engine Results Pages).
Imagine this scenario, you search for a review or recipe article online. In the vastness of Google search results, one seems to draw your attention. It has more elements such as a picture, a rating, or some organized text in a way you haven’t seen on the others.
What are the odds you will be attracted to and therefore click on that one versus the normal, generic link? I guess the odds are huge, or precisely 35% higher according to this study from CXL Institute. And that is the power of Schema Markup.
We want you to use all of the possibilities your WordPress website has to offer. So, let us show you how to add schema to WordPress!
Content:
- What is Schema Markup?
- Types of Schema Markup
- How to Add Schema Markup to Your Website
- Testing Your Schema Markup
- Schema Markup Guideline
- Conclusion
What is Schema Markup?
Schema (also referred to as Google Structured Data) is a type of microdata added to your page to help search engines display extra information about your page on SERPs. The schema code is interpreted in the form of rich snippets.
Adding schema markup to your page does not automatically improve your search rankings. But it makes it stand out visually from the crowd through rich results.
Which can improve your website’s clickthrough rate on SERPs. And high CTR is an important ranking factor as stated by Google.
It also adds context to your link. Search engine bots will know that the link they are showing is referring to a person, an event, a video, or even a grandma’s pie recipe.
Does It Work On Mobile Too?
Of course, it does! Structure data markup works everywhere across various screen sizes.
Why Schema Markup is Important
Aside from adding rich results to your page on Google SERP, it helps search engines to better understand your content.
Here is a practical example. If you are creating a post and the title contains the term “Avatar”. Search engines can only tell that it is a text element or a heading element (if you use the HTML tag for headings – H1 tag).
Using this information, search engines may not be able to easily classify the content. This is because “Avatar” can be used to describe a popular movie or user profile picture on a website.
With schema markup, you can exclusively specify the context for the article. This helps search engines understand your content better.
There are schema types for any content you are creating. From movies, reviews, recipes, you can use the one that best describes your content. And like we mentioned earlier, sites that display rich snippets tend to perform higher on SERPs.
Adding schema markup to your WordPress site can enhance your search engine rankings and make your content more attractive to users. To ensure your schema remains effective and aligned with search engine updates, our WordPress maintenance and support services offer continuous updates and troubleshooting to keep your site optimized.
Types Of Schema Markup
Schema has different types and properties. Depending on the content you want your viewers to be focused on, you should choose accordingly. There are many schema “presets” available, both in schema markup plugins and by using specific codes. Some of the more common ones are listed below:
- Product – You can add things like a price, a review, and even availability.

- Movie – You can see how the rating system can complement the information given to us by IMDB.

- Video – You can even show a video thumbnail with your link. That is a sure way to attract some views to your videos.

- Event – Showing dates, information about sales, and locations.

- Recipe – This grandma either has 162 grandchildren, with a liking of her cooking, or she shared her recipe with other people. Either way, she showed us how we can use rich snippets to know something about her cooking, without even looking inside.

- Rich Cards – With Schema markups, you can create a profile for your company. It will show up as rich snippets when someone searches for your company. Below is an example of how the featured snippet markup looks when you search for ‘Facebook’.

There are more elements you can put in any of these types, but not all of the sites use the full power of it. Certainly, that could also be a Google algorithm’s choice.
How To Add Schema Markup To Your WordPress Site
There are many ways to add schema to WordPress. You can manually generate the schema code for your content or use a dedicated WordPress schema plugin. Additionally, some SEO plugins now include structured data into their plugins. If your SEO plugin supports it, you can simply use it to create schema for your content.
However, there are more features and customizations that come with using a schema plugin or manually generating the schema code. We will explain all 3 methods here so you can choose the one that best suits your business needs.
Using Yoast SEO
Most SEO plugins now include structured data and schema markup in their services. Plugins such as Yoast SEO and RankMath include this feature on their free plugin.
If you are already using Yoast SEO on your website, you can set up schema types and properties for your posts and pages.
To set this up, log in to your WordPress dashboard and then go to Yoast SEO >> Search Appearance. Under “General”, scroll down to the “Knowledge Graph & Schema.org” section.

Yoast SEO will require you to choose whether your website represents an Organization or a Person. If you choose an Organization, you need to enter your business name. Otherwise, if you choose the “Person” option, you need to select a user from your site under “Personal info”.
Finally, upload your logo or user profile picture and click on Save Changes.
Yoast Premium also includes support for Local SEO. This will optimize your Google My Business profile and display rich results such as opening and closing times.
To select a default schema type for your posts, select the Content Types tab and scroll to the “Schema settings” section.

Here, you can choose the default page type and default article type for your posts.

You can scroll down and repeat the same process for your pages and other content types your website supports.

Ensure you click on Save Changes after setting your default schema types.

When you scroll to the “Yoast SEO” on your post editor, you will find the schema information for the post by selecting the Schema tab.

You can modify the schema from here as well. If you publish the post, Yoast SEO will generate a schema for the content based on the type you selected.
Using Schema Plugins
There are a lot of WP plugins to choose from, but we will present some of the popular ones.
You can go through our guide to learn how to install WordPress plugins. With that in mind, here are some useful plugins for adding google structure data in WordPress.
Schema – All In One Schema Rich Snippets

This is a free rich snippet plugin made by Brainstorm Force (the team behind the popular Astra theme). The fact that it is free, and that it works just as well as paid ones should be its biggest “selling” point.
The plugin has 70,000+ active installations on the WordPress plugin directory. It is easy to use and comes with a number of premade item types:
- Review
- Event
- People
- Product
- Recipe
- Software Application
- Video
- Articles
After installing the plugin, it will add a section where you can configure rich snippets from the post editor.
To generate schema for your content, open the post/page you wish to create the snippet for. After that, go to the “Configure Rich Snippet” section (somewhere at the bottom of the page you are editing).
![]()
Next, choose the schema markup type and fill in the necessary information. Here we used the Item Review schema to add extra information about a logo maker tool. When you Publish/Update the page, it will add a schema field toward the end of the post on your website.

That’s it. As a result, your rich snippet is added to the page, and if the Google algorithm approves it, you just got a pretty professional-looking site/link.

There are other schema types you can choose from. For instance, if you are creating the schema for a blog post, you can choose the Article schema from the dropdown menu.
The major con about this plugin is that you have to manually enter the details on individual posts on your website. So if you already have many posts on your website before installing the plugin, it can be tedious to enter the details manually.
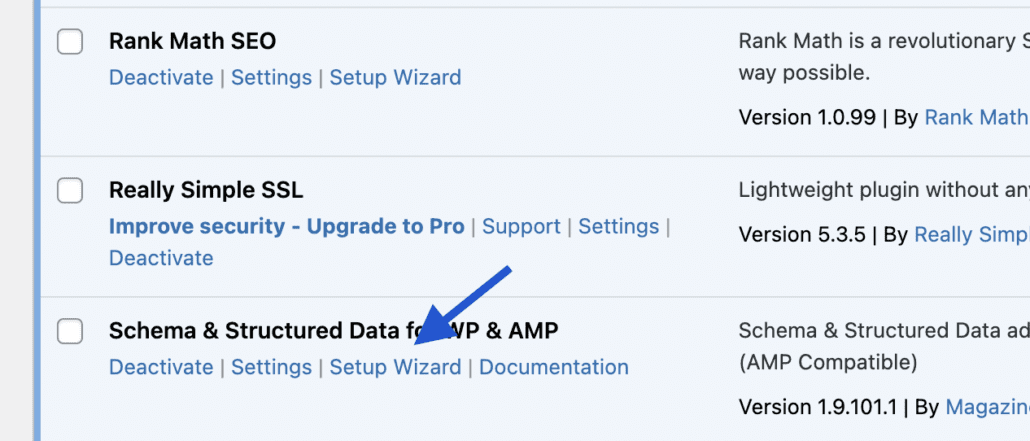
Schema & Structured Data for WP & AMP

Schema & Structured Data for WP & AMP comes with some extra options and possibilities when compared to the plugin we described above.
The plugin supports over 35 schema types such as Blog posts, News Articles, Local Business (Google My Business), Video Objects, etc.
It has a free and premium version (99-499$), but the free one already offers a lot. The plugin has over 100k active installations as well as a great score.
Running the Setup Wizard
After installing and activating the plugin, you will be taken to the plugins page. Here you can click on Setup Wizard to open up the configuration page.
On the Setup Wizard, click on Start to get started.

After that, select your Data Type from the dropdown menu under “General Settings”. Click Next to continue.

On the “Social Profile” option, you can enter all the social media account your website has. Click the Next button to continue.

Now you need to choose a default schema type for your WordPress post and page content. The option you choose here will automatically apply to all your web pages (ie, posts and pages).

Finally, click on Let’s Go to complete the setup.

You will be taken to the plugin’s settings page. Here you need to give schema.org more information about your website. Choose your website’s contact and about page from the dropdown menu.

Also, choose your site’s navigation menu and click on the Save Settings button to save your changes.
Making a Preset
Aside from the default presets you chose for your posts and pages, the plugin also lets you create new presets for your content. This can be useful if you have custom post types on your website. Here is how to create a preset.
Go to Structured Data somewhere on the bottom left of your screen. After that, click on Add Schema Type.

A quick wizard will pop up where you will choose a type. Then, click Next to continue.

Finally, choose a placement for it.

Using the Schema Presets in WordPress Posts
To add/modify schemas on your WordPress posts and pages, go to the post you wish to update, then hover over the post and click Edit.

On the post editor, you need to scroll down and find the “Schema & Structured Data on this post” section. The plugin will automatically fetch the schema you chose for posts when configuring the setup wizard.

You can update this schema by clicking on Modify Article Schema Output. The button text might be different depending on the preset you chose during the setup. Here, you can modify the schema the plugin generates for your content and fill in the details you wish to use.

You can click on Restore to Auto Fetch to revert to the markup the plugin generated.
If you have more than one preset, you will see a similar list of choices for the post type. The plugin also lets you enter your custom schema markups.

To use this option, click on Custom Schema. It will show a textbox where you can enter your custom schema in JSON-LD format.
Schema Pro
Schema Pro is a premium schema rich snippet plugin for adding structured data to WordPress. You can get it for either $67 a year or pay $237 for lifetime access. It is developed by the same team as the Schema – All In One Schema Rich Snippets. So you can be sure you are getting your money’s worth.

The plugin provides 13 different schema types, which are more than enough for standard users. It also comes with more options than the All In One Schema plugin. It is user-friendly, and all the customization is one click away.

The plugin has color and some other customizations that let you blend schema with your site’s theme/design.
The Manual Way Using Schema Markup Generators
There are different ways to go about this. You could manually generate the structured data code or use an online schema markup generator. We will use an online generator here for simplicity. But we will also explain the code it generates so you can have a better understanding of the code.
To start, go to the RankRanger markup generator. Here, you need to choose the type of schema you want to create.

After that, a form will pop up that you need to fill in with details about your website. You will see the schema markup the tool will generate for you on the right. You can copy this by clicking on Copy.

Next, you will need to add the code generated into your website. If you created the schema for your primary domain, then you need to add the code to your theme’s <head> tag.
If the code is for a specific post, you can directly add it to your post from the post editor.
Adding Schema Code to <head> Tag in WordPress
the easiest way is to use the WPCode plugin (formerly insert headers and footers). After installing and activating the plugin, you can access the plugins page by going to Code Snippets >> Header & Footer.

Next, paste the schema markup code in the header code block. After that, click on Save Changes to update your site.

Gutenberg Block Editor
You can directly paste the schema code into your WordPress post using the block editor. This is ideally useful if you created a post-specific schema. To add the schema, open the post you wish to edit.

In the post editor, add a new HTML block and paste the HTML code you copied from the markup generator into this block.

Finally, save the post by hitting the Update/Publish button.
Adding Schema to WordPress Using Classic Editor
If you are using the classic editor, you can switch to the Text tab in the post editor and paste the schema code at the end of your content.

Once done, click on Publish/Update to save your changes.
Regardless of the method you use to add the schema code, schema.org will still recognize the presence of structured data on your web page.
Understanding A Simple Code
There is an in-depth tutorial on how to get started using microdata on schema.org, so we will cover just the basics. The recommended format is JSON-LD, but we will use microdata in this guide since it is easier for beginners to understand. You should start your code with something fairly similar to:
<div itemscope itemtype="http://schema.org/Movie">
The word “itemtype” defines a type of schema from schema.org. Here we used a “Movie” schema type. Next, you need to tell us what movie you are talking about. This is where we are adding an item property called “name”.
Matrix
Now you can add more details about a movie like the director and some information about him. We will use a new itemtype here called “Person”.
<div itemprop="director" itemscope itemtype="http://schema.org/Person">
   Director: <span itemprop="name">Lana Wachowski</span>
   (born <span itemprop="birthDate">June 21, 1965</span>)
</div>
You can then add a genre, some other information, a movie rating, and a bunch of other data. It’s all up to you. Go wild!
A JSON-LD code would look something like this:
<script type="application/ld+json">
   {
     "@context":"http://schema.org",
     "@type":"Movie",
     "name":"Matrix",
     "director":{
        "@type":"Person",
        "name":"Lana Wachowski"
     },
     ...
   }
</script>
Testing Schema Markups
After creating structured data for your web pages, you can use a schema markup validator to test the markup. Google’s structured data markup helper provides 2 options for testing your markup.

If you use the Schema Markup Validator, it will only validate whether schema.org structured data is available on the page. It does not show warnings specific to Google. Rich Results Test tool on the other hand is Google’s official tool for testing structured data. With it, you can also see how your page will display on Google SERPs.
We will use the Rich Results Test tool for this example. To start, click on Go to the Rich Results Test.
Next, enter the link you wish to test and then click on the TEST URL button. Google will run some checks on the link you entered.

If there are schemas present on the page, you should get a notification with the number of items found on the page. It will also notify you of warnings (if any) and tell you if your site is eligible for rich results.

Sidenote: Validating your schemas does not automatically add rich results to your web pages. It is up to Google to decide whether or not to add them to your search results. However, adding them positions your website to be considered for rich results.
Schema Markup Guidelines
Things you should be careful with:
- Check if your schema is based on potentially misleading content.
- Do not make the content you are referring to in schema hidden from search engines.
- Double-check if your Shema data is incorrect in a way that the test tool doesn’t check.
- Your content should be up-to-date. Data including old dates won’t be shown.
- Schema needs to have original information, no copyrighted material, please!
- Don’t make false claims or link false reviews, the ones we showed in examples are just for show (and fun).
- Above all, there must be no promotion of violence, hatred, or dangerous activities. Read more about guidelines here.
When it comes to available formats, you can choose one of the following:
- JSON-LD
- Microdata
- RDFa
Note: If your site doesn’t comply with Google’s guidelines, there is a big chance Google will take action. Though, even if that happens, you can fix it and submit your site for another review.
Conclusion
Adding schema to WordPress is not a hard thing to do. You can use a schema plugin or manually generate schema with code.
Just follow the guidelines and it should all work out. If you already did everything to make your site the best it can be why not go another step forward? Using schema markups is not a need, it’s a luxury. The luxury anyone can afford. So just use it and prosper!
Also, while schema is great for presenting your content in search pages, your site needs to rank well if your schema markup will get any visibility. Read our beginner’s guide to technical SEO for WordPress users to learn how to optimize your website.