How to Make Fewer HTTP Requests in WordPress
 Websites that make more HTTP requests tend to load slower. Optimizing your server to make fewer HTTP requests will improve your website performance and overall loading speed.
In this guide, you will learn how to optimize your website to make fewer HTTP requests. Before that, let’s explain what HTTP requests mean and why you should reduce the number of requests your server processes.
Content:
- What are HTTP Requests?
- Benefits of Reducing HTTP Requests
- How to Analyze Your Site’s HTTP Requests
- Tips to Make Fewer HTTP Requests in WordPress
- Conclusion
What Are HTTP Requests?
HTTP is short for HyperText Transfer Protocol. It is how servers communicate with each other (i.e. browser and web server).
A website contains various elements such as image files, JavaScript, and CSS files. These files work together to ensure the website displays correctly. If one of the elements is not loaded properly, it will affect the design and functionality of the website.
To load a page, the web browser has to download all the files from the web server. For this to happen, the browser needs to make HTTP requests to the server.
The server takes care of retrieving the requested page. So if 40 files need to be loaded, the server will make 40 separate HTTP requests.
The more files you have on your website, the more HTTP requests your server has to make.
Benefits of Reducing HTTP Requests
You need to make fewer requests on your server because it reduces server response time. If the server has to make many HTTP requests, it will slow down your website.
The default settings of most websites require the server to download all the necessary files before displaying them on the user’s web browser.
Some requests are “blocking” in nature. This means other requests will not execute until the blocking request has been completed.
A slow website affects user experience, which can lead to a high bounce rate on your website. Further, when your bounce rate is high, it will affect your site’s ranking on search engines. For this reason, you need to optimize your website speed by making fewer HTTP requests.
Before we proceed, you need to understand a general rule of thumb. If you have more files on your server that need to be loaded, it will result in more HTTP requests. Also, if you have large files on your server, it will lead to a longer response time.
To make fewer HTTP requests on WordPress sites, you need to reduce the number of files the server processes. But that alone may not fully optimize your website speed. You also need to reduce the file size on your server so it can process the requests on time.
How to Analyze Your Site’s HTTP Requests
Now you know what HTTP requests are and the benefits of reducing the number of requests your server processes.
Before going any further, you’ll need to test your website to know the number of requests it currently generates. Knowing this beforehand will let you know if the tips you’ll apply from this guide have a good impact on the number of requests your site makes.
There are many online tools for testing HTTP requests. GTmetrix and Pingdom speed test tools can analyze your website load times. Some of these testing tools can also highlight the files that load slower and suggest possible fixes.
For this example, we will use the GTmetrix tool to analyze a test website. To start, head over to the GTmetrix website and enter your website address. After that, click on Analyze.

The tool will analyze your website performance, including the time to first byte and the overall loading speed.

Scroll down to the ‘Top Issues’ section. You will see issues affecting your website performance and loading speed. From here, you can also see possible solutions to the issues.

Scrolling down further to the ‘Page Details’ section, you will see the overall page load speed and the total number of requests. The website in this example makes about 57 requests when loading the page. We can reduce the number of requests to improve the website’s performance.

You can access a detailed report on individual requests from the Waterfall tab.

Here you will see the time each request takes to process in detail.

In the next section, we will share tips on how to make fewer requests. After implementing the tips, we will re-analyze this sample site to see the improvement we have achieved. Let’s get started.
Tips to Make Fewer HTTP Requests in WordPress
Now you know what HTTP requests are and how to analyze the number of requests your server makes. Next, we’ll show you 10 ways to optimize your website and reduce server response time.
- Install a WordPress Caching Plugin
- Minify CSS and JavaScript Files
- Combine CSS and JavaScript Resources
- Optimize Your Images (Remove Unnecessary Images)
- Enable Lazy Loading
- Use a CDN
- Replace Heavy Plugins With Lighter Ones
- Delete Unused Plugins and Themes
- Reduce Third-party Scripts
- Defer Render-Blocking JavaScript
Install a WordPress Caching Plugin
Before we begin the optimizations, you’ll need to install a caching plugin on your website. Using a caching plugin, you can implement most of the tips we share in this guide.
There are many free and premium plugins available. Premium plugins like WP Rocket optimize some parts of your website by default. However, it is a premium option and is not available to online beginners.
We will use a free plugin that cuts close in terms of functionality and features. To follow the steps in this guide, you need to install the LiteSpeed Cache plugin on your website.
For this, log in to your WordPress admin dashboard and then go to Plugins >> Add New. On the search box, enter ‘litespeed cache’.

Next, you’ll need to click the Install Now button to begin the installation.

After the installation completes, the button changes to “Activate”. Click on this button to activate the plugin.
Minify CSS and JavaScript Files
CSS and JavaScript files are essential to beautify your web page and make it interactive. However, these files are often large and can increase the time it takes for your server to process requests.
Serving a minified version of your site’s resources greatly reduces the size of the files. Some themes and plugins already use minified scripts. But you still need to enable this option to further optimize your site’s resources.
To start, go to LiteSpeed Cache >> Page Optimization. You’ll need to enable the Minify CSS option on the’ CSS Settings’ tab.

Also, click on the JS Settings tab and enable the JS Minify option.

Combine JavaScript and CSS Resources
WordPress themes and plugins have their separate CSS stylesheet and JavaScript files. Each time you load a page, your server has to download all the files individually before displaying the page to the user.
The number of HTTP requests your site needs to make increases as you continue to install plugins on your website. To resolve this issue, you need to combine all the CSS and JavaScript files so your server combines multiple requests.
On the LiteSpeed Cache page optimization settings, navigate to the CSS Settings tab and enable the option that reads “CSS Combine”.

Similarly, navigate to the JS Settings tab and enable the JS Combine option.

Note: You’ll see a warning that reads; “This option may result in a JS error or layout issue on frontend pages with certain themes/plugins. JS error can be found from the developer console of the browser by right-clicking and choosing Inspect.”
It essentially means combining JS files may cause compatibility issues with some of your plugins. So we recommend you visit your website frontend after saving your changes to test if everything works as it should. If not, you can disable this option and proceed to the next optimization tip.
Optimize Images (Remove Unnecessary Images)
Media files such as images and videos make websites visually appealing. However, if you do not optimize your media files, it will affect your user experience.
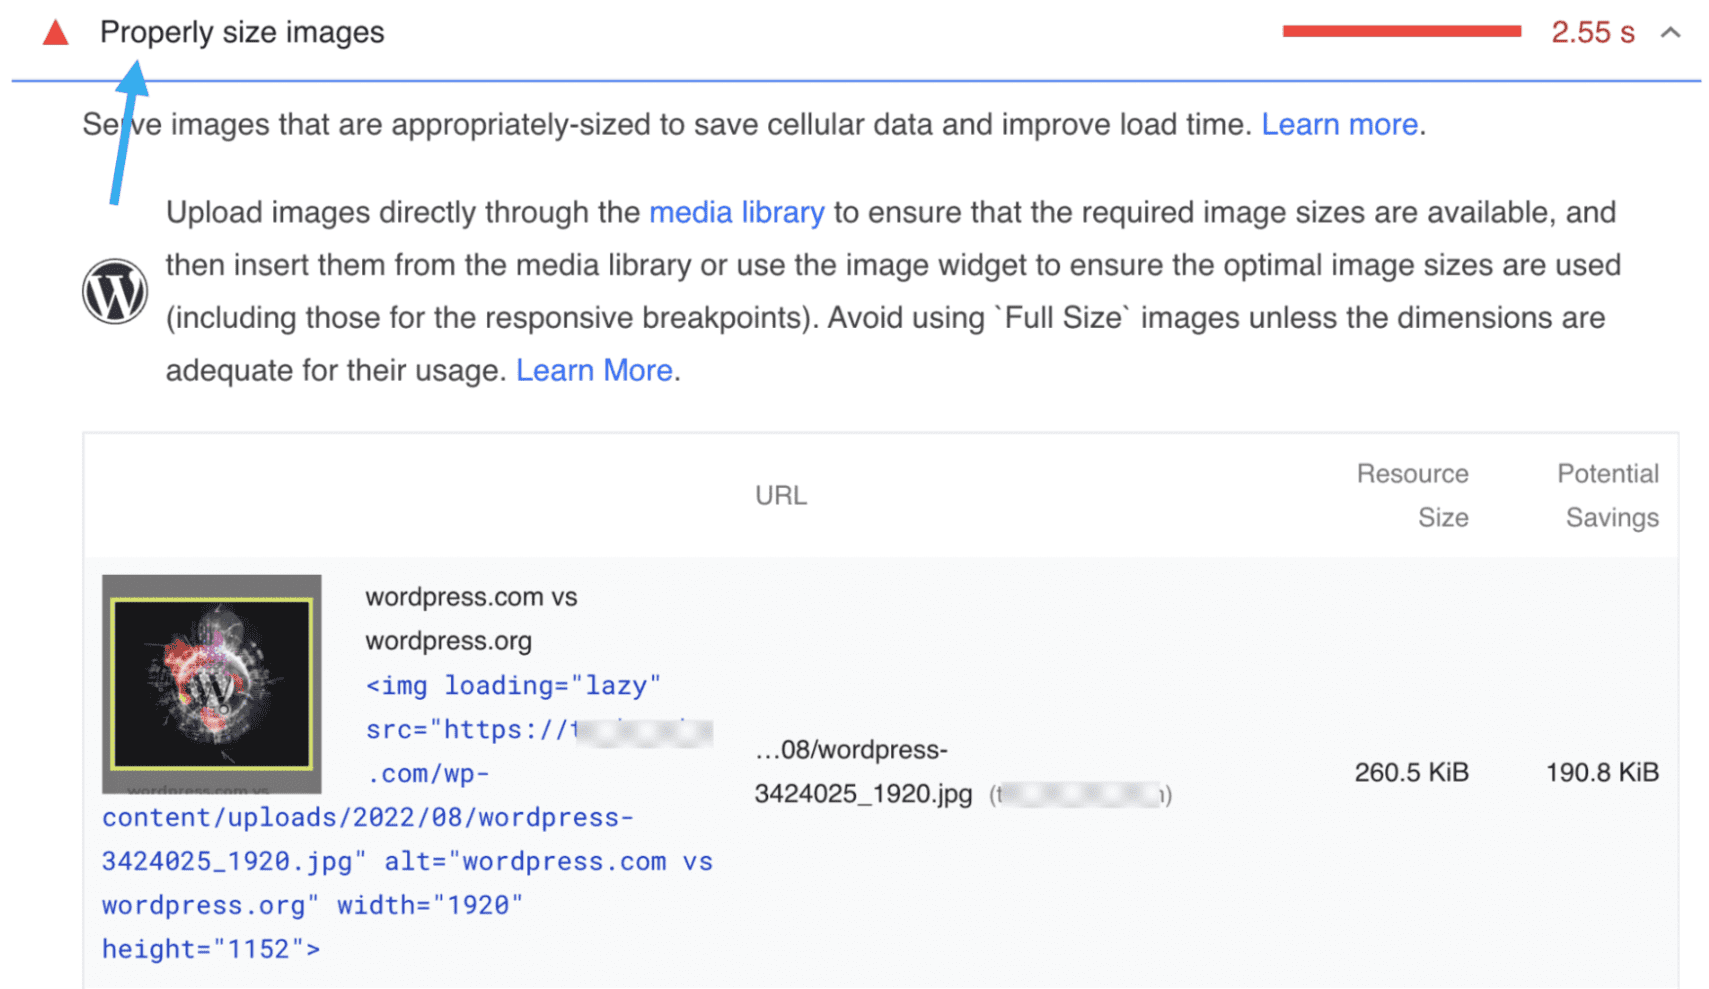
Uploading high-resolution images means they will require more storage space. And when the server needs to make a request, it will result in a long loading time. Here is an example of that from testing the sample website with the PageSpeed Insights tool.

We recommend compressing media files to optimize your images before uploading them to your WordPress site. Tools such as Compressor.io can be useful for compressing image files.
You can also use an image optimization plugin to compress existing images on your website. For this, we recommend using the Smush plugin.

After installing and activating the plugin on your website, you’ll need to access the plugin’s settings page through Smush >> Bulk Smush. You’ll see the number of images that need to be compressed in the “Bulk Smush” section.

To begin optimizing your images, you’ll need to click the Bulk Smush Now button.

It may take a while for the plugin to complete the process. Once completed, the plugin will optimize large images, reducing their file sizes.

The plugin will also show the amount of storage space you’ve saved from optimizing your images.

Deleting Unused Images
If you have media files you are no longer using on your website, you need to delete them from your site. To delete an image from your site, go to Media >> Library.

Next, locate the image you wish to delete, hover over the image and select Delete Permanently.
Enable Lazy Loading to Make Fewer HTTP Requests
Lazy loading is a technique that allows web images to only load when the image is in the user’s viewport. This means your server will load other essential resources and delay loading images until they are needed.
We’ll use the Smush plugin to implement lazy loading. To start, go to Smush >> Lazy Load, then click on the Activate button to enable lazy loading on your website.

We’ll use the default options selected by the plugin.

Scroll down and click on Save Changes to update your changes.

Use a CDN To Reduce HTTP Requests
CDN is short for Content Delivery Network. It is a web performance tool that serves as a middleman between your server and the user’s browser.
They improve your website performance by serving users a cached version of your site based on their location.
Additionally, CDNs can process requests faster thanks to their multiple servers. The user’s browser responds faster when it is close to the server.
There are many CDN providers available such as MaxCDN and Cloudflare. Some of them offer free services for online beginners.
You can check our tutorial to learn how to set up Cloudflare in WordPress. The guide also explains how to get and configure free SSL using Cloudflare.
Replace Heavy Plugins With Lighter Versions
If you use a plugin that requires a lot of resources to function, it will affect your website performance.
We tested the same website for Core Web Vitals using Google’s PageSpeed tool. Here is the suggestion from Google.

Google suggests using an optimized theme and plugins to reduce initial server response time.
The best way to resolve this is to look for an alternative plugin with a lightweight design.
However, if replacing the plugin will affect important features on your website, continue using the plugin and reach out to the plugin’s developers to inform them about the performance issue.
Delete Unused Plugins and Themes
Although inactive, some of the resources from themes and plugins you are not actively using still get loaded when a user visits your website.
Ideally, you shouldn’t leave inactive files on your site. Aside from increasing HTTP requests, they often take up server space and this can affect your website loading time.
To delete a plugin, log in to your WordPress dashboard and then go to Plugins >> Installed Plugins. Next, click on the Inactive tab.

After that, click on Delete below the inactive plugin to remove it from your website.
Follow the same process to delete other unused plugins from your website.
To delete a theme from your website, go to Appearance >> Themes to open the themes page. Next, hover over the inactive theme and select Theme Details.

On the next page, click on Delete, located at the bottom of the page.

Repeat the same process for other inactive themes on your dashboard.
Reduce Third-party Scripts
Third-party scripts are pieces of code you add to your theme’s <head> tag to import features from an external script to your website. These can include scripts from Google Analytics, Google Font, Facebook Pixel, or third-party advert networks.
If the third-party scripts are heavy, it will increase the number of HTTP requests and load time of your website.
Let’s say you added a script to your website to verify domain ownership on a web service. Once the verification is complete, you should remove these scripts if they are not essential for your website performance.
Some third-party scripts, however, are crucial to your website performance. Removing these scripts may affect your website design or functionality.
If the scripts are necessary, there are 2 ways you can handle them. You can defer render blocking resources or load scripts externally using Google Tag Manager.
Google Tag Manager provides a storage space to host third-party resources instead of adding them to your website directly. You only need to add the Google Tag Manager code to your website.
After adding the code, you’ll be able to add other scripts to your Google Tag account and it will work just fine on your website.
We will explain more about deferring JS in the section below.
Defer Render-Blocking Scripts
Render-blocking scripts are resources such as JavaScript and CSS code that prevent web pages from loading fast. These scripts contain large files, and the server must wait for them to load before displaying the web page.
A way around this is to defer the script from loading at the first request. Deferring is similar to lazy loading images.
When you delay render-blocking scripts, your server will only load the resources when the user starts interacting on the page. This will reduce the number of requests your server makes to load a web page.
The LiteSpeed Cache plugin has this feature. To enable it, go to LiteSpeed Cache >> Page Optimization. After that, click on the JS Settings tab and scroll down to the “Load JS Deferred” section.

We recommend choosing the Delayed option. This option will load the render blocking resources as soon as the user begins to scroll. That way it doesn’t affect the initial page load time.
Note: You’ll see a warning that reads; “This option may result in a JS error or layout issue on frontend pages with certain themes/plugins.”
We recommend visiting your website frontend after saving your changes to see if it affects your site’s layout. If this setting is incompatible with your theme, we recommend turning it off, so it doesn’t affect your user’s experience.
After implementing the tips in this guide, analyze your website again using the GTmetrix tool to see the number of requests your server makes. Here is the result from testing the same website with GTmetrix.

We have reduced the page size and the total number of HTTP requests from 57 to 15. That’s approximately a 73% decrease in the number of requests.
Conclusion
Little changes on your website can greatly impact your overall website speed. If users spend less time waiting for your content to load, they will stay longer.
In this guide, we explained how HTTP requests work and why you need to optimize your website to make fewer requests. We then shared 10 ways to reduce the number of requests your server processes.
Making fewer HTTP requests is one way to speed up your site. For more information, check our WordPress speed optimization guide.


