How to set up Cloudflare SSL on WordPress

Free and Flexible Cloudflare SSL on WordPress.
There are different types of SSL certificates. They also come at a different cost and some of them are free. To the untrained eye, they all do the same thing, which is, of course, not true. A free SSL certificate is usually a self-signed certificate and regardless of being there, the browsers will prompt visitors with a security warning (which in turn can actually be worse than not having an SSL certificate at all).
So how about getting an SSL certificate that’s both free and does the job? Totally possible, provided that you understand and accept the following disclaimers:
- The flexible Cloudflare SSL only encrypts the exchange between the visitor and the site (not between your hosting server and Cloudflare)
- Your visitors will see that the site is marked as ‘Secure’ and resolving under the HTTPS protocol, but it will not protect forms that ask for sensitive information (like credit card credentials)
- If you are running a blog or a showcase site this is a great solution. Otherwise, it is highly advised to get a full SSL certificate issued by a certified authority
How to add Cloudflare Flexible SSL to WordPress?
Here’s the list of 5 things you need to do to setup Cloudflare free SSL on your site:
- Request and set up the free Flexible SSL on Cloudflare
- Install required plugins on your WordPress site
- Change the WordPress Site URL
- Enforce HTTPS via Cloudflare
- Resolve mixed-content issues
1. Requesting and setting up the free Flexible SSL on Cloudflare
Sign up for Cloudflare
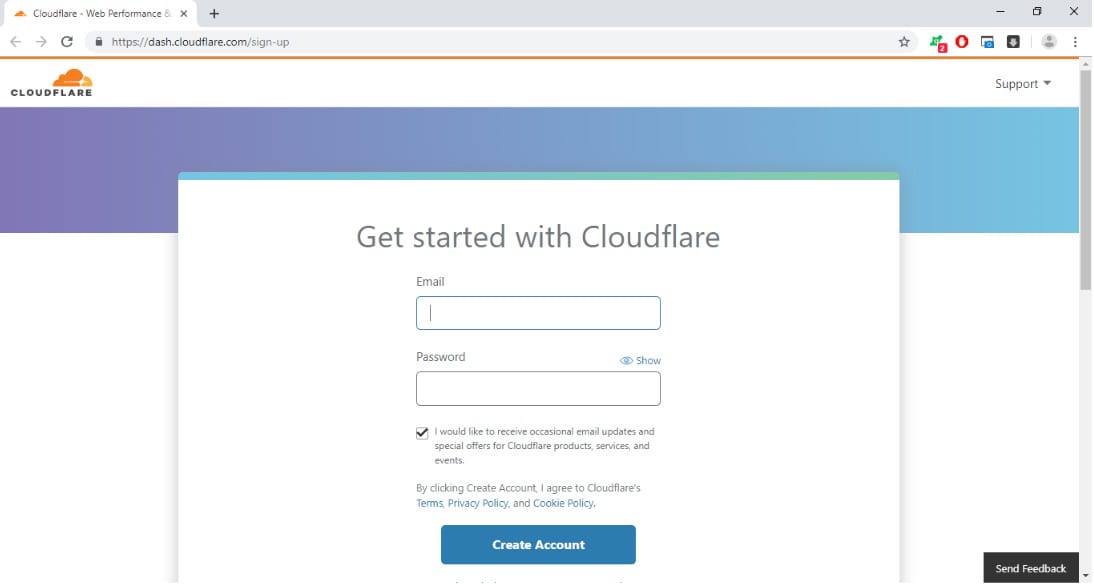
Visit the Cloudflare sign up page. Enter your credentials and verify your email address.
Add your site
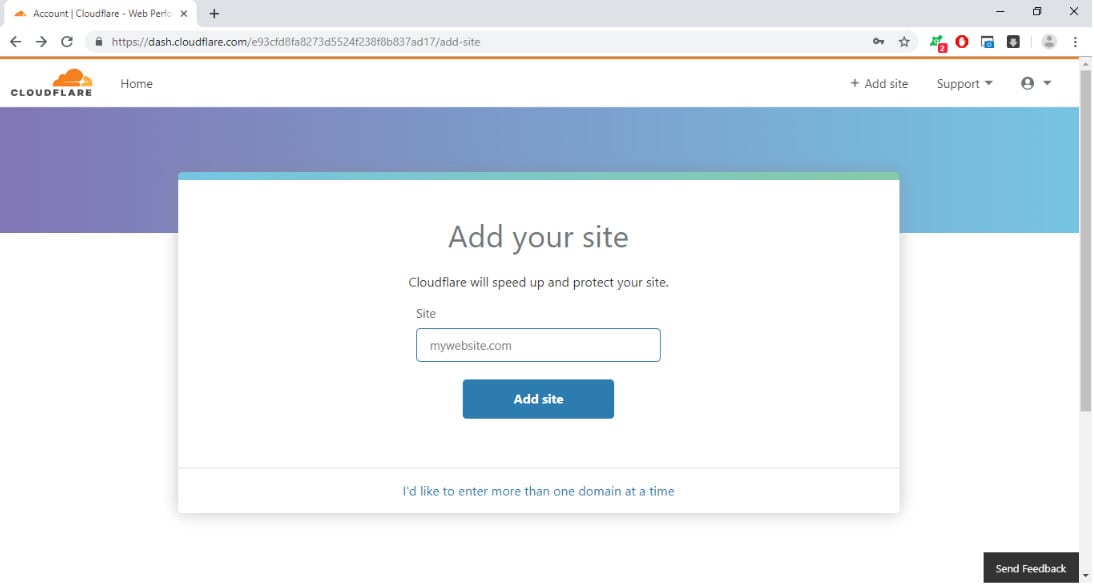
All you need to do in this step is enter the domain name of your site.
Select the free plan

Choose the free plan which should be all the way to the left.
Change your name servers
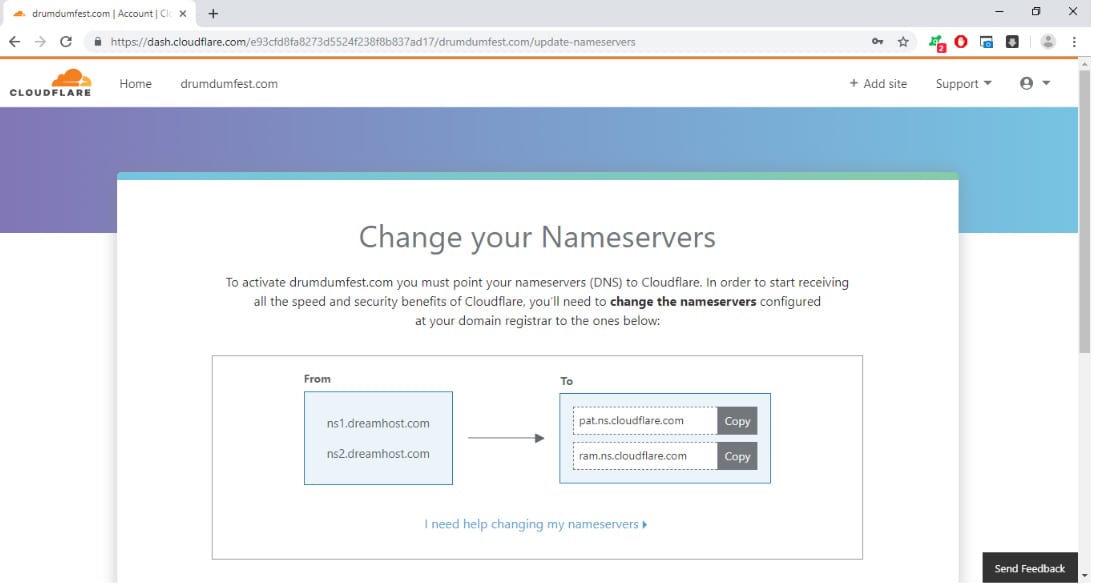
IMPORTANT***: In order for the whole thing to work, you will have to point your nameservers to Cloudflare. You will need to configure this at your domain name registrar, which might be different from your hosting provider. After you have copied over the nameservers to your domain name registrar, click ‘Continue’ and you will be redirected to the settings for this domain.
Request the Flexible SSL Certificate
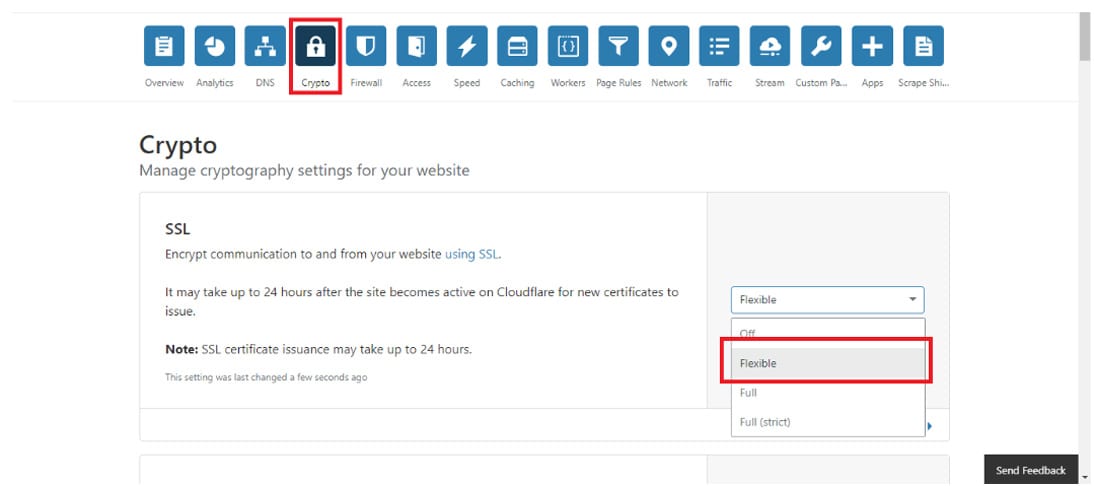
In case you are not seeing a page that looks like the one above, click on ‘Home’ and then click on the domain name that you added.
You will see a row of icons. Click on ‘Crypto’ and choose Flexible from the drop-down menu under SSL settings (it should be the second item in the drop-down list).
If you have pointed your nameservers to Cloudflare, as instructed in the previous step, the SSL should be active in 15 minutes approximately. This can vary depending on several factors like propagation time on your DNS, Cloudflare, etc.
If you have something else to do, check back later to see if the SSL is active and proceed.
2. Installing required WordPress plugins
CloudFlare Flexible SSL Plugin
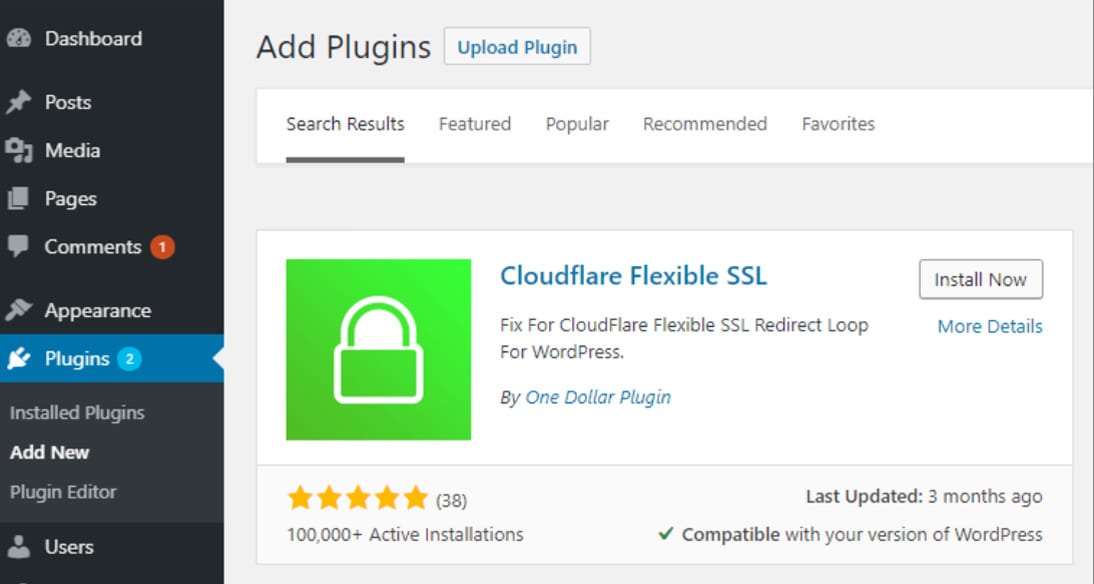
In your WordPress dashboard, go to Plugins >> Add New, then search for the ‘Cloudflare Flexible SSL’ and install it. This plugin enables the Flexible SSL and prevents the infinite redirect loop which might occur.
HTTPS redirection plugin
The redirection plugins are required when installing CloudFlare SSL on WordPress to avoid the so-called “redirect loops”. The Cloudflare will force all of the traffic on your site to HTTPS. The server will have to respond via HTTPS as well. Therefore, you will need one of these two plugins. Depending on the site, hosting server and other settings, you might find that one plugin doesn’t work for you so you may try another one. One of them will work for you.
WordPress HTTPS (SSL)
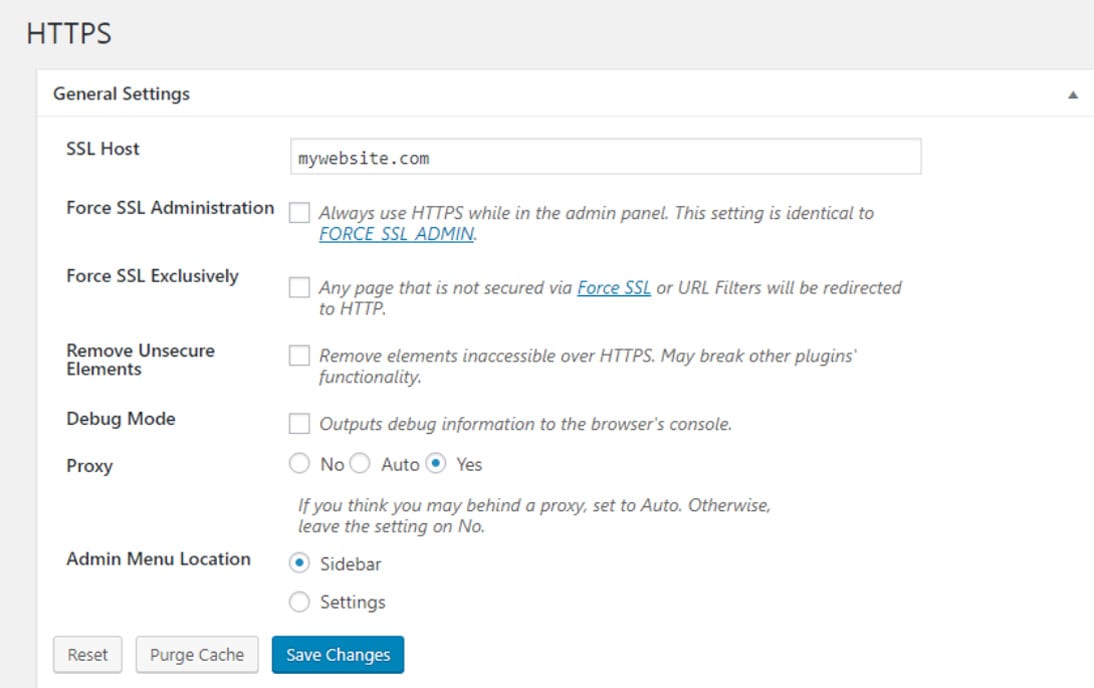
Go to ‘Plugins’ section in your wp-admin dashboard and click on ‘Add new’. Search for the WordPress HTTPS (SSL) plugin. After installing the plugin, activate it then go to the settings and choose ‘Yes’ under Proxy.
Really Simple SSL
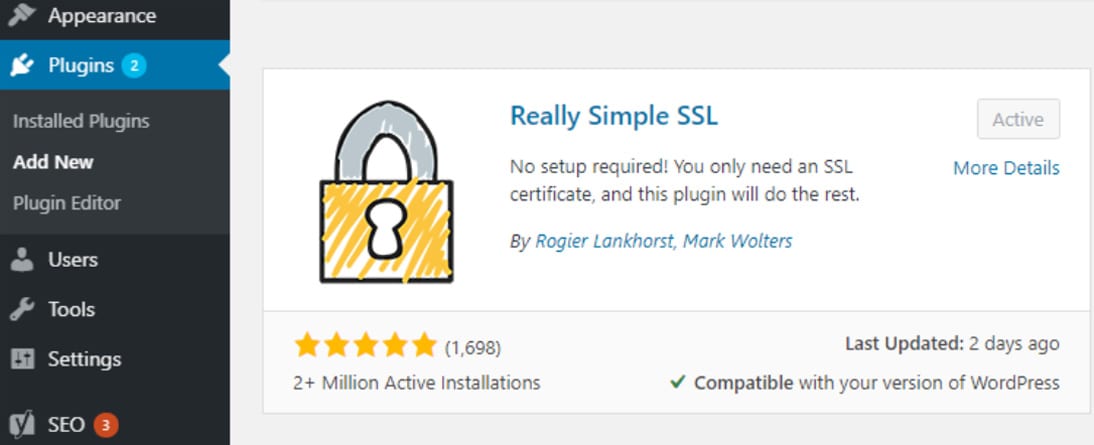
This plugin is lightweight alternative to the first one. In most cases, you will not need to change any settings after installation. All you have to do is activate the plugin and click on ‘Go ahead, activate SSL!’
3. Changing the WordPress Site URL
There are two URLs associated with WordPress sites: WordPress address and Site address.
The WordPress address points to the location of your admin pages, content, and other necessary directories and files. This is the core of your site which determines the way it is displayed and determines its functionality.
The Site address is where visitors land when they visit the site.
These two addresses are the same in a default WordPress installation. Why are they sometimes different? Two main reasons:
– The WordPress installation is not in the root directory on the hosting server. Some users put the WordPress site in a subdirectory for security purposes.
– Some parts of the site are not WordPress. One example would be having a site that has a blog that runs on WordPress, while the other parts of the site are static or made using a different method or CMS.
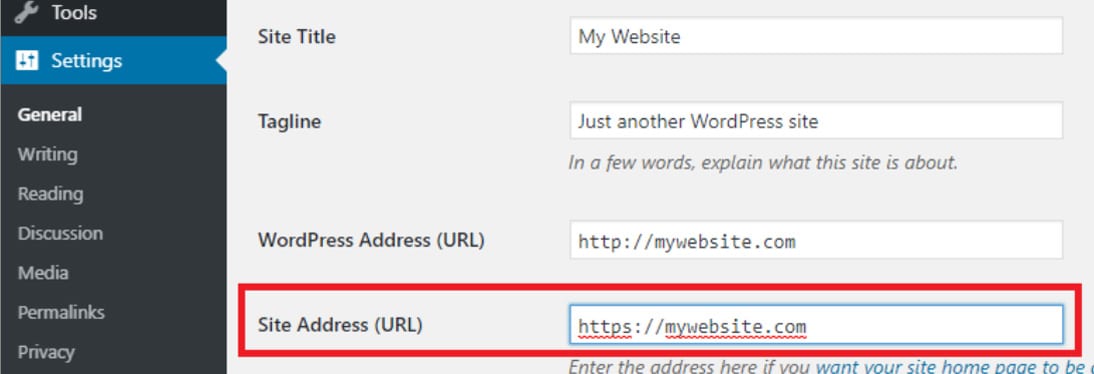
In the case of Flexible Cloudflare SSL on WordPress, we need the Site address to point to the HTTPS version of the site (served by Cloudflare). The WordPress address should remain the same as it is pointing to our hosting server which does not have an SSL certificate.
Changing WordPress address will break your site. Only change the Site Address.
Log in to your wp-admin dashboard, then go to ‘Settings’ -> ‘General’ and then just change the ‘http://’ prefix to ‘https://’. See the image bellow.
4. Enforce HTTPS via Cloudflare
After you’ve made all of the changes above in order to setup Cloudflare SSL on WordPress, there are some final redirection tweaks that you will have to make on Cloudflare. Follow these steps:
- Go back to your profile on Cloudflare
- Select your domain
- Choose ‘Crypto’ from the row of icons at the top
- Turn on the option ‘Always Use HTTPS’ (located approximately in the middle of the page)

- Check the ‘Opportunistic encryption’ and ‘Automatic HTTPS rewrites’ options. They should be enabled by default. If they aren’t, enable them now.
You can also create a Page Rule. It does exactly the same thing as the ‘Always Use HTTPS‘ option in the ‘Crypto’ tab. Page rule has a quicker response because it is processed at the edge of the Cloudflare.
To create a page rule:
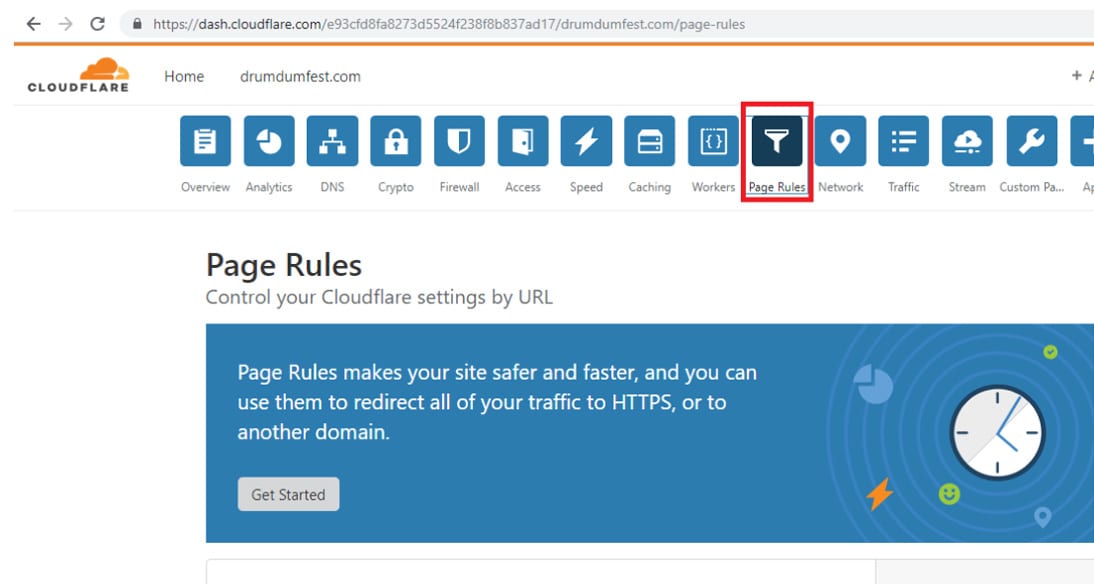
- Go to the ‘Page Rule’ tab on Cloudflare (select it from the top row of icons)
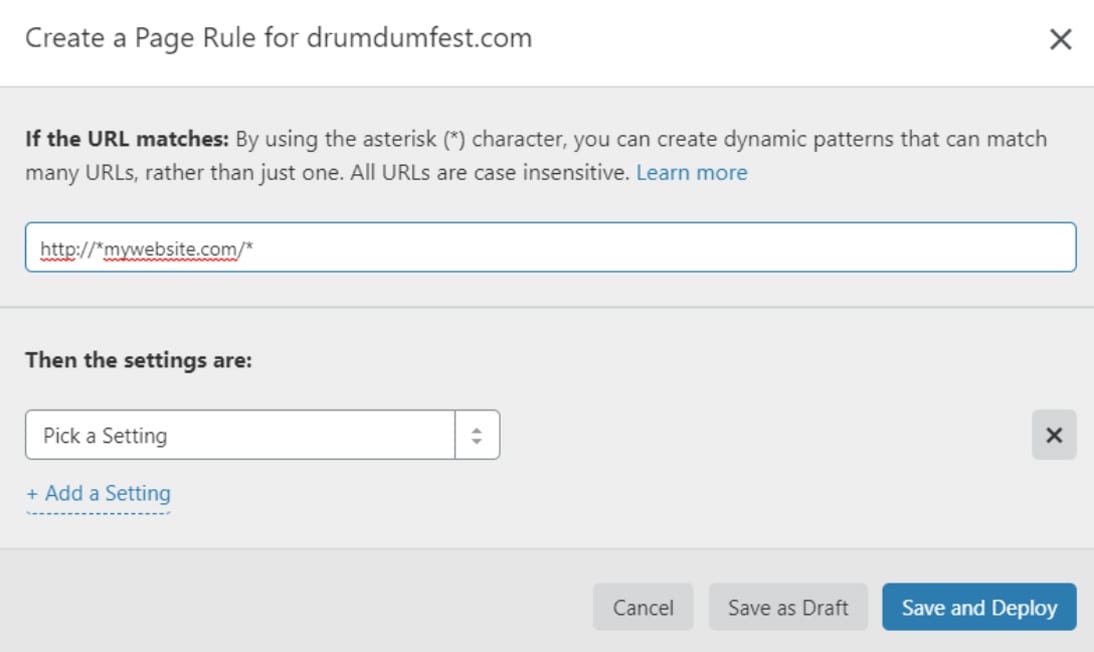
- Click on ‘Create a Page Rule’
- Enter your domain name in between to asterisks
- Under ‘Pick a setting’ choose ‘Always use HTTPS’
5. Resolving mixed-content issues
By the time you get to this step, your site should automatically redirect the visitors to the HTTPS version of the site.
Redirecting a WordPress site can lead to mixed-content issues. This means that some resources (including links, images, scripts,etc.) are loaded over the insecure ‘HTTP’ protocol while the site is loaded over the ‘https’. Depending on the browser, the padlock might be missing from the address bar or your site will not be displayed as fully secured.
Hardcoded insecure URLs
The URLs which are hardcoded can be found in theme and/or plugin files. This happens because developers use absolute instead of relative paths (i.e. http://mywebsite.com/wp-content/image.png (absolute) vs /wp-content/image.png (relative)).
In this case, you will have to edit the problematic files manually. Since it is impractical to just search the theme/plugin files for the hardcoded links, the best thing to do is to use the String Locator plugin. It will help you locate the file and the exact line of code on which the insecure URL is located.
Verify that your site is resolving under HTTPS
If you followed these steps correctly, your site will resolve under HTTPS. In order to avoid any issues in the process, it is important to do everything in the same order. Bear in mind that some changes will take more time, therefore you might not be able to do this in one go.
If you are using a caching plugin, empty the cache. It is also a good idea to clear the cache from your browser before checking to see if it is resolving correctly.
Aditional Information on CloudFlare SSL on WordPress
Is Cloudflare good for WordPress?
Yes, Cloudflare is beneficial for WordPress as it enhances website security with free SSL, reduces load times via its CDN, and protects against DDoS attacks, making it a well-rounded choice for website owners.
How do I connect SSL to WordPress?
To connect SSL to WordPress, you generally need to ensure your hosting provider supports SSL, install an SSL certificate, and adjust your WordPress settings to use HTTPS URLs by modifying the WordPress Address and Site Address.
Is Cloudflare SSL good enough?
Cloudflare’s free SSL, offering encryption between the site visitor and Cloudflare, is good enough for basic security needs and personal websites. However, for enhanced security, especially for handling sensitive information, a paid SSL may be more appropriate.
Is Cloudflare free SSL vs paid SSL?
The main difference between Cloudflare’s free SSL and paid SSL is the level of encryption and support. Free SSL encrypts traffic between the visitor and Cloudflare, while paid SSL plans offer more robust encryption options and dedicated support.
How to get an SSL certificate free in WordPress?
You can obtain a free SSL certificate for WordPress through Cloudflare by setting up your site with Cloudflare and enabling the SSL option in your Cloudflare dashboard, or by using other providers that offer free SSL certificates, such as Let’s Encrypt.
CloudFlare SSL on WordPress – Conclusion
Hopefully, now your website is running a Cloudflare SSL on WordPress and has a green lock. Let us know in the comments below if you enjoyed our guide. However, if you are still not able to set up SSL on WordPress feel free to contact our WordPress Support.
More Resources:
- Best Drag-and-Drop WordPress Theme Builders Of 2020
- What is a Slug in WordPress?
- Malware Removal Guide in WordPress – How We Do It


