How to Clear WordPress Cache – Step By Step Guide
You might have made some major changes to your website on your administrator dashboard, but on viewing your site in the browser, you find out that nothing changed. You may also have made and saved changes to scripts on your web server, like modifying fields on your contact form. If you are wondering what happened to the changes you made and why they aren’t seen when you preview the site, you should ask yourself if you need to clear or purge WordPress cache.
Your WordPress website may be caching pages with the help of WordPress plugins, and so is your browser. Your updates are likely not showing because your cache plugin has not updated its content to your latest additions, or you have not cleared your browser cache.
A cache plugin is very necessary for the optimum performance of your WordPress website. It enhances website speed by caching pages and loading them to the browser on user requests.
In this article, we will explain to you what caching plugins are and why you need to install one. We will also teach you how to clear WordPress cache from some of the popular WordPress caching plugins.
There are some managed websites that save cached data on the server. For website owners who fall under this category, we will show you how to purge cache from your WordPress web host.
Content:
-
- What is caching, and how do cache plugins work?
- Different Types of Caching
- Why do you need to clear your WP Cache?
- Impact of Caching on Site Performance
- Three steps to clearing WP Super Cache WordPress plugin
- How to clear cache from WP Total Cache plugin
- Two ways to purge WP Fastest Cache WordPress plugin data
- Clearing Cache on Hosting Providers
What is caching, and how do cache plugins work?
Caching helps to reduce the time and resources needed to load your site pages. In WordPress, the caching plugin creates and stores a static version of your website’s most requested files.
With the cached content available, WordPress does not repeatedly need to go through the process of loading numerous PHP scripts, pulling database results from the DB, loading JavaScript, CSS and HTML files to the browser on every request.
To make things faster, WordPress fetches the cached version of your web content from the caching plugin and loads them to the browser. This greatly reduces the load time of the website, and the number of server resources it could have used.
Explanation of Different Types of Caching
Caching is a crucial technology in enhancing the performance and speed of a WordPress site. It involves storing copies of files or data in a temporary storage location so that they can be accessed more quickly by users. There are several types of caching, each serving a unique purpose and functioning at different levels of the website delivery process. Understanding these can help WordPress site administrators make informed decisions about their caching strategies.
Browser Caching
Browser caching occurs at the user’s end, where web browsers like Chrome, Firefox, or Safari store copies of web pages, including HTML files, CSS stylesheets, JavaScript, and images. When a user revisits a website, the browser can load these files from its cache rather than downloading them again from the server, significantly reducing load times and bandwidth usage. For WordPress sites, leveraging browser caching means setting expiration times for resources or configuring ETags to manage how and when the browser stores and revalidates files.
Server-Side Caching
Server-side caching is implemented on the web server hosting the WordPress site. It can take various forms, including:
Page Caching: Stores the entire HTML output of a web page on the server, allowing the server to serve this static version quickly without processing the heavier WordPress PHP scripts on each visit.
Object Caching: Involves storing database query results so that the next time a piece of data is needed, it can be fetched from the cache rather than querying the database again.
Opcode Caching: PHP code is compiled into bytecode, which is then executed on the server. Opcode caching stores this compiled bytecode, allowing subsequent executions to be faster.
Server-side caching reduces the server’s workload and response times, leading to a faster browsing experience for the user.
Caching by WordPress Plugins
WordPress caching plugins are designed to simplify the caching process for site administrators. These plugins can handle various caching types, including page caching, object caching, and browser caching rules. Popular plugins like WP Super Cache, W3 Total Cache, and WP Rocket provide user-friendly interfaces to manage caching settings, clear cached content, and even optimize other performance-related aspects like file minification and lazy loading of images. These plugins often offer advanced features tailored to the specific needs of WordPress sites, such as handling user sessions, customizing cache rules for different types of content, and integrating with content delivery networks (CDNs).
CDN Caching
Content Delivery Networks (CDNs) are networks of servers distributed geographically, designed to serve web content to users from the closest server location, thereby reducing latency. CDN caching stores static website content (like images, CSS, and JavaScript files) on these servers. When a user requests a webpage, the CDN serves this content from the server nearest to them. For WordPress sites, using a CDN can significantly improve global access speeds and reduce the load on the original hosting server.
Why do you need to clear your WordPress cache?
Since WordPress would rather load content to the browser from caching plugins, there are chances that changes you made directly to your scripts or via the admin dashboard may not reflect immediately when you load the site.
So you have to manually get rid of the static, cached version of your web pages, media, compressed scripts, and stylesheets. You must do that by purging your cache plugin to make room for updates from the server.
It is very important to clear the browser cache frequently. This is necessary for all updates to load on the browser. Most popular browsers always save cached data and the saved data can prevent updates from loading properly. So it is up to you to manually clear out the browser cache by yourself as it is the only way your updated content can load.
Impact of Caching on Site Performance
Caching is a critical component in optimizing the performance of WordPress sites. By storing temporary copies of content, caching reduces the need for repetitive data processing and retrieval, leading to faster page load times, reduced server load, and an overall smoother user experience. However, the impact of caching is not solely positive; certain aspects, particularly the frequency of cache clearing, can have nuanced effects on site performance.
Positive Impacts of Caching
Reduced Load Times: Caching static versions of your content (HTML, CSS, JS, images) means that browsers and servers can quickly serve content without processing PHP scripts or database queries, significantly reducing page load times.
Improved Server Performance: By minimizing the amount of data processed and transferred between the server and the client, caching reduces server load. This is particularly beneficial during traffic spikes, as it helps prevent server overloads and potential downtimes.
Enhanced User Experience: Faster load times contribute to a smoother, more enjoyable browsing experience, which is crucial for retaining visitors and improving metrics like bounce rates and time on site.
SEO Benefits: Page speed is a ranking factor for search engines like Google. Faster websites are more likely to rank higher in search results, leading to increased visibility and organic traffic.
Potential Drawbacks of Frequent Cache Clearing
While caching is beneficial, clearing cache too frequently can negate some of these advantages:
Temporary Performance Drops: Every time the cache is cleared, the server must rebuild cached content from scratch. This can temporarily increase load times and server load until the cache is fully regenerated.
Increased Server Load: Frequent cache clearing forces the server to repeatedly process and store data, increasing the workload and potentially affecting the site’s overall performance, especially on shared hosting environments.
Content Delivery Interruptions: For sites using Content Delivery Networks (CDNs), clearing cache can lead to temporary inconsistencies in content delivery, as different CDN nodes might serve different versions of the content until the cache is fully propagated.
Balancing Caching and Cache Clearing
To maximize the benefits of caching while minimizing potential drawbacks, it’s essential to strike a balance:
Strategic Cache Clearing: Only clear cache on WordPress when necessary, such as after making significant updates to your site’s content, design, or functionality. Avoid clearing cache for minor changes that don’t impact the user experience.
Selective Cache Clearing: Some caching solutions and plugins allow for selective cache clearing, where only specific parts of the cache are cleared (e.g., cache for a single page or post). This can minimize the impact on site performance.
Cache Expiration Settings: Configure cache expiration settings to automatically clear and regenerate cache at optimal intervals. This ensures that content remains fresh without the need for manual cache clearing.
Monitoring and Optimization: Regularly monitor your site’s performance using tools like Google PageSpeed Insights or GTmetrix. Use the insights to optimize caching settings and identify the best practices for your specific site and hosting environment.
Three steps to clearing WP Super Cache WordPress Plugin
Step 1
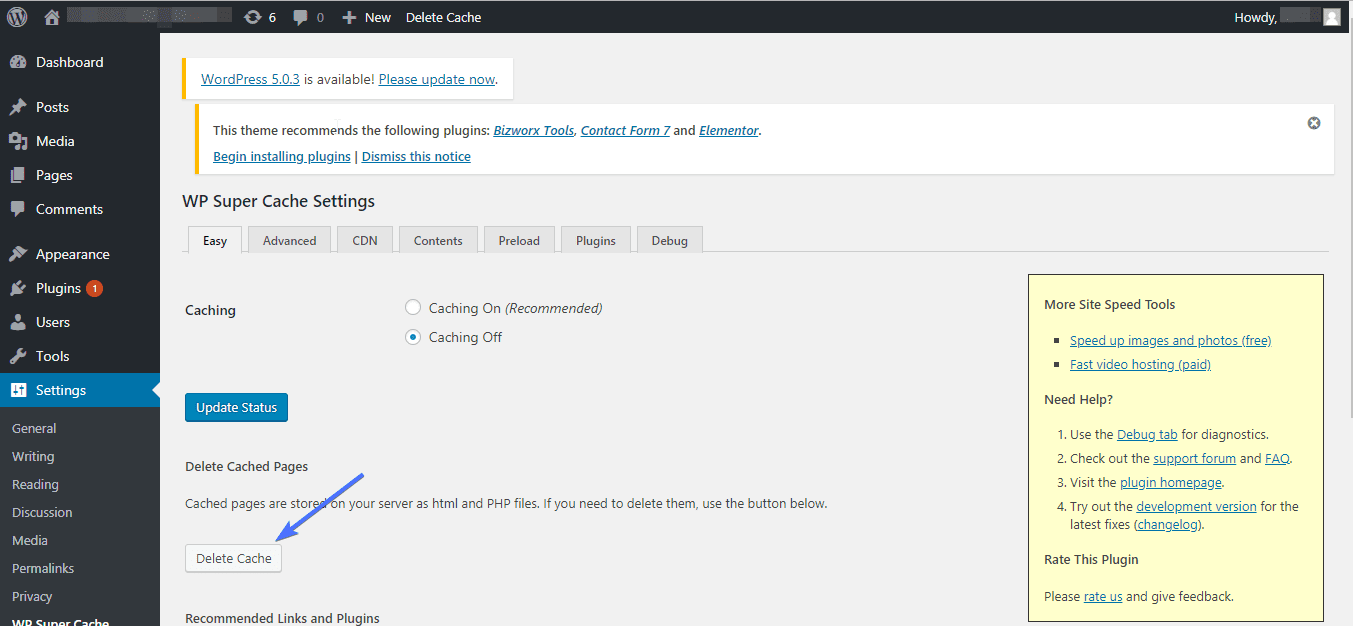
Login to your admin dashboard, go to Settings and select WP Super Cache from the menu.
Step 2
On Wp Super Cache Settings page, click on the Delete Cache button.
Step 3
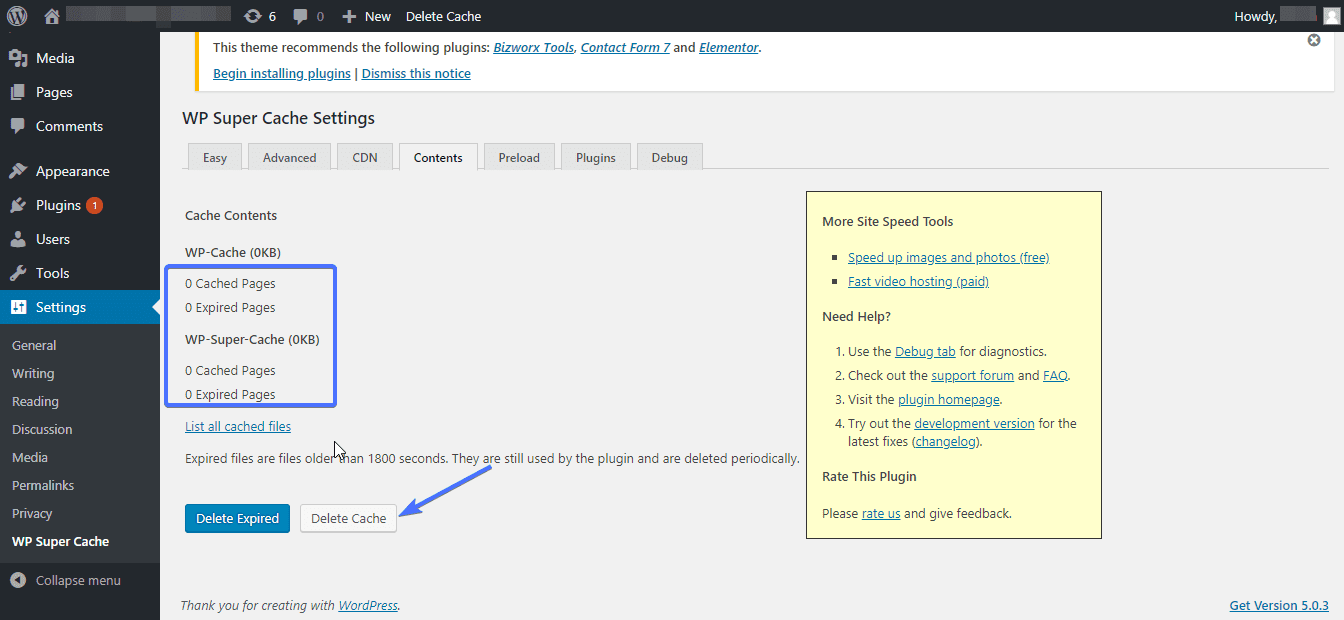
You will see a window with a table of Cache Content. All cached pages created by the plugin may be listed out. Again, click on Delete Cache.
How to clear WordPress cache from W3 Total Cache Plugin
Step 1
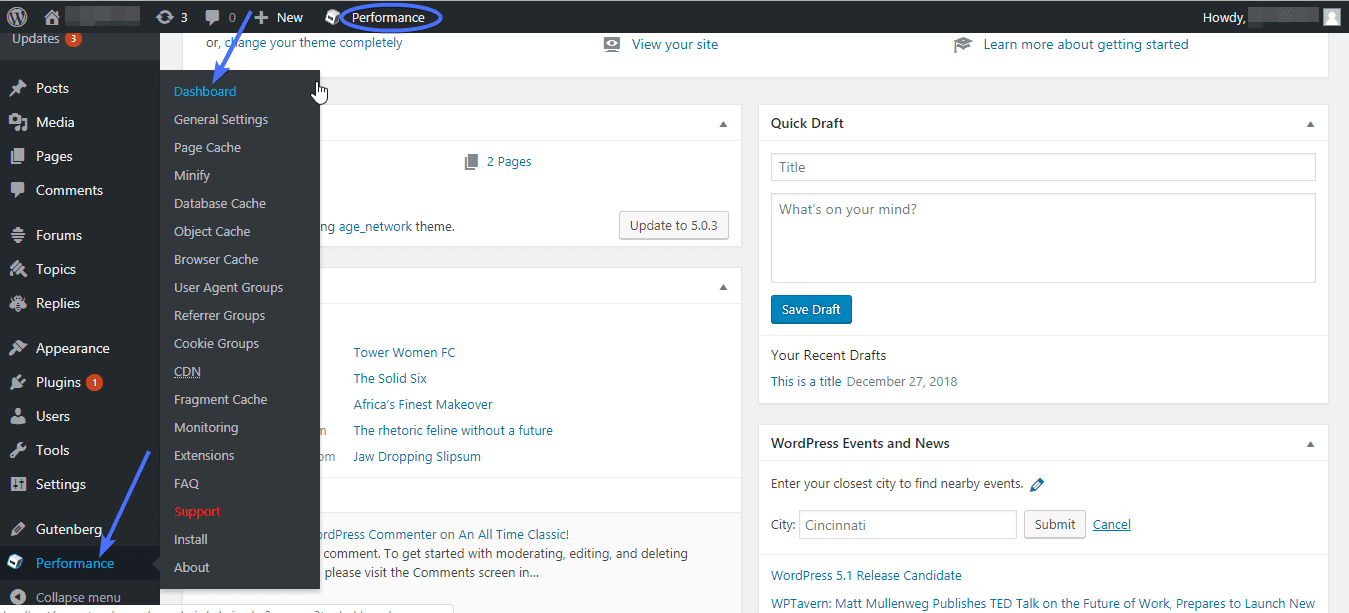
Login to your admin dashboard. Click on Performance to access the WP Total Cache dashboard, or Mouse-over Performance and select Dashboard from the menu.
Step 2
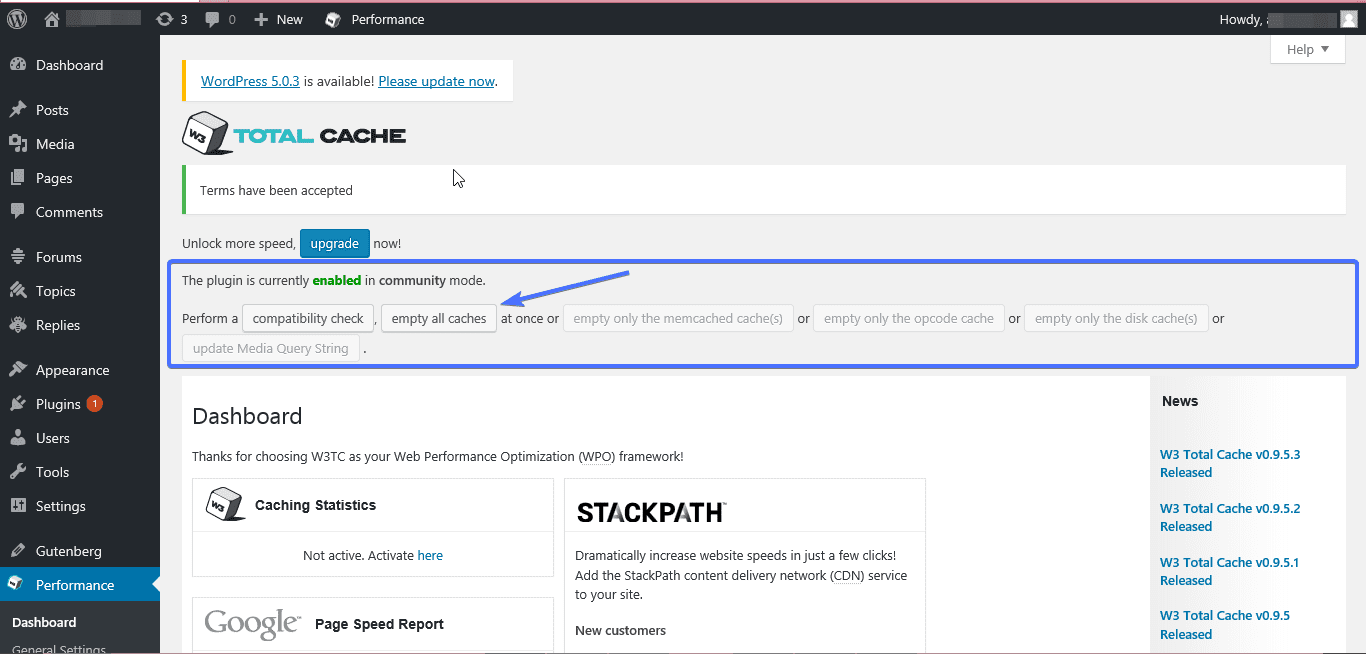
Search for a button labeled ‘empty all cache’ in the outlined region on the page as shown in the image below and click on it. And that’s it.
Two ways to purge WP Fastest Cache WordPress Plugin data
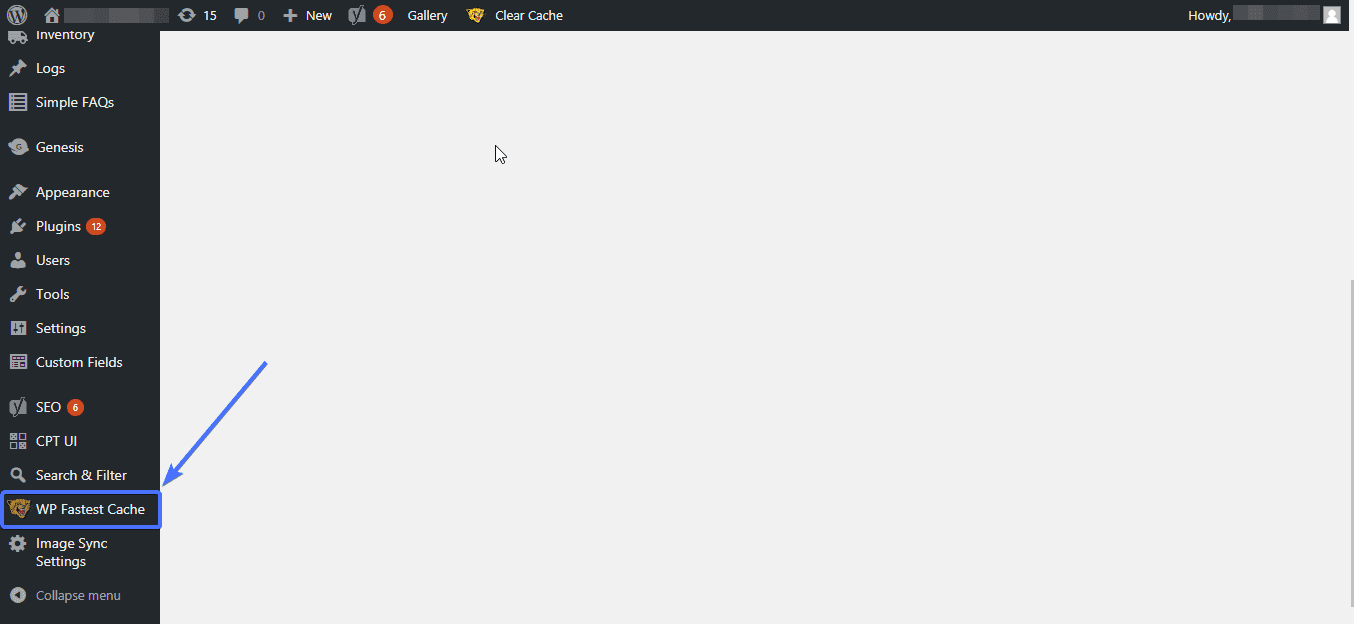
Step 1
Login to your admin dashboard, and click on WP Fastest Cache
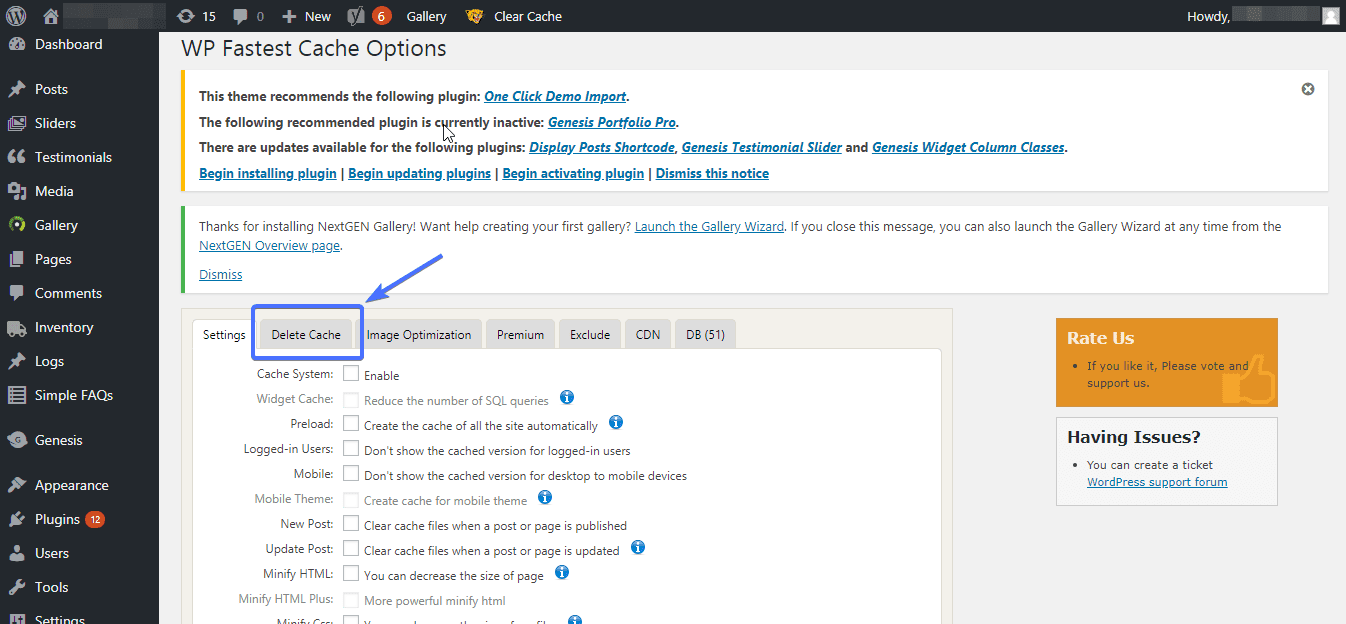
Step 2
On the WP Fastest Cache Options page, select the Delete Cache tab.
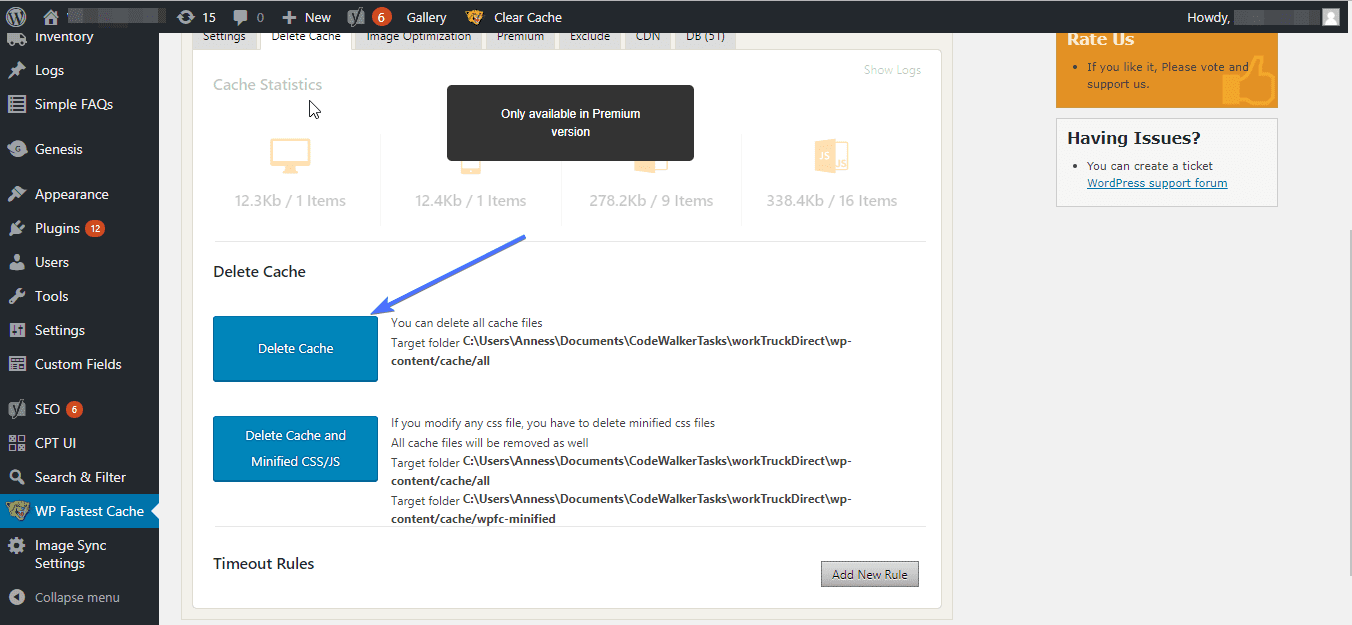
Step 3
Finally, click on the Delete Cache button
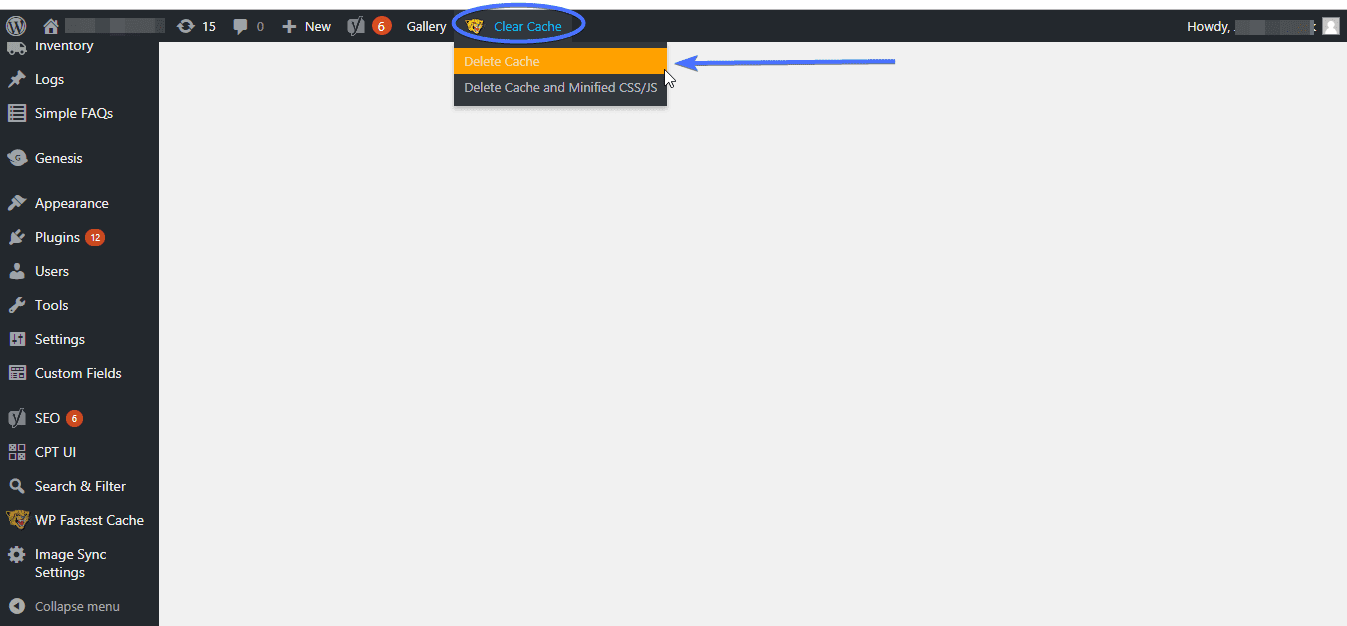
Note: A quicker way to clear all WordPress cache from the WP Fastest cache is to mouse-over Clear Cache on the admin menu bar and select Delete Cache.
Clearing Cache on Hosting Providers
Many WordPress hosting providers offer built-in caching solutions to enhance website performance. These caching mechanisms can vary significantly from one host to another, both in how they function and in how they are managed. Understanding how to clear cache on WordPress with your specific hosting provider is crucial, especially after making updates to your site that don’t immediately reflect. Here’s a look at how to clear cache on some popular WordPress hosting providers:
WP Engine
WP Engine provides a user-friendly interface for managing cache directly from the WordPress admin dashboard. To clear your cache on WP Engine:
- Navigate to the WP Engine menu item in your WordPress admin bar.
- Click on “Caching” from the dropdown options.
- Select “Purge All Caches.“
This action will clear all cached content stored by WP Engine, ensuring that your site’s visitors will see the most recent version of your pages.
Bluehost
Bluehost’s WordPress hosting plans come with a caching solution that can be managed directly from the WordPress dashboard. To clear cache on Bluehost:
- Find the “Caching” button in the top admin toolbar of your WordPress dashboard.
- Click on it and select the “Purge All” option.
This will clear the cache across your entire site, making any recent changes visible to you and your site’s visitors.
SiteGround
SiteGround offers a powerful caching tool called the SG Optimizer, designed to improve the performance of WordPress sites hosted on their platform. To clear cache with SiteGround:
- If you’re using the SG Optimizer plugin, go to the plugin settings in your WordPress dashboard.
- Look for the caching options, and you’ll find a button to “Purge SG Cache.”
Alternatively, if you’re managing your site through the SiteGround User Area:
- Navigate to the “Speed” section and find the “Caching” service.
- Choose the “Dynamic Cache” option and then “Flush Cache” to clear cached content.
Additional Tips for Other Hosting Providers
Managed WordPress Hosting: Many managed WordPress hosting solutions have their own caching mechanisms. Typically, these platforms provide a way to clear cache on WordPress either through a specific plugin they offer or directly within their hosting control panel.
cPanel Hosting: For hosts that use cPanel, there’s often a section dedicated to caching where you can manage and flush cached content. Look for sections labeled “Cache Manager” or similar.
Custom Solutions: Some hosts might use custom solutions or third-party caching plugins. In these cases, it’s best to consult the host’s support documentation or contact their support team for guidance on clearing cache.
Conclusion:
Caching plugins play a vital role in speeding up the loading time of your website. However, because of the way these plugins work, it is important to know, that they can prevent you from seeing the changes you have made to your website after refreshing your browser.
This tutorial has shown you how to clear the WordPress cache from the popular caching plugins. The problem you faced where your saved changes did not update is now solved. You may also learn how to Fix “WordPress Keeps Logging Me Out” Error and how to Fix Err_Connection_Refused Error.
Remember to always clear your browser cache, as many times as you clear the cache in WordPress. Your browser cache can as well prevent you from seeing changes made in your site. For more WordPress tutorials check our WordPress blog.


