
As a website owner, you want your visitors to experience fast loading speeds on your site. A great way to do this is by preloading internal website links in WordPress to speed up loading.
Link preloading is a browser feature that loads links in the background before a website visitor clicks on them. Preloaded links give the impression that your website is loading faster. This is because the user sees the content of the links right away after clicking.
Enabling this feature is a pretty straightforward process, and we’ve created this easy guide to help you.
In this Article:
- Why Should I Preload Links?
- How Do I Enable Link Preloading in WordPress?
- How to Manually Preload Key Requests – For Advanced Users
- Frequently Asked Questions
- Conclusion
Why Should I Preload Links?
At the risk of stating the obvious, no one likes a slow website. Preloading links can thus improve the user experience for your website’s visitors. Visitors are more likely to stay longer on your website and read more pages when your site is fast. Also, this is good for your bounce rate.
Further, since bounce rate can affect your WordPress SEO ranking, preloading links could help attract more visitors to your site.
Note, however, that link preloading is different from having a preloader animation. Read our article on WordPress preloaders to learn more about this.
How Do I Enable Link Preloading in WordPress?
The easiest way to preload links on WordPress sites is with a plugin. In this article, we will show you how to do this using the Flying Pages plugin.
Note: We will also show you how to use WP Rocket, but you should use this option if you already have it installed.
Flying Pages waits until the browser is idle, then injects a small JavaScript code. Thereafter, it identifies pages in the viewport and preloads them when the mouse hovers over them.
Flying Pages also ensures that preloading links won’t slow down or crash your server.
Steps To Enable Link Preloading Using Flying Pages
Now, let’s take you through the steps involved in enabling link preloading in WordPress for faster loading:
Installing the plugin
First, Install and activate the Flying Pages plugin. To do this, login to your WordPress dashboard and go to Plugins >> Add New.
Search for the Flying Pages plugin, then click Install Now. Afterward, click the Activate button.

Plugin Settings
After activating the Flying Pages plugin, you should configure the settings to preload links. Proceed to Settings > Flying Pages in your WordPress admin panel.
Next, you can select a time for the “Delay to start preloading” in the drop-down menu. This setting is the time before the link preloading process can begin.

You can increase the time if you want less server load, but it is ideal to leave the default option of “0 seconds” as seen in the image above.
The next step is to configure the “Max requests per second” setting. Keeping this number low will mean less load on your server.
We’ll suggest again that you go with the default value of “3 requests”. This should work for the majority of WordPress hosting setups.
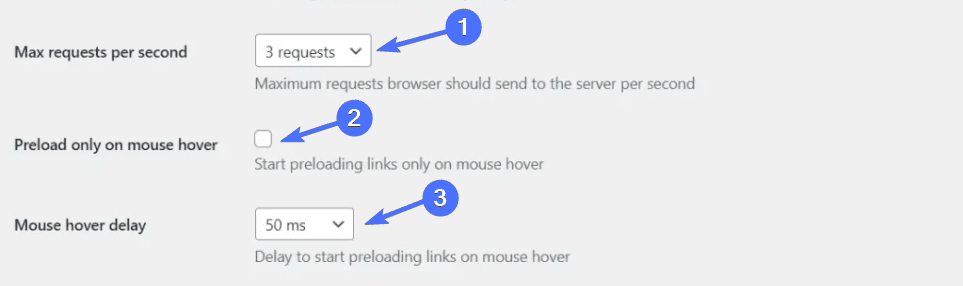
If you want to save server resources by preloading links only when the user hovers over them, tick the “Preload only on mouse hover” box. This way, the page will preload shortly before the user clicks.
Additionally, you can adjust the “Mouse hover delay” duration. This is the amount of time before preloading begins once a user hovers over a link.
Ignore preloading specific items
Further down the settings page, you’ll see a list of keywords that the plugin will ignore for preloading. The picture files and login pages are standard.
You may choose to leave the list the way it is or you can add extra keywords. For instance, if you run an online store, it’s a good idea to include dynamic pages like “/cart” or “/checkout” in this list. This way, they won’t get preloaded.

Finally, disable preloading for admins as shown in the image above.
Doing this helps to decrease the load on your servers. When you check the box, the plugin will only preload for website visitors who aren’t logged-in administrators.
Now click on Save Changes to save all the settings you’ve modified. Great work! You’ve successfully activated link preloading on your website!
Preloading With WP Rocket
If you already have the WP Rocket cache plugin installed, you do not need to install a new plugin. Simply navigate to WP Rocket’s Preload settings. Once there, tick the “Enable link preloading” checkbox to activate this feature.

WP Rocket also gives you the option to preload fonts, and you can add links to the fonts you want to preload.
To figure out which fonts to preload in WP Rocket, enter your website url into PageSpeed Insights to perform a website speed test, and it will suggest these files for you (if any).

Copy the URL(s) and paste it in the “Fonts to Preload” field.
You should note though, that you can only preload fonts hosted on your domain (or your CDN’s domain) with the WP Rocket plugin.
After saving your changes, test your site once more using PageSpeed Insights. The “Preload Key Request” warning should no longer appear.
How to Manually Preload Key Requests – For Advanced Users
Using a plugin to implement preload on key requests is the easier method. If you are a more advanced user and will prefer to preload critical requests manually, you can do so by inserting the code below in your header.php file. Ensure that you input the right code, depending on the file type you intend to preload.
<link rel='preload' href='/image.png' as='image'>

<link rel='preload' href='/style.css' as='style'>

<link rel='preload' href='/script.js' as='script'>

<link rel='preload' href='/font.woff2' as='font' crossorigin>
Replace the dummy link (image.png, style.css, etc) files with the file you intend to preload. For example, if you’re preloading an image file, it should look like this:
<link rel='preload' href='https://www.fixrunner.com/wp-content/uploads/year/day/image-name.png' as='image'>
Here too, if you’re unsure of which files to preload, you can enter your site url in PageSpeed insights to find out these files.
Following these steps, add WordPress link preload instructions for all the files you wish to preload and then save your header.php file. This would enable preloading for those files.
While setting up link preloading is relatively simple, maintaining this feature requires consistent attention to avoid potential issues with site performance. With Fixrunner’s WordPress website care plans, you can ensure that these enhancements are regularly reviewed and maintained.
Frequently Asked Questions
What Can Be Preloaded in WordPress?
It’s possible to preload several resources, we’ve listed the most common ones below:
- document: this is an HTML document intended to be embedded by a <frame> or <iframe>.
- Embed: This is a resource to be embedded inside an <embed> element.
- fetch: This is a resource to be accessed by a fetch or XHR request, such as an ArrayBuffer, WebAssembly/WASM binary, or JSON file.
- font: Font file.
- image: You can also preload image files.
- object: Such a resource is to be embedded inside an <object> element.
- script: JavaScript (JS) file.
- style: CSS stylesheet.
- track: WebVTT file.
- worker: A JavaScript web worker or shared worker.
- video: Video file, as typically used in <video>.
What is Preload Cache in WP Rocket?
Caching plugins like WP Rocket save the generated files from a first user’s visit to your page. For this first user, the site will be slower, while subsequent visitors will be served the cached files, and thus see higher speeds. And each time you make changes to your site, this cycle repeats.
However, users will see a quicker page the first time they visit your website if you use the Preload Cache option. Preloading cache, in essence, simulates a visit to your page before any user sessions. This means that any users who visit your page for the first time will enjoy the cached version — a quicker page.
This is pretty useful since a poor first impression on your website may cause visitors to quit and never come back. Also, cached versions enable faster page visits and better page indexation. Crawling also becomes more efficient for search engine bots.
Are There Other Plugins for Preloading Key Requests
Yes! Examples of other plugins to use for preloading key requests besides Flying Pages and WP Rocket include Asset CleanUp, Autoptimize, Perfmatters, SG Optimizers and Pre* Party Resource Hints. Most of these plugins offer a wide range of extra features besides preloading. Thus, you should decide if you need the extra features.
Conclusion
Website Speed is one of the most important factors in user experience on the internet. Preloading internal links in WordPress leads to faster loading speeds on WordPress websites.
In this guide, we’ve shown you how to preload links in WordPress websites. With these instructions, you can make your site quick and responsive!
Also, check out our complete guide on WordPress Speed to further improve your site loading time.