How to Fix The Upload Failed to Write File to Disk Error in WordPress
Have you ever tried to upload pictures to your WordPress website and received this error message Upload: Failed to write file to disk? If you are currently seeing this error, don’t panic!
In this article, you will learn a couple of easy ways to fix this error quickly. Even if you are just starting out with WordPress, you should be able to follow through easily.
In This Article:
What Causes Failed to Write File to Disk Error in WordPress?
There are a couple of reasons why you may be seeing this error. The major cause, however, is incorrect folder permission.
When you create a WordPress website, your web server creates folders in which files are stored. To access these folders and store (write) files into them, WordPress needs to be given appropriate permissions. If a folder fails to provide the needed permissions, WordPress will display “failed to write to disk” error message when you try uploading to that folder.
Also, you might experience this error if the quota limit of your server has been exceeded, or when the temporary file directory in your web server gets filled.
Diagnosing with WordPress Site Health Tool
When encountering the “Upload: Failed to Write File to Disk” error, one effective method to diagnose the issue is by utilizing the WordPress Site Health tool. This built-in feature provides a comprehensive overview of your website’s health, including file permissions, which are crucial for resolving this specific error.
Accessing the Site Health Tool
To begin, navigate to your WordPress dashboard. From there, select ‘Tools‘ and then click on ‘Site Health.’ This section is divided into two tabs: ‘Status’ and ‘Info.’ For our purposes, we’ll be focusing on the ‘Info‘ tab.
Checking File Permissions
Once in the ‘Info‘ tab, scroll down to the ‘Filesystem Permissions‘ section. Here, you’ll find a list of critical WordPress directories, including the ‘Uploads’ folder, where your media files are stored. The tool will indicate whether these directories are writable.
For seamless media uploads, the ‘Uploads‘ directory must be set to ‘Writable.’ If it’s marked as ‘Not writable,’ this is a clear indication that incorrect file permissions are likely causing the “Failed to Write File to Disk” error.
Interpreting the Results
If the Site Health tool reveals permission issues, it’s a signal to take corrective action. Adjusting file permissions might seem daunting, but it’s a crucial step towards ensuring your WordPress site functions correctly.
The permissions for the ‘Uploads’ directory should ideally be set to 755, allowing WordPress to write files to the disk without compromising security.
Next Steps
Identifying the problem is half the battle. Once you’ve pinpointed incorrect file permissions as the culprit, the next step involves rectifying these permissions.
This can be done via an FTP client or through your hosting provider’s file manager. Detailed instructions for this process can vary depending on your hosting environment and the tools at your disposal.
Guide to Fix Failed to Write File to Disk Error
There are a couple of methods for fixing this error. The first thing to try is changing the folder permission with an FTP client. Second, check if disk limit on the server has been exceeded. And finally, empty the temporary file directory.
-
Change Folder Permission via FTP Client
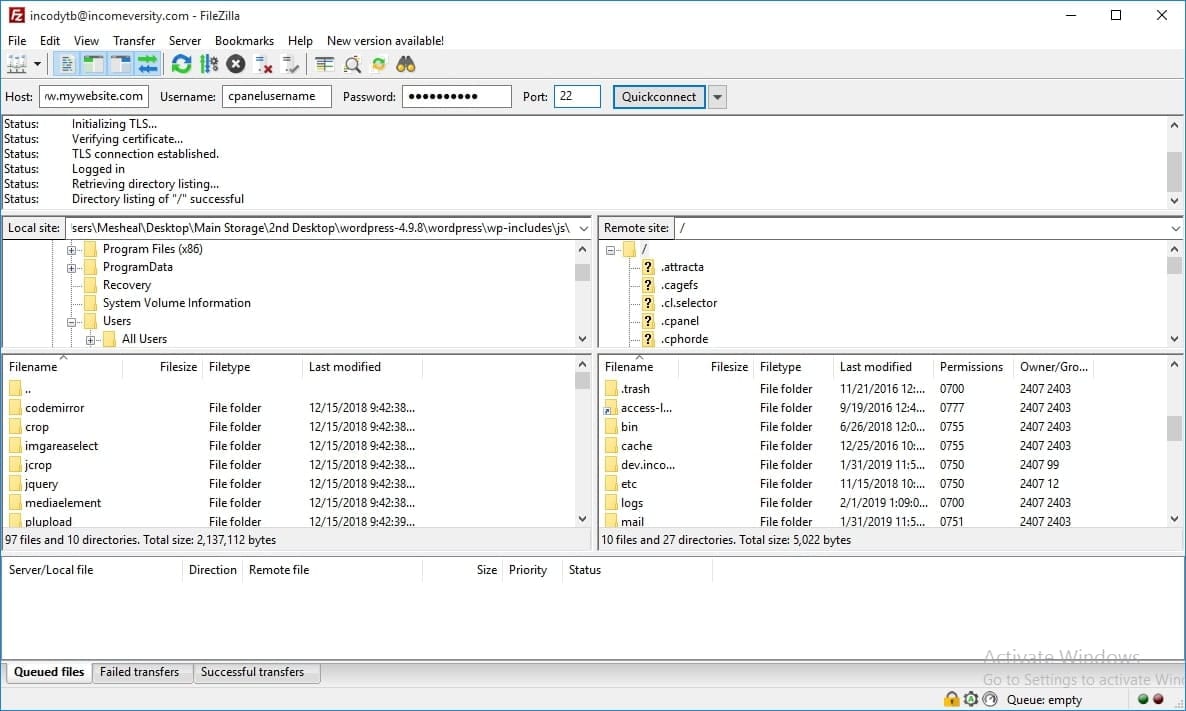
If you don’t have FileZilla client, head over to FileZilla’s website and download it for free. It has both Windows and Mac versions. Once you have it installed and running, connect it to your WordPress website. You would be asked to provide your host, username and password.
The host is your website domain, for example, mywebsite.com. Then enter the username and password in the correct entry fields (you can get these details from your webhost). In the port field, put 22.
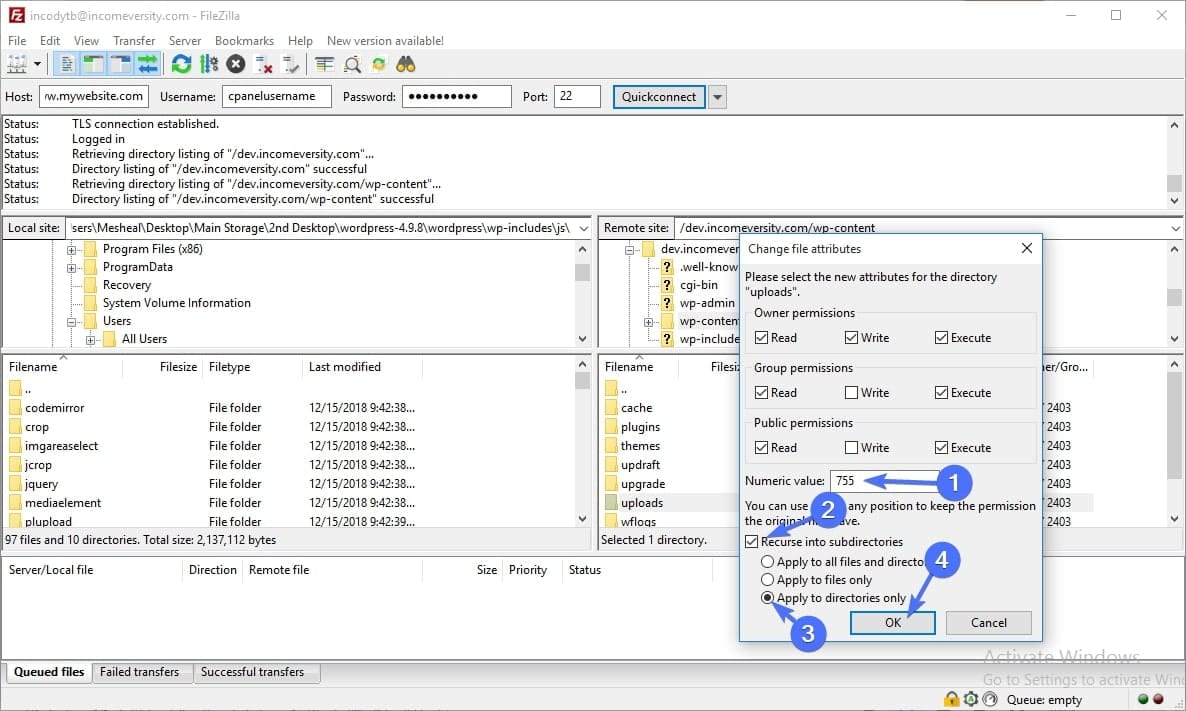
Once a connection with the server has been established, locate the “wp-content” folder and double click to open it. Within this folder, locate the uploads folder, right-click on it, and select “File permissions”.
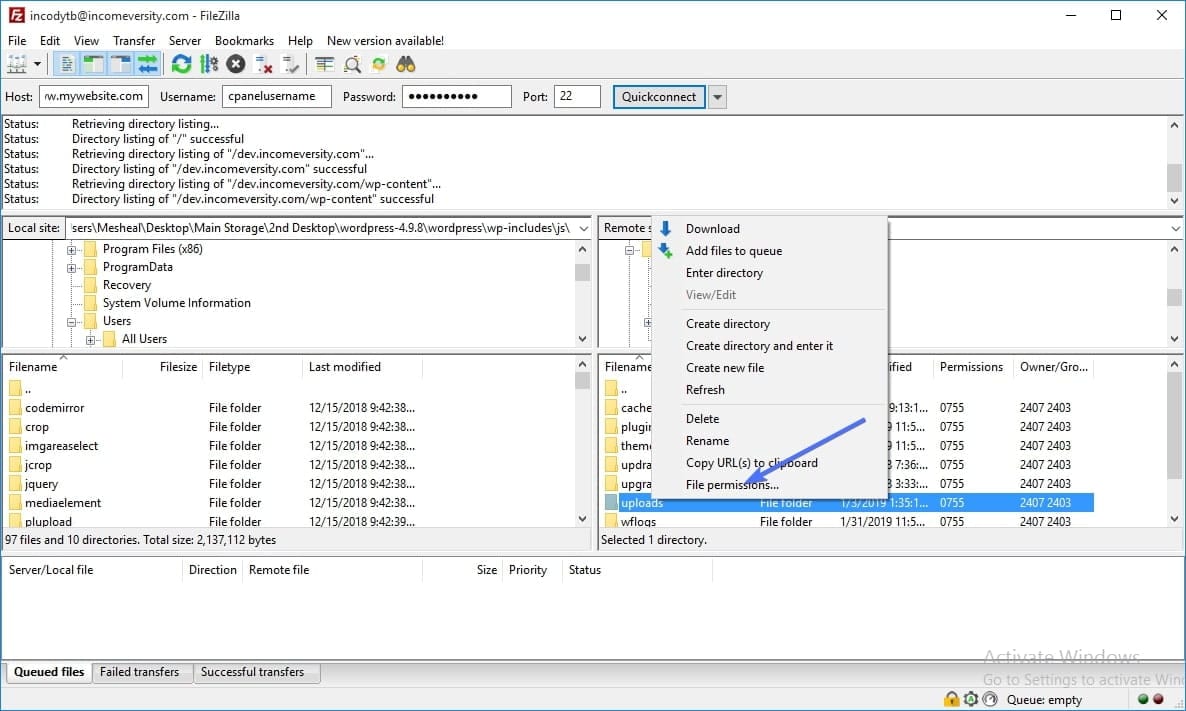
A dialog box with numerous checkboxes would pop up. Don’t let the numerous checkboxes bother you. Just locate “Numeric value” field, and type in the value, “755”. Make sure to check the “Recurse into subdirectories” and “Apply to directories only” radio buttons and click the OK button. That’s it!
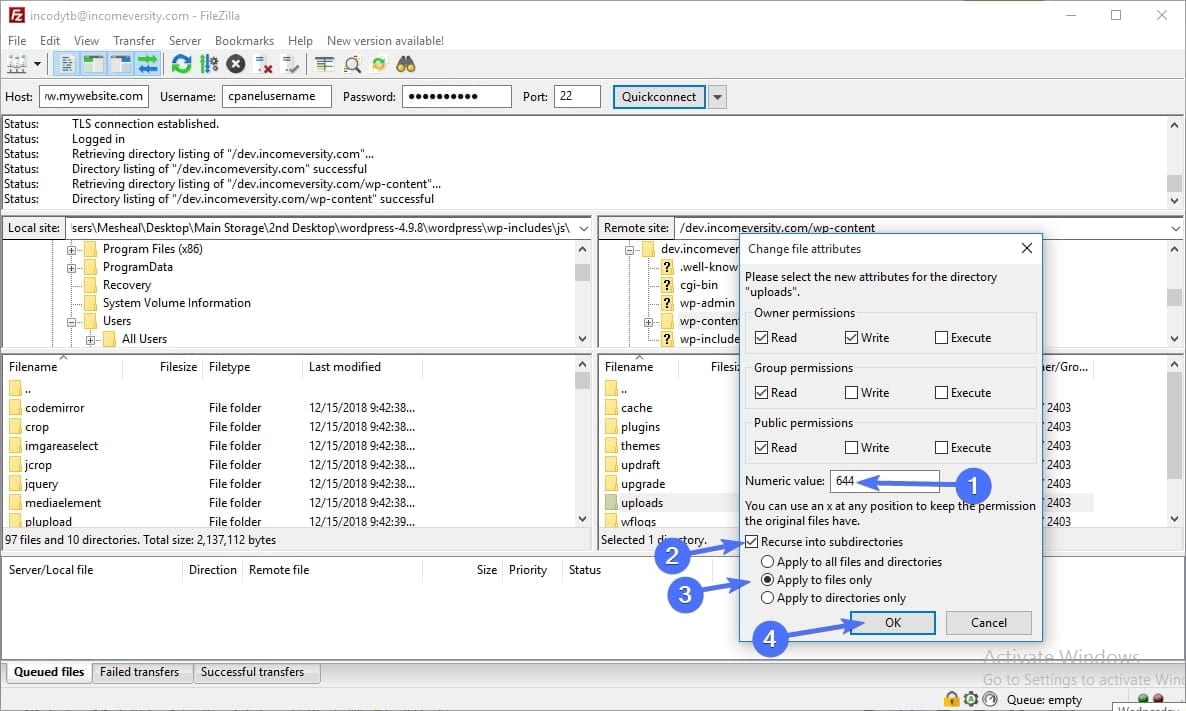
If the Failed to write file to disk error still persists, it could mean that the files within the folder haven’t given WordPress permission to access them yet. You can fix that too!
Similar to the previous step, right-click on the wp-content folder and then click on “File permissions”. This time, enter the value “644” into the Numeric value field. Check the “Recurse into subdirectories” radio button. In addition to that, check the “Apply to files only” radio. Click OK to implement these file permissions.
Try uploading a picture to WordPress. It should go through without any error message this time.
-
Check if Quota Limit on Your Server Has Been Exceeded
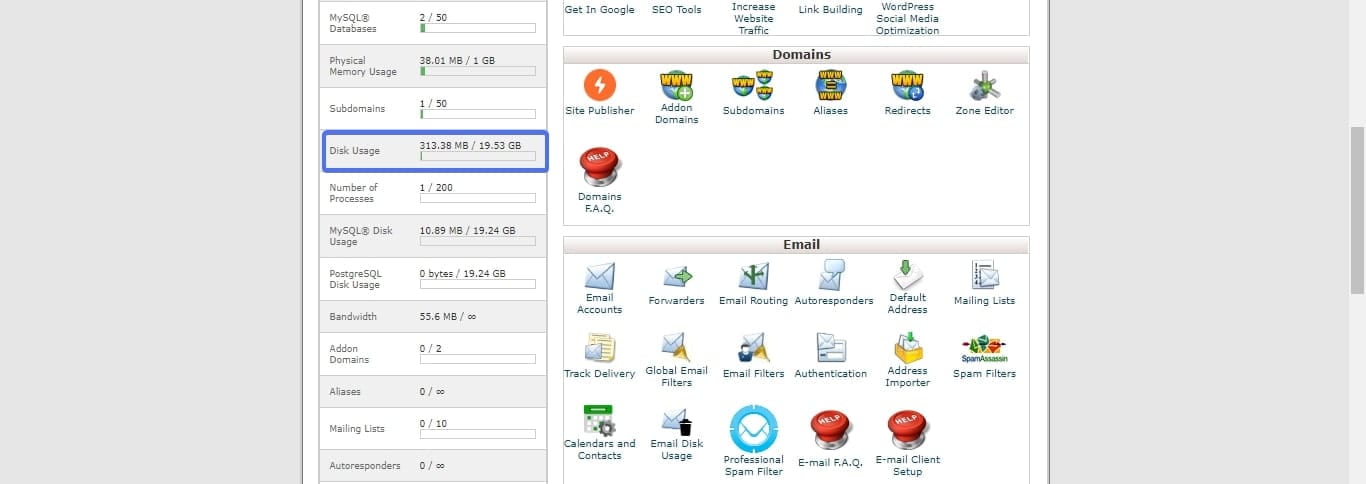
Quota limit is the maximum storage space on your web server. Your host provider determines it. Some host providers limit it; for others it is unlimited, depending on your hosting plan.
Exceeding this limit will cause file upload errors in WordPress. If you are still experiencing Upload: failed to write file to disk error, check with your host provider if you have exceeded your quota limit. If that is the case, you might have to upgrade your hosting plan. Alternatively, free up some space by deleting files that are no longer relevant from the server. You can do this using cPanel or FileZilla.
-
Empty the Temporary File Directory to Fix Failed to Write File to Disk Error
Another less obvious yet significant factor that could lead to the “Upload: Failed to Write File to Disk” error in WordPress is related to the temporary folder. This folder plays a pivotal role during the file upload process, and issues here can disrupt normal operations.
When files are uploaded to WordPress, they are initially stored in a temporary folder on the server. This is a standard procedure that acts as a holding area, ensuring files are correctly received before they are moved to their final destination, typically the ‘Uploads’ directory.
However, if this temporary folder is full or improperly configured, WordPress cannot proceed with the file transfer, resulting in the aforementioned error.
Identifying Temporary Folder Issues
Unlike file permissions, diagnosing temporary folder issues can be more challenging, as WordPress does not provide a direct tool like the Site Health feature for this purpose.
However, signs that point towards a temporary folder issue include consistent upload failures despite having correct file permissions and adequate disk space.
Resolving Temporary Folder Complications
Addressing issues with the WordPress temporary folder often requires a more hands-on approach:
- Contact Your Hosting Provider: Since access to the server’s temporary folder might be restricted, your first step should be to reach out to your hosting provider’s support team. They can check the status of the temporary folder and clear it if it’s full.
- Increase Temporary Folder Capacity: If the temporary folder is consistently reaching its capacity, ask your hosting provider if it’s possible to allocate more space to this folder to accommodate your site’s needs.
- Check Server Configuration: In some cases, the temporary folder’s path may be incorrectly configured in your server’s settings. Your hosting provider can verify this configuration and make necessary adjustments.
Proactive Monitoring
To prevent future disruptions, consider setting up a monitoring system with your hosting provider to alert you when the temporary folder is nearing capacity.
This proactive approach can help you avoid not only the “Failed to Write File to Disk” error but also other potential issues related to server limitations.
Conclusion
Failed to write to disk error is one common error on the WordPress platform. The good news is that you can quite easily fix it.
In this article, you have learned 3 ways to fix this error. See also how to Fix Updating Failed and Publishing Failed Errors in WordPress Page and Post Editor and how to Fix The “503 Service Temporarily Unavailable” Error In WordPress.
We hope you found it useful, and if you did, kindly share this article with others.
Also, if you run into more WordPress errors or issues feel free to contact our wp support. For more WordPress tutorials check our WordPress blog.
More Resources:
- How to Clear WordPress Cache – Step By Step Guide
- Optimize Images For Web – Complete Guide On How To Do It
- How to Fix “Are You Sure You Want to Do This?” Error in WordPress

