How to Customize WordPress Header
The header section of your WordPress website contains some of the most important design elements of your site. Major site defining aspects like your main menu, header image, contact information are located in this section. Since it usually meets the eyes first, it has to be captivating enough to make a good first impression. To do this, start by creating a WordPress custom header.
Your WordPress default themes header will usually not be appealing to users. So it makes so much sense to brand your website by adding code, custom videos, images, and taglines to your header. This enables your website to easily convey its uniqueness to your target audience.
After reading this article, you will learn how to create custom headers in WordPress how you can use it to personalize the design and appearance of your WordPress site.
Content
- What is a custom header?
- Emphasizing Header Accessibility and Mobile Responsiveness
- Performance and Optimization: Enhancing Your WordPress Header
- Customizing the WordPress header
- Header plugin for Social media icons
What is a custom WordPress header?
A custom header is a WordPress feature that allows users to improve the appearance of their website’s header using the default WordPress theme customizer. This can be achieved in a number of ways including; uploading customized title images, adding or removing header text, inserting header widgets, and adding social media icons.
Emphasizing Header Accessibility and Mobile Responsiveness
Accessibility in web design ensures that your website can be used by as many people as possible, including those with disabilities. An accessible header means that all users, regardless of how they interact with your site—be it through a mouse, keyboard, screen reader, or any assistive technology—can navigate your content effortlessly.
Key considerations for an accessible header include:
- Semantic HTML: Use proper HTML tags to structure your header. For instance, wrap the primary navigation in <nav> elements and use <h1> for your main site title to provide clear landmarks for assistive technologies.
- Alt Text for Logos and Icons: Ensure that any logos or icons within your header have descriptive alt text, allowing screen reader users to understand their purpose.
- Keyboard Navigation: Your header should be fully navigable using a keyboard alone, with a logical tab order and visible focus states for interactive elements.
Prioritizing Mobile Responsiveness
With over half of global internet traffic coming from mobile devices, a mobile-responsive header is non-negotiable. A responsive header adapts to various screen sizes, ensuring that navigation remains intuitive and content is easily readable without the need for zooming or horizontal scrolling.
To achieve a mobile-responsive header, consider the following:
- Responsive Design: Employ CSS media queries to adjust the layout and style of your header based on the screen size. This might include stacking elements vertically on smaller screens or adjusting font sizes for readability.
- Hamburger Menus for Mobile: On smaller screens, traditional navigation menus can take up too much space. Collapsing your menu into a “hamburger” icon frees up real estate while keeping navigation accessible.
- Touch-Friendly Elements: Ensure that clickable elements in your header, like menu items or buttons, are large enough to be easily tapped on a touchscreen device.
Testing and Optimization
The final step in ensuring your header’s accessibility and mobile responsiveness is thorough testing. Use a variety of devices and browsers to interact with your header. Also, consider employing accessibility testing tools and real user feedback to identify and address any issues.
Performance and Optimization: Enhancing Your WordPress Header
In the realm of web design, the allure of a visually striking header must be balanced with the practicality of website performance. This is particularly true when it comes to incorporating images and videos into your WordPress header.
A well-optimized header not only captivates your audience but also contributes positively to your site’s SEO and overall user experience.
The Importance of Optimization
High-resolution images and videos can significantly increase your website’s loading times, potentially leading to higher bounce rates and lower search engine rankings.
In today’s fast-paced digital environment, users expect quick and responsive websites. Therefore, optimizing your header’s media content is not just a recommendation; it’s a necessity.
Optimizing Header Images
When it comes to images, the key is to find the perfect balance between file size and quality. Here are some tips to optimize your header images.
- Choose the Right Format: JPEG is ideal for photographs, while PNG is suitable for images with transparent backgrounds. WebP, a newer format, offers superior compression and quality characteristics compared to JPEG and PNG.
- Compress Your Images: Use image compression tools to reduce file size without compromising quality. Many online tools and WordPress plugins can automate this process.
- Use Responsive Images: Ensure your theme supports responsive images, which adjust according to the screen size, reducing the load on smaller devices.
Optimizing Header Videos
Videos, while engaging, can be even more demanding on performance. Consider the following for video headers:
- Host Videos Externally: Hosting videos on platforms like YouTube or Vimeo and embedding them on your site can save bandwidth and reduce loading times.
- Use Short Clips: Shorter videos load faster. Aim for clips that are a few seconds long, loop smoothly, and convey your message effectively.
- Consider a Fallback Image: Always provide a fallback image for scenarios where the video cannot load, ensuring your header remains visually appealing.
Implementing Lazy Loading
Lazy loading is a technique that defers the loading of non-critical resources at page load time. Instead, these resources are loaded at the moment they are needed (e.g., when scrolling down the page).
Implementing lazy loading for your header media can significantly improve initial page load times and, as a result, user experience and SEO.
Regular Performance Audits
Regularly auditing your website’s performance using tools like Google PageSpeed Insights can provide valuable insights into how your header affects your site’s loading times.
These tools offer specific recommendations for improvement, which can guide your optimization efforts.
Customizing the WordPress Header
The features on your WordPress header is determined by your chosen theme. The latest default WordPress themes (both free and premium) have the custom header feature. These themes provide header image options to choose from, they also allow users the liberty to upload custom videos and images.
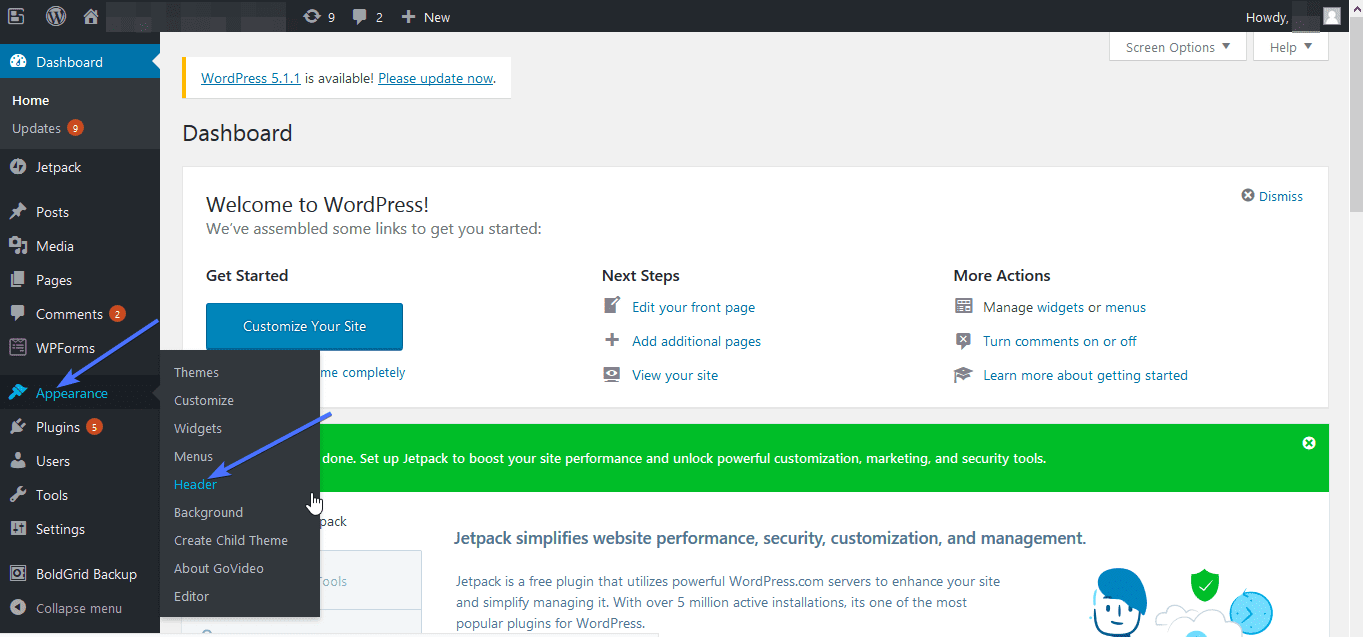
However, if your default WordPress theme is not custom header enabled, you will not be able to customize your WordPress header. To determine if your theme is custom header enabled, go to your WordPress admin panel and click on Appearance. If you find the Header option under its menu, then the theme supports custom headers.
Steps to add a custom header image
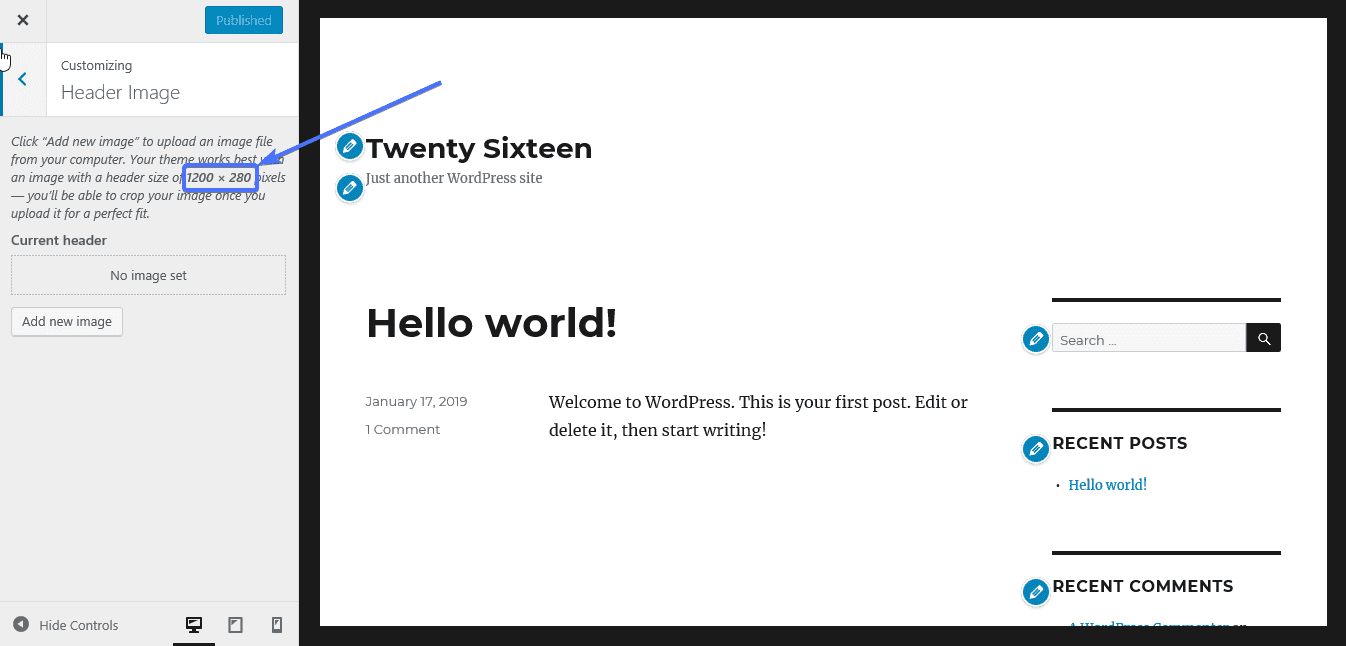
We will use the Twenty Sixteen default WordPress theme to customize the header. You can look at the dimensions for your header image in the header section by clicking Appearance >> Header on the admin dashboard.
Step 1 – Get a new image
The first thing you need to do is to get a good quality image that represents your site well. The image should be both meaningful and relevant. You can source for images from websites that provide royalty free images or use an original image that suits the purpose. We are using a sample image from Pixabay.
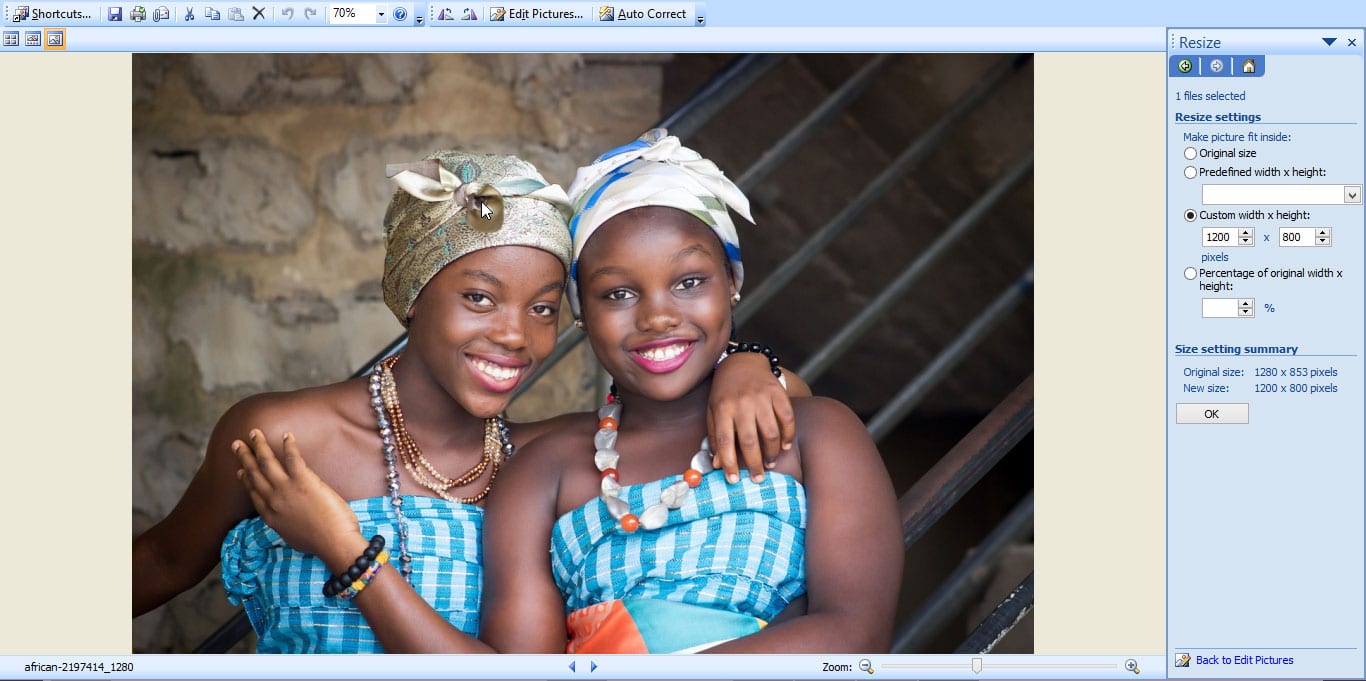
Step 2 – Edit and resize the image
Some themes allow you to crop the image as soon as you upload it, while some do not. In any case, you can use an image editing tool such as Adobe Photoshop to resize your image to the dimensions your theme specifies. This would also be a good time to add any artistic or graphic details to your header image. We’ll use the Microsoft Office Picture Manager.
Step 3 – Upload and replace the image
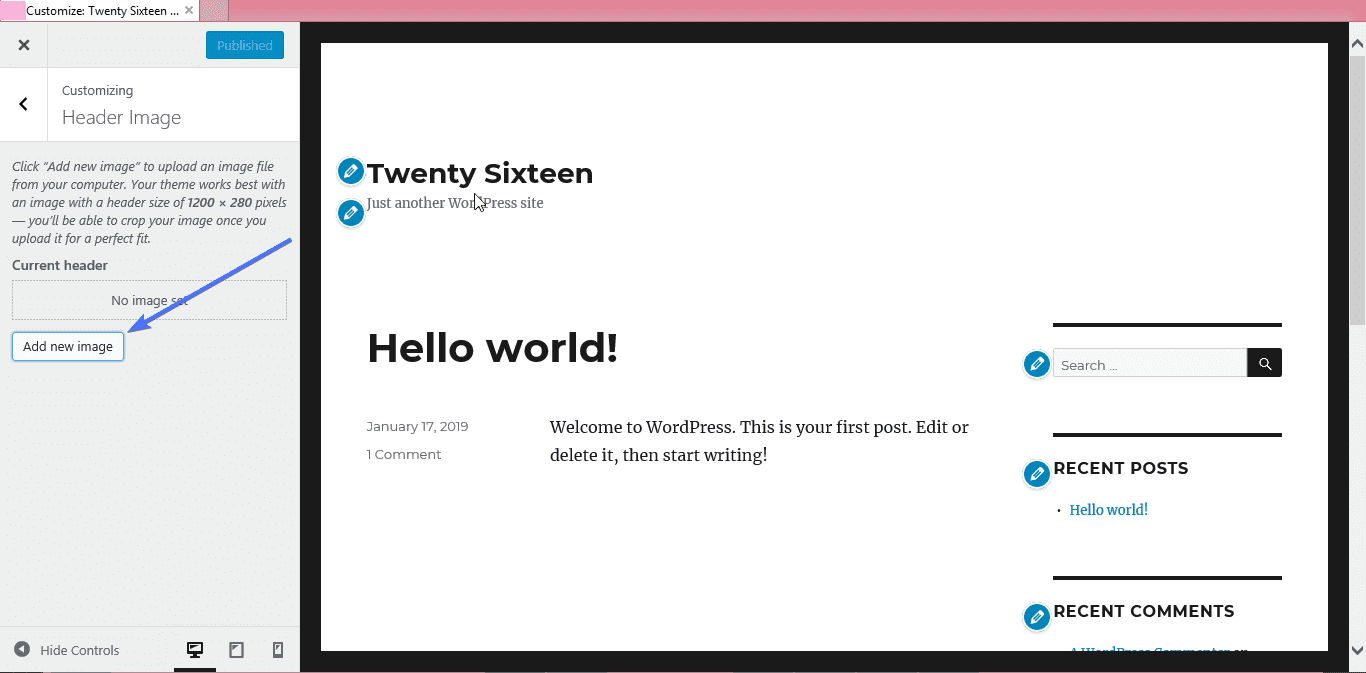
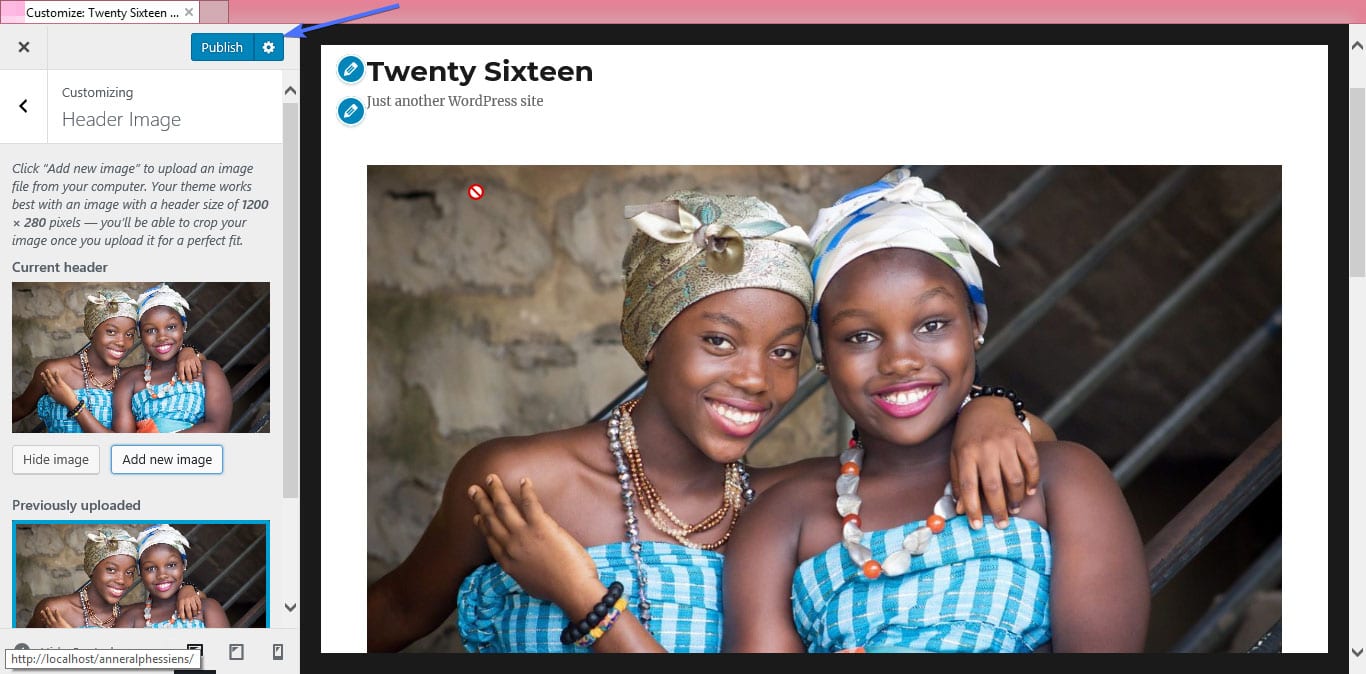
The default Twenty Sixteen theme does not have a set header image. So as we have seen already, go to Appearance >> Header, then click the Add new image button.
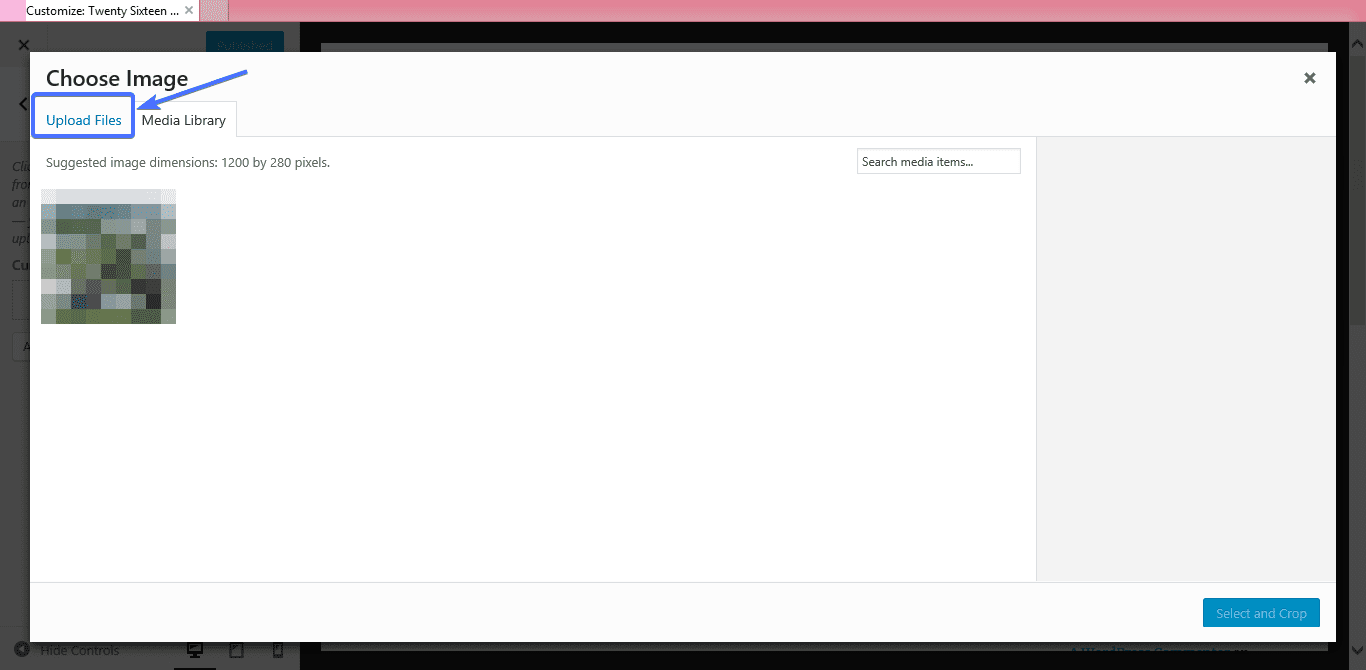
On the new window, click the Upload Files button.
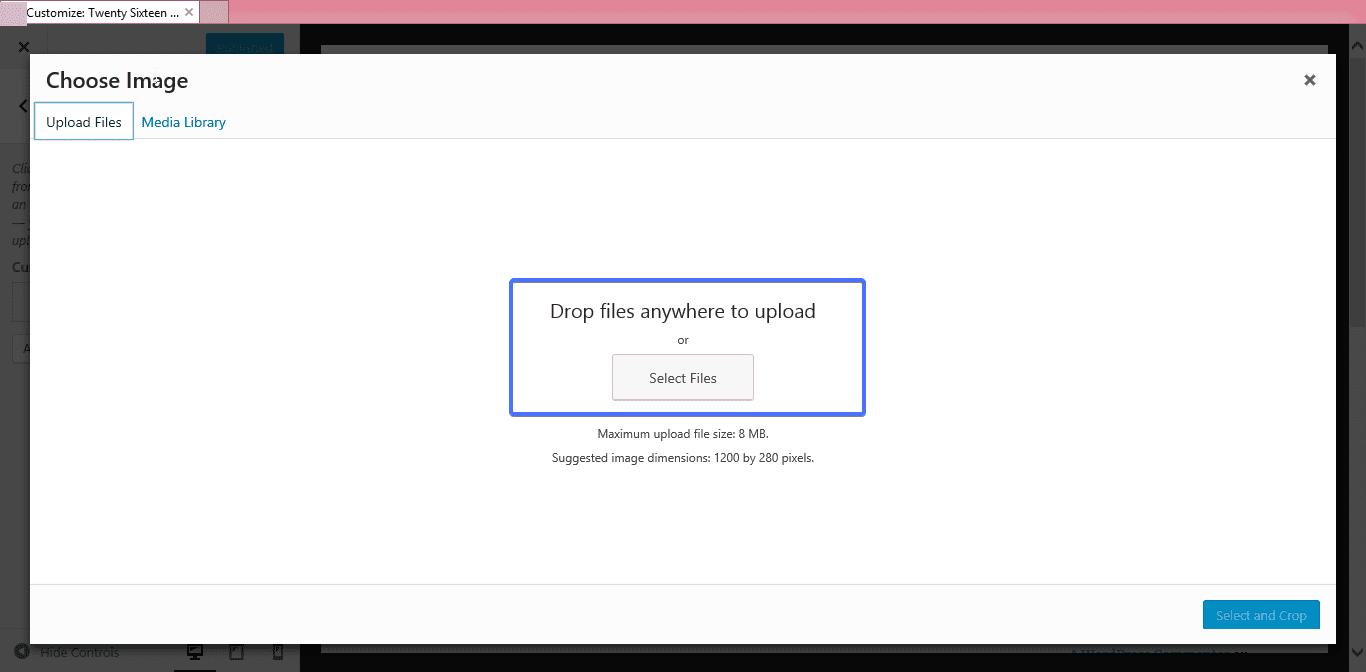
Click Select Files and select the image file you want to upload.
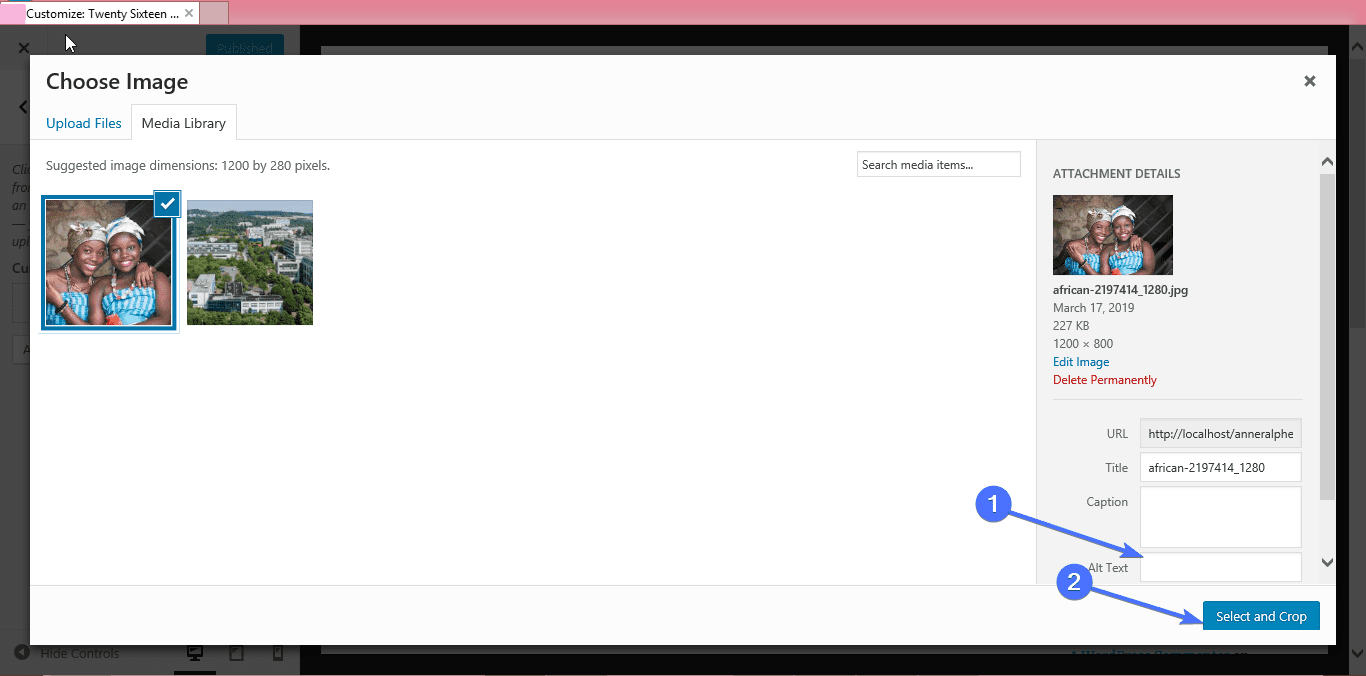
Next, provide alternate text, then click on Select and Crop.
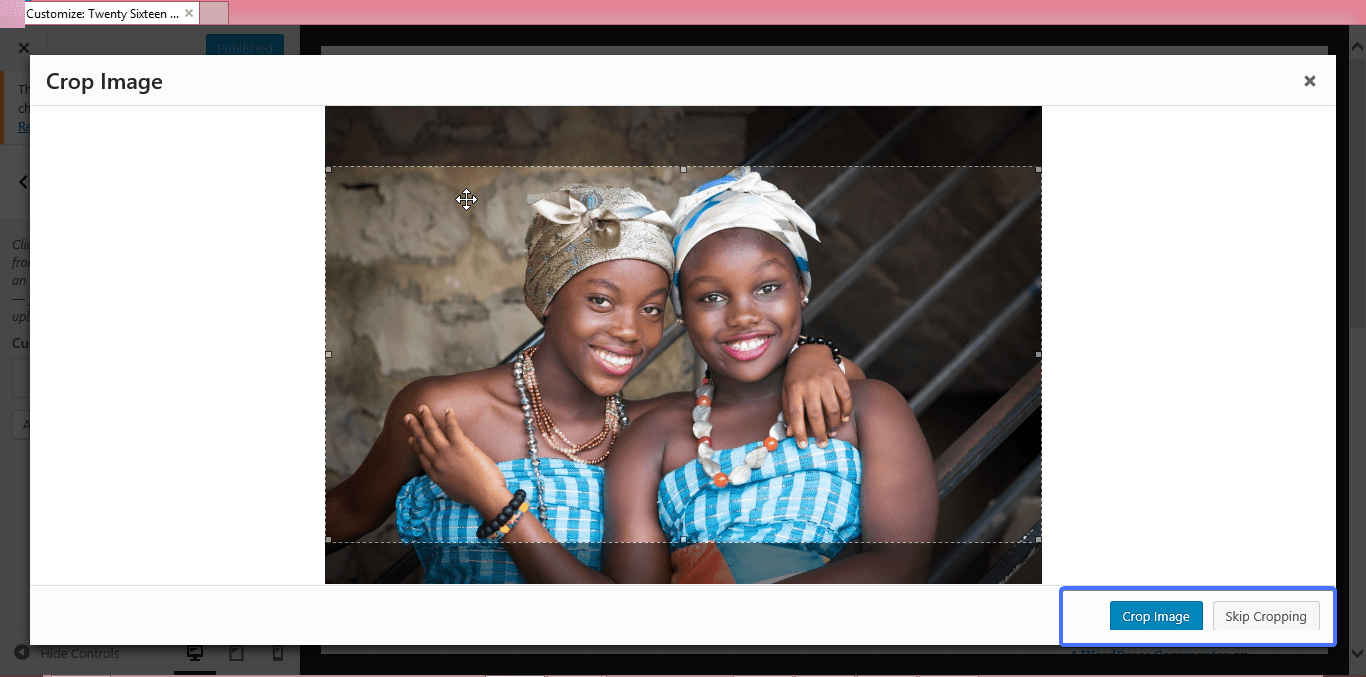
If you intend to crop the image, choose Crop Image. Otherwise, click Skip Cropping.
Click on Publish to display your new WordPress header.
How to add a video header
There are themes that support video headers and for this feature, we will use the default Twenty Seventeen WordPress theme.
Option 1 – Use an mp4 video format
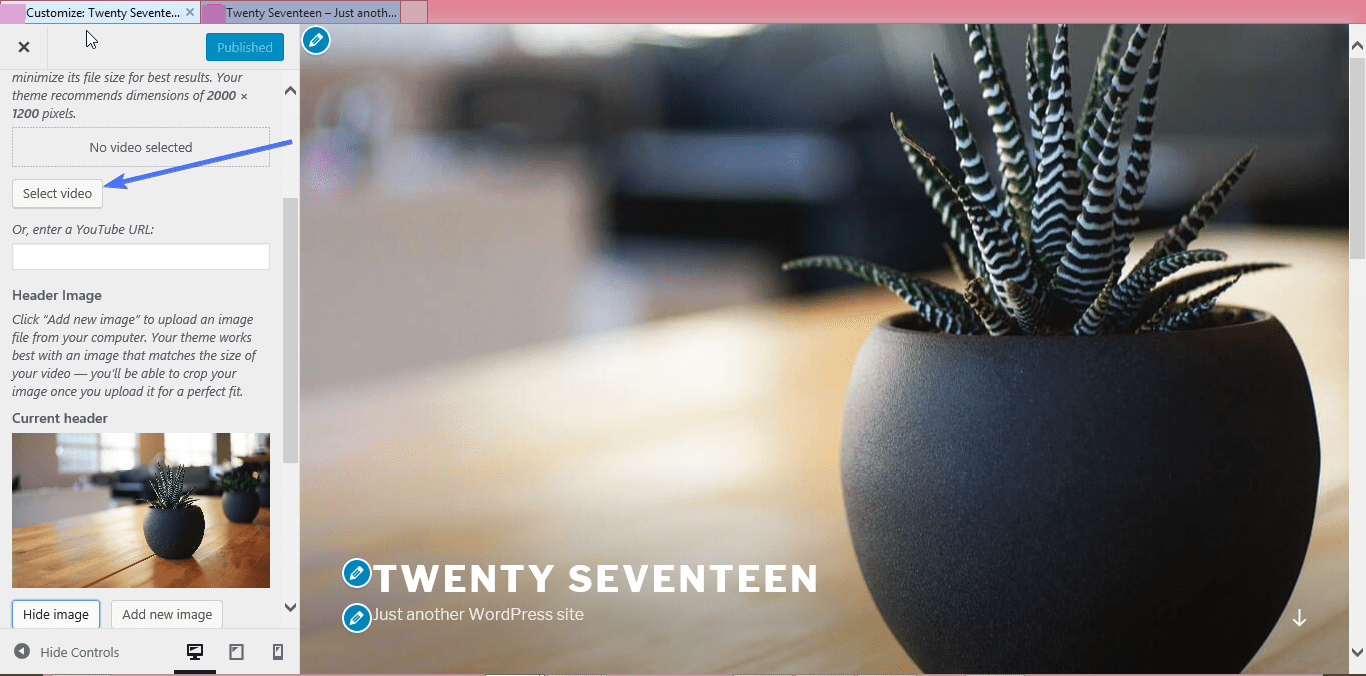
On your admin dashboard, follow the same steps through Appearance >> Header >> Select Video.
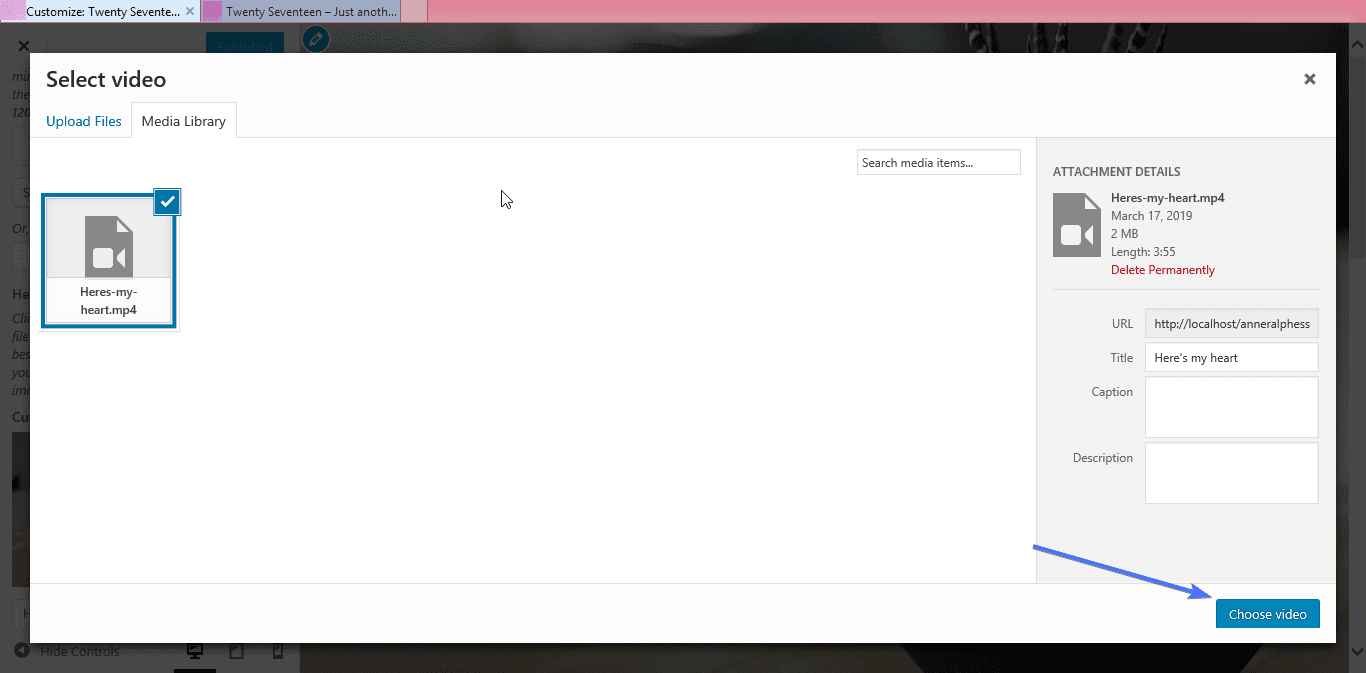
The next window gives you the option to upload the video from your computer. After uploading click Choose video.
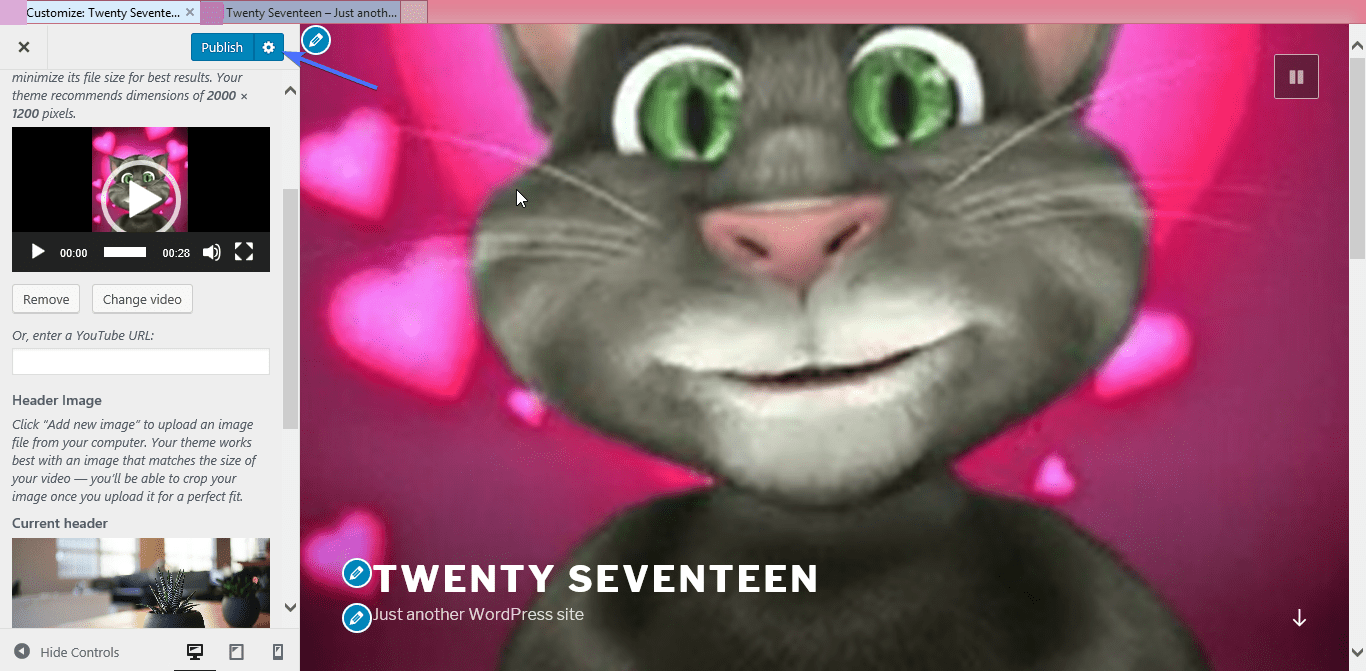
Click Publish to save and display your header video.
Option 2 – Load a video from Youtube
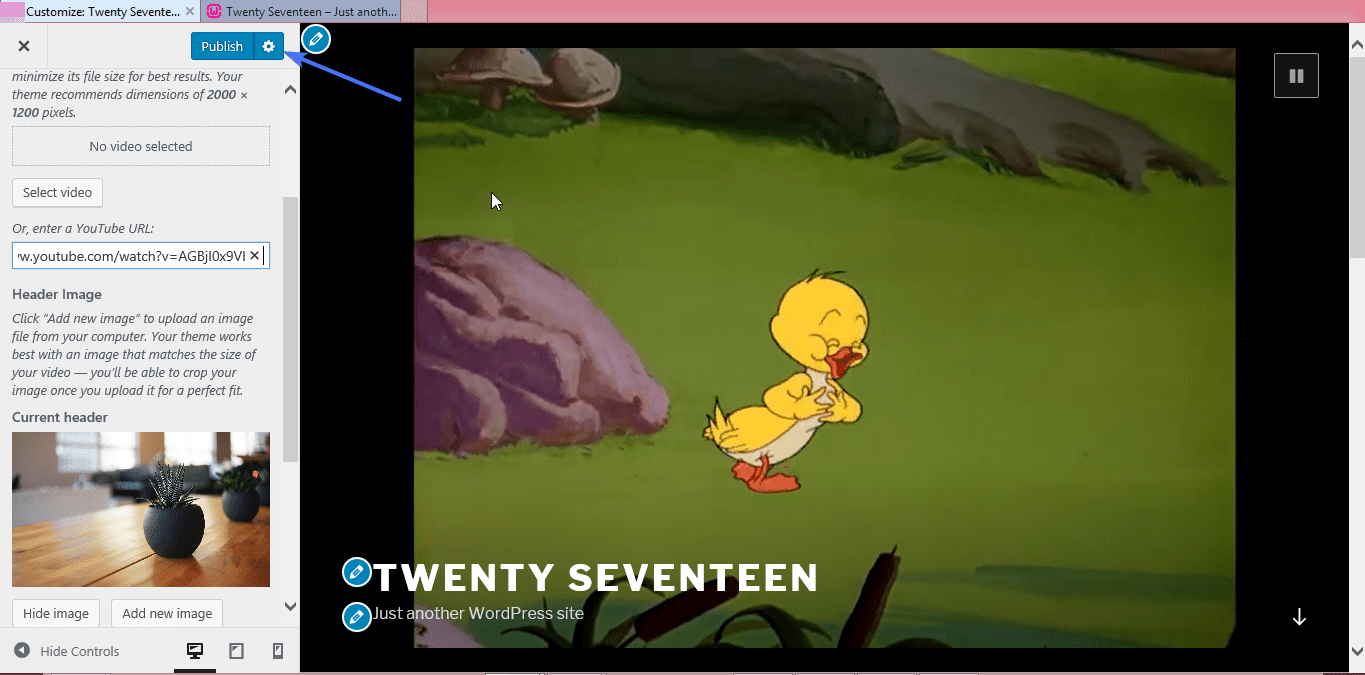
The second option is to load the video from YouTube. So instead of doing Select video, copying and pasting the URL of the header video you wish to use in the text input bar will do the job.
Fallback Images for Video Headers: Ensuring Seamless User Experience
Not all users have access to high-speed internet, and some devices or browsers may have limitations that prevent video playback. In such scenarios, without a fallback image, your website could display an empty space or a loading error in the header area. This could detract from the user experience and your site’s professional appearance.
A well-chosen fallback image ensures that your website remains visually appealing and conveys the intended message, even when the video cannot load. It acts as a static representation of your video content, maintaining the aesthetic continuity of your site.
Choosing the Right Fallback Image
Selecting an appropriate fallback image is more than just picking any still from your video. Consider the following:
- Relevance: The image should encapsulate the essence of the video, reflecting the theme or key message of your content.
- Quality: Opt for high-resolution images that are clear and visually appealing, ensuring they look good on various devices and screen sizes.
- Optimization: Large images can slow down your site. Compress your fallback images to balance quality and performance, enhancing your site’s loading speed.
Implementing Fallback Images
Most modern WordPress themes and page builders that support video headers also offer an easy way to set a fallback image. Typically, you’ll find this option in the same section where you upload your video header.
If your theme doesn’t provide a straightforward method, consider using custom CSS or reaching out to the theme’s support for guidance.
Testing Across Devices and Browsers
Once you’ve set your fallback image, it’s crucial to test how your header appears across different devices and browsers. This ensures that all visitors, regardless of their browsing conditions, receive a cohesive and engaging experience when they land on your site.
How to add a custom logo to your header in WordPress
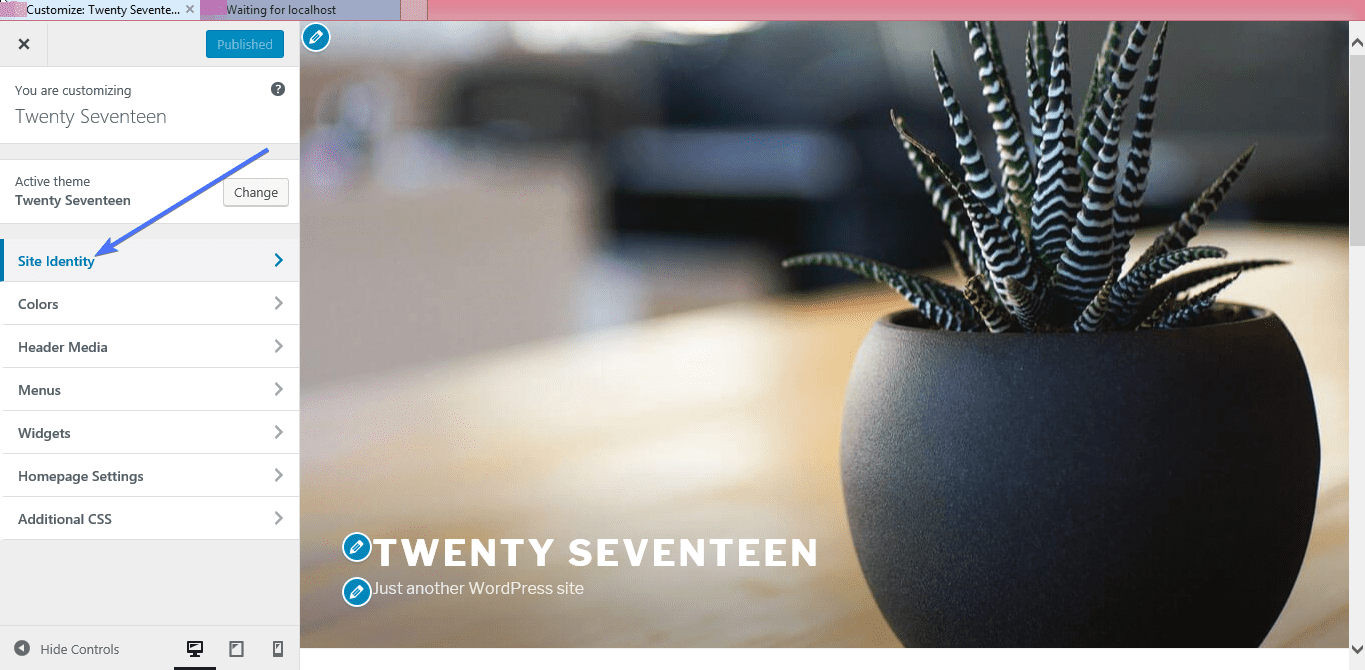
Go to Appearance >> Customize, then select Site Identity
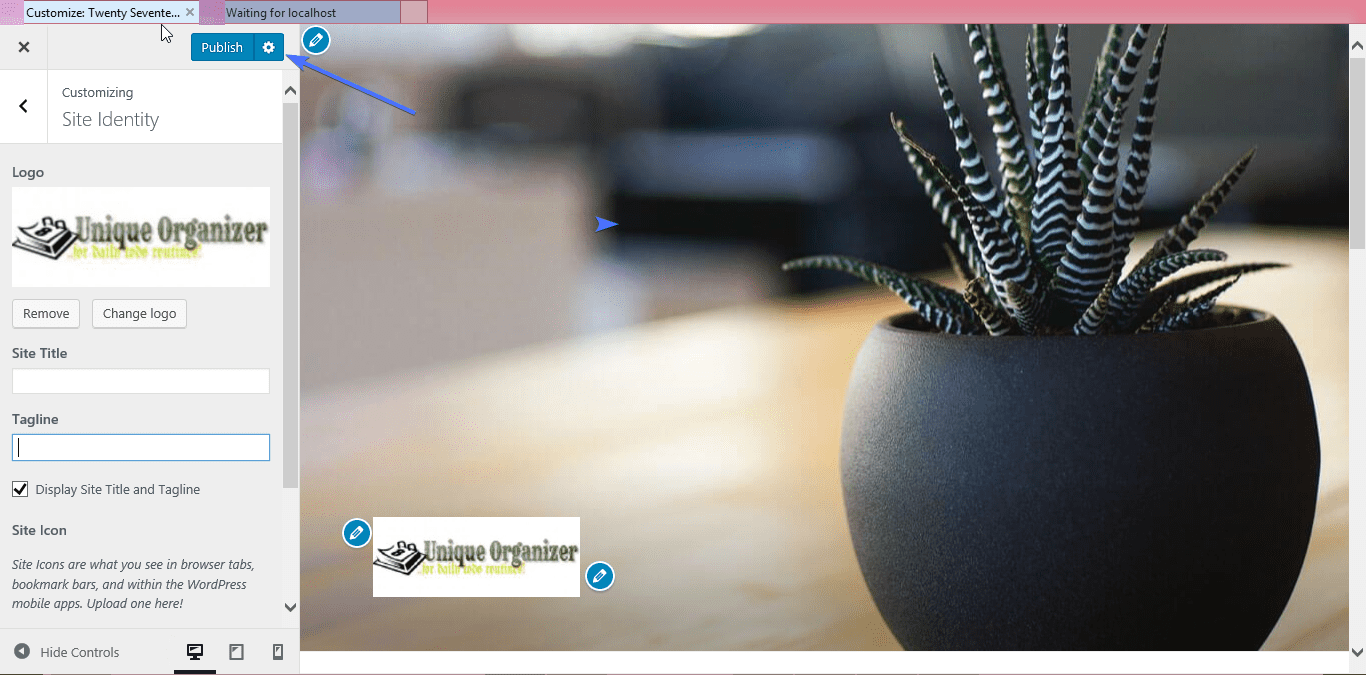
Click Select logo to upload the logo file. The process is the same as the steps outlined above.
Delete the Site Title and Tagline as they may no longer be necessary. Click Publish to display your logo.
Header plugin for social media icons
You can always use custom header WordPress plugins to speed everything up. Many WordPress themes have support for adding social media icons to the footer and other widget enabled parts of the website. But if you need to add social media icons to your header, there are a couple of things you may need to do first.
- Download and install the plugin Menu Image (its free)
- Source for social media icon images
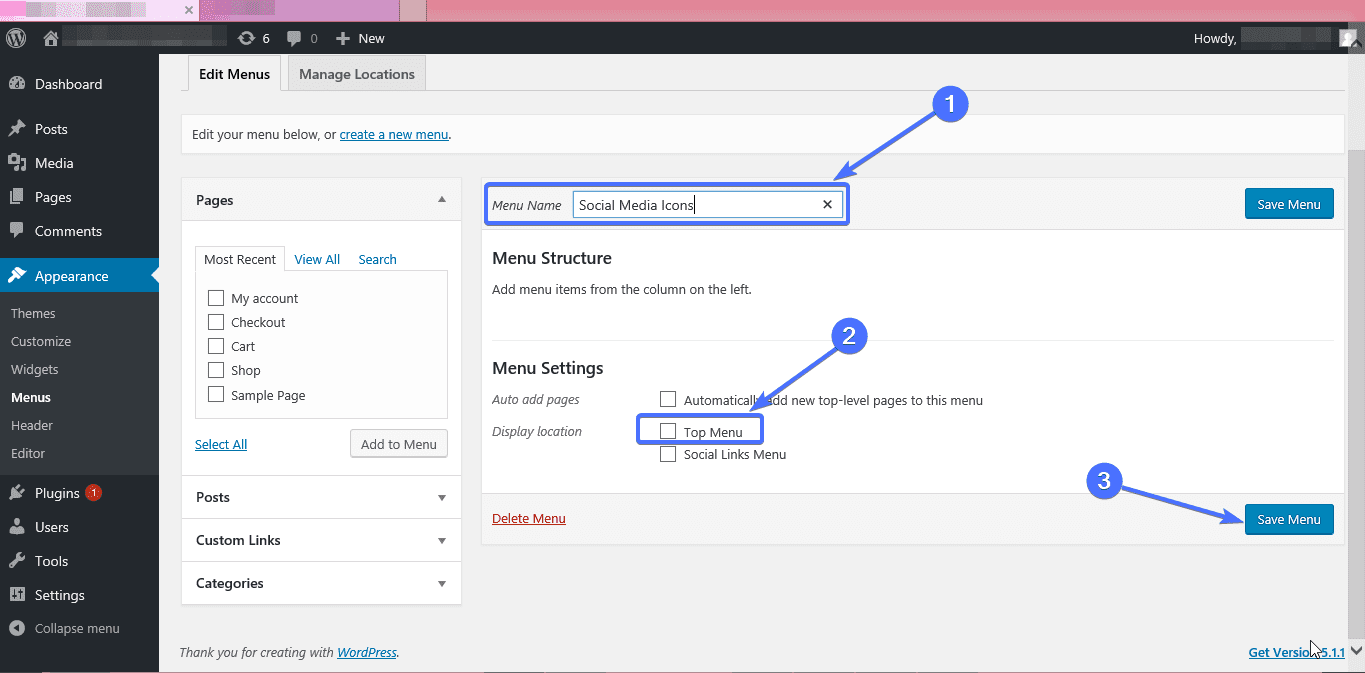
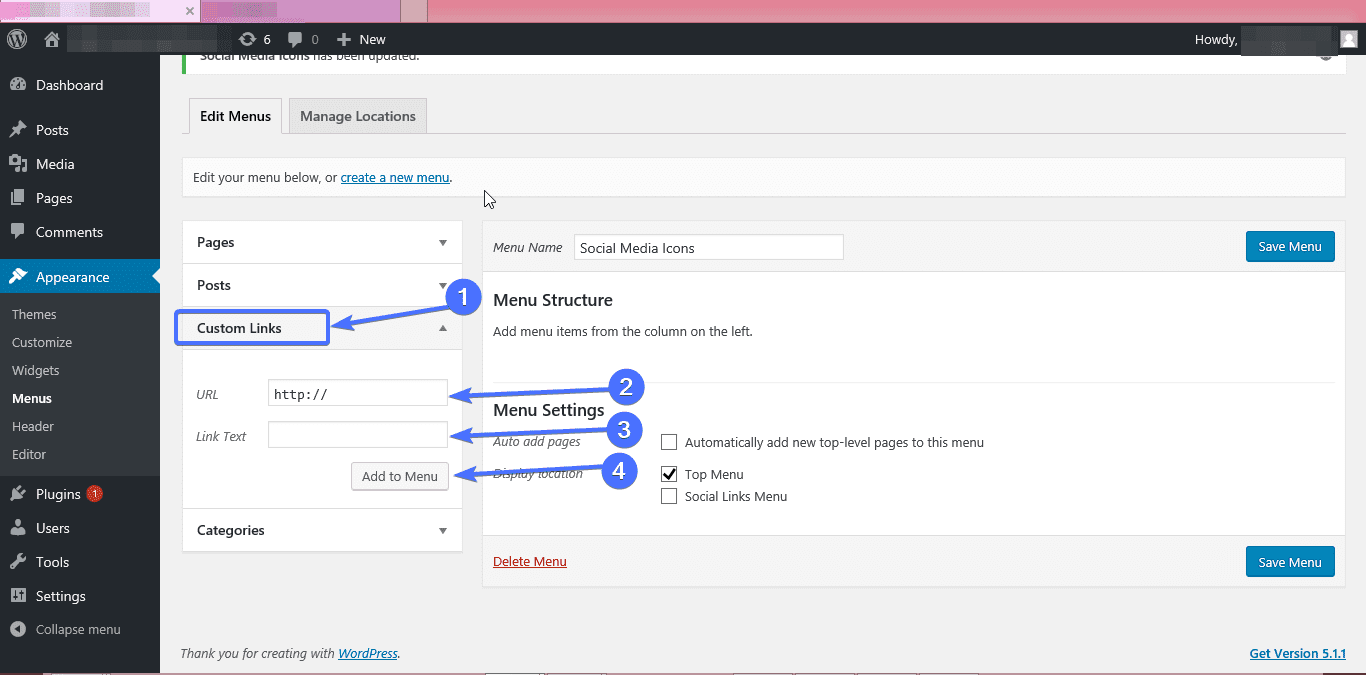
From your WordPress admin dashboard, go to Appearance >> Menus. Provide a name for your menu, check the box for Top Menu, and click Save Menu.
Select Custom Links, fill in values for the URL (to your social media pages) and the Link Text (such as Facebook), then Add to Menu.
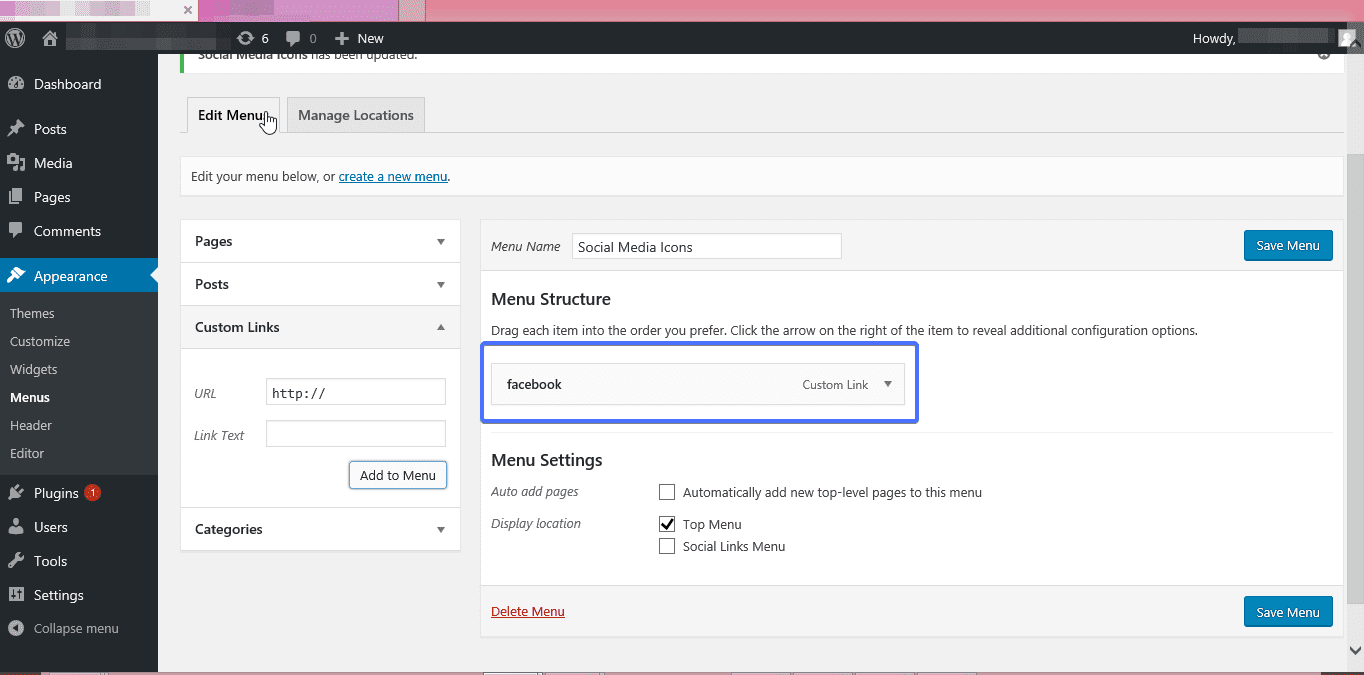
A Custom Link is created under the Menu.
Click on the custom Link to expand it. You will notice that the image size defaults to 36 x 36 and there are radio button options to determine the displaying of the link text (title). Check the Hide radio button and click Set Image.
Upload your selected image file and click the Save Menu button.
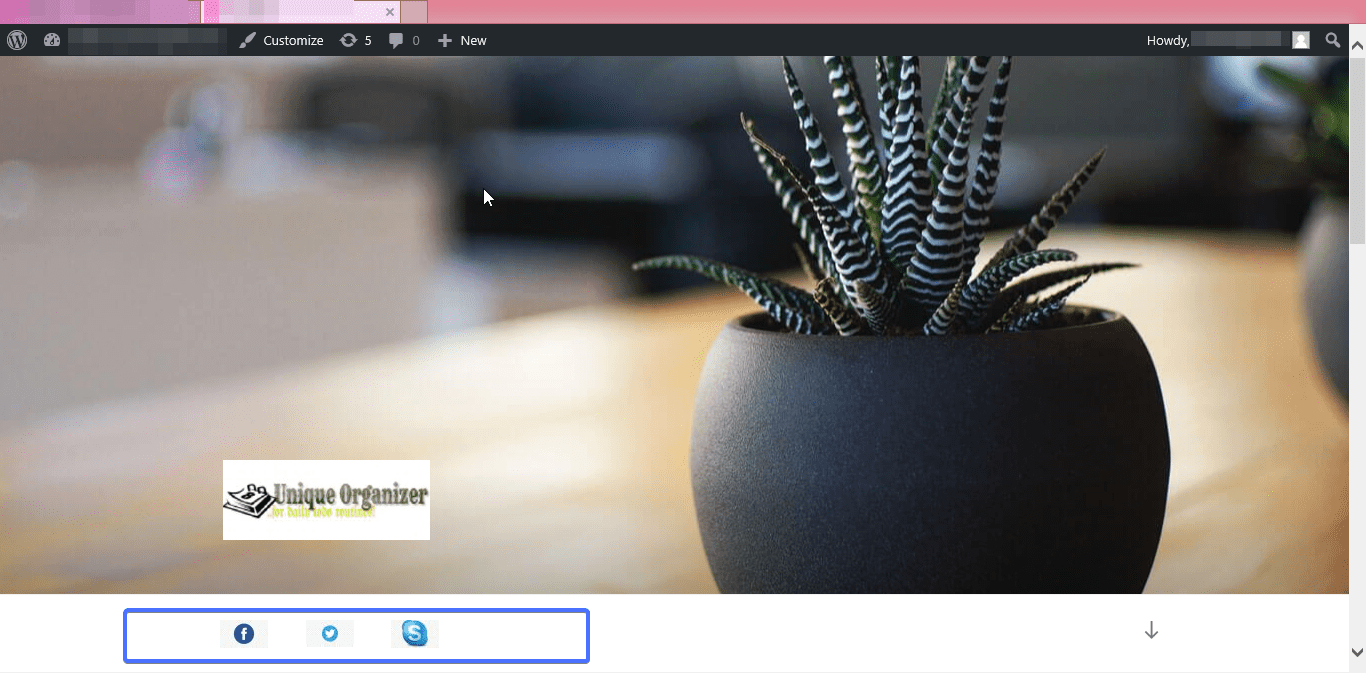
Hit the refresh button to see your social media icon on the top menu of the header.
Conclusion
There are many advanced changes and customizations you can make to your WordPress header. It may require further research and even getting your hands dirty with adding code. When all is done, your site should present the look and feel that you want to give your users.
This article has taught you most of the simple customizations you can perform on your site to make it look unique. For more step by step WordPress tutorials check our WordPress blog.
More Resources:
- How To Fix The “503 Service Temporarily Unavailable” Error In WordPress?
- Squarespace Vs WordPress
- The Fastest WordPress WooCommerce Themes Of 2020
- How to Fix “Vary Accept-encoding Header Error” in WordPress

