WordPress Favicon – How To Easily Setup For Your Site
Having to add/change a Favicon, or Site icon, is an important branding element every WordPress website user should consider.
They are the tiny, cropped images you see on a browser’s tab when you open a website.
As an illustration, here’s how favicon looks on a browser.

Chances are you have seen them a zillion times over the web. But what’s the deal with them? Should you bother about having them on your WordPress blog or site?
The truth is, they are more important than you may imagine. A favicon represents your website identity to visitors.
When you don’t set a custom favicon on your website, a generic icon will be used by default. And that won’t be nice for your site design and identity.
Here’s a scenario.
![]()
With several pages opened at a time, your site title will be blocked from the view of a web user. In such a situation, your site will very likely get lost in the eye of the web user if it uses a generic favicon.
There are many other significant roles Favicons play as you will get to find out shortly in this article. Additionally, you will get to learn how to create/change and also upload your Favicon to your WordPress site.
In this article:
Reasons Why Having Favicons in WordPress Really Matter
Maybe you aren’t sold yet on the idea of creating a favicon for your website? Or perhaps the whole site identity thing doesn’t catch your fancy.
If so, here are solid reasons why having favicon in WordPress is important.
Establish Credibility
Without a favicon, your website can come off as unprofessional, and you sure wouldn’t want that to happen.
Additionally, a favicon also helps make your site trustworthy.
Improves User Experience
If you’ve noticed, browsers like Chrome save favicons of sites you regularly visit on your homepage. It saves you the trouble of having to always type out a site’s URL.
As such, having one on your site makes it easy for your users to come visiting.
Enhances Branding
When you see a swoosh logo, you think of Nike, right? The same goes for the half-eaten apple – you think of Apple.
That’s branding 101. Like your site logo, a favicon also gives your business an unmistakable identity online.
How to Create/Change WordPress Favicons
With all said, it’s about time you created a memorable site icon for your WordPress site. There are three ways you can go about this:
- Modifying your existing site logo
- Hiring a Designer
- Going the DIY(Do-it-yourself) route
Modifying Your Existing Site Logo
This by far is the simplest, fastest and most effective. In fact, a favicon is nothing more than a cropped logo.
If you will be using your site logo, you will have to do some editing. Using a photo editing software like Photoshop, adjust the image size to 512px by 512px. That’s the standard size for WordPress.
Hiring a Designer
Though this might not be cost-effective, hiring a professional designer comes with some perks. First, you are sure of getting something of good quality.
Additionally, a professional designer will create a favicon that’s unique to your business.
However, since a cropped logo often does the job, you have to weigh the pros and cons and then decide if you want to spend the extra.
Do It Yourself (DIY)
If you’ve got the skills and time, the DIY route would suffice. You could use an image editing program like Gimp, Photoshop or Illustrator.
Alternatively, you can use an online tool like Faviconer. You have the option of drawing a custom icon or uploading an image. Then Faviconer would make a favicon out of the uploaded image.
You also have the option of online generators that spin off favicons at the click of the button. Examples are Favicon.cc and Favicon Generator.
Favicon Format
In the early days of WordPress, you could only upload an ICO file for a favicon. An ICO file format made it possible for browsers to adjust the favicon size based on the viewing device.
But that was before. Now, WordPress accepts image files in ICO, jpg, png or gif formats.
One last thing worth mentioning is the size of the icon. To avoid the image from being chopped off, ensure its length and width are the same. It should be at least 512px by 512px – a perfectly square shape.
Uploading The Favicon to WordPress
With your favicon ready, it’s about time that you upload it to your WordPress site. There are a couple of ways you can go about that.
You have the option of manually uploading the site icon, or using a plugin. Let’s explain.
Uploading To Your Site Manually Via FTP
For older versions of WordPress (4.2 and lower), you only had the option of uploading favicons via FTP. It is unlikely that you would need to use this method. Seriously, if your WordPress version is 4.2 or lower, please update.
Nonetheless, here’s how to upload favicon in older versions of WP.
First, in this case, your favicon images has to be 16px by 16px in size, with name as favicon.ico.
When you have that, establish a connection to your site using an FTP program. With a connection established, the next step is to upload the image to your site’s root directory.
The root directory (also root folder) is the main folder containing your WP files (it is often public_html).
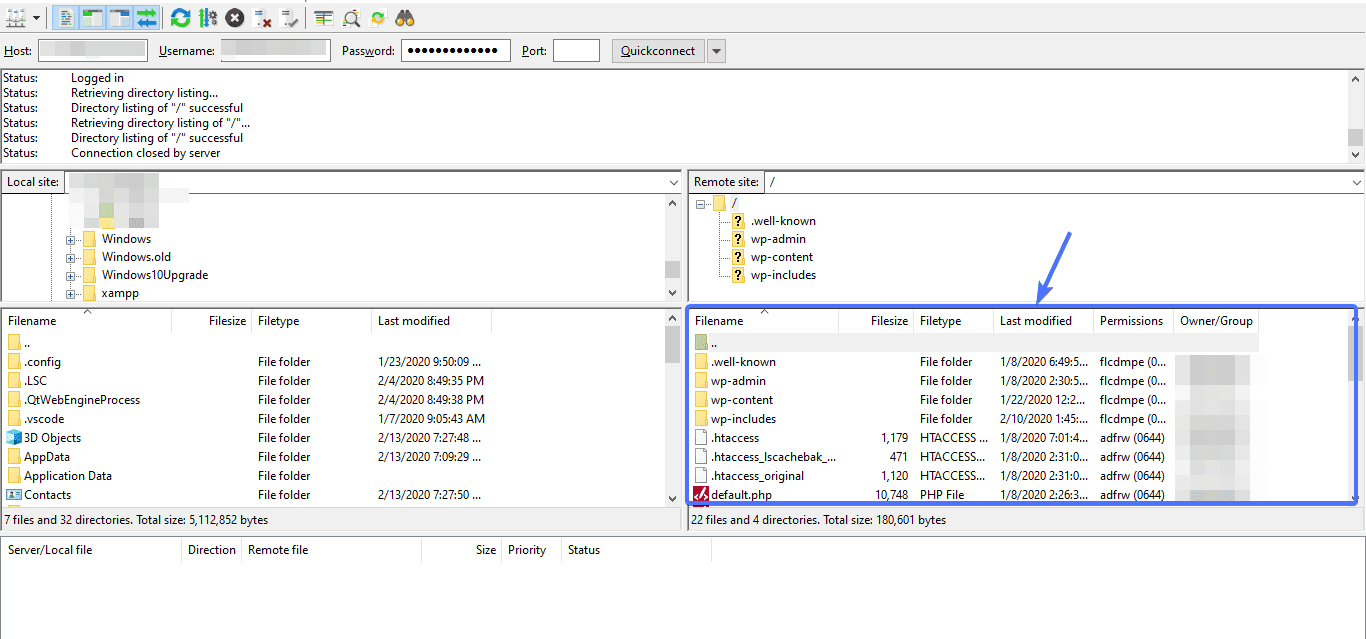
Here’s how you upload the image to your site via FTP.
- Locate the image you wish to upload on your computer and select it.
- Once you select an image, right-click on it and click Upload
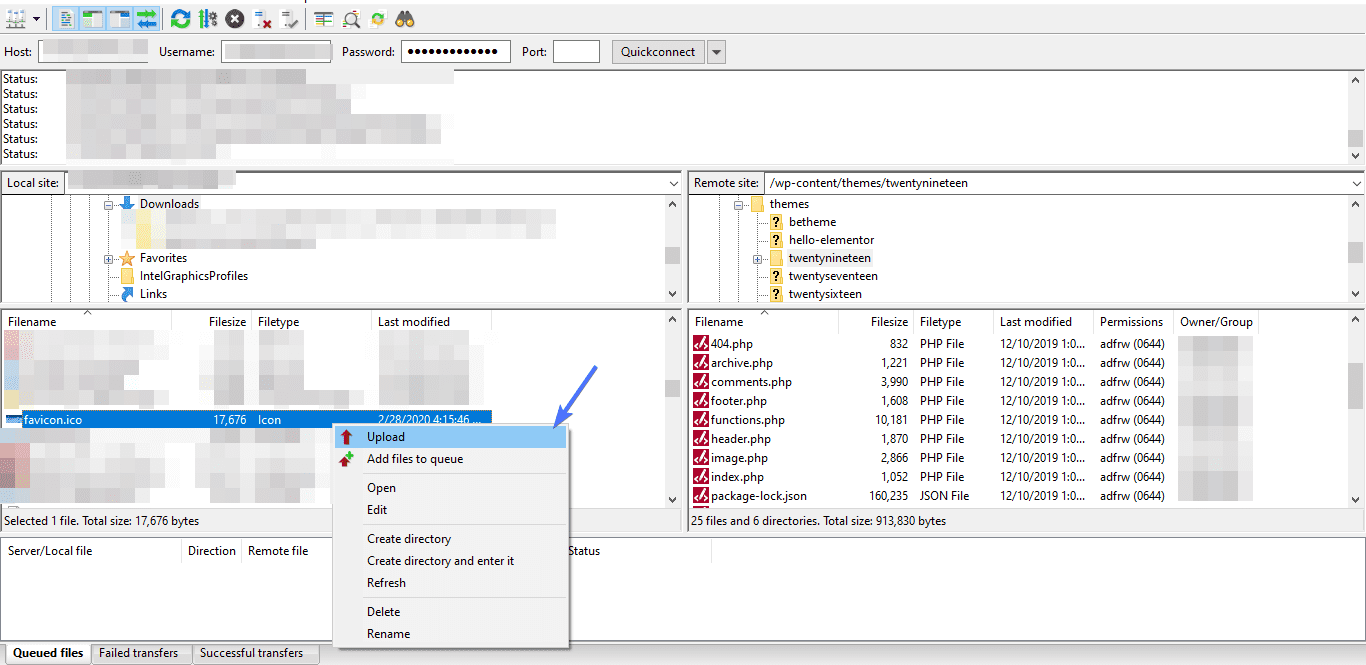
With the image uploaded to your site, you have to place the following code in your header.php file, before the </head> tag.
<link rel="icon" type="image/x-icon" href="http://www.mywebsite.com/favicon.ico">
Of course, you have to replace mywebsite.com with your domain name.
You will find the header.php by navigating to wp-content >> themes >> your theme >> header.php
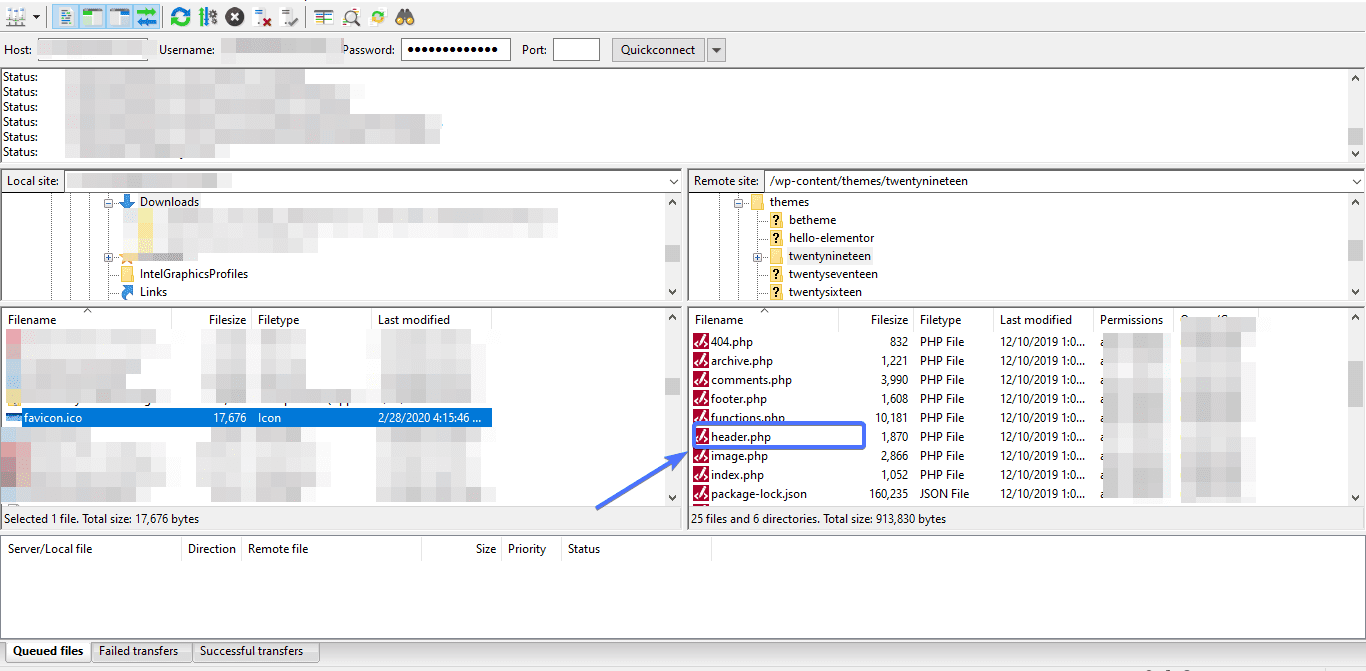
Right-click on it, select View/Edit, then paste the code, save, and upload.
However, if you are not comfortable making edits to your core files, there’s a workaround. Simply install and activate the Insert Headers and Footers plugin.
After installation and activation, navigate to Settings >> Insert Headers and Footers. Then paste the code.
Uploading Favicon Via WordPress Customizer
There’s an inbuilt function that lets you upload favicon to your WordPress site, regardless of the file name or type. This easier method is available to you as long as you have a recent version of WordPress.
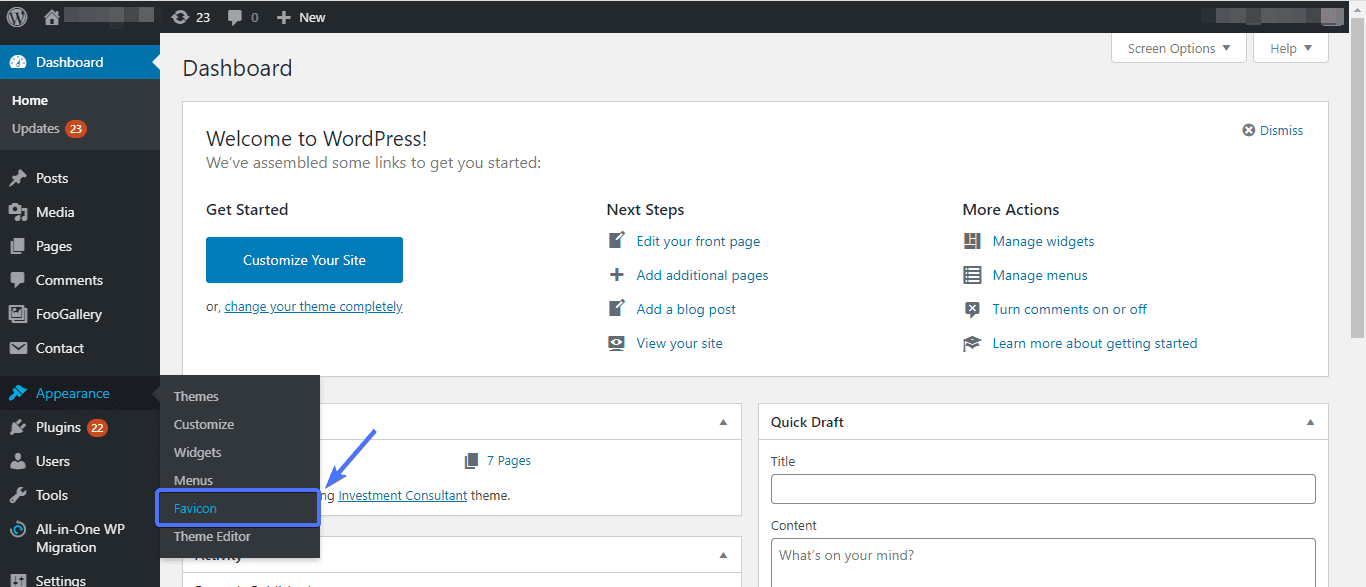
To use it, log into your WordPress dashboard.
Then navigate to Appearance >> Customize
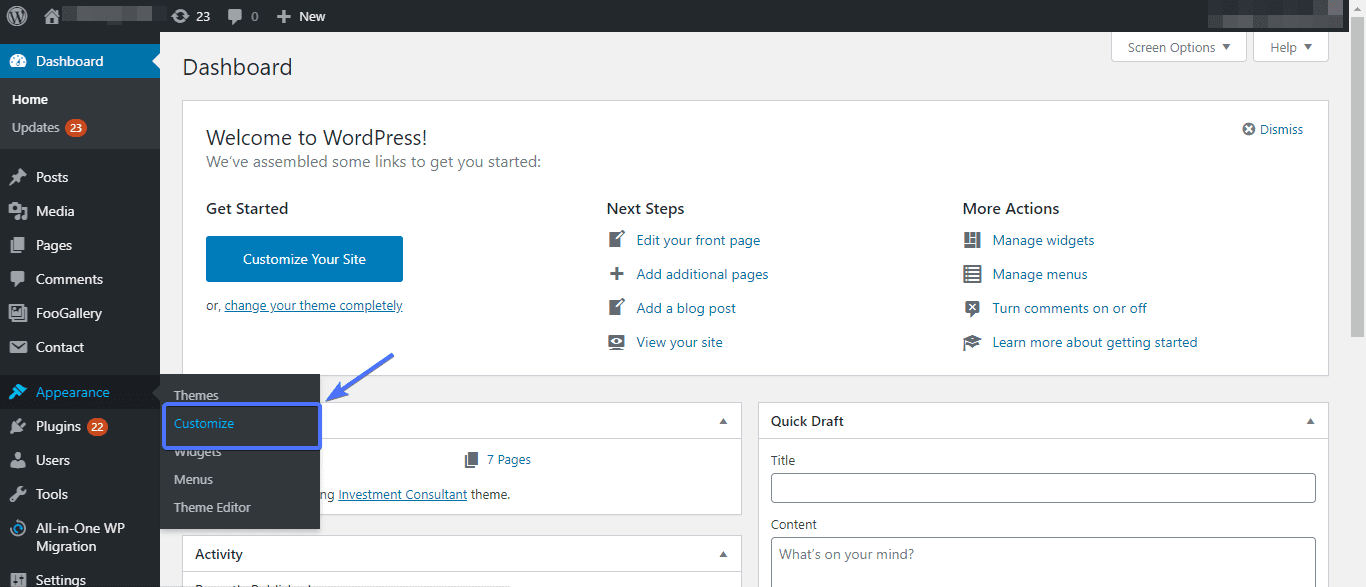
Next, navigate to Site Identity >> Select site icon
![]()
Upon click, you will be taken to your site’s media library. If the image has already been uploaded, just select it.
Else upload it by clicking the Upload Files tab and selecting it from your local files. When done, hit Publish.
Uploading WordPress Favicon Via a Plugin
There are quite a number of plugins for WordPress you can use to install/change favicons on your site. Using plugins ensures your site icon features are never lost, irrespective of the device they are viewed on.
However, considering that there’s an inbuilt method for this, only use this method if you are seriously concerned about how your favicon appears on different devices.
One of the most popular plugins for this is Favicon by RealFaviconGenerator, so go ahead and install it on your site. After installation, navigate to Appearance >> Favicon.
Next, select an image. Ensure the image fits the specified dimensions. Then click Generate favicon.
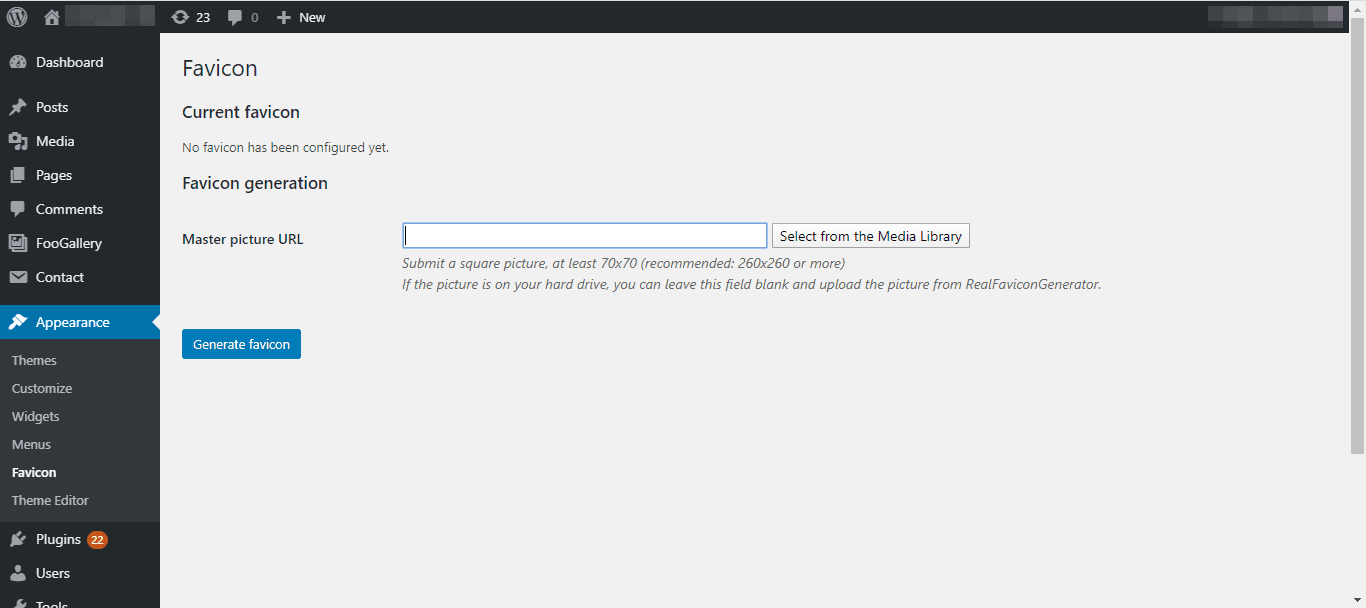
Upon click, you will be taken to an online optimizer tool. Here, your uploaded image will be optimized for Android, iOS as well as Windows devices.
Once you are satisfied, scroll down and click Generate Favicon and HTML Code.

And you are all set.
Conclusion
Favicon in WordPress plays an important role when it comes to branding and user experience. You can’t afford not to have a memorable one on your website.
In this tutorial, we certainly showed you how to go about creating a memorable site icon. You also got to learn how to install/change WordPress favicons in three ways.
We hope you found this tutorial helpful.
More Resources: