How to Add Expires Headers in WordPress

Would you like to learn why and how to add expires headers in WordPress? You may have come across this recommendation when running your website on speed test tools like GTMetix.
Expires headers leverage browser caching to improve your website speed and performance.
In this tutorial, you’ll learn how expires headers work and why they are important. Then we’ll show you 2 ways to add expires headers to WordPress.
In this article:
- Understanding Expires Headers: A Beginner’s Guide
- Boosting Your Site’s Health with Core Web Vitals
- How to Add Expires Header in WordPress (2 Ways)
- How Browser Caching Affects the Load Speed of a Website
- Exploring Cache-Control Headers
- Conclusion
Understanding Expires Headers: A Beginner’s Guide
Have you ever wondered how some websites seem to load instantly on your second visit? The secret often lies in a clever trick called “expires headers.” Let’s break this down into a simple analogy to make it easier to understand.
Imagine you’re visiting a friend’s house for the first time. You need directions, and it might take you a bit longer to find the place. But the next time you visit, you remember the way and get there much faster. In this analogy, your friend’s house is a webpage, and your memory is the browser cache.
When you visit a website, your browser (like Chrome or Firefox) needs to ask for directions every time, which means loading images, stylesheets, and scripts from the server. This can take time, especially if there are a lot of files to load. But what if your browser could remember some of these files, just like you remember the way to your friend’s house? That’s where expires headers come into play.
Expires headers are like a note attached to each file, telling your browser how long to remember (or “cache”) them. If the note says, “Remember this for a week,” the next time you visit that website within the week, your browser will skip asking for those files and load them from memory, making the page load much faster.
This doesn’t just make websites load quicker for you; it also reduces the load on the website’s server, making it a win-win situation. However, it’s important to use expires headers wisely. For things that rarely change, like logos or stylesheets, a longer memory note makes sense. But for frequently updated content, a shorter time or even no caching is better to ensure you always see the freshest content.
How Cached Files Are Deleted
For a file to be deleted from a browser’s storage, an expiry date needs to be set on it. To achieve this, rules need to be added to the header telling the browser the exact time to discard old files and fetch new ones.
These rules are known as Expires Header. Oftentimes, they are added manually to web servers via the htaccess file. It tells the browser the specific file to delete and the specific date to do so.
In place of Expires header, some webmasters prefer to set Etag Headers. Basically, they do nearly the same thing, but for this article, we will be focusing on Expires header.
There are a couple of ways to set expires headers, but we will be considering just two: manually and via a plugin.
How Long Should Cached Files Stay Before They Expire?
There are no set rules for that. The trick is web assets that are requested more frequently should have a shorter expiration time. A good example is HTML files. Ideally, 1 hour will suffice.
Whereas assets that are requested less frequently should have a longer expiration time. CSS, Javascript, and your website logo are typical examples. These can be given an expiration time of 1 month.
For files that hardly ever change, such as images, the expiration time is usually set to 1 year.
Boosting Your Site’s Health with Core Web Vitals: Why Expires Headers Matter
Let’s dive into something called Core Web Vitals. Think of them as a health check for your website. Google uses these to see how well your site performs. It’s like a report card for your website’s speed, stability, and user-friendliness.
Now, you might wonder, “What does this have to do with expires headers?” Quite a bit, actually! Expires headers are a behind-the-scenes helper that can boost your site’s speed. And speed is a big deal for Core Web Vitals.
When your website loads quickly, visitors are happy. They can find what they need without waiting. Google notices this happiness. It smiles upon fast, efficient sites by giving them a thumbs-up in search rankings. This is where SEO, or Search Engine Optimization, comes into play.
SEO is all about making your site attractive to search engines like Google. The faster and smoother your site, the higher Google might rank it. This means more people can find your site when they search for something you offer.
By setting up expires headers, you’re telling browsers to remember certain parts of your site. Next time someone visits, their browser loads the site faster because it recalls some of the content. This speed boost can help your site score better on Core Web Vitals, making your site more SEO-friendly.
How to Add Expires Header in WordPress (2 Ways)
In this section, we’ll show you 2 ways to quickly add expires headers in WordPress. Manually and using WordPress plugins.
The manual method requires modifying your server configuration file. So if you’re not comfortable with editing server files, we recommend using the plugin method.
Note: Since we’ll be making changes to site files, we recommend backing up your WordPress site before you proceed.
Adding Expires Headers in WordPress Manually
Before getting started, you need to figure out if your website is using Apache or Nginx web servers. You can reach out to your WordPress hosting provider’s support to get this information. However, there is a quick way to find out.
First, open the website you want to check, then right-click and select Inspect.

In the ‘Developer Tools’ section, click on the Network tab. Once here, refresh the page again and select your web address from the available ‘Network’ options.
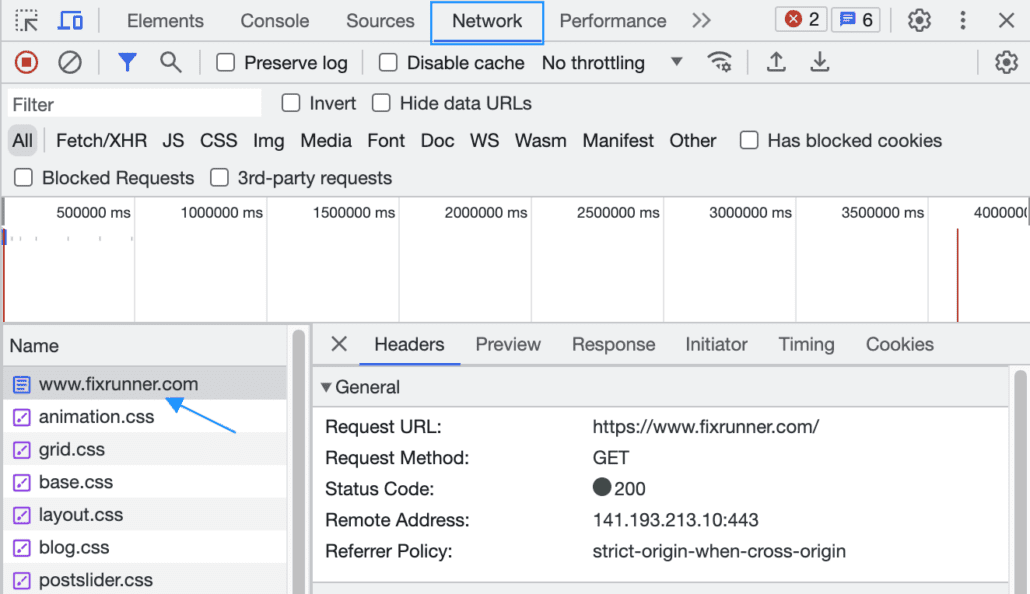
In the overlay that appears, scroll to the Server section. You’ll see the server your website is hosted on.
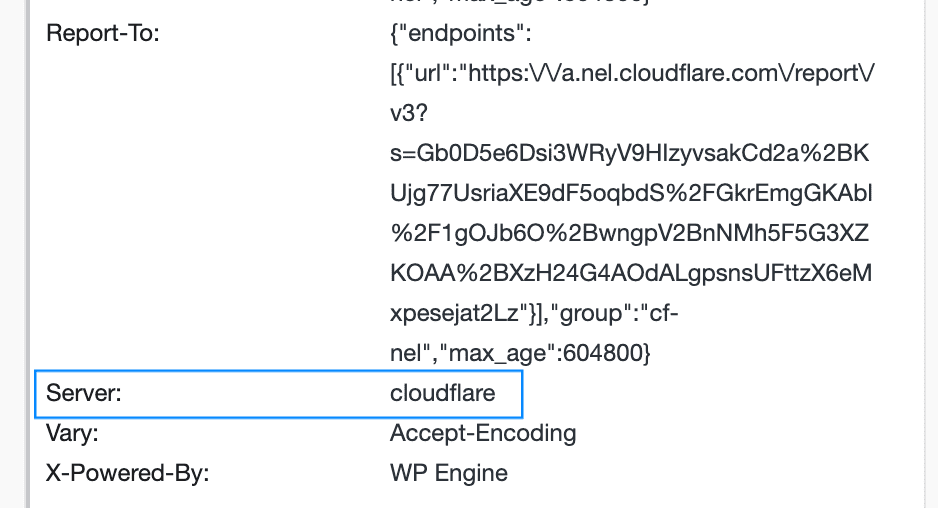
You may either see a CDN server like Cloudflare, or Apache/Nginx server.
Below, we’ll cover how to set expires headers in Nginx, Apache, and CDN servers.
Apache Web Server
To add expires headers in WordPress on Apache servers, you will need to access your WordPress website htaccess file.
These files can either be accessed via the cPanel or FTP clients like FileZilla. For the sake of simplicity, we will stick with cPanel.
First, log into your cPanel account. After logging in, you will see a File Manager icon. Click on it.
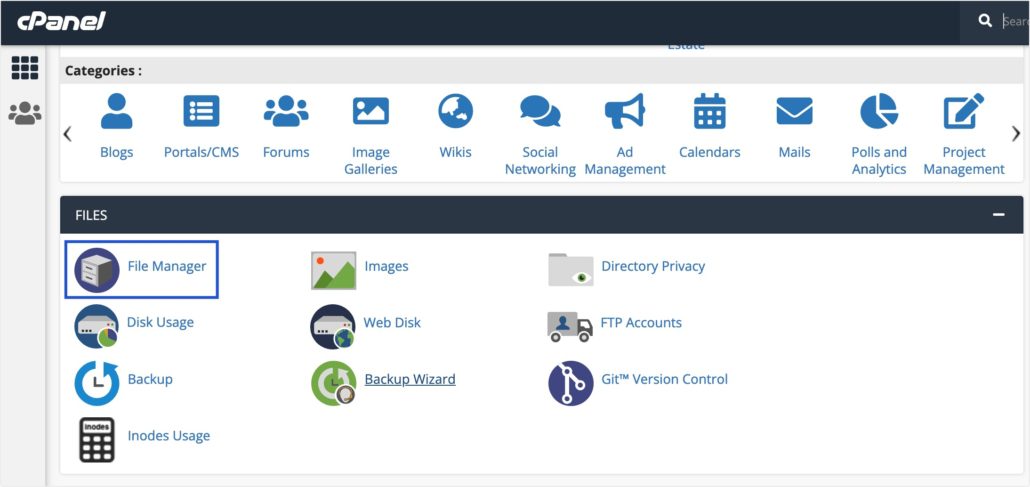
Upon click, navigate to the root folder containing your site files. This is usually the public_html directory.
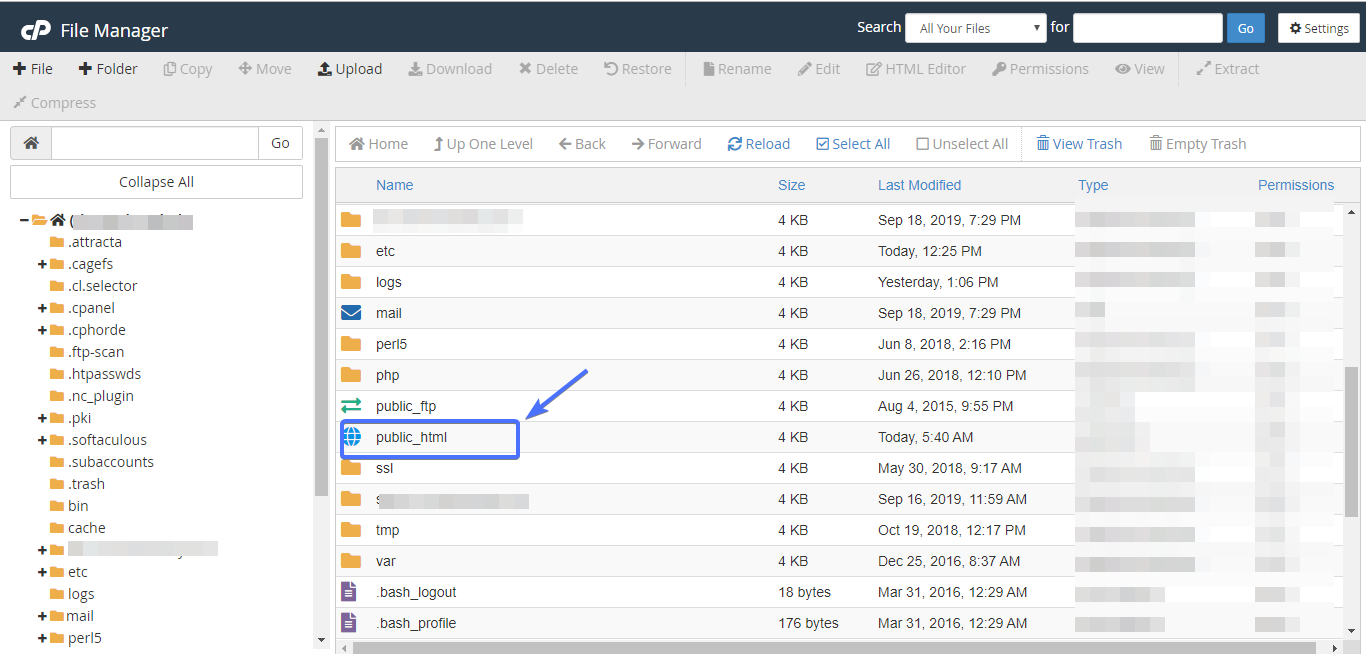
Here, you will find the .htaccess file. Right-click on this file and click Edit.
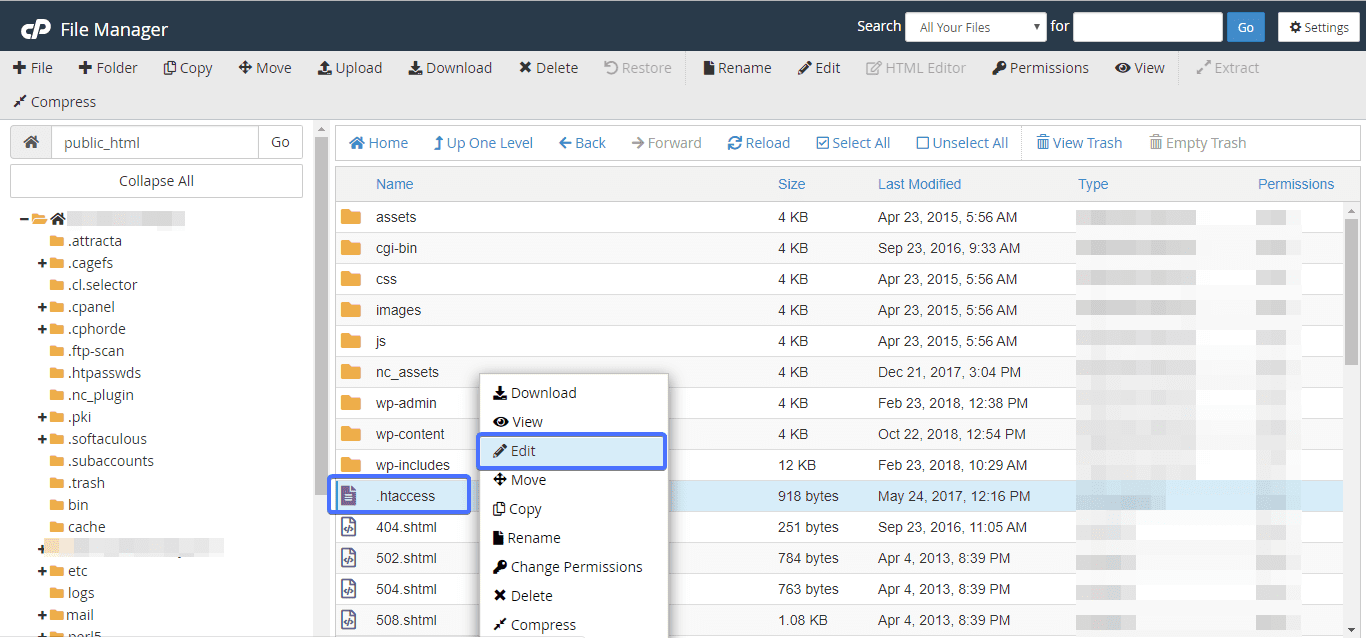
Then copy and paste the following code into it.
<IfModule mod_expires.c>

  ExpiresActive On

  # Images
  ExpiresByType image/jpeg "access plus 1 year"
  ExpiresByType image/gif "access plus 1 year"
  ExpiresByType image/png "access plus 1 year"
  ExpiresByType image/webp "access plus 1 year"
  ExpiresByType image/svg+xml "access plus 1 year"
  ExpiresByType image/x-icon "access plus 1 year"


  # Video
  ExpiresByType video/mp4 "access plus 1 year"
  ExpiresByType video/mpeg "access plus 1 year"


  # CSS, JavaScript
  ExpiresByType text/css "access plus 1 month"
  ExpiresByType text/javascript "access plus 1 month"
  ExpiresByType application/javascript "access plus 1 month"


  # Others
  ExpiresByType application/pdf "access plus 1 month"
  ExpiresByType application/x-shockwave-flash "access plus 1 month"

</IfModule>
From the code snippet above, you can see that images have been given an expiration time of 1 year. Likewise also videos. But for CSS and Javascript, they will be erased from the cache and replaced every month.
Of course, you can always change these time parameters but only do so with caution.
For better efficiency, some webmasters take things further by setting what is known as Cache-control Headers.
Cache_control headers serve the same purpose as Expire headers in that they also set an expiration date for cached files.
The major difference between Cache-control header and Expires header is that cache control is more detailed as you can specify other caching parameters in addition to when the cache should expire. It is also more modern.
Note that adding both to your server isn’t necessary as this might lead to redundancy.
If you would like to set cachecontrol headers to your server, add the following piece of code to the htaccess file.

# BEGIN Cache-Control Headers
<IfModule mod_expires.c>

  <IfModule mod_headers.c>

    <filesMatch "\.(ico|jpe?g|png|gif|swf)$">

      Header append Cache-Control "public"

    </filesMatch>

    <filesMatch "\.(css)$">

      Header append Cache-Control "public"

    </filesMatch>

    <filesMatch "\.(js)$">

      Header append Cache-Control "private"

  </filesMatch>

    <filesMatch "\.(x?html?|php)$">

      Header append Cache-Control "private, must-revalidate"

    </filesMatch>

  </IfModule>

</IfModule>
Using Nginx Web Server
Unlike Apache, Nginx server doesn’t work with .htaccess file. To set expires header on it, copy and paste the following line of code to your server block.
location ~* \.(js|css|png|jpg|jpeg|gif|svg|ico)$ {

 expires 30d;

 add_header Cache-Control "public, no-transform";

}
For Content Delivery Network
If your website runs on a content delivery network – or CDN for short – you will need a different approach to set expiration dates on cached files. The trick is to unset what are known as Etags from your CDN servers.
Doing so is quite simple. Just copy and paste the code snippet below to your htaccess file.
# Disable ETags

<IfModule mod_headers.c>

Header unset ETag

</IfModule>

FileETag None
Choosing the Right Tools: Premium and Free Plugin Recommendations for Expires Headers
To make your website faster and more efficient with expires headers, you don’t always have to dive deep into code. There are fantastic tools out there, both premium and free, that can do the heavy lifting for you. Let’s explore some of these plugins that can help you effortlessly implement expires headers on your WordPress site.
Premium Option: WP Rocket

WP Rocket stands out as a top-tier choice for those willing to invest in their website’s performance. It’s like giving your site a turbo boost without needing to know how a turbo works. Once activated, WP Rocket automatically applies the best caching settings, including setting up expires headers. It’s user-friendly, incredibly effective, and doesn’t require you to tinker with complex settings. The investment not only brings you speed but also peace of mind.
Free Alternatives: W3 Total Cache
If you’re starting out or prefer to keep your budget tight, there are excellent free options that still pack a punch. W3 Total Cache is a powerful plugin that offers a wide range of caching tools, including expires headers. It might take a bit of setup, but it’s a robust solution for those looking to speed up their site without opening their wallets.
WP Super Cache
WP Super Cache is another great free option, known for its simplicity and effectiveness. It generates static html files from your dynamic WordPress blog, meaning fewer resources are needed to load your site, leading to faster load times for your visitors.
Making the Choice
Whether you choose the premium route with WP Rocket or opt for the free capabilities of W3 Total Cache or WP Super Cache, you’re taking a significant step towards improving your site’s performance. Remember, a faster site not only makes your visitors happy but also contributes positively to your SEO efforts.
When selecting a plugin, consider your technical comfort level, the specific needs of your site, and your budget. No matter your choice, you’re on the right path to a faster, more efficient website.
How Browser Caching Affects the Load Speed of a Website
To get things started, let’s head over to GTMetrix – an online website performance test tool – and run an analysis of your website.
You might see something that looks like this:
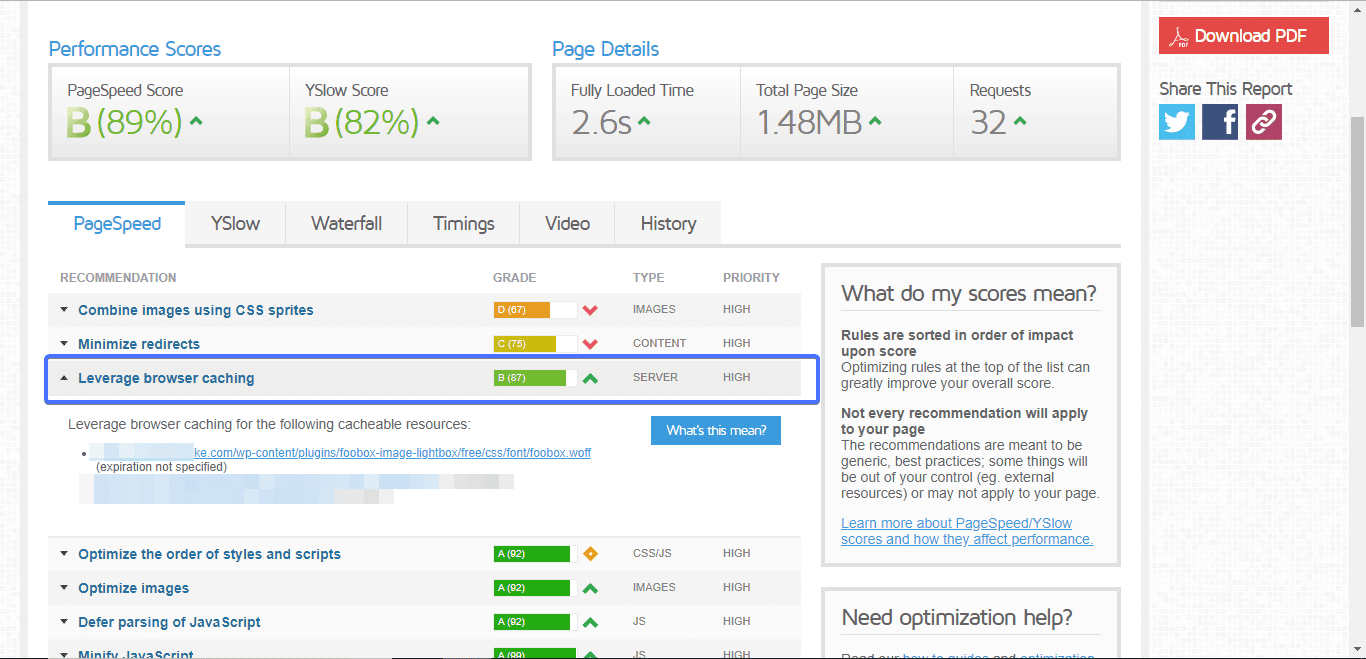
From the screenshot above, you could see GTMetrix suggesting that we leverage browser caching.
So, how does browser caching work?
When a web user hits the homepage of your website for the first time, his/her browser will make an HTTP request to your web server. The request will instruct the server to download the needed images, JavaScript, and CSS files, plus other file types needed to render the requested web page.
Since it’s the first visit, all resources will be downloaded and cached by the browser. As you might expect, the entire request/download process will take a significant amount of time.
However, upon subsequent visits, the process will change. Before making a download request to the web server, the browser will first check if the requested web page files have been cached. If they are cached, the browser will serve the files from its cache instead of the webserver.
Doing so will help speed up your WordPress website as zero time will be spent downloading these files from the server. In addition to that, the load on your server is greatly reduced, hence there’s more efficiency.
Exploring Cache-Control Headers: A Modern Twist on Caching
While we’ve been talking about expires headers, there’s another player in the game: cache-control headers. Think of them as the modern sibling to expires headers, offering a bit more flexibility.
Cache-control headers are like detailed instructions for your browser on how to handle caching. They can say, “Hey, keep this file for 30 days,” or “Don’t cache this at all!” This gives you more control over how different parts of your site are cached.
Why does this matter? Well, in the fast-paced world of the internet, having the latest and greatest on your site is key. Cache-control headers help make sure your visitors are seeing your newest content without sacrificing speed.
But here’s the cool part: you don’t have to choose between expires headers and cache-control headers. You can use both! They can work together to make your site as fast and fresh as possible.
Think of expires headers as setting a simple expiration date, while cache-control headers are like a detailed manual for how to cache your site’s content. By understanding and using both, you’re equipped with a powerful toolkit for speeding up your site and keeping your visitors happy.
How to Add Expires Headers WordPress – Conclusion
Leveraging browser caching is one of the ways to optimize your website’s load speed. But you have to do it right to see meaningful results.
In this article, we showed you how to leverage browser caching by setting cache_control and expires headers to your web server. You got to learn how to do so by copying and pasting codes to the .htaccess file.
What’s more, you’ve seen a couple of plugins you could use if editing your .htaccess file feels uncomfortable.
We hope you found this article helpful. If you did, kindly share.
More Resources
- Remove Query Strings from Static Resources – 2 Methods
- The Link You Followed Has Expired Error
- How to Fix the “Specify a Cache Validator” Warning


