How To Find, Create And Use htaccess File In WordPress
In this quick tutorial, we will explain everything you need to know about the WordPress .htacces file and its uses. Knowledge of editing the WordPress htaccess file can undoubtedly be a mighty tool in your arsenal. With it, you can affect both the security and performance of your WordPress websites.
What Is .htaccess?
For servers running Apache web server software, htaccess is a rather powerful configuration file (a core file). It basically enables and disables certain functions that Apache Web software offers.
The file is directory-oriented; basically, wherever you put it, it will start affecting everything inside. When detected it instantly starts changing your site’s behavior.
Where Can I Find WordPress .htaccess File?
Its usual location is the root folder of your site, but you can’t access it through the default WordPress interface. Hence, you will have to use certain software.
For this, we will be using a free tool called FileZilla. You can download it from the official site.
Next, what you got to do is:
- Open the program.
- Enter the required information.
If you use web hosting or specifically WordPress hosting service, you can ask your hosting provider for this information. - Connect to your web server.
- Finally, in the bottom right corner, you will find what you were looking for.
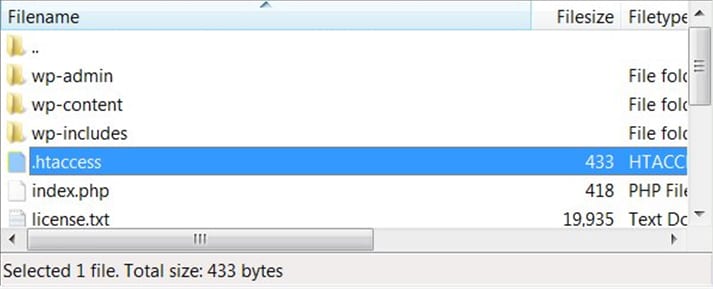
I Did What You Said, But I Can’t Find It?
If you can’t see it right away, then the reason might be that your file manager doesn’t show hidden/sensitive files. By default WordPress htaccess file should not be visible. To fix this, inside your FTP client, find an option called “Force showing hidden files”.
For example, in FileZilla, this option is here.

The second reason can be that the file still doesn’t exist. Therefore, we need to create it.
WordPress htaccess – How Do I Create It?
Creating an htaccess file in WordPress is rather easy.
- Open your WordPress dashboard.
- Go to Settings/Permalinks
- Scroll to the bottom and click “Save Changes”
Occasionally, this results in an error, so you must do it by hand.
- Firstly, you have to open a text editor.
- Copy and paste the code (provided below), and save it. Obviously, the file name should be “.htaccess”.
# BEGIN WordPress

<IfModule mod_rewrite.c>

RewriteEngine On

RewriteBase /wordpress/

RewriteRule ^index\.php$ - [L]

RewriteCond %{REQUEST_FILENAME} !-f

RewriteCond %{REQUEST_FILENAME} !-d

RewriteRule . /wordpress/index.php [L]

</IfModule>

# END WordPress
Or for WordPress multisite networks (e.g the ones using enterprise WordPress hosting):
# BEGIN WordPress

RewriteEngine On

RewriteBase /

RewriteRule ^index\.php$ - [L]

#add a trailing splash to /wp-admin

RewriteRule ^([_0-9a-zA-Z-]+/)?wp-admin$ $1wp-admin/ [R=301,L]

RewriteCond%{REQUEST_FILENAME}-f[OR]

RewriteCond%{REQUEST_FILENAME}-d

RewriteRule^ - [L]

RewriteRule ^([_0-9a-zA-Z-]+/)?(wp-(content|admin|includes).*) $2 [L]

RewriteRule ^([_0-9a-zA-Z-]+/)?(.*\.php)$ $2 [L]

RewriteRule . index.php [L]

# END WordPress
*Don’t use Word or similar word processing tools, since they tend to format text. We need it to stay exactly the same.
The second thing you need to do is, open FileZilla, and drag the file to the root directory. It’s basically a very similar process to manual WordPress installation.
WordPress htaccess – What Can I Use It For And How?
So you managed to find/create it, what now?
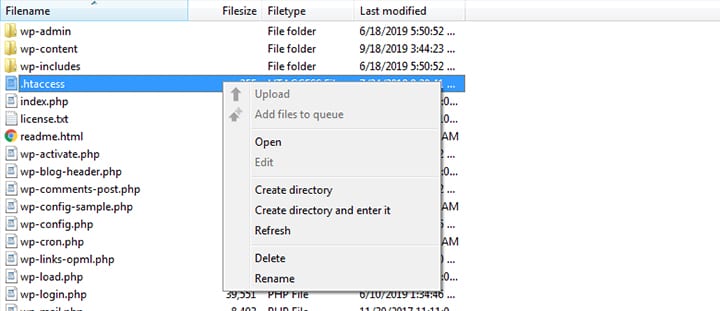
To use/edit htaccess, you need to switch back to FileZilla, right-click on it and press open.
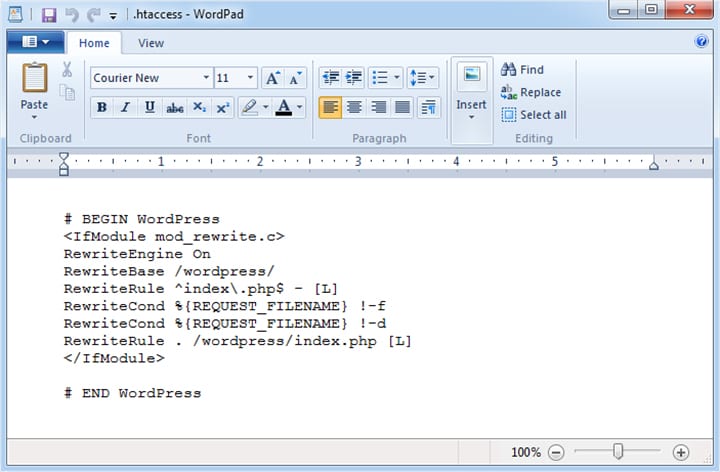
Add any additional functionality you need, but don’t break the order of lines from the image below. Write outside “#BEGIN” and “#END” section.
Save, and close it. The Filezilla will then ask you if you want to overwrite an old version, click “Yes”.
WordPress htaccess Tips And Tricks
Like we said at the beginning of the article, you can indeed edit the htaccess for WordPress security and performance-boosting uses. The following are some of the examples of what you can do.
Baning A Specific IP Address
Sometimes you will have to deal with specific IPs you know have rather bad intentions. To release yourself from such a burden, just ban them.
# BEGIN WordPress

<Limit GET POST>

order allow,deny

deny from 123.456.78.9

allow from all

</Limit>

# END WordPress
Redirection
You can use the htaccess file for WordPress redirection purposes. For 301 redirects add the following line of code:
# BEGIN WordPress

Redirect 301 /oldpage.html http://www.yourwebsite.com/newpage.html

# END WordPress
or you can make viewers use HTTPs (SSL certificate) with:
# BEGIN WordPress

RewriteEngine On

RewriteCond %{HTTP:X-Forwarded-Proto} !https

RewriteRule ^(.*)$ https://%{HTTP_HOST}/$1 [R=301,L]

# END WordPress
Prevent PHP Files From Executing
If you are not already familiar with the term backdoor, it is a file or piece of code that, when it becomes active, lets other malicious files inside. Since we don’t want that, this code can stop all PHP files in a specific directory from activating:
# BEGIN WordPress

<Directory "/var/www/wp-content/uploads/">

<Files "*.php">

Order Deny,Allow

Deny from All

</Files>

</Directory>

# END WordPress
In our example, the folder is “Uploads” but you can change it to anything you like.
Restrict Access to the WordPress Admin Page
You wouldn’t like many people having access to your wp-admin page now, would you? That would be risky, so just use this:
# BEGIN WordPress

ErrorDocument 401 /path-to-your-site/index.php?error=404

ErrorDocument 403 /path-to-your-site/index.php?error=404

<IfModule mod_rewrite.c>

RewriteEngine on

RewriteCond %{REQUEST_URI} ^(.*)?wp-login\.php(.*)$ [OR]

RewriteCond %{REQUEST_URI} ^(.*)?wp-admin$

RewriteCond %{REMOTE_ADDR} !^IP Address One$

RewriteCond %{REMOTE_ADDR} !^IP Address Two$

RewriteCond %{REMOTE_ADDR} !^IP Address Three$

RewriteRule ^(.*)$ - [R=403,L]

</IfModule>

#END WordPress
Enabling Browser Cache
Caching certain data can improve the site’s performance. You can, for example, change the time it takes for a certain data to expire (the period it will remain cached) with this:
# BEGIN WordPress

<FilesMatch "\.(jpg)$">

Header set Cache-Control "public, max-age=3600"

</FilesMatch>

#END WordPress
Stop Directory Browsing
If you didn’t already disable this, now is certainly the time for that. You don’t want anyone to be able to see the list of all your files, don’t you?
Add this little line of code to default WordPress htaccess:
# BEGIN WordPress

Options All -Indexes

# END WordPress
Script Injection Prevention
Hackers sometimes use methods like script injection to mess with your site. They usually attack specific locations like, for example, “Globals” and “_Request”. You can counter that by adding the following code:
# BEGIN WordPress

Options +FollowSymLinks

RewriteEngine On

RewriteCond %{QUERY_STRING} (<|%3C).*script.*(>|%3E) [NC,OR]

RewriteCond %{QUERY_STRING} GLOBALS(=|[|%[0-9A-Z]{0,2}) [OR]

RewriteCond %{QUERY_STRING} _REQUEST(=|[|%[0-9A-Z]{0,2})

RewriteRule ^(.*)$ index.php [F,L]

# END WordPress
Blocking Image Hotlinking
When someone links your picture on their site, what they are actually doing is moving all that outgoing traffic to your site. Since with the cloud hosting services (or managed WordPress hosting), you pay for a certain amount of traffic, this is not something you want.
To prevent someone from linking your picture as an external resource, and therefore basically steal your bandwidth, use this code:
 #BEGIN WordPress

RewriteEngine On RewriteCond %{HTTP_REFERER} !^$ RewriteCond %{HTTP_REFERER}

!^http://(www\.)?your-site.com/.*$ [NC] RewriteRule \.(gif|jpg)$

http://www.your-site.com/example.gif [R,L]

#END WordPress
Just change the domain to your actual URL, and image file name to the one you want to protect.
The “Easier” Way
Like with most things WordPress related, there is also an easier way of creating and editing the WordPress htaccess file code. The first thing is the Htaccess Editor plugin.
The Htaccess Editing Plugin
Yes, we said you can’t access htaccess directly, but, the thing is, if you make a mistake with this plugin, you will have to do the manual method anyway. So it was better not to tell you from the start.

After you install and activate it, go to Settings/WP Htaccess Editor. This will open the default htaccess file.
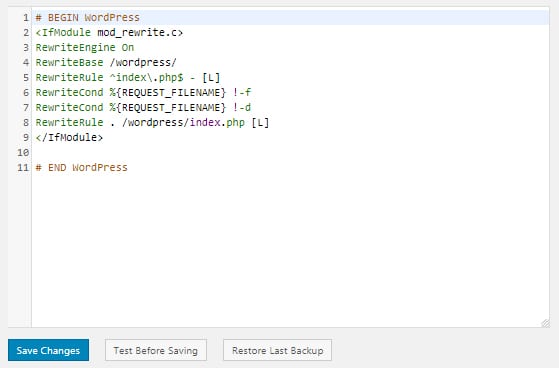
Since we already showed you what you can do, go nuts!
The WordPress htaccess Generator
With this htaccess generator, you can generate code for various uses, that you can then copy to your default WordPress htaccess file accordingly. It can also show you how to better organize the code.
Conclusion
Now that you know how to edit htaccess file, you can make your site more efficient and secure. And just think about it, you can basically do all that with a single WordPress file.
Lastly, if you are interested in reading more about WordPress and WordPress related topics, check the rest of our blog here.
More Resources:
How to Fix 403 Error in WordPress
How to Secure Your WordPress Website
Edit Your WordPress Images(Opens in a new browser tab)


