A Step By Step Guide On How To Reinstall WordPress

Sometimes reinstalling WordPress may be the only option left after all other troubleshooting methods have failed. But how do you reinstall WordPress without losing your content, plugins, themes, and SEO?
In this WordPress tutorial, we will quickly show you how to reinstall WordPress. If you prefer to stay out of anything technical, our team of WP experts can help you out.
We offer affordable WordPress support and maintenance packages. Alternatively, if you don’t mind doing it yourself, roll up your sleeves and let’s get to work.
Content:
- Why reinstall WordPress
- How to Reinstall WordPress
Why Reinstall WordPress
There are a few reasons why you may need to reinstall WordPress. However, note that the uninstallation and reinstallation of an existing WordPress site aren’t always necessary.
In fact, most common WordPress errors have very simple fixes. To clarify, we will go through some of these errors and how to fix them.
Syntax Error
This is one of those frustrating coding error messages we all get in our programming adventure once in a while. Syntax is a group of rules you need to comply with in order to get the code working.
For this reason, even the smallest mistake like a bracket or comma can “break” the code. To fix it, see where the problem arose (the error displays code line location of the problem), find it, and manually correct it.
Learn more about fixing syntax errors in WordPress.
A Plugin Is Acting Weird
Face it, some themes and plugins don’t behave well together. If there is a conflict, you will have to use a different plugin compatible with the ones you have installed.
To check which ones are making all the fuss, disable each plugin separately.
Internal Server Error
This one is a little tricky. It tells us there is a problem but that the server is not sure what and where is it. To fix it, you’ll need to check a couple of things: htaccess, PHP memory limit, and plugins.
Plugins are the easiest things to troubleshoot. In essence, you need to disable each one and see if the problem is fixed.
Next, you can try increasing the PHP memory limit inside the wpconfig.php file. If this doesn’t solve the problem, find htaccess, and make a WordPress backup. Go to Settings > Permalinks and save permalink changes. This should do the trick.
Learn more about fixing internal server error in WordPress.
Misplaced Sidebar
This is not always a cause for concern. In truth, it doesn’t even have to be a problem with your WordPress theme. There is a chance you have too many div tags in your code. Learn how to fix sidebar below content issue in WordPress.
404 Errors
If 404 error happens: Go to Settings > Permalinks and save changes. This will then overwrite htaccess and in most cases, fix the problem.
Can’t Log Into WordPress Dashboard
If you somehow lost the password, you can edit your database using PhpMyAdmin. Learn more about fixing WordPress login issues.
We haven’t gone into so much detail since this guide is only focused on how to uninstall and reinstall WordPress. We already have a guide on how To fix common WP errors, problems & issues. Please check it out.
And if you are still not confident enough to tackle these problems, by all means, seek help from professionals. Besides, nobody is judging!
How To Reinstall WordPress
So, you tried everything, but the problem is still there. Now, you must completely reinstall WordPress. Don’t worry, there are a couple of simple methods you can use to get this done. We will show you 3 of them.
The method you choose depends on these two factors:
- Do you want a completely fresh installation?
- Or a quick reinstall without losing content.
Note: Before using any of these methods, please backup your website. Although you are not likely to lose content using any of the first two methods, we recommend you do a backup still. You can use any of our best backup plugins to get the job done.
1. Reinstall WordPress via the Dashboard
This is the simplest solution. Not only is it simple; you won’t lose any of your site’s content using this method. To reinstall WordPress via the dashboard, follow the steps below.
Open your Dashboard and click “Re-install Now”.

The installation should begin immediately.

Finally, you will see “Welcome to WordPress” and the version you just installed.

The job is therefore done!
2. Reinstall WordPress Through FTP
Sometimes, as we mentioned before, you can lose access to your WordPress dashboard. So what would be the solution here? To do the same thing we did in the example above, but without the admin panel access. we will use an FTP client (Filezilla is a great choice) instead.
Installing FTP Client
First, go to the FileZilla website and download the latest version of FileZilla Client. After it’s downloaded, install it on your computer.

Open the FTP program, fill all the information you are asked to (Host, Username, Password, and Port), and click “Quickconnect“.

If everything is in the right order, the following text will be displayed. (some of the information will differ a little in your case).
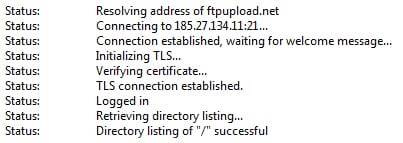
On the left side, you should see your local files and on the right, your remote files.

*Don’t close the FileZilla because we will need it in the next part.
Using FileZilla To Reinstall WordPress
Now that we have an FTP client, we need to download the latest version of WordPress. To do so, go to the WordPress site and download it. (It’s free of course!)

Extract your WordPress content from the .zip archive. The list should look like this:

We do not need the wp-content folder, so delete it. Go back to FileZilla, on your left-hand side where your local files, open and highlight all the extracted WordPress files.
Next, drag the files to the Public_html folder (or anywhere WordPress was originally installed). You’ll see this folder in the remote site section (right-hand side of your screen).
A warning will appear asking if you are sure about overwriting the files. Check “Always use this action” and click OK.

Wait for it to finish uploading and that’s all. The text we previously showed should now look similar to this.

You now have a manually reinstalled core WordPress via FTP.
3. The “Nuclear” Option
Maybe you heard the term “nuke it”? Well, as the name implies, it destroys everything. In contrast to the real world, we at least have an efficient virtual shelter (a back-up). This option is for the bravest or the ones that just know how to do it properly. In a couple of minutes, you will be one of the latter.
For this, we will also use FileZilla.
Backing Up
To export your data (posts, pages, etc.), do the following:
Go to the “Tools” section and click on “Export”.

This will open the “Export” section, where you can choose what to download. Just leave it on “All content”.

The browser will then download the .xml file to your computer.

Finally, copy the “wp-content” folder from FileZilla from WordPress hosting to your computer.
Content is secured!
Nuking The Files
Now for the fun (and a little scary) part. Open FileZilla and login to your WordPress hosting (like we showed you before). Go to the “Remote site” section and locate your public_html folder (or anywhere WordPress was installed). Open it, select all the existing WordPress files, right-click and click “Delete”.

Wait for it to finish, and now all the files are gone.

To complete the uninstallation, we need to delete all existing databases as well. Depending on the control panel of your host, this part could be visually different accordingly.
In your control panel, you should find an icon called “MySQL Databases“. Click on it.

There, you can choose the database you want to delete and click on “Remove Database“.

At last, you’ve destroyed every trace of your site. Now we need to bring your files back!
Reinstall WordPress from a fresh copy
There are various ways you can do this. The user-friendly approach is an automatic installation from your host’s control panel (all WordPress hosts have this).
The other method is something we already did previously so it should take no effort.
Before that, let us create the database. Go to your control panel, and open “MySQL Databases“. (the same location as before)
Pick a name and click “Create Database“.

Your database is now established. We will need this information soon.

Automatic Installation
As an example, here, we have the “Softaculous Apps Installer“. It offers several programs to be installed directly from the host.

After you open it and find WordPress software, click “Install Now“.

If you don’t want to configure anything yet, scroll down the next page, and hit “Install“.

Wait for the installation to complete.

After all that, you now have freshly installed WordPress!
The Manual Way
We already looked at how to use FileZilla to uninstall and reinstall WordPress. For this purpose, all you need to do is to drag the files and folders into the now-empty public_html folder (or where WordPress was previously installed). After that, go to your website.
The installation will ask you to choose a language. (However, don’t worry, you can change this later)

Then, you will be presented with information about the installation process. Click on “Let’s go!” to continue.

Fill data for your database and submit.

Click the “Run the installation” button.

Write your details and click on “Install WordPress“.

That’s it.

As a result, you can now log into your fully working copy of WordPress.

Bringing Data Back
To bring back your data overwrite the “wp-content” folder in FileZilla with the one from your computer.
Next, to get posts and pages go to the “Tools” section and click on “Import“.

We first need to activate the importer. Find the “Install Now” button beneath the word “WordPress”.

After the installation run the importer.

Choose your .xml file and click on “Upload file and import“.

Bonus Tip
We recommend that you configure “robots.txt” before nuking your site or doing some longer maintenance. In other words, make sure Google bots won’t crawl and index your site while in that state.