
The reason why WordPress has taken the lead as a great CMS platform is that it is open-source and available to everyone. Anyone interested in how the platform works has easy access to the system code and knows what goes on behind the curtains.
However, this level of openness also introduces potential security challenges. Malicious users can easily exploit vulnerabilities in your core files, themes, and plugins to hack your website.
One of the ways hackers can access this information is through your website directory listing, which means internet users are able to view and browse the folders and files that make up your website. Therefore, you should consider disabling the directory listing on your WP website in addition to other WordPress Security Practices.
In this guide, you will learn why you need to disable directory listing and how to do so.
Table of Contents:
- Why is It Important to Disable Directory Listing?
- First Step – Check if Directory Browsing is Enabled on Your Website
- How Do I Disable Directory Browsing in WordPress?
- What Next After Disabling Directory Browsing on Your WordPress Site?
Why is It Important to Disable Folder Browsing?
An improperly configured server can make your WordPress directories or folders visible to the public—if they know where to look. Experienced attackers understand what directory browsing is and know how to exploit it to access sensitive information.
Your WordPress folders contain everything about your website: media files, themes, plugins, settings, and other important configurations. Think of your WordPress directory as the hard drive of your website.
If someone can browse these folders, they gain a wealth of insight into your site’s structure. Worse, if any of your themes or plugins have vulnerabilities, an attacker can exploit them to compromise your site or steal personal data.
To add an extra layer of protection, it’s important to disable directory listing or folder browsing. Doing so ensures that no one can view the contents of your directories, even if they know the path.
One of the simplest ways to disable directory browsing is by modifying your .htaccess file. You can use a straightforward directive in .htaccess to disable directory listing**, effectively preventing unauthorized users from accessing your folders. This is a key step if you’re looking to htaccess prevent directory listing and secure your site.
While WordPress has strong built-in security, it remains a high-profile target for hackers. That’s why we always recommend reinforcing your website’s defenses. In this guide, we not only show you how to disable directory listing, but we also share other best practices and 8 top-rated WordPress security plugins to help protect your blog.
First Step – Check if Directory Browsing is Enabled on Your Website
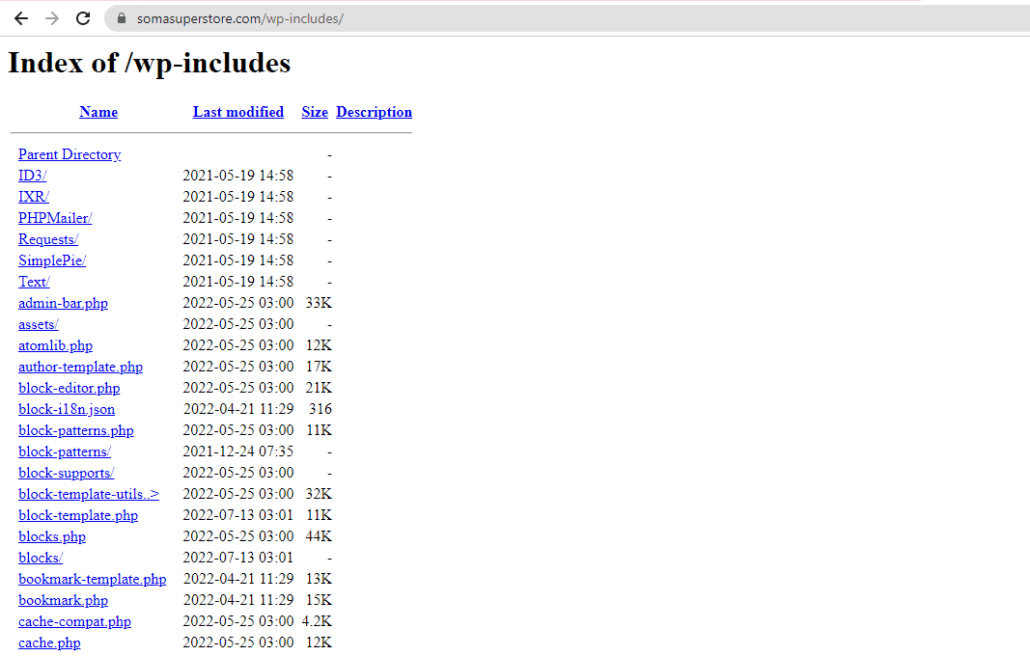
Before you begin, we recommend confirming that you actually have this problem. To do this, add /wp-includes to your website’s domain name.
I.e: https://yourwebsite.com/wp-includes
If directory listing is enabled on your website, you can see the list of the files within this folder, as shown below.
If this is the case for you, then let’s jump into how to fix it.
How Do I Disable Directory Browsing in WordPress?
This section walks you through the steps to disable directory listing on your website. Let’s jump in.
1. How to Disable Directory Browsing via cPanel
If your WordPress hosting platform supports cPanel or a similar hosting panel, disable directory browsing via the file manager.
So to get started, log in to your cPanel account, scroll to the ‘Files’ section, and click on File Manager.

Here, locate the directory containing your website files. For our example, this is the ‘public_html’ folder. Once you’ve located the folder, right click on it. From the context menu that appears, click Manage Indices.

This allows you to customize what will happen when no index file exists in a directory. The index file is what causes a webpage to be displayed instead of allowing the directory to be listed.
So to prevent directory listing, select ‘No Indexing’, and hit the Save button.

This will prevent folders that do not contain index.html or index.php files from displaying on your front end when a hacker tries to access them.
To confirm that this setting has been applied, you should try reaccessing your folders. Do this by going to https://yourdomain.com/wp-includes. You should encounter a 403 (Forbidden) error, as shown below.

But if this doesn’t work for you, or your hosting provider doesn’t offer cPanel, we’ll walk you through how to edit your .htaccess file with a WordPress plugin to achieve a similar result.
If you’re uncomfortable editing files directly, opting for website management packages can ensure that such security measures are handled by professionals, reducing the risk of accidental errors.
2. Disable Directory Browsing With Htaccess File Editor Plugin
To protect your folders without using the cPanel File Manager app, you will need to edit the .htaccess file to include a rule that automatically adds an index file to your folders. We’ll use the “Htaccess File Editor – Safely Edit Htaccess File” Plugin to do this.

To install this plugin, login to your WordPress admin dashboard and go to Plugins >> Add New.

Using the search bar, search for “Htaccess File Editor”.

Now, hit the Install Now and Activate buttons consecutively to enable the plugin on your website.
Using the WP Htaccess Editor
After activating the plugin, go to Settings >> WP Htaccess Editor to access the plugin’s settings page.

Because the .htaccess file is such an important file that defines essential rules for your website directories, an editing mistake can make your website inaccessible.
Therefore, we recommend backing up this file before continuing with this step. This way, you can revert to the last working version if there is a mistake.
The plugin automatically performs a backup to your website folder before allowing you to edit the .htaccess file. And you can always access it via the ‘wp-content’ folder on your hosting dashboard. You’ll find these backups at ‘/wp-content/htaccess-editor-backups/’.
Side note: You can learn how to backup your entire website from this detailed guide from Fixrunner. Alternatively, you can use one of these WordPress backup plugins to backup your website.
Once you access your .htaccess backup file, you can simply edit it to correct the error. Likewise, if you can still access your admin area after an error. Simply hit the Restore Last Saved Backup below the .htaccess text editor. This will restore your website to a working state.

Let’s go back to editing the file. Scroll down, you will notice that the editor is overlaid with a red cover. Click the I understand. Enable the editor button to begin editing.

At the bottom of the file (after the last line), enter the following line of code:
Options -Indexes
And hit the Save button.

Now, confirm again that your folders are protected by adding /wp-includes to your website URL. It should be protected, as seen below.

I Encounter an Error after Editing .htaccess File
If you encounter an error, you should check the file for a typo. To be sure, you can delete the line you added and copy and paste it exactly as it appears above. the command should be the last in the file.
If you have made a mistake preventing you from accessing your admin area, you need to manually edit the file.
If you can access cPanel, simply log in to your dashboard and go to Files >> File Manager.

Within the ‘File Manager’, locate the root directory containing your website files and double-click to open it. Within this folder, locate your .htaccess file, right-click on it, and select Edit.

You will see a warning to perform a backup before continuing. Click Edit again.

Now, you can edit your .htaccess file to include the correct code. Once done, click on the Save Changes button.

What Next After Disabling Directory Browsing on Your WordPress Site?
Having successfully disabled directory browsing on your WordPress website, you can rest assured that hackers can no longer view site directory files in your server.
In addition to protecting your website folders, you can take further steps to harden your website against security threats.
And here is an additional resource to help you – Best WordPress Security Plugins to Stay Protected.