How to Use FTP (A Complete Guide for Beginners)
Running a WordPress site entails several processes. Downloading and installing plugins, updating them, troubleshooting errors, uploading files, and editing files are just a few. While some of these tasks can be done through your dashboard, you need FTP for others.
FTP stands for File Transfer Protocol and is a fast and effective way of managing your WordPress files. You can edit files, create backups, transfer files from your local computer to remote servers (and vice versa), install WordPress, among other things.
Even though FTP is valuable, some WordPress users find it hard to use. If you are one of them, this guide is for you. You’ll learn how to use FTP to perform several functions in WordPress.
Let’s dive in.
Content:
- What is FTP?
- Why do you need FTP as a WordPress user?
- Working with FTP: things you need?
- Difference between FTP and SFTP
- How to get started with FTP
- Installing WordPress using FTP
- Using FTP for multiple file or folder upload
- Installing a plugin via FTP
- How to Install a WordPress theme with FTP
- Backing up all WP files through FTP
- How to update WordPress manually using FTP
- Fixing common WordPress errors using FTP
- Conclusion
What is FTP?
We check our emails, download files, update blogs, and access different websites on the internet every day. These activities are possible only because of the HTTP (Hypertext Transfer Protocol) connection. HTTP is the ‘means of transportation’ through which web pages, images, and other resources get to your screen from the web servers where they reside.
While HTTP is used by all and sundry to access the internet, FTP is used to access and transfer files across two systems.
Let’s see a proper definition: FTP (which stands for File Transfer Protocol) is a standard network protocol used for transferring files between two computers over a Wide Area Network (like the internet) or over a Local Area Network.
This interactive protocol was developed because of the need for a swift and dependable method of transferring files from one system to another regardless of their operating systems and machine architecture.
Although the hypertext transfer protocol (HTTP) has taken over as the major mode of sharing smaller files between computers over the Internet, FTP file transfer is still useful for sharing larger and more complex files.
Web designers and developers use FTP extensively to copy files, such as Web pages and graphics, onto Web servers.
Why do you need FTP as a WordPress user?
You are most likely aware that WordPress already lets you upload files through the dashboard. So, you may be wondering how FTP applies to you as a WordPress user.
Well, FTP is useful when you can’t access your dashboard as a result of a WordPress error. In cases like that FTP enables you to upload or download files from your local computer (client) to a server (which could be your hosting account). It also allows you to edit files and folders on your server and with either of these, you can fix the error.
FTP is useful for:
- Downloading WordPress files to backup
- Customizing your WordPress files (for advanced users only)
- Transferring your blog or website to another hosting account
- Troubleshooting WordPress errors
- Manually installing WordPress themes and plugins
- Uploading media files in bulk, rather than one at a time.
- Manually deactivating themes and plugins
Working with FTP: Things you need
To get started with FTP, you need an FTP client, your username, and password. Let’s discuss each one in detail.
FTP Client
An FTP Client is a software that lets you connect to an FTP server. It manages all the complexities that relate to the FTP protocol.
There are different FTP clients available. Some have easy to use graphical interfaces, others have command-line interfaces.
Examples of FTP clients include:
FileZilla
This is probably the most popular and most versatile FTP client. Mac, Windows, and Linux users will find this app valuable. It is free to use.
WINSCP:
This is a free FTP client designed strictly for windows users. Just like any other client, it is useful for uploading and downloading files. It is easy to use and supports FTP, SFTP, and SSH.
Cyberduck:
Here is another easy-to-use FTP client suitable for both Mac and Windows users. It is absolutely free.
Transmit:
If you are a MAC user, this is for you. Incredible speed, folder syncing, disk feature, and a simple code editor are just a few of what you’ll enjoy using this client.
Transit has a 7-day free trial, which is enough time to decide if you want it or not. The full version is worth $45.
FreeFTP:
FreeFTP is another popular client for windows. It is easy to use and requires just a click of the button to connect to your server.
FreeFTP supports FTP, SFTP, and FTPS and is absolutely free to use. For more features, you can get DirectFTP for $34.
WS_FTP professional:
This is another popular client for Windows. It comes with security features like 256-bit AES encryption and login authentication encryption.
Pricing starts from $49.95.
Apart from these, some internet browsers come with in-built clients, through which you can download files from your web browser.
Username and password
Whenever a user starts the FTP client, he/she is prompted to enter a username and password. This is a method of authentication that limits file system access to authorized users only.
As a WordPress user, your FTP credentials are sent to your email when you purchase WordPress hosting.
You may also see your FTP login details in your cPanel dashboard. If you have problems finding your login credentials, contact your web hosting provider for help.
If you don’t have the login information, you should reach out to your Web Host.
Difference between FTP and SFTP
The first users of FTP were on Local Area Network (LAN) within an organization. Because of this, security wasn’t such a big deal. The protocol sends user names, passwords, and all information in plain text.
Using FTP over a WAN means your data can be intercepted, read, and exploited by malicious hackers. For this reason, SFTP (Secure FTP) came into being. SFTP is simply a secure version of FTP.
Getting Started with FTP
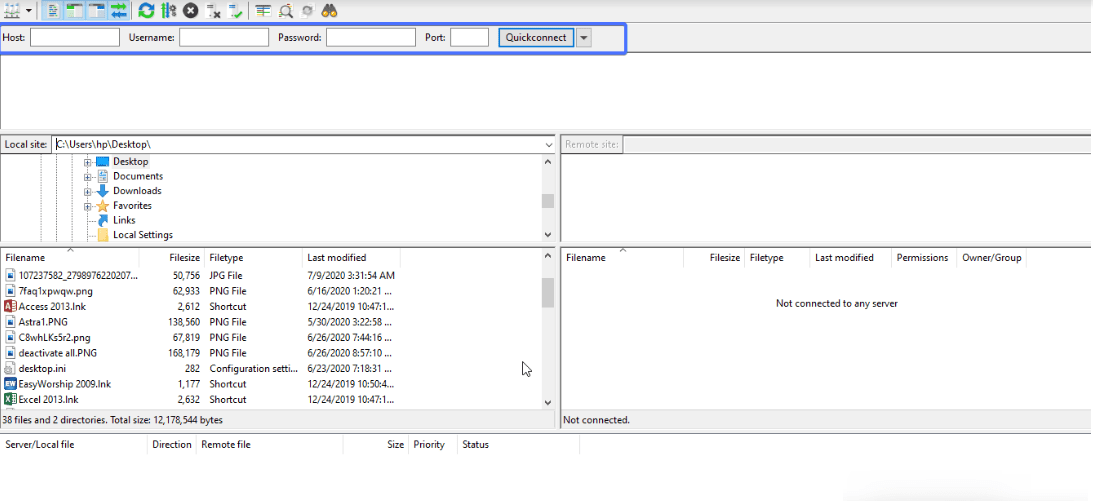
This section explains how to install the FileZilla FTP client and use it to access your server. You may also use any other client that suits your computer’s operating system.
- First, download FileZilla, install it, and launch it.
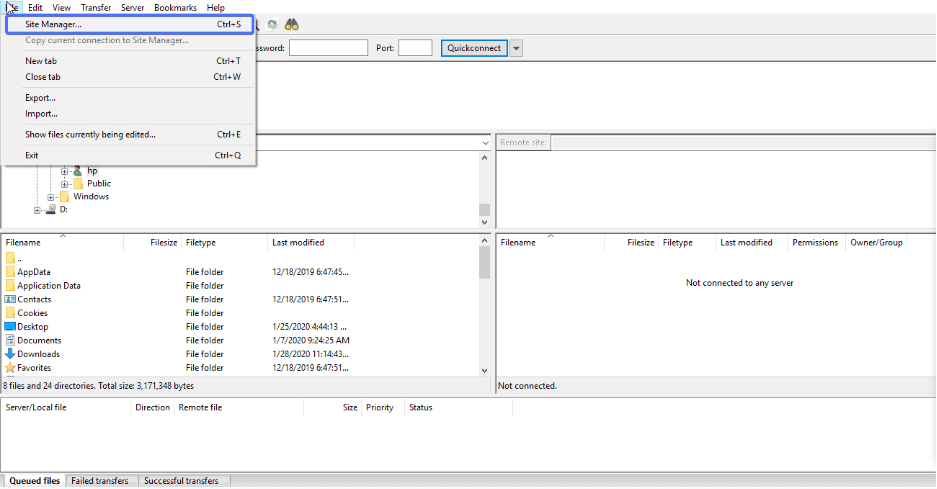
- Next, go to File > Site Manager at the top left corner of your screen.
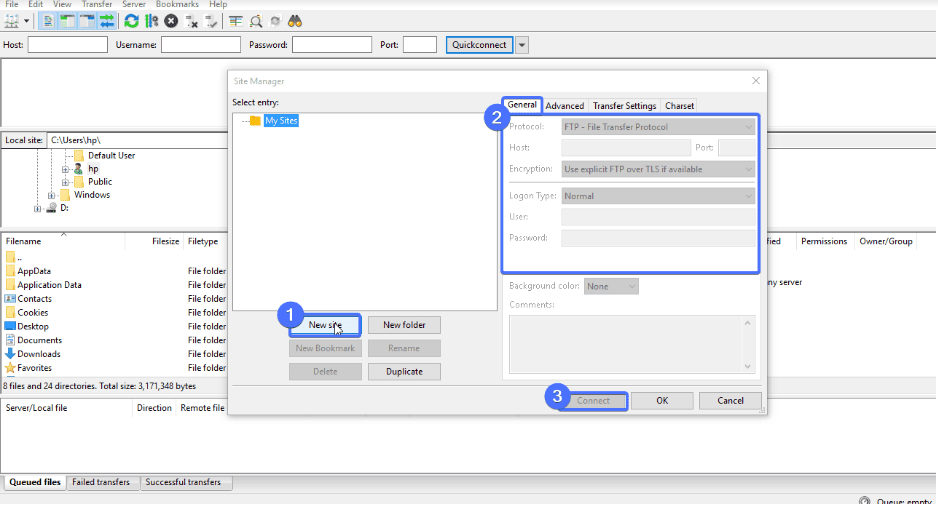
- On the resulting window, click the “New Site” button. Then, fill in the required fields.
- Protocol: set this to FTP (or SFTP if you want to use a secure connection and if your host supports it)
- Host: enter in your website’s main URL (such as www.fixrunner.com) or IP address here
- Logon type: set to ‘normal’
- User: enter your user name
- Password: enter your password
- Click “Connect” and FileZilla handles the rest.
Note: to know your username and password, you can contact your hosting provider.
How to Install WordPress using FTP
One of the most efficient ways of getting WordPress up and running is by installing it using the “Famous 5-Minute Installation”.
The process involves four steps only:
- Create a database.
- Connect to your server using FTP.
- Download, extract and upload WordPress.
- Run WordPress installation.
Step 1: Create a Database
No WordPress site can function without a database. It is where all your site’s data (usernames, passwords, posts, pages, comments, etc.) will be stored. Follow these steps to create one.
- Login to your hosting’s control panel.
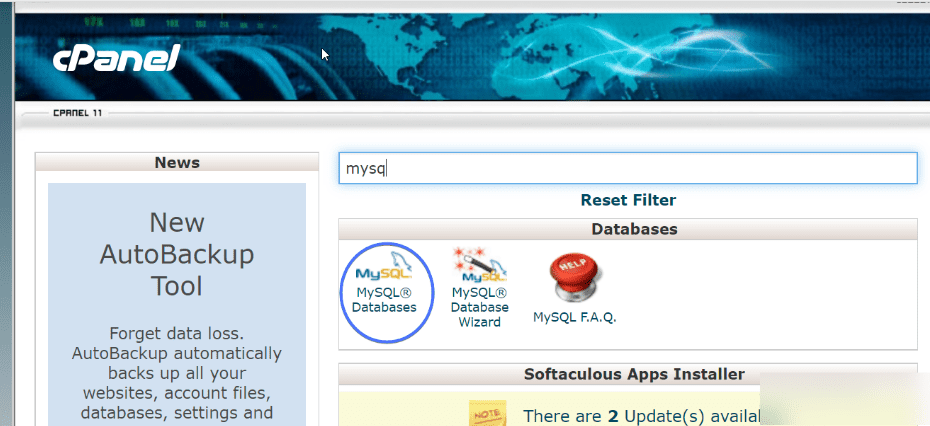
- Search for “MySQL Databases” or anything similar (the exact name depends on your hosting provider) and click on it.
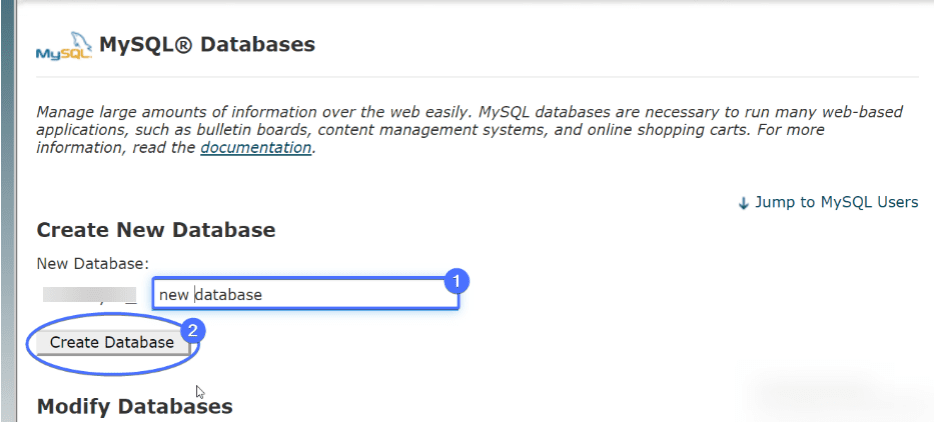
- Give your database a name and click the “Create Database” button.
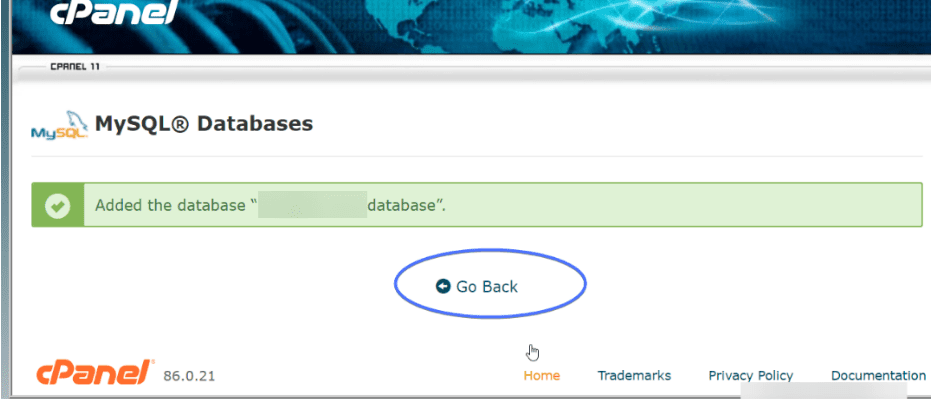
- The next page confirms that your new database has been created. Now, click “Go Back”.
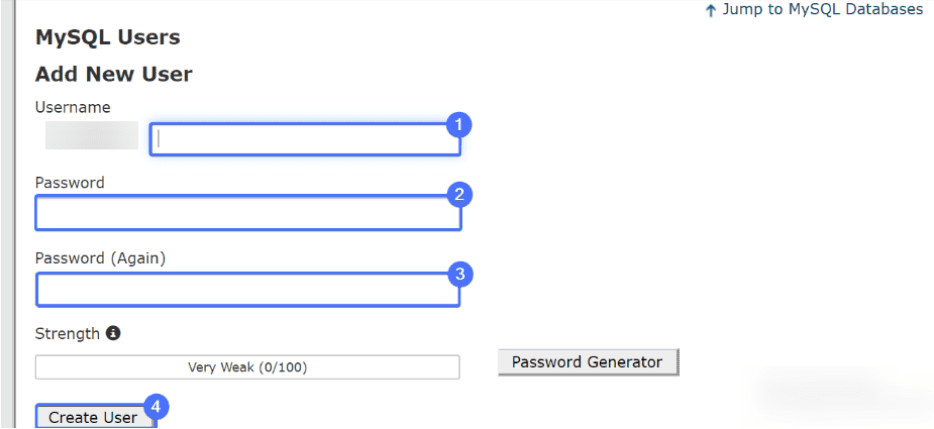
- Next, create a username and password in the “MySQL users” section. You may use the Password Generator to create a strong password for you. Then, click “Create User.”
These details will be required later in the installation process, so, keep it safe.
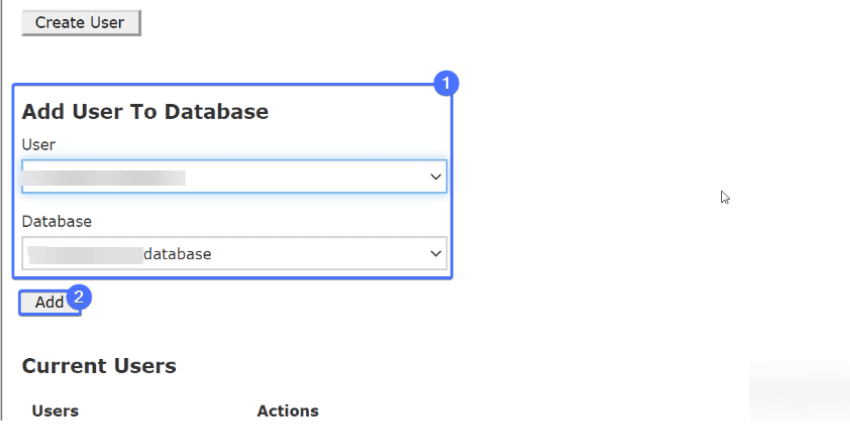
- Now, go to the “add user to database” section, select the user and database you created earlier, and click “Add”.
Step 2: Download FTP and connect it to your server
At this point, create an FTP connection to your server. See the How To Use FTP section above if you need reminders.
Step 3: Download, extract, and upload WordPress
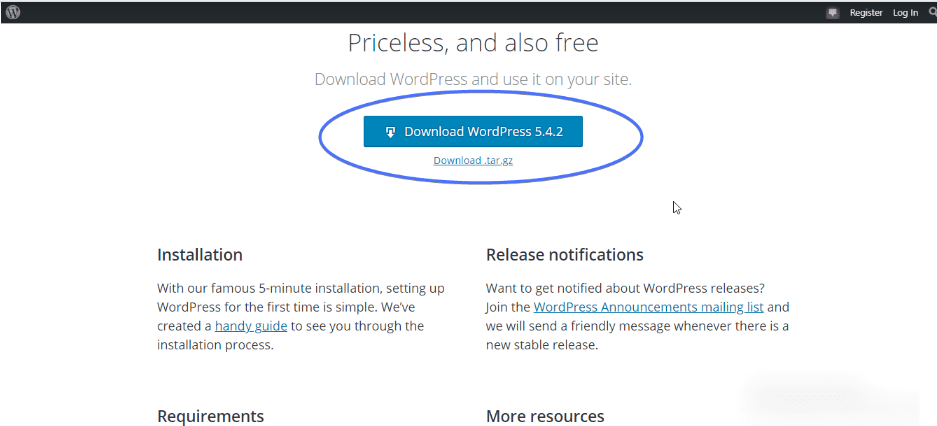
Visit the WordPress download page and click the “Download WordPress” button.
Unzip the file to extract the WordPress folder. The folder contains all files you need to create your WordPress site.
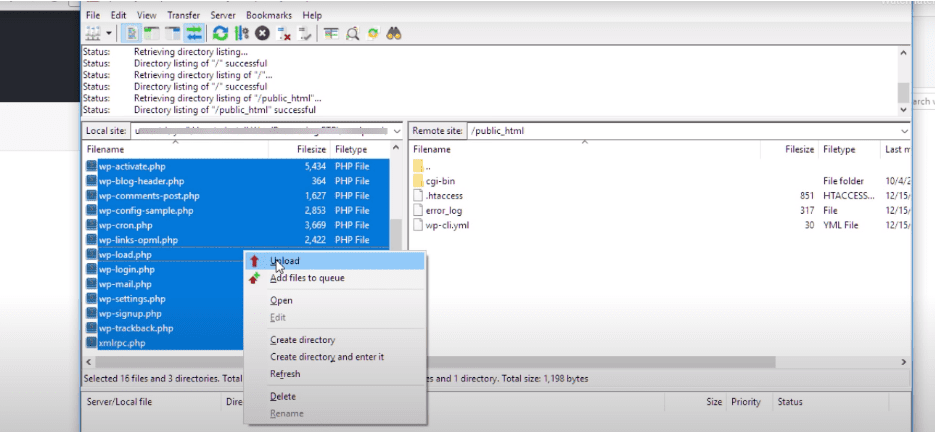
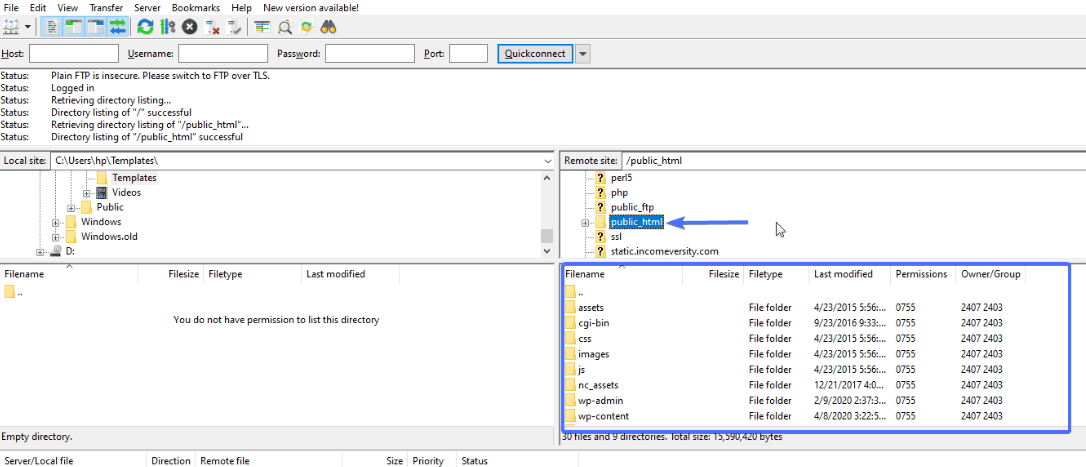
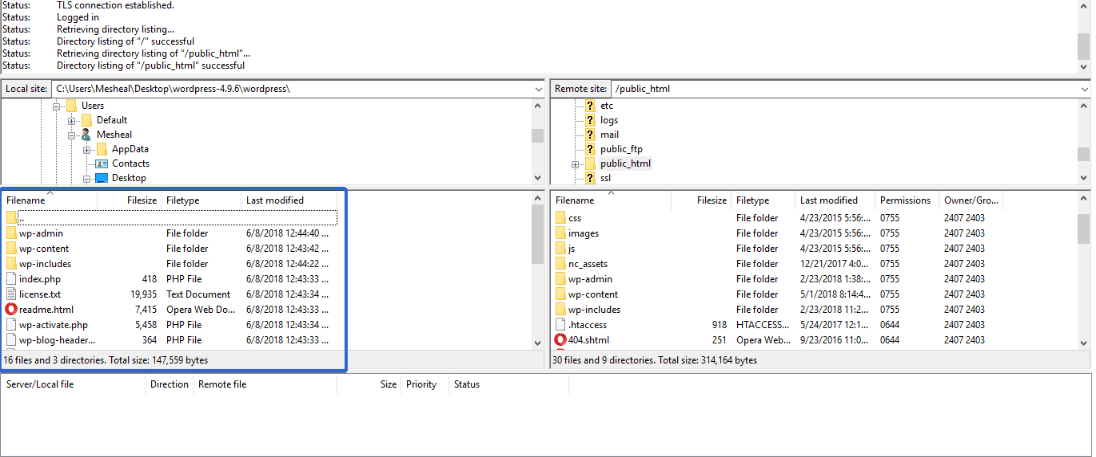
Next, go back to FileZilla. The screen is divided into two sections — local site and remote site. The local site section displays files on your computer while the remote site section displays your website files.
Open the WordPress folder on the local site section (left side), and the public_html folder on the remote machine.
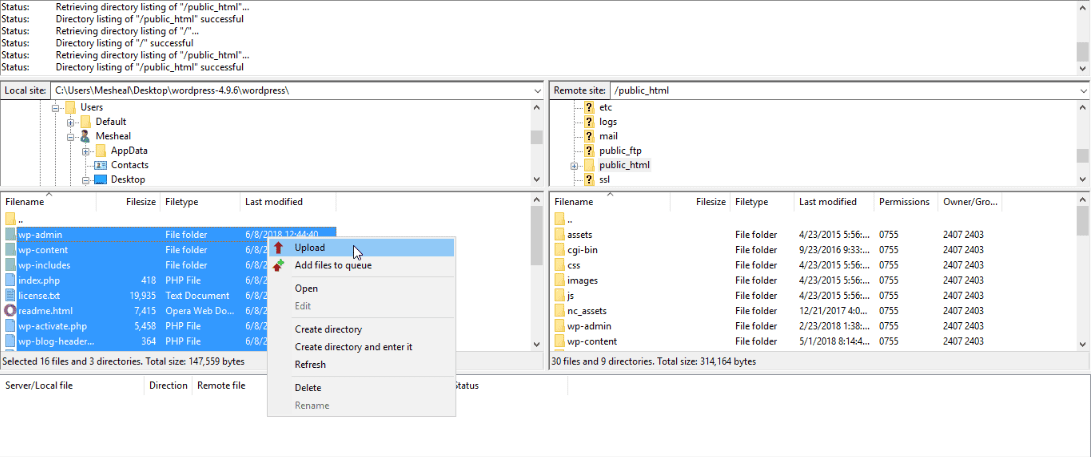
On the left, highlight the files and folders within the WordPress folder, right-click and select “upload”. Your FileZilla client automatically copies the WordPress files to your public_html folder.
When the upload completes, we have successfully created a database and uploaded WordPress. The next step is the easiest of all.
Step 3: Run the installation
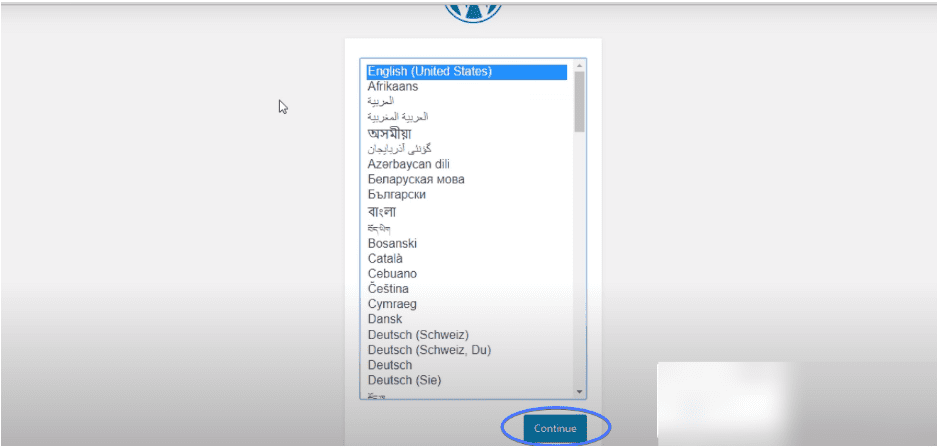
First, visit your website URL and you’ll see this WordPress installation screen:
Select your preferred language and click Continue.
The next screen gives you a hint of details you’ll provide. Hit the “Let’s go” button.
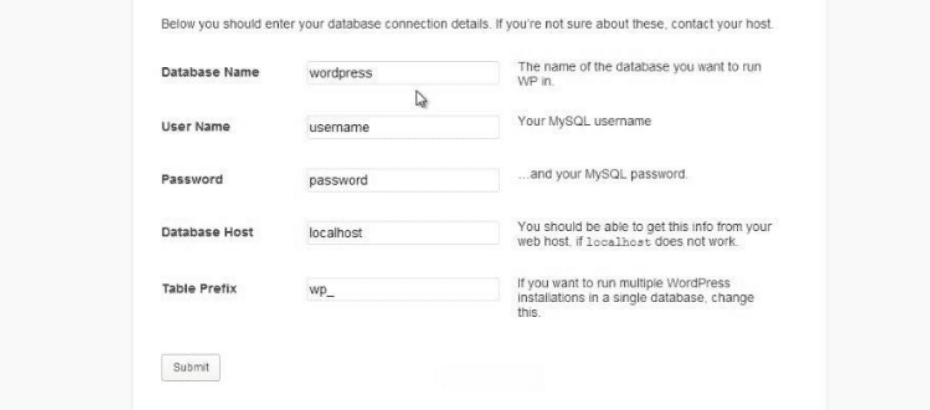
Next, input your database name, username, and password (the same details you used while creating a database).
The Database Host and Table Prefix fields should be left the way they are. Then, click Submit.
The next screen prompts you to run the WordPress installation. Click Run the install.
Finally, fill in your site title, username, password, and email address. Then, click Install WordPress.
After installation, you’ll see a success screen.
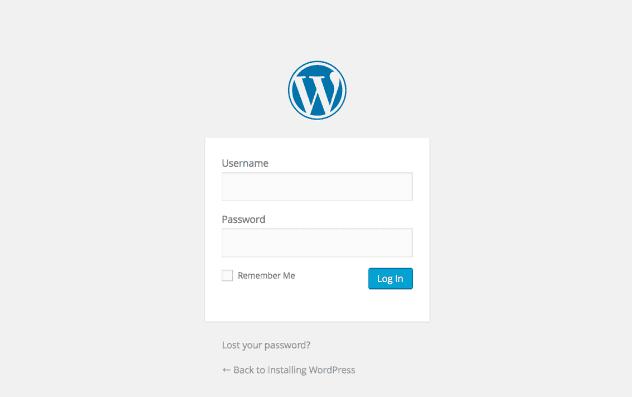
Next login to your newly installed website using your username and password.
This step takes you straight to your WordPress dashboard. You can start writing posts, installing plugins, and changing the appearance of your site from here.
How to use FTP for multiple file or folder upload
WordPress has a media upload functionality that works perfectly well until:
- You need to upload hundreds of files quickly.
- You need to upload very heavy files.
When either of these two circumstances arises, you need FTP.
There are two steps involved in uploading files to the WordPress media library,
- Upload the files to your server through FTP.
- Register the files to the WordPress media library using a plugin.
Let’s go through these steps in greater detail.
Step 1: Upload the files to your server through FTP
Launch your FTP client, then enter your login details and connect to the server.
Navigate to the wp-content/uploads/ folder. This is where you upload the files. Simply, click on the files you need to upload and drag them to the wp-content/uploads/ folder.
Now, you have successfully uploaded your files. However, the uploaded files are not in the WordPress media library. The next step shows how to make your files visible.
Step 2: Register the files to the WordPress Media Library using a plugin
Install and activate the “Media from FTP” plugin.
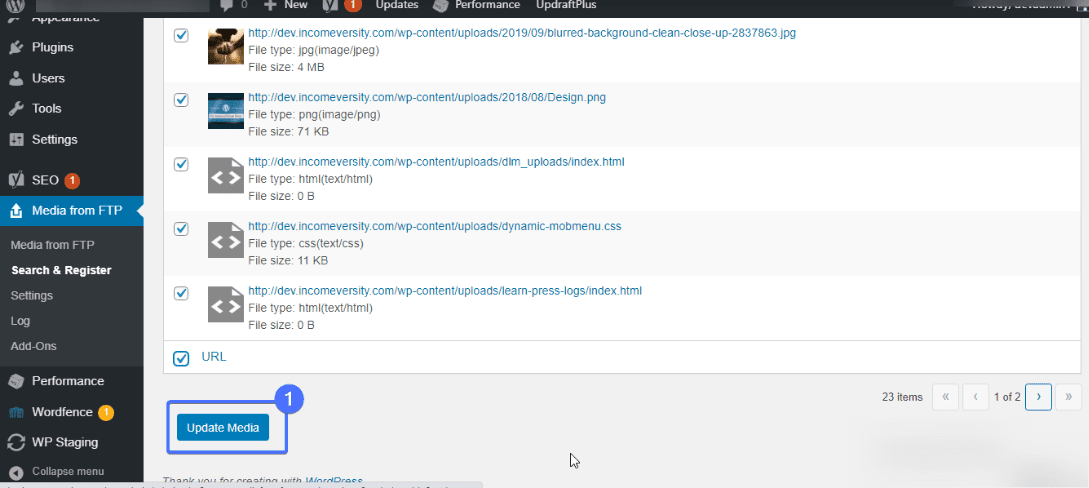
After activation, open “ Media from FTP→ Search & register”.
The page opened will show you a list of files downloaded using FTP. To select all files, tick the “URL” box, otherwise, tick the boxes one after the other.
Lastly, click Update Media.
How to Install a plugin using FTP
You can also install a plugin with FTP.
To do this, download the WordPress plugin. Plugins come in a zip format. Unzip and extract the plugin’s folder.
Next, launch your FTP client and set up an FTP connection to your server. Once connected, open the ‘wp-content > plugins’ folder. That is where WordPress checks for plugins.
Next, upload the folder you extracted from the zip file into the plugins folder. Now, visit your dashboard to activate your newly installed plugin.
How to Install a WordPress theme with FTP
This is just the same method as installing a plugin except you’ll be uploading your files to the ‘wp-content > themes’ folder.
Download the theme file and unzip it. You should get a folder named after the theme. Now connect to your server using FTP and open your ‘wp-content > themes’ folder.
Next, right-click on your new theme folder on the left and select upload.
When the upload completes, head to your WordPress dashboard and go to Appearance > Themes. Here, locate the theme you just uploaded and activate it.
How to backup all WP files through FTP
To back up your WordPress files, connect to ftp, and open your public_html folder. Within this folder, select all files and folders you need to back up and download to your local machine.
This, however, does not include your Database. To backup your database, you’ll need a plugin. You can read this guide for more information: WordPress Database Plugins.
How to update WordPress manually with FTP
Updating WordPress can usually be done through your dashboard. But, when you can’t access your dashboard, you can use FTP.
To do this, download the recent WordPress version. After download, extract the file to reveal the WordPress folder.
Launch your FTP client and connect to your server. On the Remote site section, open the folder containing the WordPress files (this is usually the public_html in many hosts).
On the “local site” section of FileZilla, locate and open the WordPress folder you downloaded and extracted.
Next, select all files within the folder, right-click, and click ‘Upload’.
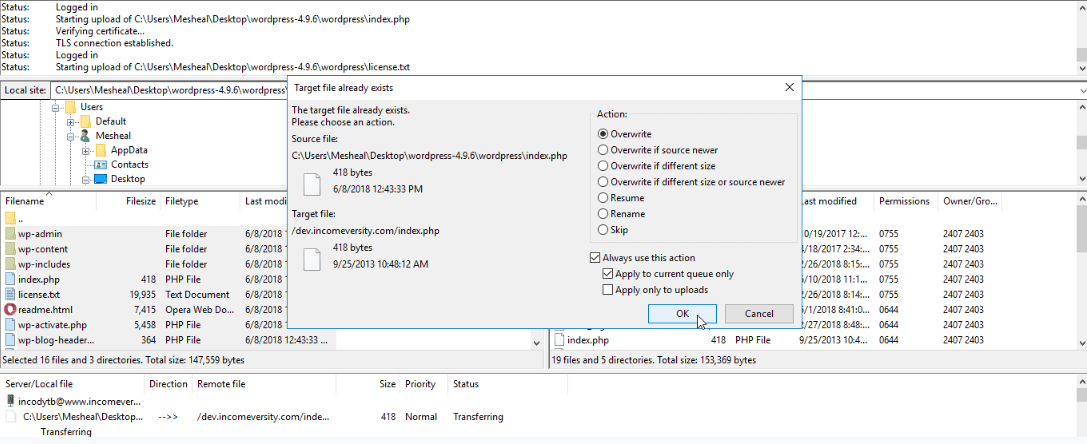
You’ll shortly see the “Target file already exists” dialog box. Select “Overwrite”, tick “Always use this action” and “Apply to current queue only”, and click OK.
Wait for the upload to complete. When it does, your WordPresss is updated.
Side Note: Don’t worry about losing your wp-config.php file, or the contents of your wp-content folder. The downloaded wp version contains wp-config-sample, so wp-config is not overwritten. Your content in wp-content also remains intact.
How to fix common WordPress errors using FTP
When errors arise in WordPress, the easiest way to solve it is through FTP. Here are some common WordPress errors.
Solving plugin or theme conflicts
When you have a plugin or theme conflict on your hands, deactivate all plugins and reactivate them one after the other. This way, you can identify the trouble-causing plugin.
If you can access your dashboard, you can deactivate your plugins via FTP. Here’s how.
Launch your FTP client and connect to your server. The “Remote site” section of the app displays all your WordPress site files. Navigate to the ‘public_html >> wp-content’ directory. Inside the wp-content folder, there is a folder named ‘plugins’. This is where WordPress stores all your plugins. Right-click on the ‘plugins’ folder and rename it. We’ll rename ours ‘plugin_deactivated’.
This process immediately deactivates all active plugins on your website.
Next, Return to your website and refresh.
If the error on your website is a result of a plugin conflict, it would be solved and you can log in to your website. Then, go back to the FTP client and return the plugin folder back to its original name. You can finally reactivate your plugins 1 by 1 on the dashboard to find which one is faulty.
Please read this guide for more information: How to Disable Plugins using FTP.
If it’s a theme conflict, locate your theme folder within “uploads > themes” and rename it (possibly to themename_deactivated).
This process immediately deactivates your active theme.
Next, refresh your website. You can now login to your WordPress admin if the error is a result of a theme error. You may also read this guide for more information: How to Disable Themes Using FTP.
Of course, don’t forget to give the theme folder its original name if you want to reactivate it.
Conclusion
If you had little or no idea of what FTP is, now you know. We discussed how to use FTP to install WordPress, troubleshoot errors, backup WordPress files, and a lot more.
For more tutorials on how to handle any WordPress-related issues, please see the other technical and WordPress how-to guides in our WP College.
More Resources:
- How To Install WordPress Plugins: Complete Guide
- How to Fix Error Establishing Database Connection in WordPress
- Instagram Widgets for WordPress

