How to install and use WordPress on AWS(Amazon Web Services)
Some of the biggest internet companies use AWS. To just name a few Netflix, Airbnb, Adobe Systems, Autodesk… Also, some of the managed WordPress hosting solutions are hosted on Amazon Web Services. Since you have a middleman between you and AWS, cost of running a website might be greater. Therefore if you cut the middlemen (hosting provider) and move WordPress site to AWS, you might save some money.
With AWS you are making your hosting solution on Amazon’s server.
The unique thing about AWS is that you pay only for what you use. This might be appealing to a business that does not get a lot of traffic. However please note if you get a large spike in traffic it’s going to raise your costs. That said Amazon has a monitoring and notifications service so you can follow your site traffic and know if it’s going to exceed some limit.
While the cost might be less initially, you are responsible for maintaining your server that might be time-consuming even if you have technical knowledge. If you don’t know how to do that, you’ll need to learn or pay someone to maintain your server. So this is something that needs to be considered.
That said, you can follow this step by step guide and see just how complicated the initial setup is. But first, let’s get started with the benefits of installing WordPress on AWS.
Table of Contents:
- AWS Web Hosting Benefits: In-depth Analysis of AWS Advantages
- Overview – Step by Step Guide
- How To Host WordPress on Amazon Web Services (AWS)
- How To Set Static IP
- How to Register a Domain Name
- How to Configure DNS
- Set up CloudWatch Monitoring and Notifications Service
- Amazon Lightsail as an Alternative
- Troubleshooting and Support
- Conclusion
AWS Web Hosting Benefits: In-depth Analysis of AWS Advantages
Choosing the right hosting platform for your WordPress site is crucial for its performance, security, and scalability. Amazon Web Services (AWS) stands out as a premier choice for web hosting, offering a range of benefits that cater to websites of all sizes and complexities.
Let’s delve into the specific advantages of AWS web hosting to understand why it’s considered a superior choice for WordPress hosting.
Scalability
One of the most significant benefits of AWS is its unparalleled scalability. AWS allows you to easily scale your hosting resources up or down based on your website’s demand, ensuring that your site remains responsive and efficient, even during unexpected traffic spikes.
This flexibility is particularly beneficial for businesses experiencing rapid growth or websites with fluctuating traffic patterns.
Global Data Center Availability
AWS boasts an extensive global network of data centers, strategically located in various regions and availability zones around the world.
This global footprint enables you to host your WordPress site closer to your target audience, significantly reducing latency and improving load times for a better user experience. Moreover, AWS’s global presence ensures higher redundancy and reliability, minimizing the risk of downtime.
Cost-Efficiency
AWS follows a pay-as-you-go pricing model, which means you only pay for the resources you actually use. This approach can lead to significant cost savings compared to traditional hosting services that may require you to pay for a fixed package of resources, regardless of your actual usage.
AWS also offers various pricing plans and options, such as reserved instances and spot pricing, which can further optimize your hosting expenses.
Enhanced Performance
AWS provides a robust infrastructure equipped with high-performance computing, storage, and networking capabilities. This ensures that your WordPress site can handle complex operations, high-resolution media content, and large volumes of data with ease.
AWS’s performance optimization features, such as Amazon CloudFront (a global content delivery network) and Amazon ElastiCache (in-memory caching service), further enhance your site’s speed and responsiveness.
Security and Compliance
AWS is committed to maintaining the highest levels of security and compliance. It offers a comprehensive suite of security tools and features, including network firewalls, encryption, and identity and access management, to protect your WordPress site from potential threats.
AWS also complies with various industry standards and certifications, ensuring that your hosting environment meets strict security and regulatory requirements.
Reliability and Uptime
AWS’s architecture is designed for high availability and fault tolerance. Its data centers are equipped with backup power supplies, networking connectivity, and other redundancies to ensure continuous operation.
AWS’s Service Level Agreement (SLA) guarantees an impressive uptime percentage, giving you peace of mind that your WordPress site will remain accessible to your users around the clock.
Overview – Step by Step Guide
This step by step guide is divided into five sections.
- In the first section, we’ll demonstrate how to host WordPress on Amazon Web Services (AWS).
- Then we’ll set static IP for our website.
- After that, we’ll demonstrate how to register a domain name.
- Then we’ll explain how to configure DNS. This is going to link static IP to the domain name.
- And finally, show how to set up CloudWatch monitoring and notifications service.
The first section is required. The other four are optional. If you are just testing AWS you don’t need to do them.
1. How To Host WordPress on Amazon Web Services (AWS)
Step 1: Create an AWS Free Tier account
Before we start hosting WordPress on Amazon Web Services (AWS) you should sign up for the account. This an easy process just go to this webpage and click on create a free account. Since this is a tutorial, we are going to use a free tier to demonstrate the process of setting up WordPress sites with AWS.

Have your credit card nearby you are going to need it. To create an account Amazon is going to charge $1 to your credit card. This is to verify that you are a real person and also to have your payment info if you decide to switch to a paid plan.
When you sign up for AWS Free Tier you can use it for 12 months. This includes 750h per month for t2.micro instances running Linux or Windows. Please note that you should only use t2.micro instance if you want to stay in the free tier.
Step 2: Open the AWS Management Console and select EC2
Once you logged in to your new account open AWS Console. Then under the compute category click on EC2.

Step 3: Launch an Amazon EC2 instance
Now that you are in EC2 Dashboard under Create Instance click on Launch Instance. This is going to launch an Amazon EC2 instance. This instance is a virtual machine (server). If terms like virtual machines or instances are confusing you don’t fear is noting scarry. The virtual machine is an emulated computer system. On the server, your VM will get part of CPU cores, RAM and storage. This is a clever way of sharing computing resources. This means that your VM will run Linux OS with WordPress. While on that same server PC there might be some other VM running Windows Server OS doing something completely different. You can even run virtual machines on your home PC or Laptop with software like VirtualBox. This can be used for testing software that runs on different OS and things like that.

Step 4: Install WordPress on EC2 instance
To install WordPress on AWS EC2 instance we are going to use Amazon Machine Image (AMI) from the AWS Marketplace. AMIs are pre-configured images of operating systems bundled with common pieces of software. We are going to use WordPress powered by BitNami image. To select this image click first on AWS Marketplace and then type WordPress in the search box. WordPress powered by BitNami image will show up as the first result just click on select on the right side. This going to create an Ubuntu Linux virtual machine with pre-installed WordPress.

Step 5: Select the pricing for EC2 instance
When we say pricing don’t worry you don’t need to spend money. As we said we are going to use the free tier for this tutorial. This just listing all the prices that can be associated with this EC2 instance. Just scroll down and click on continue. The pricing is going to be $0.00 regardless of the instance size.

Step 6: Select an instance type
In this step, you will select the free-tier instance. In type, column click on t2.micro. When you selected t2.mircro instance click on Next: Configure Instance Details.

Then on the following screen click Next: Add Storage and then Next: Tag Instance.
Step 7: Set a key-value pair for instance
Next, we’ll set a name for instance. Enter Name in key box and WordPress in the Value box.

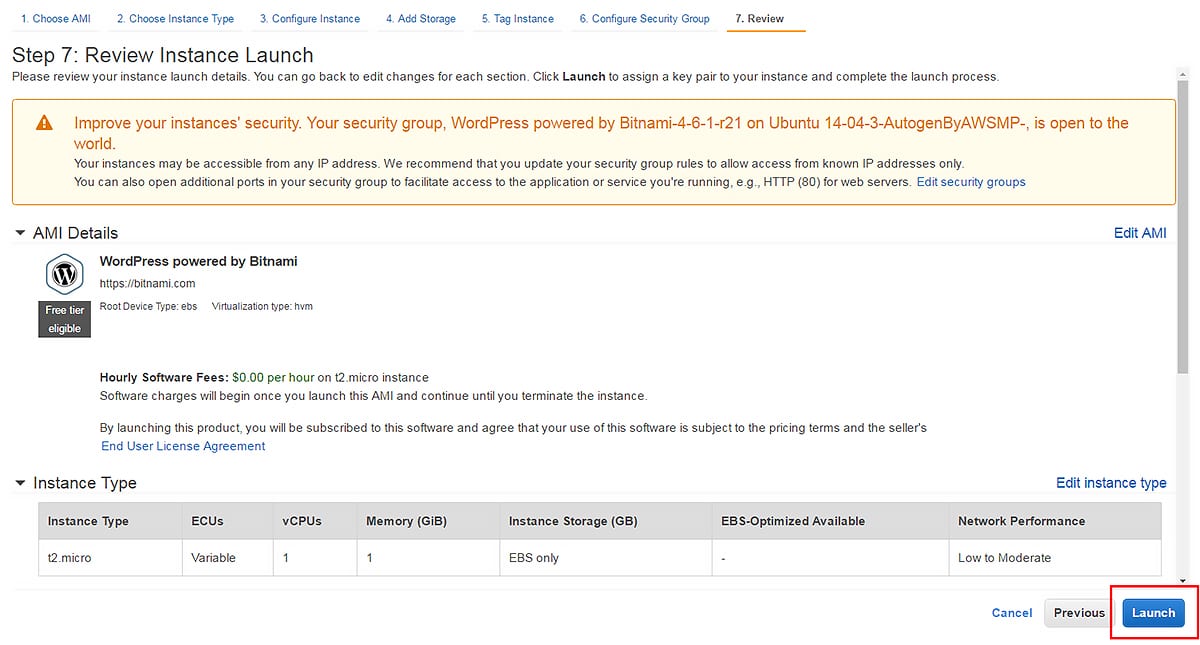
Step 8: Review instance configuration
Check if everything is configured correctly, then click on Launch.
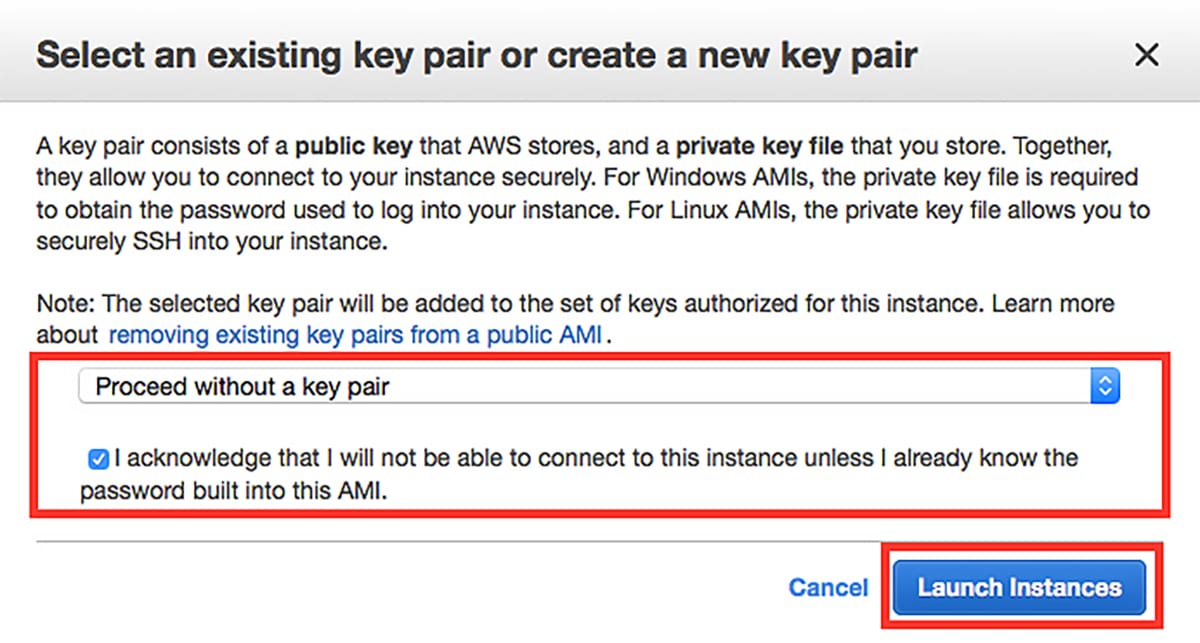
Step 9: Skip creating key-pair for SSH – WordPress on AWS
For this tutorial, we are not going to create a key-pair for Secure Shell (SSH). This is because we are not going to use a terminal to access our instance. However, if you need terminal access you can create a key-pair for SSH later on. Steps that you need to take are outlined in this tutorial. See steps 2 d.-2 f. and 3 if you need to set this up.
So just select Proceed without a key pair. Check the box next to: ‘I acknowledge that I will not be able to connect to this instance unless I know the password built into this AMI’. Finally, click on Launch Instance.
This process might take a few minutes so be patient.
Step 10: Check if WordPress instance is running
On the bottom right click on View Instances. Then select WordPress instance make sure that in Instance State column says running. It may say launching if this is the case you might need to wait a bit until the instance is up and running.

Step 11: Test your WordPress site – WordPress on AWS
Finally, in this step, we’ll get to WordPress. To access your WordPress AWS site you’ll need Public IP that is listed at bottom of the page. For our instance IP address is 54.172.168.218, you’ll get some other IP.

Copy this your Public IP, then open a new tab in your browser and paste this IP. Then press enter and hopefully, you should see a familiar WordPress blog home page.

Step 12: Make changes to your WordPress Website
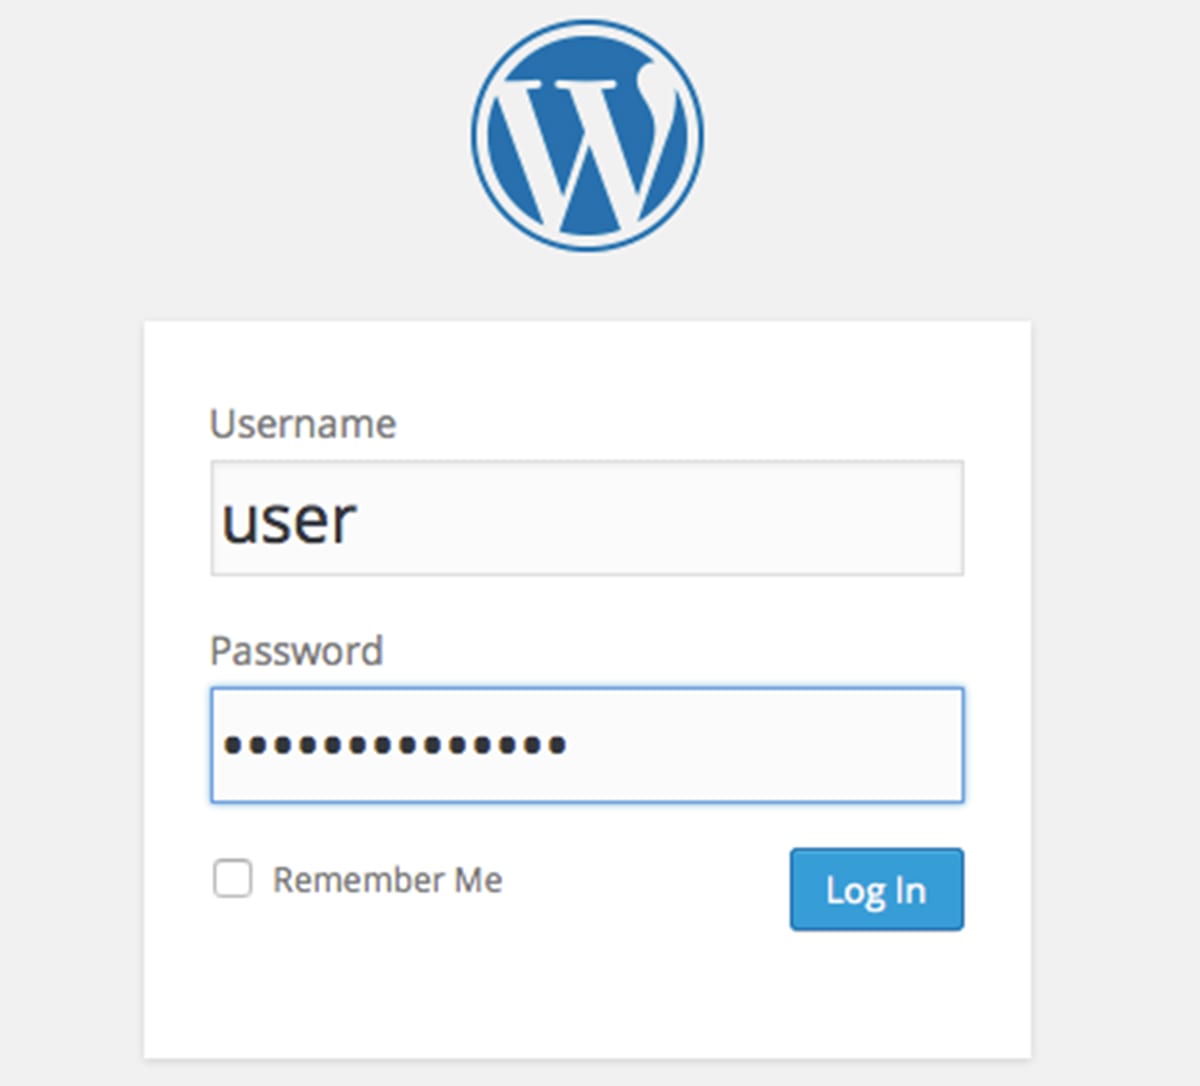
If you type /admin after your Public IP (for our instance that is 54.192.32.144/admin) and press enter you’ll get to the default WordPress login page. However, you’ll need a password to login to your WordPress console. So let’s get the password.
You can get the password by going to the EC2 management console and clicking on the Actions button. In the drop-down menu, select Instance Setting, and choose Get System Log.

In the system log window, scroll to the bottom to find the password that’s surrounded by hash marks.
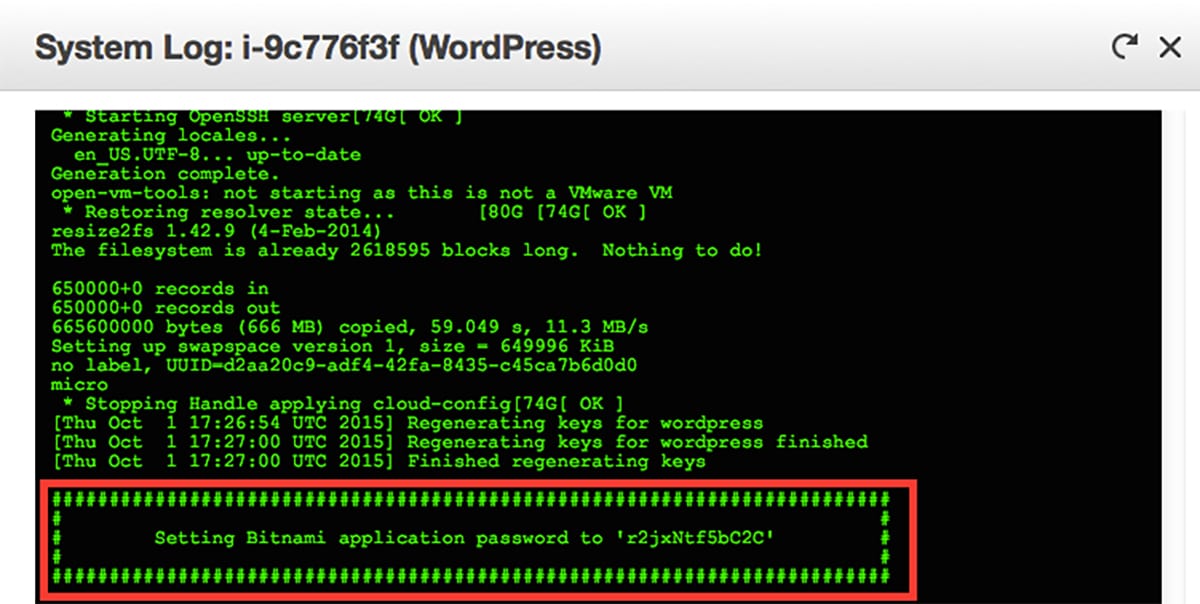
Copy this password and go back to the WordPress login page. For user name type: user and for password paste the password that you just copied.
Congratulations! You now have installed WordPress on Amazon Web Services. Now you can go and install WordPress themes, plugins and do whatever you like with your new WordPress website.
We recommend you change your WordPress password next.
Ok, we have a website that is running but one thing is missing. No one will be able to find our website so next, we have to add a domain name. Please note that you’ll need to buy a domain name and prices can range from $9 up to hundreds of dollars. So if you are just using AWS for testing you might not need to do the next steps. You can use that public IP to access your site. However, if you need to show site to other people you’ll need a domain name. So let’s set that up in the next few steps.
2. How To Set Static IP – WordPress on AWS
Step 1: Set Elastic IPs
Before we get to domain name we first need a static IP address to link to the domain name. AWS defines elastic IPs as a static IPv4 address designed for dynamic cloud computing. To set elastic IP do the following:
To set up Elastic IPs follow these steps:
- First, go to the EC2 instance console.
- Then under NETWORK & SECURITY select Elastic IPs.
- Last click on Allocate New Address button.

Step 2: Set EIP
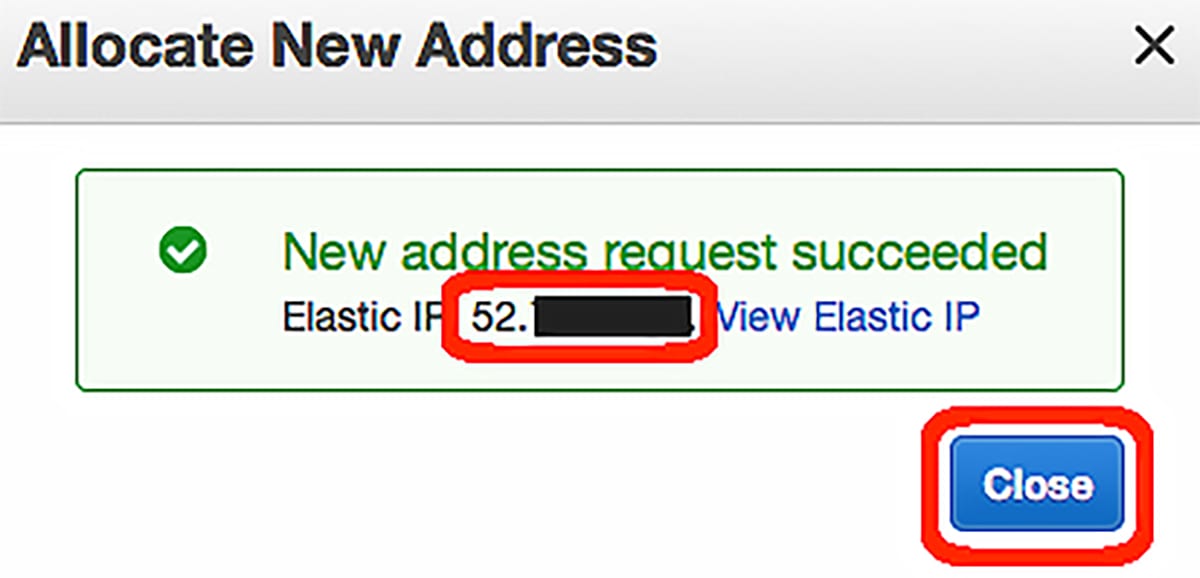
Set EIP used in: to VPC then click Yes, Allocate.
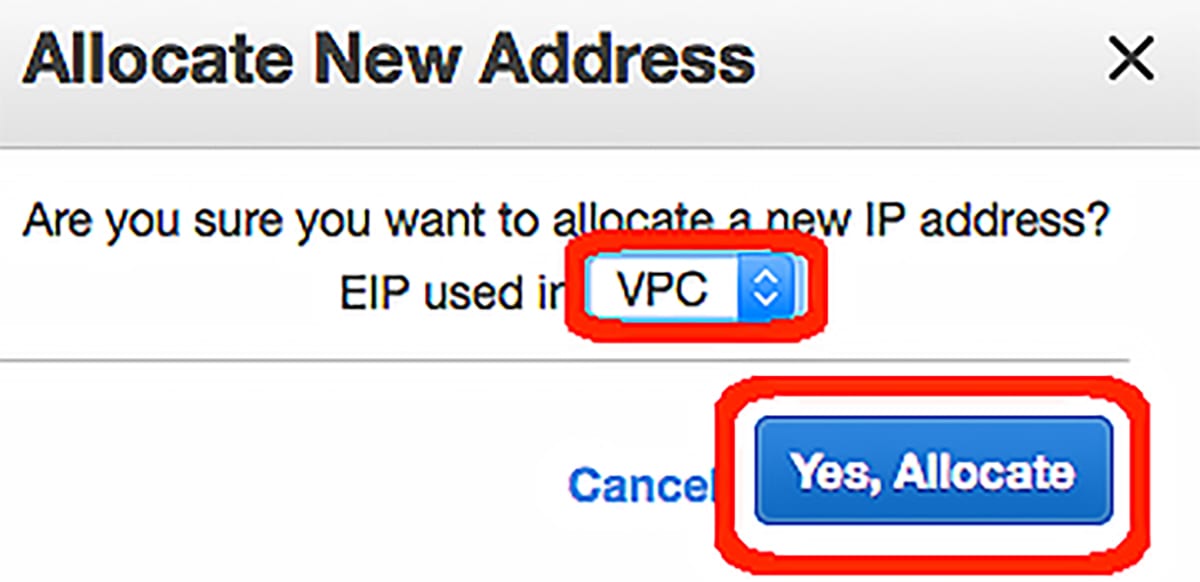
Note: There is no charge for Elastic IP addresses (EIPs) that are connected to running instances. If you remove the instance (e.g. the EIP is no longer connected to a running instance) then there is a cost of $0.005/hr for the EIP.
Step 3: Note your Elastic IP – WordPress on AWS
Note your Elastic IP you are going to need it later on.
Step 4: Associate Elastic IP address
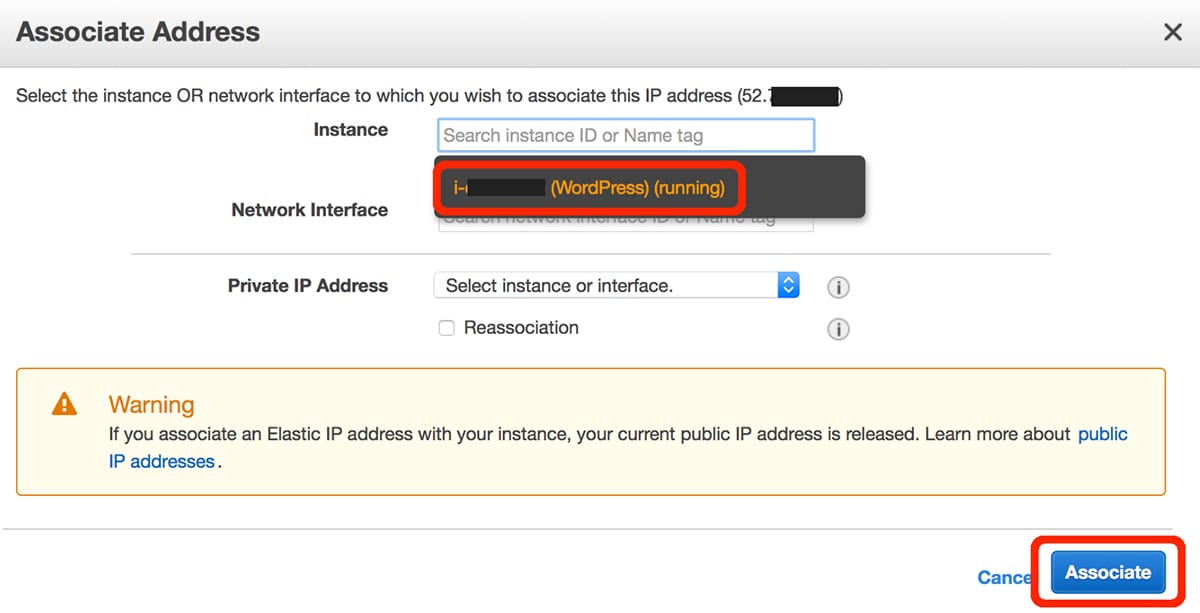
Select the new IP address in the Elastic IP column. Then press the Actions button and pick the Associate Address option.

On the next screen click in the Instance text box and choose the option that has your instance name.
Step 5: Verify your new Elastic IP
Copy Elastic IP address then open a new tab in your browser and paste the address. If nothing went wrong, you should see a familiar Hello world! WordPress starting page.


In the next steps, we are going to set the domain name system (DNS) to point to elastic IP that we just setup.
3. How to Register a Domain Name – WordPress on AWS
Step 1: Open Route 53
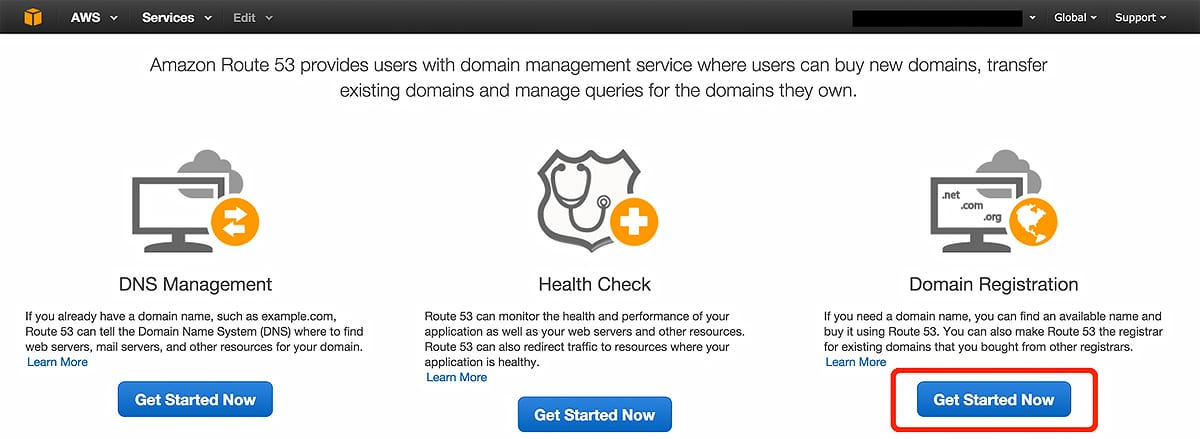
Amazon’s Domain Registration is called Route 53. To get to Route 53 open this link. You can do DNS management. monitor health and performance and domain registration. We want to register a domain name so click on the Get Started Now under Domain Registration.
Step 2: Choose a domain name – Hosting WordPress on Amazon Web Services
Please note that you need to pay for the domain name it’s not included in the free tier. To register a domain name follow these steps:
- Enter the domain name you want in Choose a domain name field.
- Then set a Top Level Domain (TLD) (e.g. .com, .org, .co.uk, etc.) next field to the right.
- And click the Check button to see if the domain is available.
- If the domain is available, click the Add to cart button.
- And scroll to the bottom of the page to click Continue.

Step 3: Enter your contact details – AWS WordPress
Enter your Contact Details. The information that you provided will be associated with the domain name.

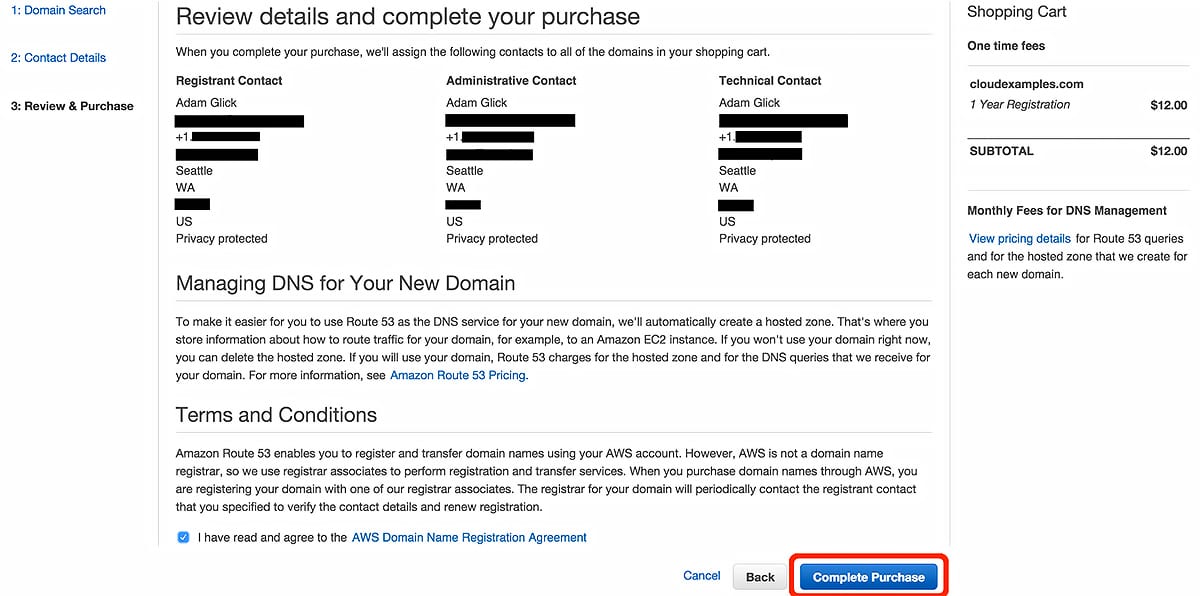
Step 4: Review details and complete your purchase
Check if everything is correct and click on Complete Purchase.
Step 5: Confirm your contact data – WordPress on AWS
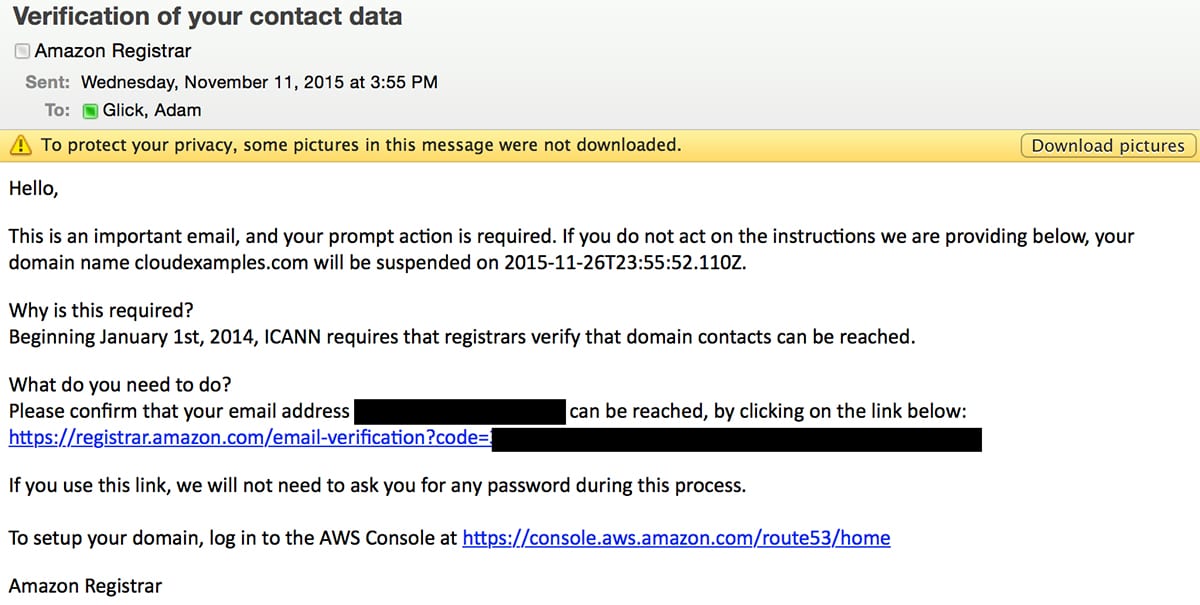
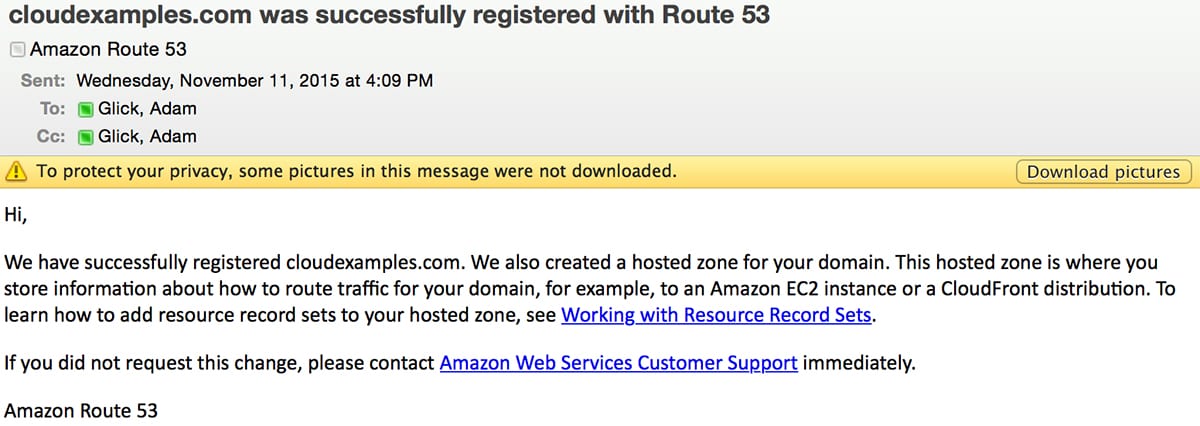
To complete your domain registration you need to open the email that you have received from Amazon. Then follow the instructions to finish verification of your contact data.
4. How to Configure DNS – AWS WordPress
This is the last thing that we need to do to have a fully functional website. We are going to link the domain name to static IP.
Step 1: Select the domain name
Open Route 53 console then click on Hosted Zones. After that select the domain name that you created. In this tutorial, we named that domain cloudexamples.com.

Step 2: Link Elastic IP to the domain name
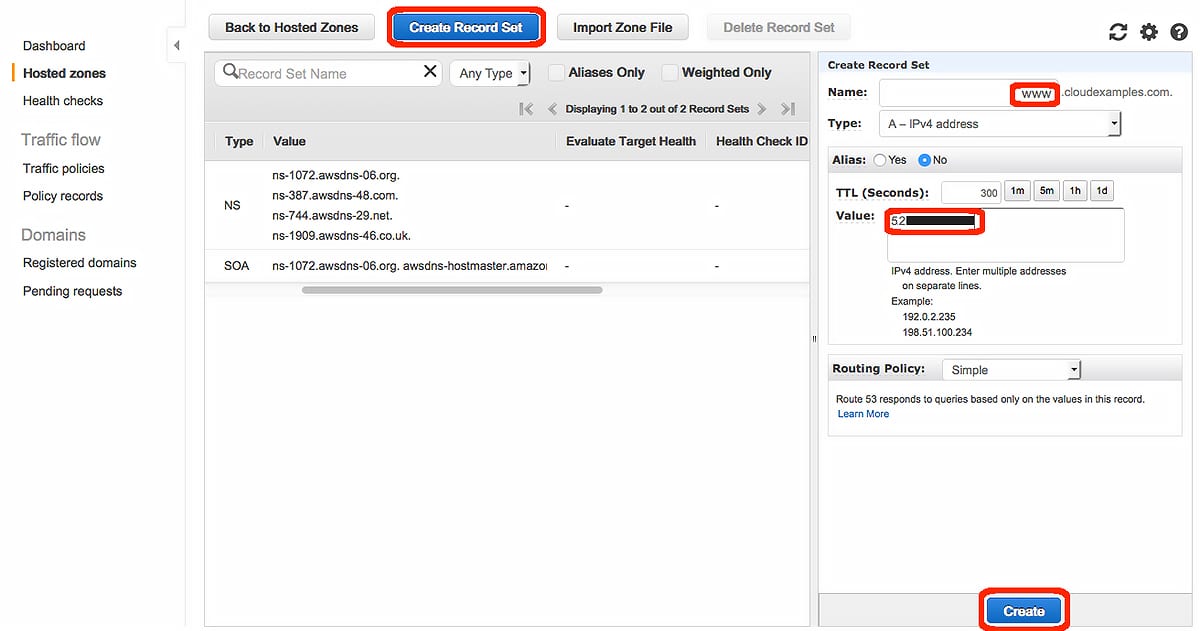
Under Create Record Set you are going to edit name and value fields. Set Name to www and for Value to Elastic IP that you created in section two. Then click on the create button.
Step 3: Verify entry
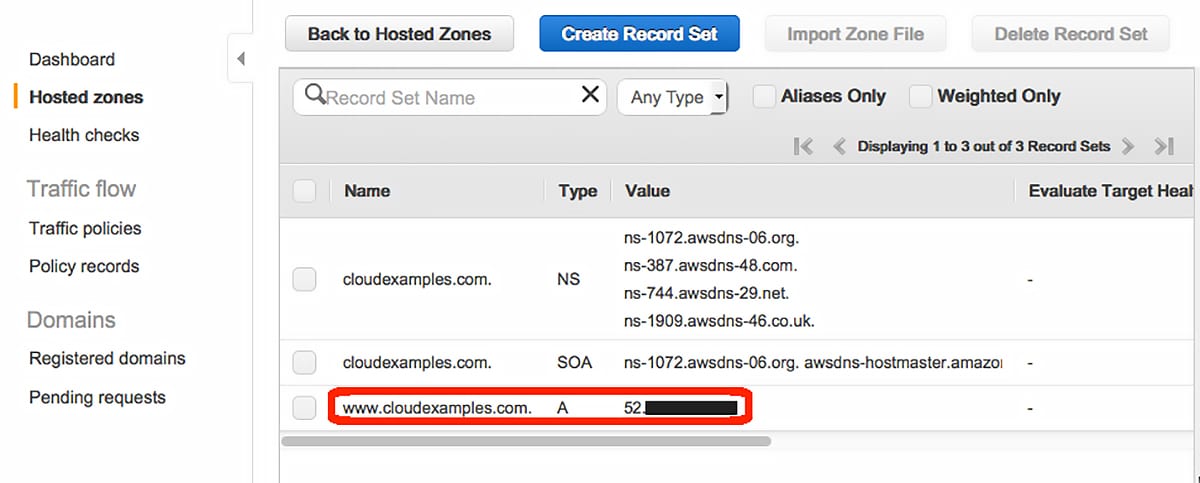
Verify that your domain name is in the main table with static IP that you entered.
Step 4: Verify that your site can be reached at the new domain name
Check that your website can be reached at the new domain by typing the address in your web browser.

This is the last step you have a fully functional WordPress hosted on Amazon Web Services (AWS) with a custom domain name.
5. Set up CloudWatch Monitoring and Notifications Service

Before you start setting this up please note that CloudWatch is not completely free. You pay for what you use the same as other AWS services. You can find full pricing on this page. That said for EC2 instance you get free basic monitoring and this includes:
- CPU utilization
- data transfer
- and disk usage activity from Amazon EC2 instances.
To get to Amazon CloudWatch Console click on this link https://console.aws.amazon.com/cloudwatch/. When you open this link you are going to see the CloudWatch overview home page.
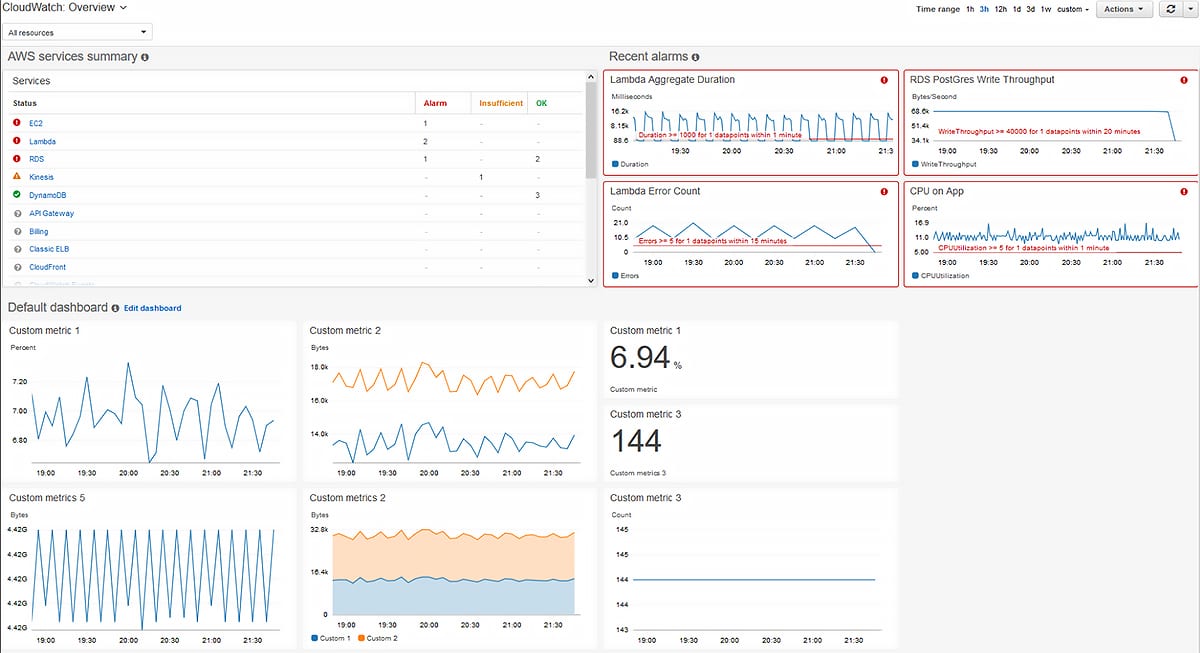
Even if you are opening CloudWatch console for the first time it might have some of the free metrics. Considering this is your first time using CloudWatch console you are going to have a button that says Create Alarm. You can click on this button to set custom alarms so you know when some metric goes over set threshold. And also, you can set actions to be taken if an alarm occurs. There are many actions that you can take on an alarm event.
CloudWatch is a must-use feature. Don’t skip this since if something goes wrong it can end up costing you a lot of money. So make sure you set alarms that will prevent that from happening.
And with CloudWatch set, your awesome website ready to go live. We know there are a lot of steps in this tutorial if you made it these far congrats.
Amazon Lightsail as an Alternative
When considering hosting WordPress on AWS, the complexity of setting up and managing an EC2 instance might seem daunting for many users, especially those with limited technical expertise or those seeking a more straightforward approach.
This is where Amazon Lightsail comes into play as a viable, user-friendly alternative.
What is Amazon Lightsail?
Amazon Lightsail is a cloud computing service that offers an easy-to-use platform for deploying and managing virtual private servers (VPS).
Designed with simplicity in mind, Lightsail provides a more intuitive interface and straightforward pricing compared to the more complex AWS EC2 service. It’s an ideal solution for small businesses, developers, and bloggers looking for a hassle-free hosting experience.
Key Features of Amazon Lightsail
- Simplified Setup: Lightsail allows you to launch pre-configured virtual servers, known as instances, with just a few clicks. These instances come with everything you need to run a WordPress site, including a pre-installed LAMP stack or other software applications.
- Predictable Pricing: Unlike the pay-as-you-go model of EC2, Lightsail offers fixed monthly pricing plans. These plans include a bundle of essential services such as compute power, memory, SSD-based storage, and data transfer allowance, making it easier to manage your hosting expenses.
- Integrated Tools: Lightsail provides a suite of integrated tools for managing your instance, including DNS management, SSH access, and snapshot backups. These tools are accessible from a simplified, user-friendly console, eliminating the need for complex command-line operations.
- Global Reach: With AWS’s extensive global infrastructure, Lightsail allows you to choose from multiple data center locations around the world. This ensures that you can host your WordPress site closer to your audience, reducing latency and improving site performance.
Why Choose Amazon Lightsail for WordPress Hosting?
For users new to AWS or those who prefer not to delve into the complexities of server management, Lightsail offers a compelling alternative. It combines the reliability and scalability of AWS with the ease of use of traditional shared hosting.
Whether you’re launching a new WordPress blog, setting up a portfolio site, or running a small online business, Lightsail provides a balanced mix of simplicity, performance, and affordability.
Troubleshooting and Support
Embarking on the journey of hosting your WordPress site on AWS can be both exciting and, at times, challenging. While AWS offers a robust and flexible platform for web hosting, users may occasionally encounter hurdles during the setup process or in the day-to-day management of their instances.
To empower our readers with the ability to navigate these challenges, we’ve compiled a troubleshooting guide for common issues and outlined the support resources available through AWS.
Troubleshooting Common Issues
- Connectivity Problems: One of the first hurdles you might face is difficulty connecting to your AWS instance. This can often be traced back to security group settings that may not be correctly configured to allow access on the necessary ports. Ensure that your security group rules allow inbound traffic on HTTP (port 80), HTTPS (port 443), and SSH (port 22).
- WordPress Installation Errors: During the WordPress setup on your EC2 instance, you might encounter errors related to database connections or missing files. Double-check your wp-config.php file to ensure that the database name, username, and password match those you created in your AWS RDS or MySQL instance on EC2.
- Performance Issues: If your WordPress site is experiencing slow load times, it may be due to insufficient resources allocated to your instance. Consider scaling your instance type to one with higher CPU and memory capacity. Additionally, review your WordPress plugins and themes, as poorly coded extensions can significantly impact site performance.
- SSL/TLS Certificate Configuration: Setting up an SSL/TLS certificate for your WordPress site on AWS is crucial for security and SEO. If you encounter issues, verify that you’ve correctly installed and linked your certificate to your instance and that your security group settings allow HTTPS traffic.
AWS Support and Resources
For issues that go beyond basic troubleshooting, AWS provides a wealth of support and resources to assist you.
- AWS Documentation: AWS offers comprehensive documentation covering every aspect of its services, from setting up EC2 instances to configuring RDS databases. The AWS documentation is an invaluable resource for step-by-step guides and best practices.
- AWS Support Plans: AWS provides various support plans tailored to different needs, from the basic Developer plan to the more comprehensive Business and Enterprise plans. These plans offer access to AWS support engineers, infrastructure event management, and technical guidance.
- AWS Community Forums: The AWS Community Forums are a great place to seek advice, share experiences, and troubleshoot issues with a global community of AWS users and experts.
- AWS Knowledge Center: The AWS Knowledge Center is a repository of answers to frequently asked questions and common issues encountered by AWS customers. It’s an excellent starting point for troubleshooting specific problems.
- AWS Partner Network: For more complex projects or enterprise-level deployments, consider working with an AWS Partner. These certified professionals can provide specialized expertise in AWS solutions, including WordPress hosting.
Conclusion – Hosting WordPress on Amazon Web Services (AWS)
In this tutorial, we went through the full process of hosting WordPress on Amazon Web Services (AWS). This process is a bit more complicated than using some hosting solutions. And while it’s less expensive there are additional costs that you should consider. Maintenance can be hard, you are responsible for updating your Linux installation and WordPress. Doing security patches so your site does not get hacked and so on. And if something goes wrong and you can’t fix it you might need to pay a developer to help you with your problem. So this is more work and if you don’t have technical knowledge it’s not worth the extra hassle.
If you don’t have time or technical knowledge you are better of using a managed WordPress solution. You can try WP Engine. They use AWS for some of their solutions so you get the performance of AWS and don’t have to manage it. These solutions usually use monthly subscription, in contrast, to pay for what you use with AWS. This might be pro or con depending on your needs.
For more WordPress tutorials check the rest of our blog out here. If you have further questions write them in the comment section below. Have a great day!

