How to Move WordPress Site to New Domain

Introduction on how to Move WordPress Site To New Domain
There will come a day when you will need to move the WordPress site to new domain. Or perhaps, for you, that day has come already. Migrating your WordPress website to another domain is a straightforward process. However, you need to get it right, else you risk losing the search traffic you’ve built.
Before migrating WordPress to a new domain, there has to be a strong reason to do so. In this article, we will review the reasons that make such a move necessary. Most importantly, you will get a step by step, detailed guide for migrating your website to another domain without losing search traffic.
In This Article:
- Reasons for migrating WordPress
- Steps to Move Your WordPress Website to a New Domain
- Putting finishing touches
Reasons for Migrating WordPress to a New Domain
Here are a couple of reasons why you may choose to migrate to a new domain:
The Need to Rebrand Arises
Rebranding might mean just changing your logo. It could also mean a complete change of the business name, business direction, and service offering. If the latter is the case for you, you cannot avoid switching to a new domain.
Google Has Slapped Your Website with Too Many Penalties
When trying to grow your search traffic, it’s easy to make mistakes. While some may be due to ignorance, others are a result of one trying to game the system. Google seriously frowns at this, and severely punishes offenders.
If you have made mistakes, and the penalties have been heavy on your website, why not move your site to another domain? Recovering SEO ranking after severe Google penalties is hard, and may not be worth the effort. Move on!
Steps to Move Your WordPress to a New Domain
1. Create a Backup of Your Site to Safely Move WordPress Site To New Domain
First, you need to create a backup of your WordPress to migrate it. You would be using this backup copy to restore your site in the new domain. Also, in the event that something goes wrong during the transfer process, you have a backup to fall on.
As a side note, if you would prefer to avoid the work and the possible complications, you can request our service, and our developers will help you with a seamless transfer.
In this guide, we will be showing you how to do this using a plugin.
Of the numerous backup WordPress plugins available, we shall concern ourselves with the Duplicator plugin. Reason: it’s simple and straightforward to use. And it’s also free!
Backup with Duplicator Plugin
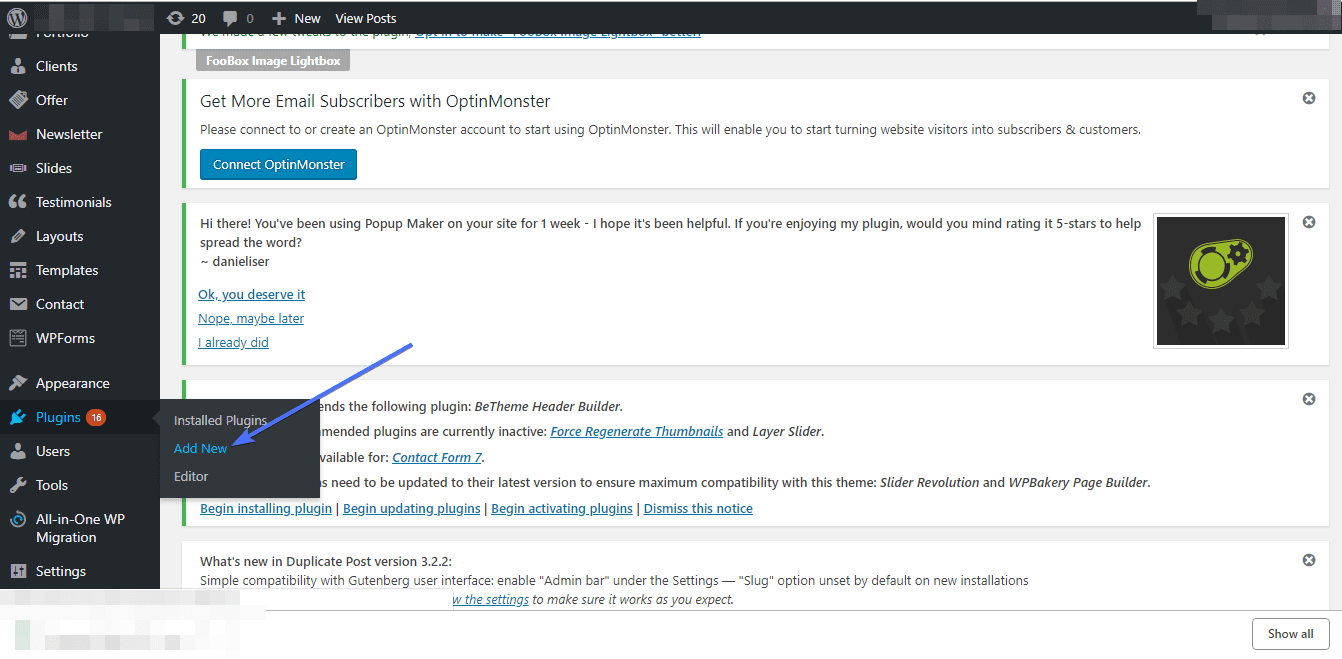
To install the Duplicator plugin, log in to your dashboard, place your mouse over “Plugins”, and then click Add New.
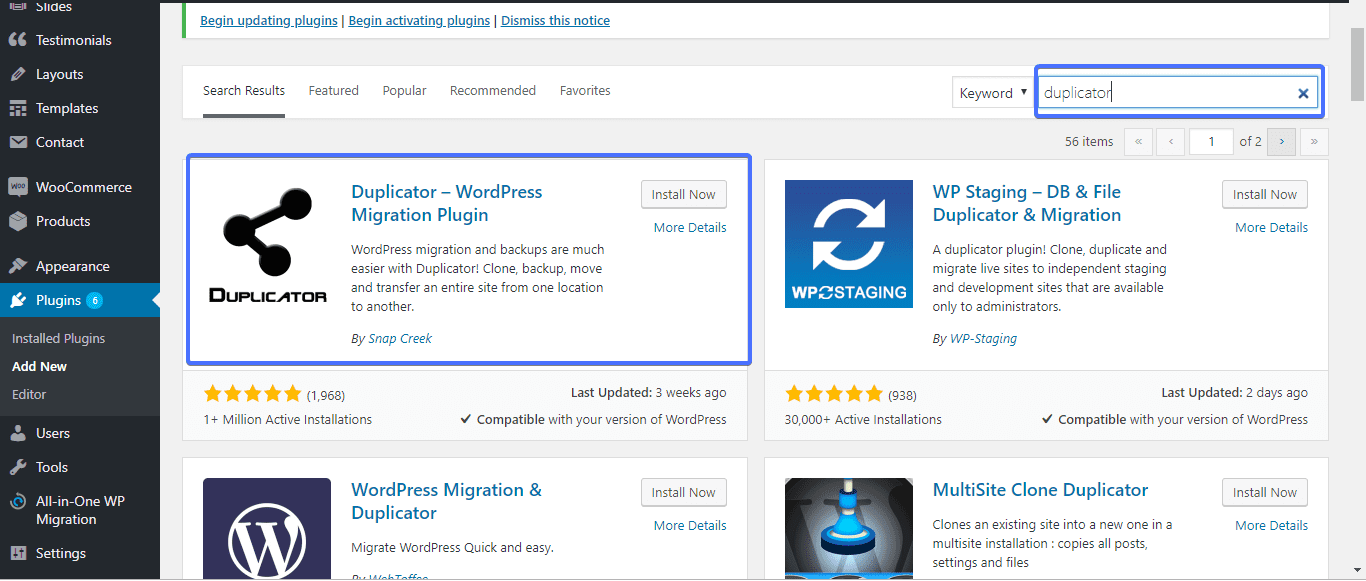
Next, search for Duplicator plugin, and once found, install and activate it.
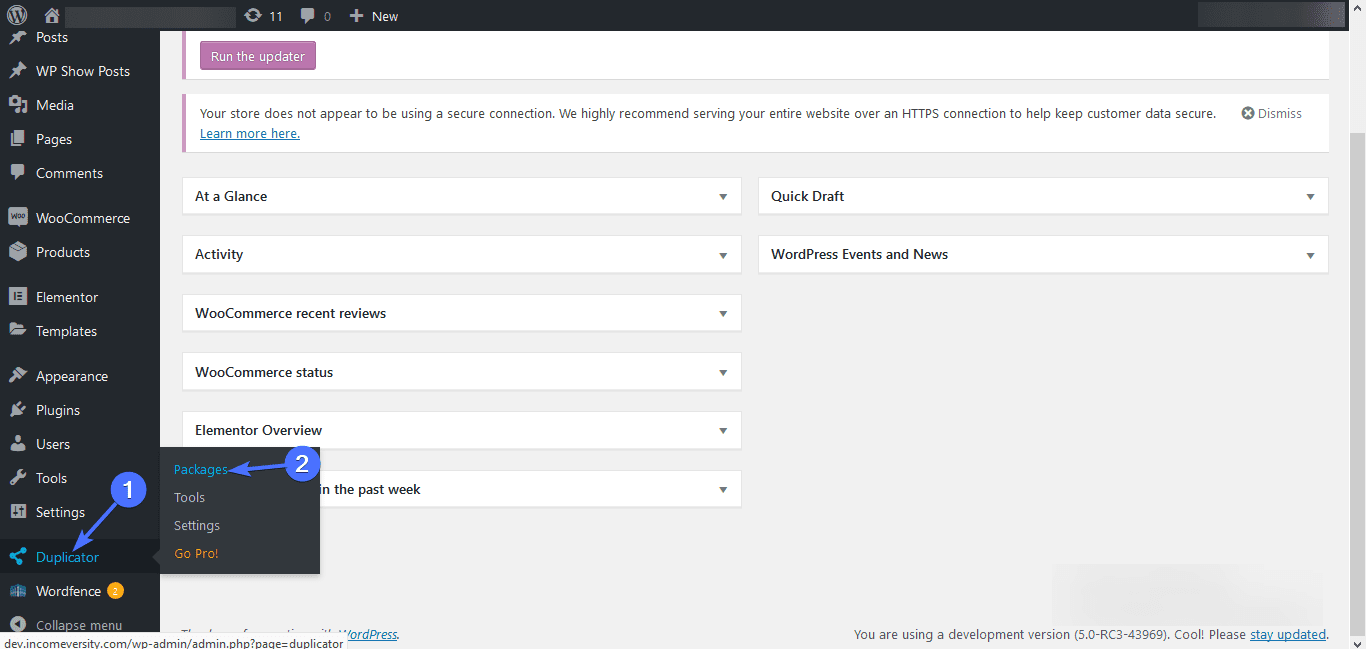
If the installation and activation were done successfully, you should see the duplicator tab on the left side of the dashboard. Select it, then press “Packages”.
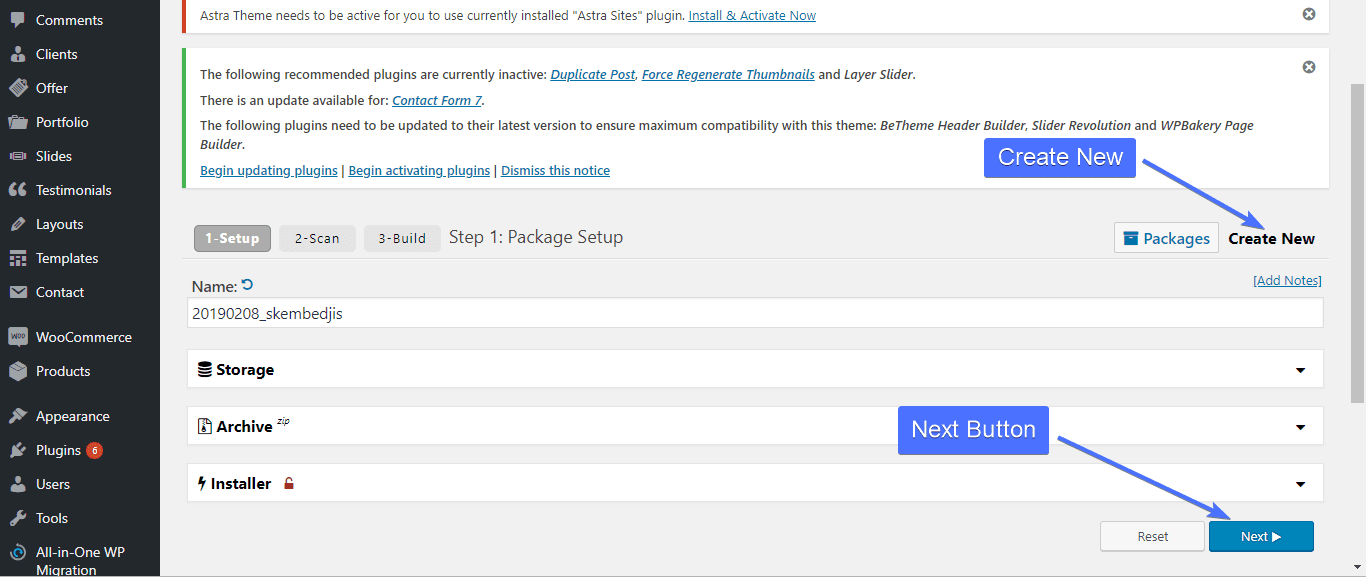
Click “Create New”, and in the create a new page, click “Next”
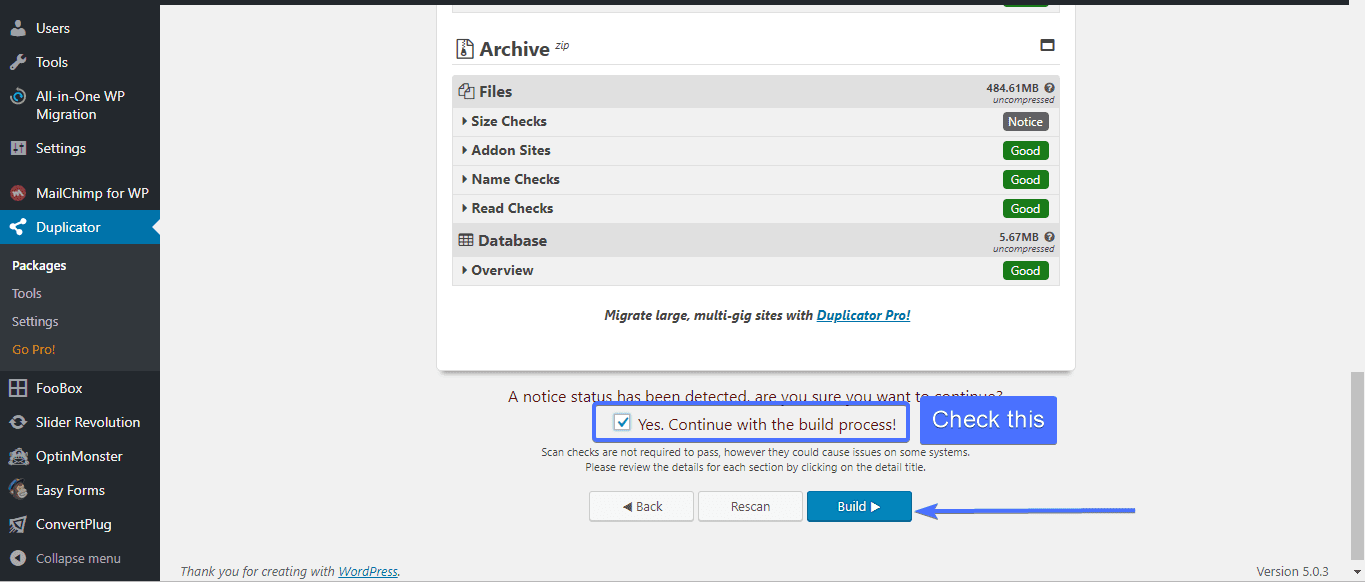
Once you’ve clicked on the next button, Duplicator would proceed to scan your WordPress website. Scanning takes a couple of minutes. After the scanning completes, check the “Yes, continue with the build process” box, and then click “Build”. Doing this will prompt Duplicator to create a copy of your website.
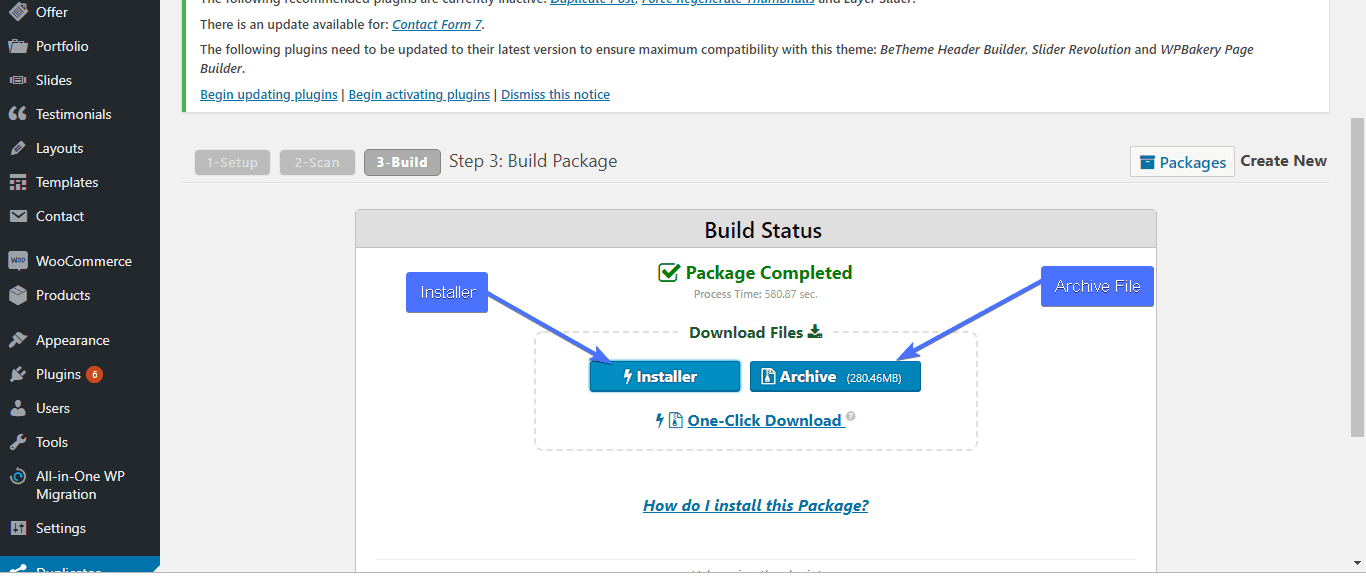
Depending on the size of your site, the build process takes 3 to 8 minutes. Finally, click the “Installer” and “Archive” buttons. This should download both the installer and archive files. You are now ready to move to the next step.
If you followed this guide, you should have a full backup of your website on your local machine.
If you need more information about automatic and manual backups, read our complete WordPress Backup Guide.
Now it’s time to move your website to its new home.
2. Create a WordPress Database Before You Move WordPress Site To New Domain
Without an SQL database, there is no way your WordPress site would work. So you need to create it first.
We are assuming you’ve already purchased a domain name and hosting for the new website. If yes, then proceed with the steps below.
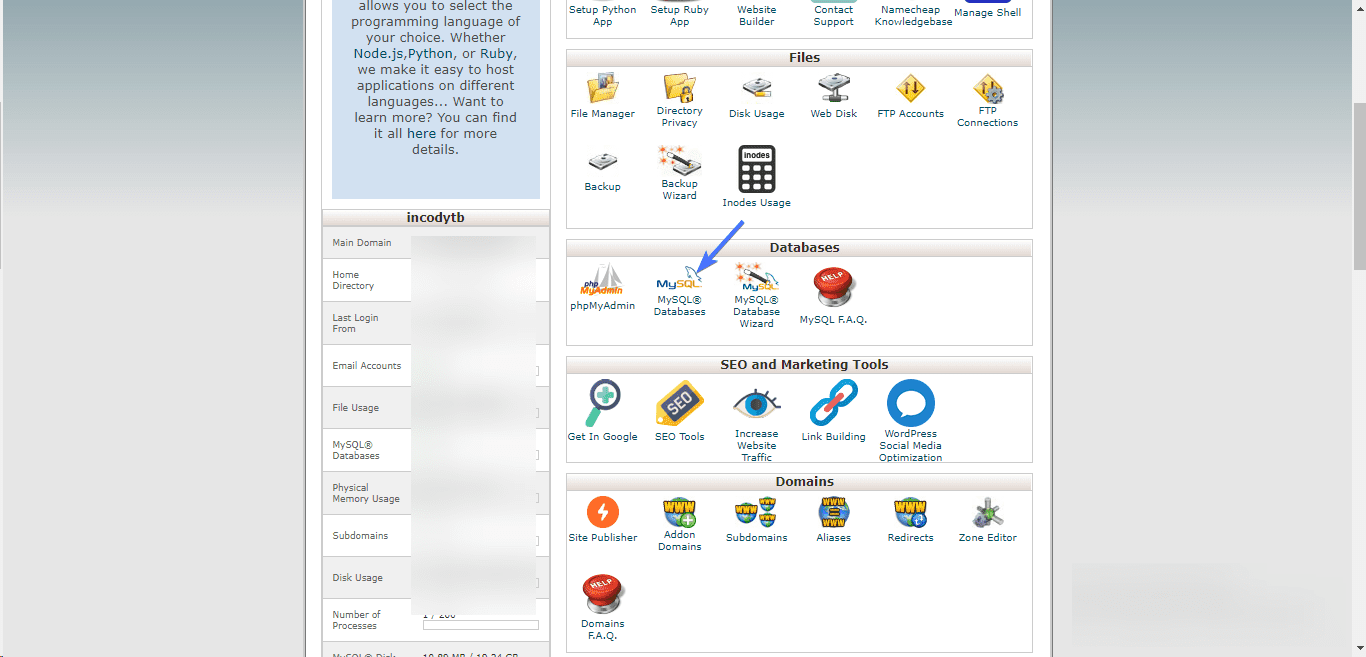
Log into your cPanel and scroll till you find the Databases section. Click the “MySQL Databases” icon.
On the next page, under “Create New Database”, type in the name of the database and click Create Database.
Note: Your database name will be your cPanel username, underscore, and the name you type in the input box.
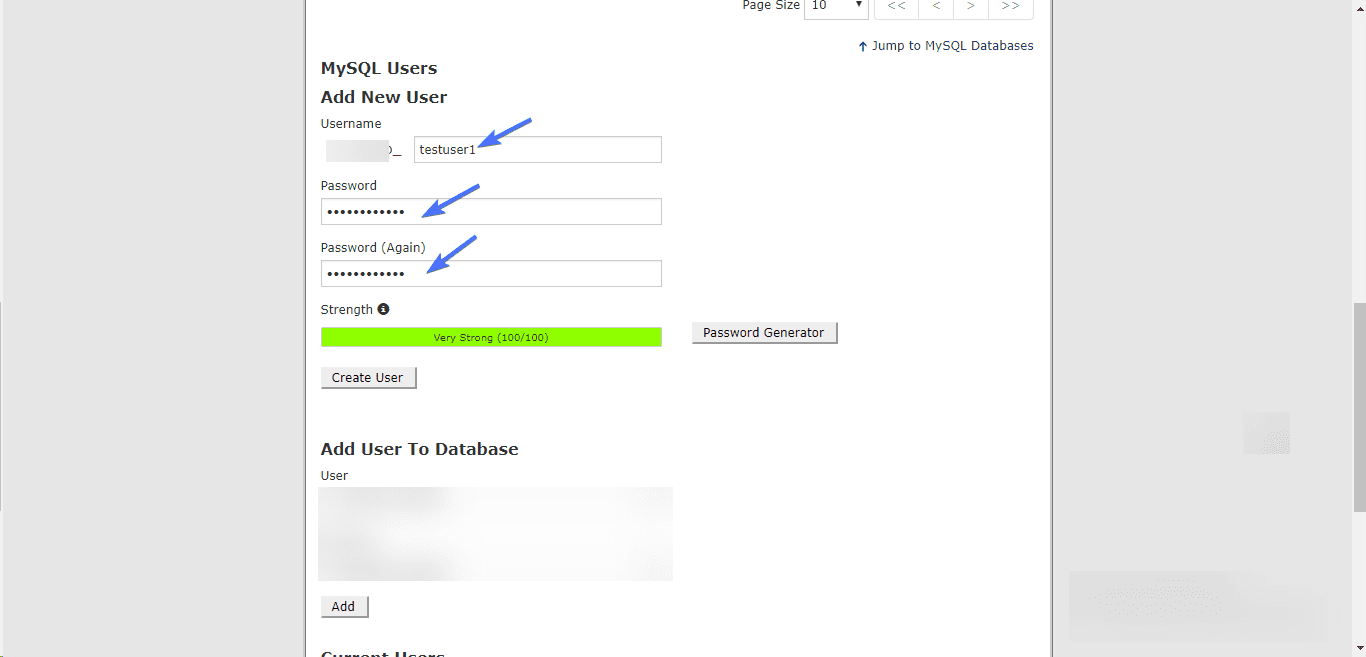
After creating the DB, go back to the MySQL page and scroll to the “Add User” section.
To add a new user, type in a username and password, and click Create User.
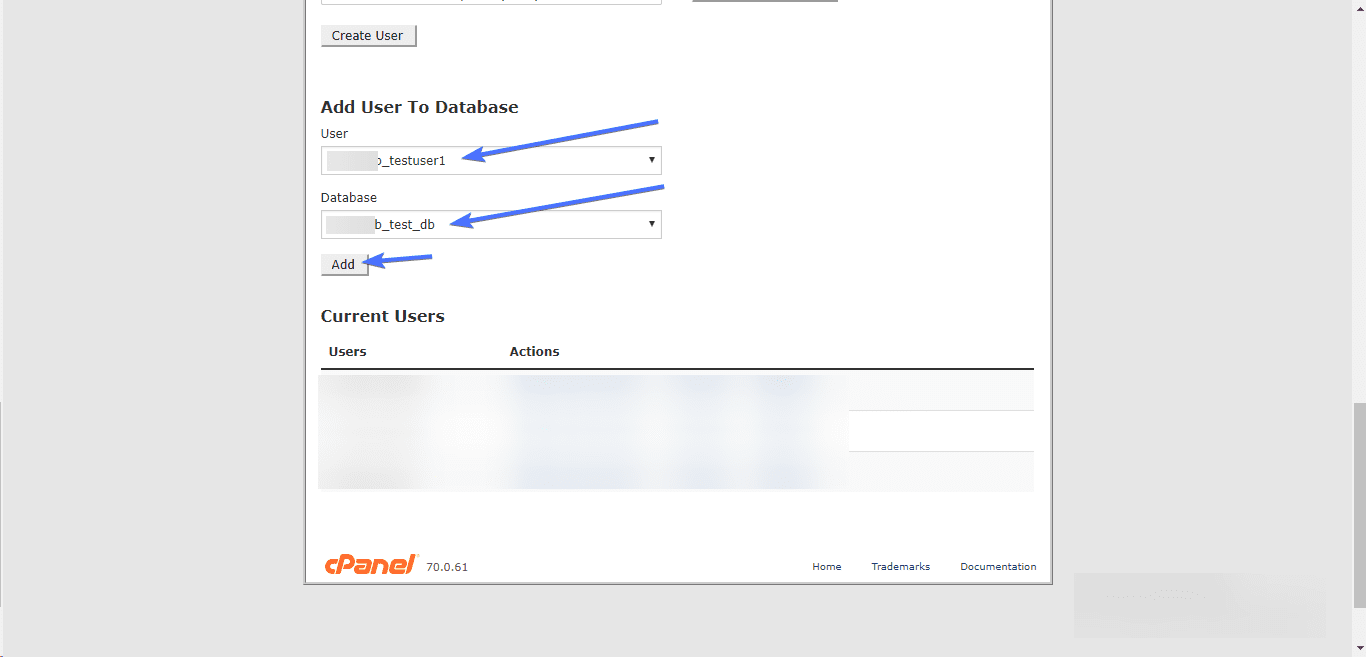
Again, go back to the MySQL page and scroll to the “Add User To Database” section.
Select the user and database you just created and click Add.
In the next screen, tick “ALL PRIVILEGES” and click Make Changes. Your new database is ready!
Note that the steps to create a database vary with host providers. So do well to reach out to your hosting company if the steps followed here do not exactly match what you are seeing.
Now you have a copy of your website on your local disk and a fresh database, you are halfway done.
3. Upload Files to the New Domain
If you have followed all the steps, you should be ready to upload the file to the new domain. The installer and archive file are the two files we will be uploading.
There are two ways to go about this:
- Via an FTP program.
- Upload directly from cPanel.
Via an FTP program
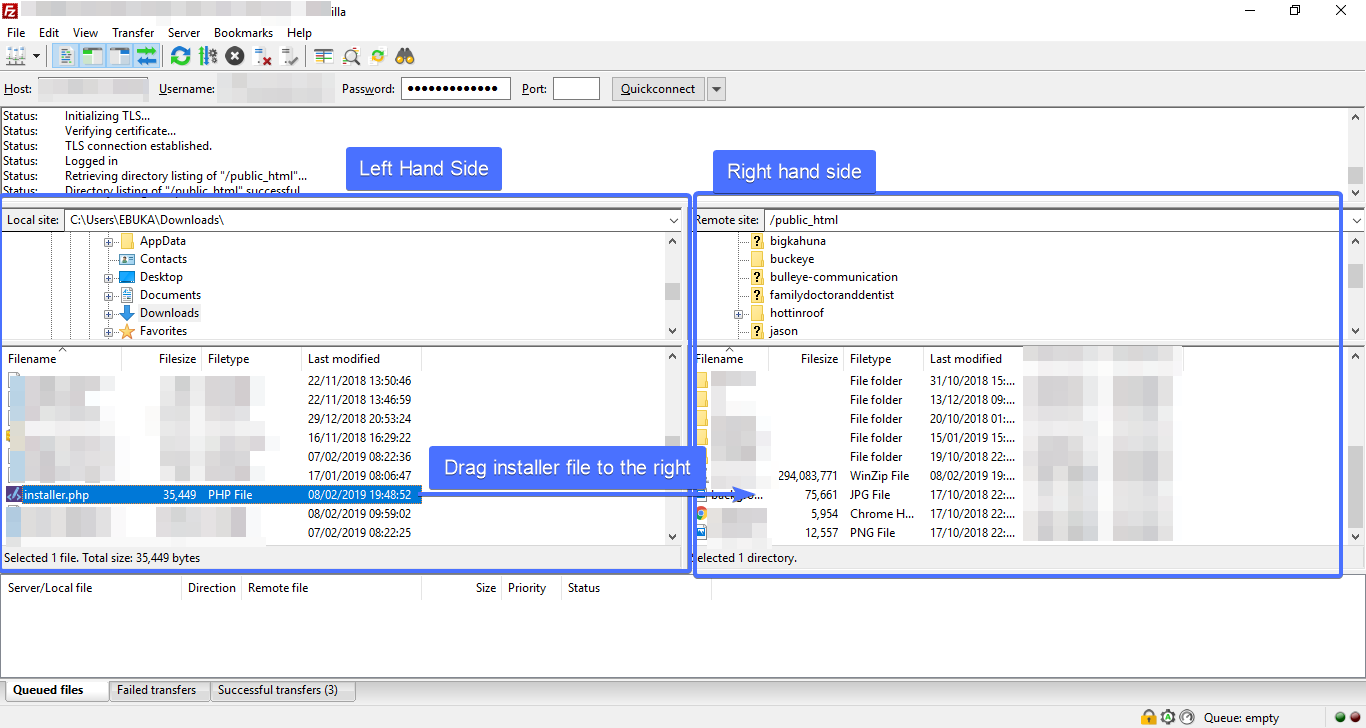
Connect to the new host server using FileZilla FTP. You will need a username and password to log into your server. If you are unsure of the username and password, contact your host provider.
After connecting via FTP, locate the folder into which you want to transfer your site (on the right side of FileZilla) and double click to open it. This folder is usually public_html.
Next, locate the installer and archive files you downloaded previously. By default, they should be in your download folder, and you will find them on the left-hand side of FileZilla. Ensure you do not change the name of the archive file, so as to avoid running into problems when unpacking the files. Upon locating both files, drag them to the right-hand side of Filezilla as shown in the picture below.
It will take some time for the process to be completed.
Upload directly from cPanel
If for any reason you couldn’t get Filezilla or your choice FTP program to work, you can upload with cPanel.
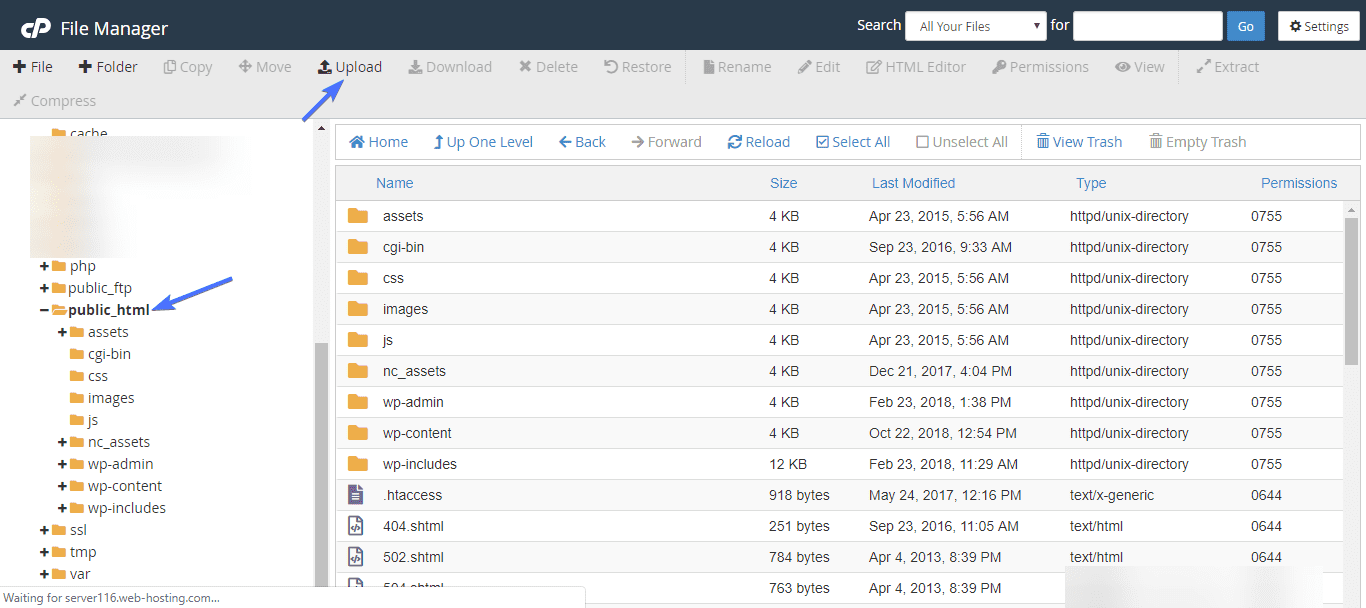
To do this, log into your cPanel of your new server.
Next, select “File Manager”. In the file manager, open the folder you want to move your files to (usually public_html), and use the upload link at the top of the screen to upload the installer and archive files.
4. Install Your Site in the New Domain
After uploading the files to your new host, enter the following URL in your browser to begin the installation:
http://mynewwebsite/installer.php
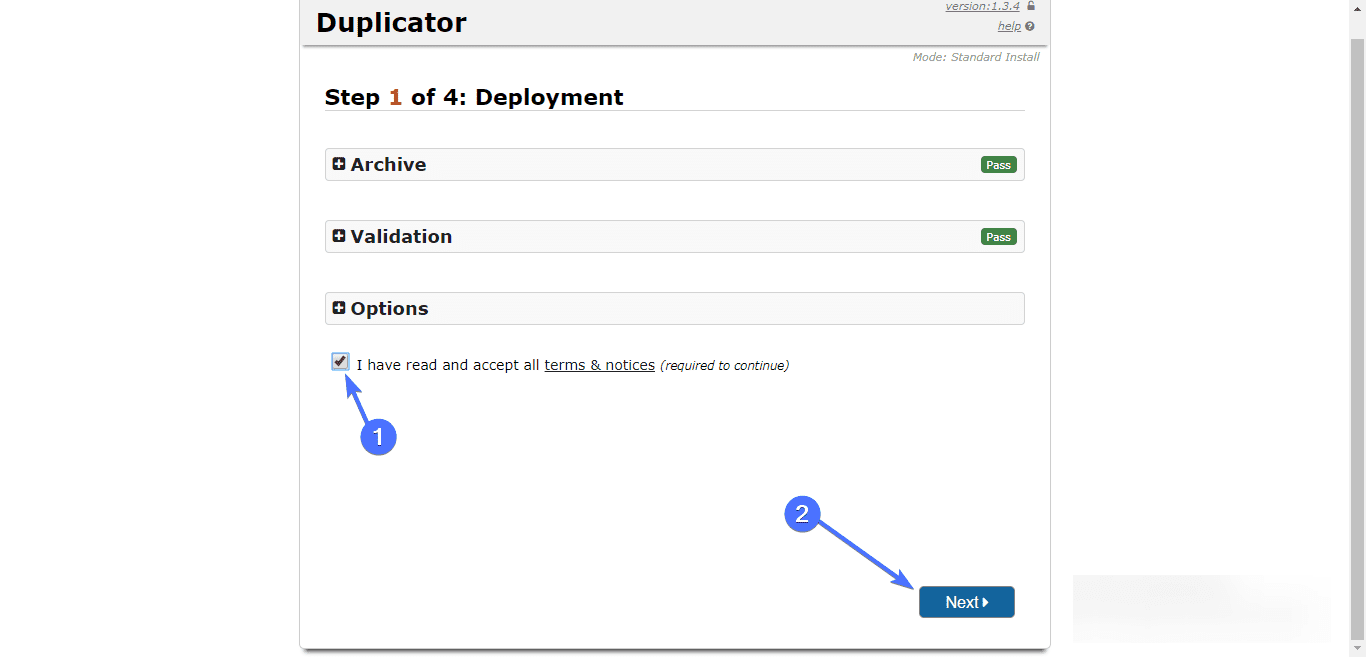
In place of “mynewwebsite”, put your new domain. If your files were properly uploaded, you should see the following screen.
To proceed, you will need to accept the terms and conditions by checking the button. Then click Next.
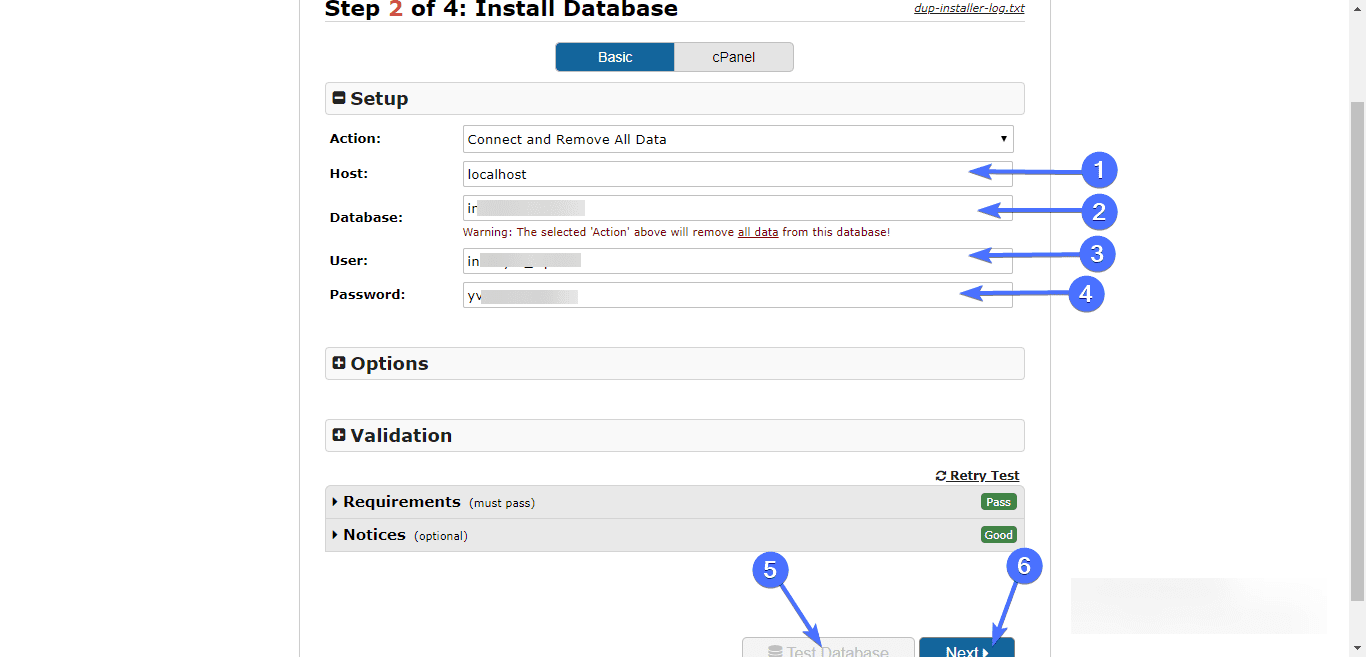
On the next screen, you would be asked to provide the details of the database you created previously. Put in the host (‘localhost’ in most cases), database name, user, and password, and click Test Database and after the test completes, press Next.
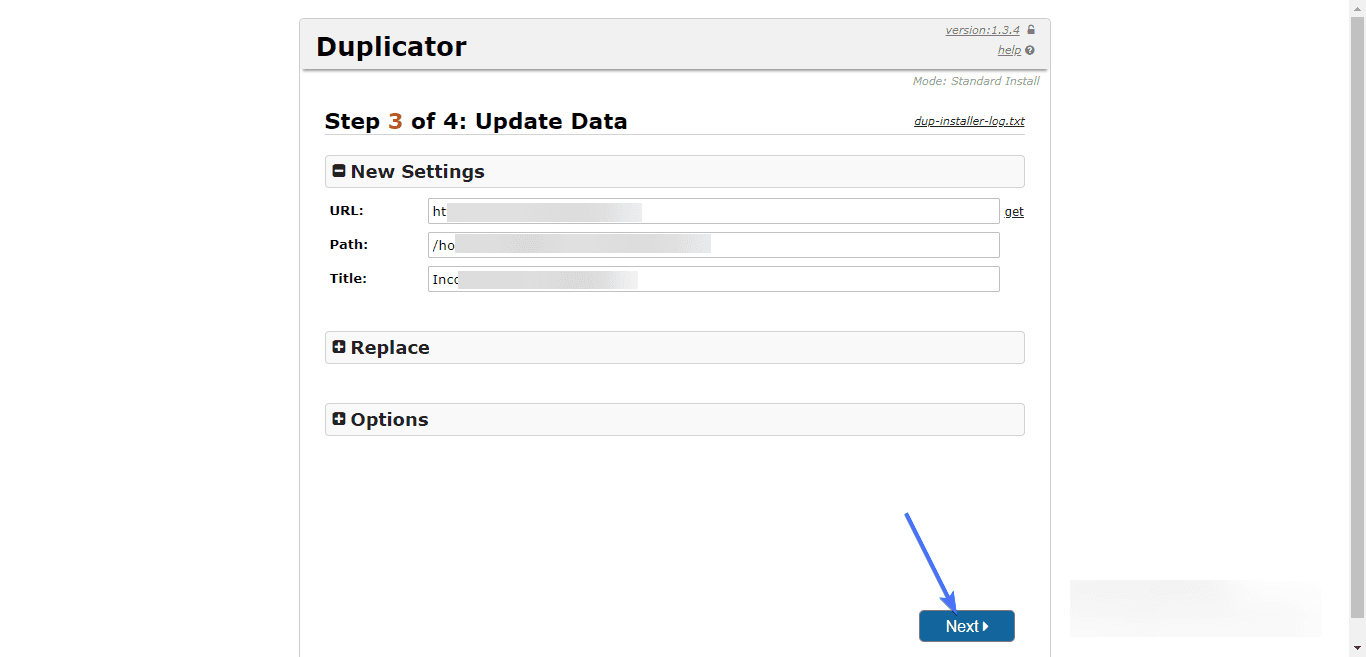
On the next page, Duplicator would have detected your new domain and set your URL. If not, input your new URL and click Next. Your site installation would begin and should complete without issues.
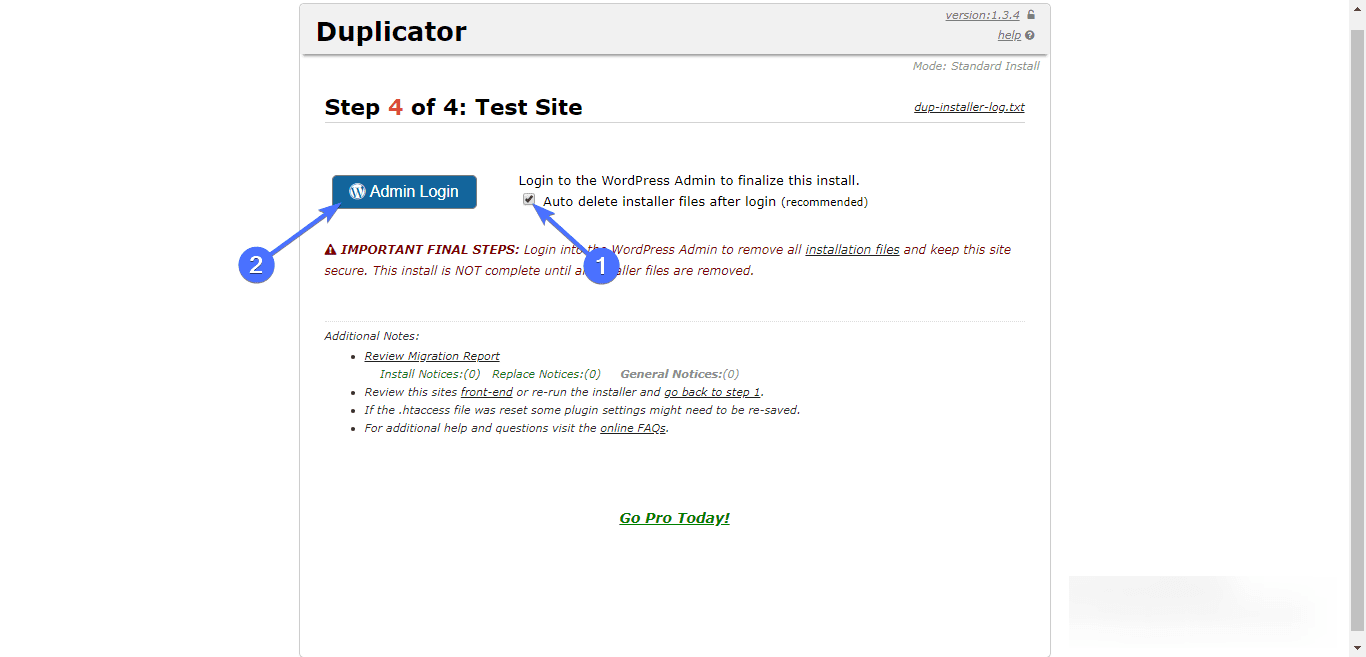
On the last step, check the “Auto Delete” option and proceed to login to your moved site.
When logged in, Duplicator would prompt you to save your permanent links. Ensure you do this so as to preserve your site’s search traffic.
Putting Finishing Touches When Migrating WordPress To A New Domain
1. Handle 301 Redirects Properly
From an SEO perspective, 301 redirects are important and shouldn’t be taken tightly. 301 redirects happen when a user clicks on the link to an old site and is then redirected to the current one.
It’s important you set it up properly. This can be done by accessing the .htaccess file of the old site via FTP. Once you get to access it, open it, and drop the following lines of code:
#Options +FollowSymLinks
RewriteEngine on
RewriteRule (.*) http://www.mynewsite.com/$1 [R=301,L]
Remember to replace “mynewsite.com” with your domain. If done well, visitors to your old website would be redirected to the new site. You may want to test this out to ensure it works.
Don’t hesitate to reach out to your host provider if you encounter technical issues.
2. Fix Broken Links When You Move WordPress Site To New Domain
Broken links hurt SEO. You should avoid them. Chances are your old website is packed with lots of broken links. Even if the links are healthy, a link or two might have broken during the migration. Either way, it makes a whole lot of sense to check and fix broken links in the newly migrated site.
To start with, enter your URL in this online broken link checker tool. Next, press on the “find broken links now” button. When you do, you’d see a curated list of outbound links that need to be fixed.
Get them fixed with Velvet Blues Update URLs. This plugin does a great job of fixing your broken links
In addition, you may want to reach out to people linking to your site and request they update the links.
3. Make Updates in Google Analytics
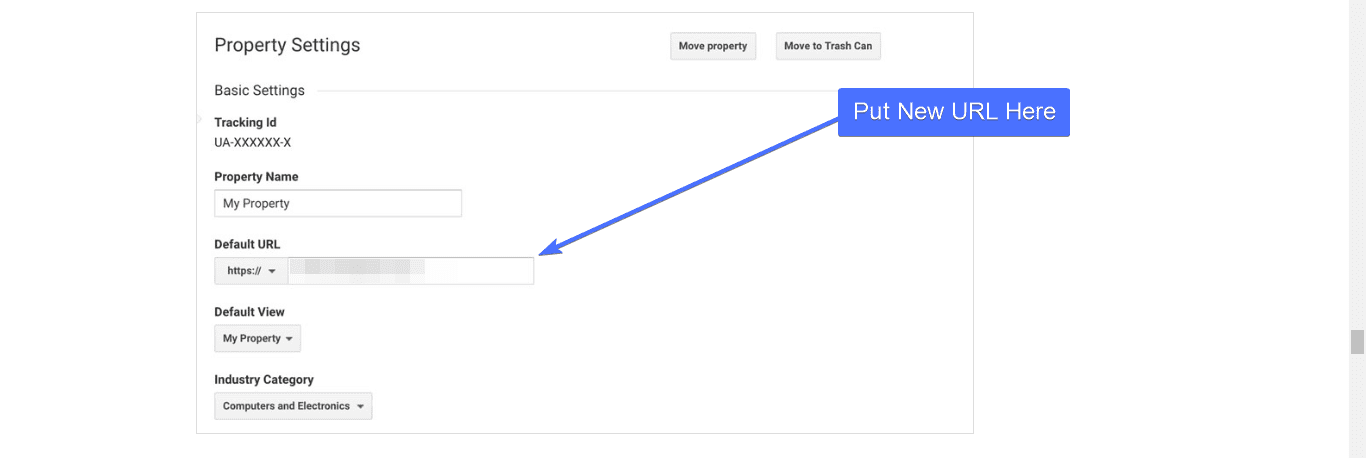
Update the old URL in Google Analytics to the new URL. You can do this by going to Admin >>Property Settings. Change the default URL to the new one.
4. Notify Your Subscribers and Visitors of the Changes
Ensure those who have been following your website are properly notified of the changes. This can be easily done by sending out emails. Since they are a loyal audience, they won’t hesitate to inform you about bugs on your website. That way you wouldn’t lose your SEO.
Frequently Asked Questions
Why might I need to move my WordPress site to a new domain?
There are various reasons for moving a WordPress site to a new domain, such as rebranding, changing the focus of your website, or seeking better search engine rankings.
What are the steps to move a WordPress site to a new domain?
The primary steps involved in moving a WordPress site to a new domain are:
- Backup your existing website
- Add the new domain to your hosting account
- Migrate your website to the new domain
- Replace URLs in your database
- Create 301 redirects
- Update Google Search Console and Analytics
How do I backup my existing WordPress site?
You can use a plugin like UpdraftPlus or create a manual backup through your hosting control panel or FTP.
How do I migrate my website to the new domain?
Use a plugin like Duplicator or All-in-One WP Migration to easily transfer your site to the new domain, or follow a manual migration process if you prefer.
How can I replace URLs in my WordPress database?
You can use a plugin like Velvet Blues Update URLs or Better Search Replace, or run SQL queries through phpMyAdmin to replace old URLs with new ones in your database.
What is a 301 redirect, and why is it essential?
A 301 redirect is a permanent redirect that informs search engines that a page has moved to a new location. It helps maintain your search engine rankings and ensures that visitors who access your old domain are redirected to the new domain.
How do I create 301 redirects for my WordPress site?
You can use a plugin like Redirection or Simple 301 Redirects or manually create 301 redirects by editing your .htaccess file.
Why should I update Google Search Console and Analytics after moving my WordPress site to a new domain?
Updating Google Search Console and Analytics helps maintain your search engine rankings, provides accurate data on your website traffic, and enables you to submit a change of address for your site.
How long does it take for the migration process to be completed?
The time it takes to move a WordPress site to a new domain depends on several factors, such as the size of your site, your hosting provider, and the method you use for migration. Generally, it can take anywhere from a few minutes to a few hours.
Will I lose my search engine rankings when moving my WordPress site to a new domain?
If you follow the correct steps, such as creating 301 redirects and updating Google Search Console, you can minimize the impact on your search engine rankings. However, some fluctuations may occur as search engines re-crawl and index your site on the new domain.
Conclusion
Migrating WordPress to a new domain isn’t an easy task, but very much doable. The best part is that it can be done without losing search traffic. Only ensure you carefully follow the steps in this article. We hope that you have successfully moved your WordPress site to a new domain.
If you would rather skip the work and have us do it for you, you can request our service. For more WordPress tutorials, check our WordPress blog.
More Resources:
- How to Move your WordPress site from HTTP to HTTPS
- 9 Best WordPress Migration Plugins On The Market
- Change Domain Name in WordPress

