How To Use WordPress – A Quick Guide To Get You Started
 WordPress is the most popular software for building a website on the internet. It is also very beginner-friendly which is why many people prefer using it.
Learning how to build and manage your website can save you the stress of sourcing for a developer each time you run into an error or want to add new features to your site.
In this ultimate guide, we will show how to use WordPress. We will cover the basics of installing WordPress on a hosting server and performing the basic setup steps to get your site online.
We will then show you how to manage your site from the WordPress admin dashboard.
Content:
What is WordPress?
WordPress is a Content Management System (CMS) that is used to build and design websites. It is an Open Source project that is free to download and use on any server.
Initially, the platform was intended as a tool for blogging and managing content online. Over the years, however, it has grown into a full-featured software that can be used to build any kind of website you can think about.
Why Use WordPress?
According to an online study, WordPress powers about 41.4% of websites on the internet. Given that, some may wonder why the platform is so popular. Well, here are some reasons why most people prefer WordPress.
Firstly, WordPress can be extended with the help of plugins. This means you can extend the vanilla installation of WordPress into any kind of site such as eCommerce sites, corporate websites, membership sites, community forums, and in fact, any kind of website you think of.
In addition, WordPress is beginner-friendly and also mobile responsive. This means you can create robust and beautiful websites that fit well on all devices. Also, all these can be achieved with little or no programming knowledge.
WordPress is an SEO-friendly platform. You can combine the SEO friendliness of WordPress with SEO plugins such as Yoast SEO, Rank Math, or All in One SEO, to enable you to rank your content on search engines.
Lastly, WordPress has a significant community of developers where you can get expert help for pretty much any issue that arises on your site. Also, there are thousands of blogs such as Fixrunner’s WP College that provide WordPress tutorials to help you manage your site properly.
For more on why most users prefer WordPress, check this article to learn why WordPress is so popular.
WordPress.com vs WordPress.org
Many people assume both platforms are the same, however, there is a clear difference between them. The easiest way to differentiate them is based on who is hosting your site.
WordPress.org is a self-hosted platform which means you choose your web hosting company and configure the server. With wordpress.com, however, the platform hosts your site for you and handles all the server technicalities.
With WordPress.org you are in control of the themes and plugins you choose to install on your site. However, wordpress.com does not permit you to install custom themes and plugins on your WordPress website.
Follow this link to learn more about the differences between wordpress.com and wordpress.org.
How to Use WordPress
Excited about learning how to use WordPress? Here’s a list of the things you will learn in this section.
- Domain and Hosting
- Installing WordPress on the Server
- WordPress Dashboard Overview
- Adding Content to your WordPress Site
- Installing Themes
- Installing Plugins
- Customizing your WordPress Website
- Optimizing WordPress site
Domain and Hosting
The first thing to do before creating your WordPress site is to choose a domain name and hosting provider for your site.
Think of the domain name as your home address. People who want to visit you will use the address to locate your house.
For instance, if you want to visit our website, you simply need to enter our domain name (fixrunner.com) on your browser and it will display our web pages.
In the same way, hosting is similar to your house, a place where you store your properties and other valuable items. In the world of the internet, hosting is the web server that holds your website files and resources.
When choosing a domain name, it is recommended you use a name that will be easy to remember and somewhat related to the type of content you want to share.
Also, ensure you use Top Level Domain names such as .com, .net, .org.
You can buy a domain from a domain name registrar which usually starts at $9 and varies depending on the registrar and the domain extension.
Choosing the right web hosting company for your website can get overwhelming because you have to consider many variables such as speed, uptime guarantee, customer service, etc.
Fortunately, we have a detailed guide on the recommended hosting for WordPress sites.
Installing WordPress
The next step after buying your domain name and hosting is to install WordPress on your server. If your domain name registrar is different from your hosting provider, you can learn how to connect them here.
Due to its popularity, WordPress installation has been made easy by most web hosts. This means, with just a few clicks, you will have a WordPress site up and running.
In this guide, we will install WordPress from cPanel. However, there are other means of installing the software such as using an FTP client.
Installing WordPress from cPanel
To start, login to the cPanel of your WordPress hosting.
Once in, scroll down and locate the Softaculous app installer. This tool can be used to install custom apps on your server.
Sidenote: Your host may offer a different installer, such as Fantastico. However, the steps are usually similar to what is shown on this guide.
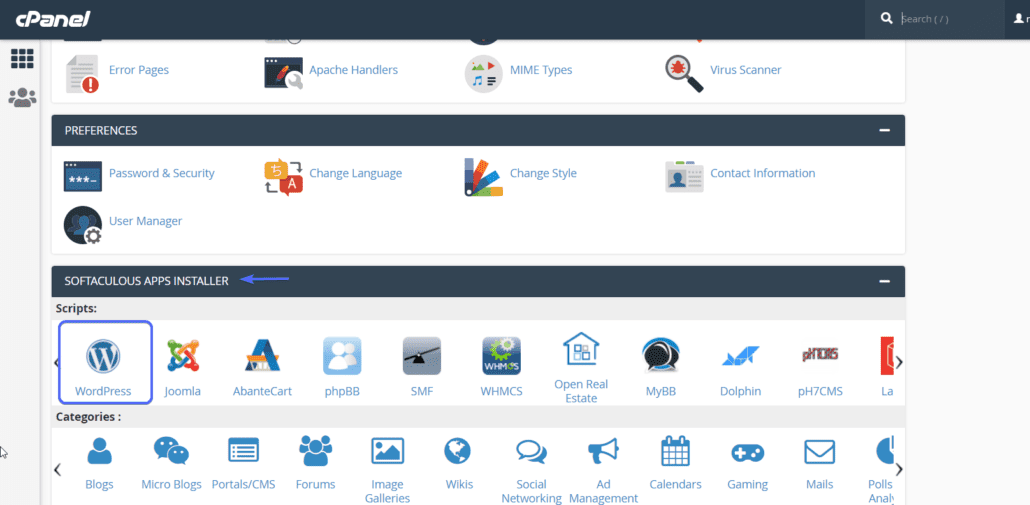
Click on the WordPress icon to open the installation panel.
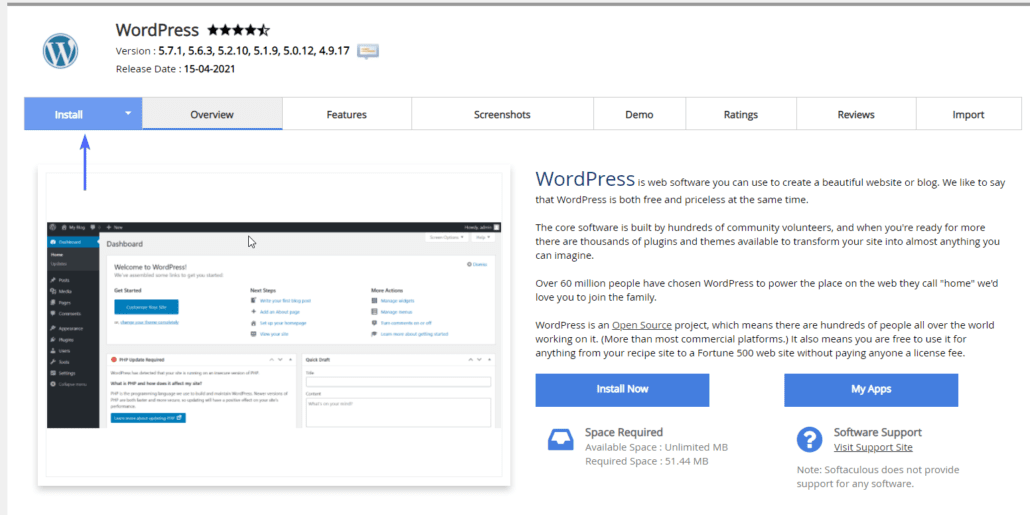
On the panel, click on Install to begin the installation.
After that, select the domain name you wish to install WordPress under Software Setup.
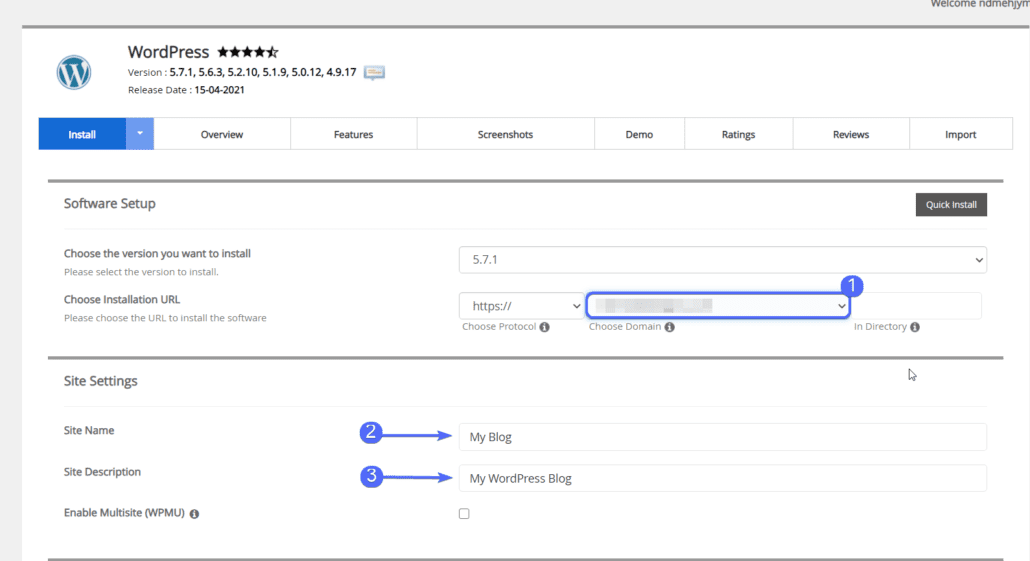
Under the Site Settings, enter the name of your site and the description. This will help users easily understand what your brand is about.
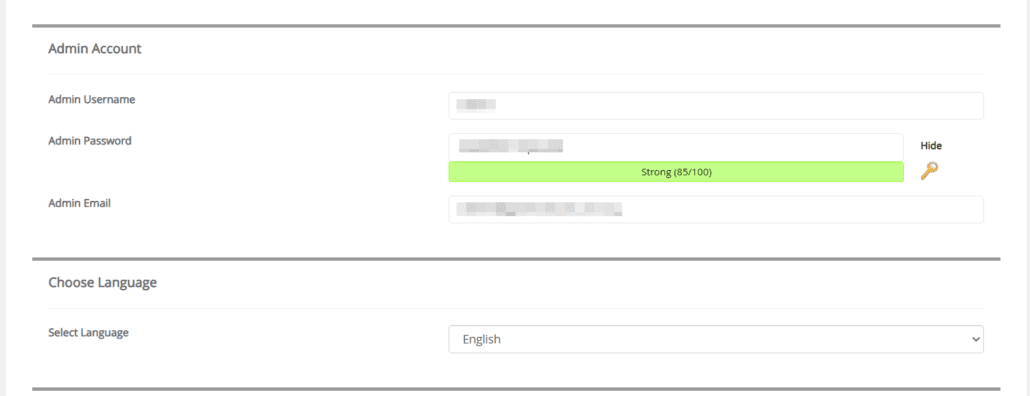
Next, enter the admin details under the admin settings. The admin username and password are the credentials you will use to login to the backend of your site. The admin email is used when you need to recover your login details.
In the Select Plugin settings, you can choose from their recommendations to automatically install plugins on your site.
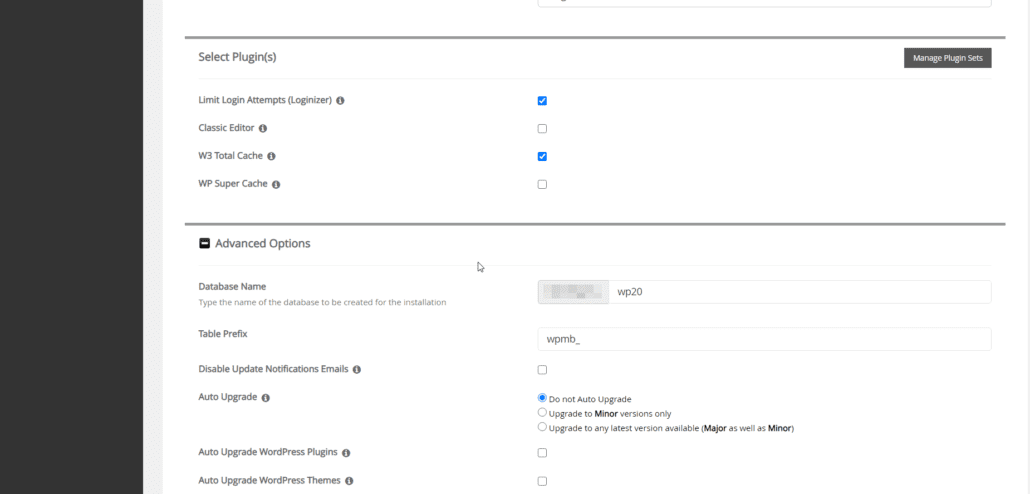
Below that, you will find the Advanced Options where you can set the database name and also set your database prefix.
Note: Typically, you need to create your database and add a database user. In this case, however, Softaculous takes care of that for you.
Next, you will find the Select Theme option where you can choose a default theme to install on your site. Don’t worry, we will show you how to install and change themes later in this guide. For now, you can choose any theme from their recommendation.
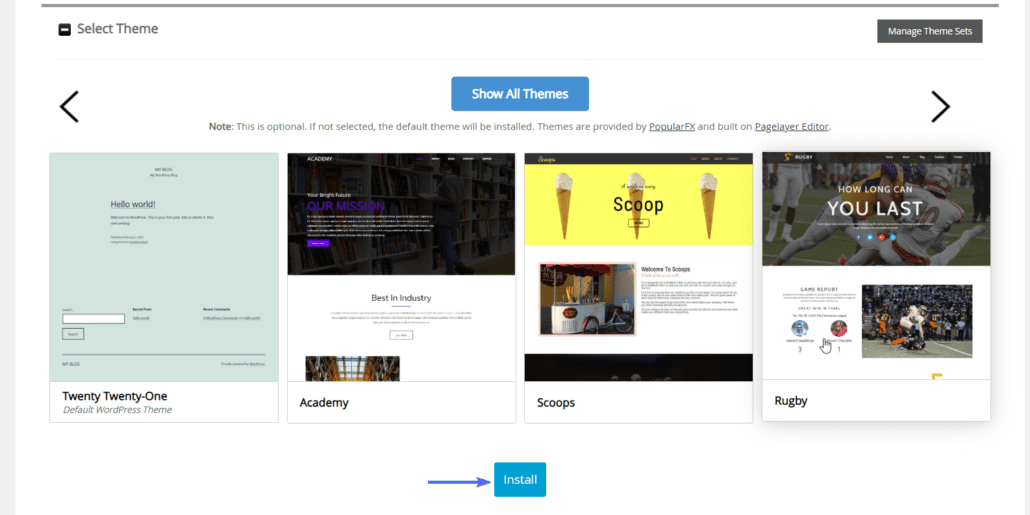
Lastly, click on the install button.
After the installation is completed, you can then visit your site and log into the admin panel.
WordPress Dashboard Overview
Every content management system should have a backend where you can perform administrative duties. The WordPress dashboard lets you do just that as long as you have the correct login details for the website.
The WordPress dashboard is a Single Page Application (SPA) that is used for configuring, customizing, and adding content to WordPress websites.
To access the dashboard, simply add ‘/wp-admin’ to the end of your websites’ address. So if your site is example.com, your WordPress dashboard can be found at example.com/wp-admin.
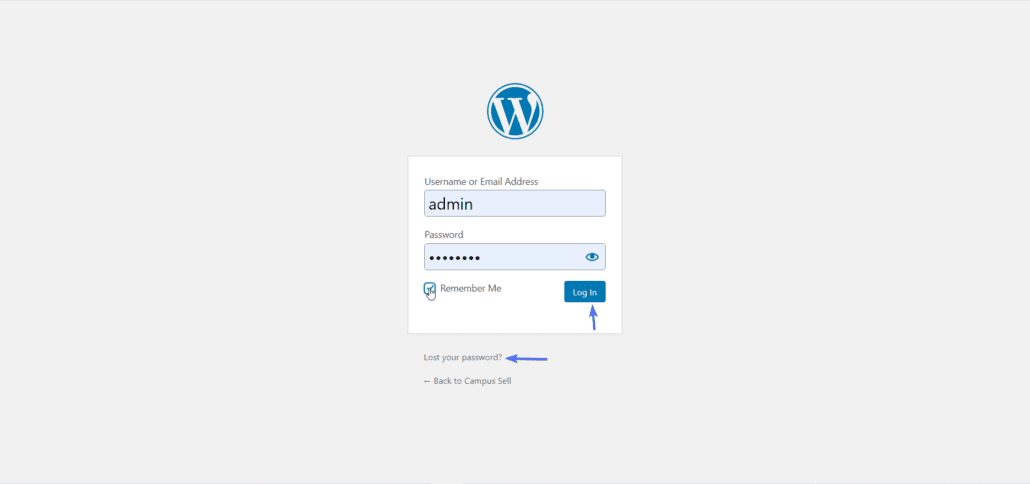
Here, you need to login with the username and password you entered during the installation process.
What If You Forget Your Password?
If you have forgotten your password, you may click on the forget password link and then enter your admin email address.
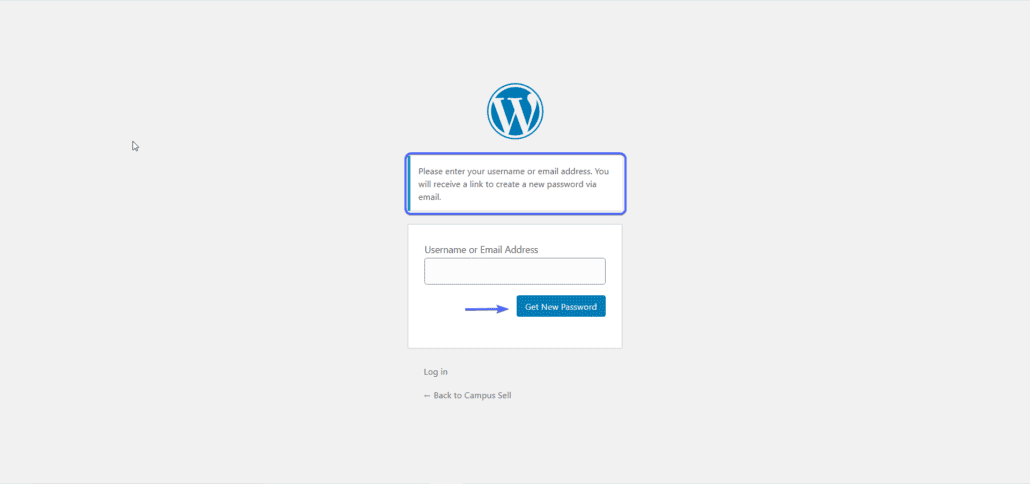
You will receive an email with instructions on how to reset your WordPress password.
However, if you entered the correct details, you will be redirected to the WordPress admin dashboard for your site.
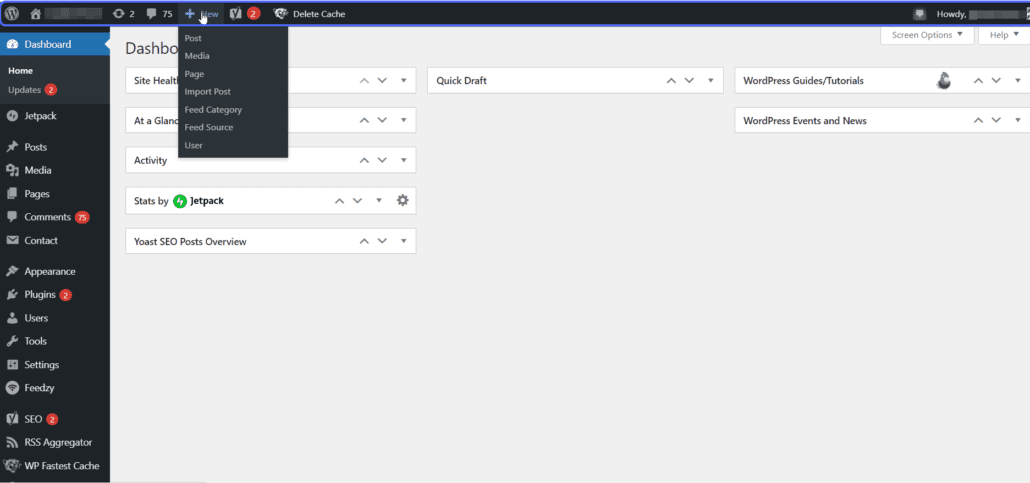
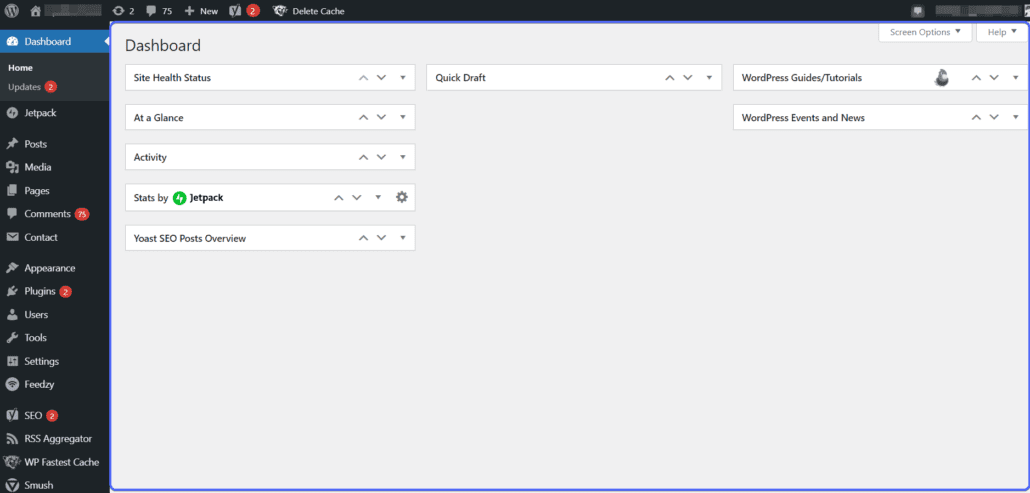
The dashboard comprises three main sections, the top navigation, side navigation, and the content area.
The top navigation area contains basic details like your website name, a link to visit the frontend of your site, a plus icon to add content to your site, and also details about the current logged-in user.
On the content area, you will find visual details about the current section you have open on the dashboard. It is the Interface where you can see and manage all the settings available on your WordPress dashboard.
The side navigation provides you with links to perform pretty much any administrative task and configuration.
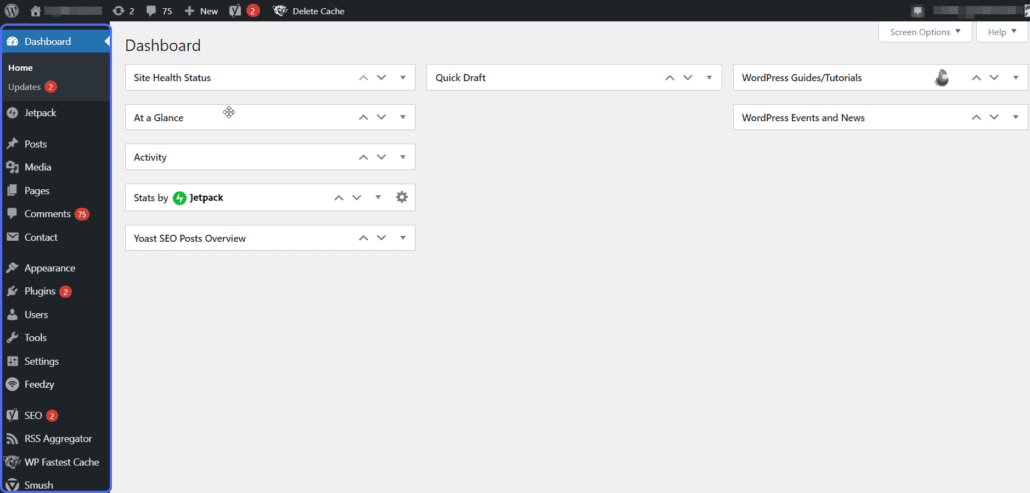
Tasks such as adding posts and pages, installing plugins and themes, adding users, and general site settings can be found on the right side menu.
We will only show you some settings that are necessary when building a WordPress site. But if you need more information about how the WordPress dashboard works, then check our Introduction to the WordPress admin panel guide for more details.
WordPress Dashboard Settings
The settings tab on the WordPress dashboard can be used to update settings about your site such as the site title and tagline and your permalink structure. You can also configure how your site homepage should look.
To view the general settings panel, go to Settings >> General.
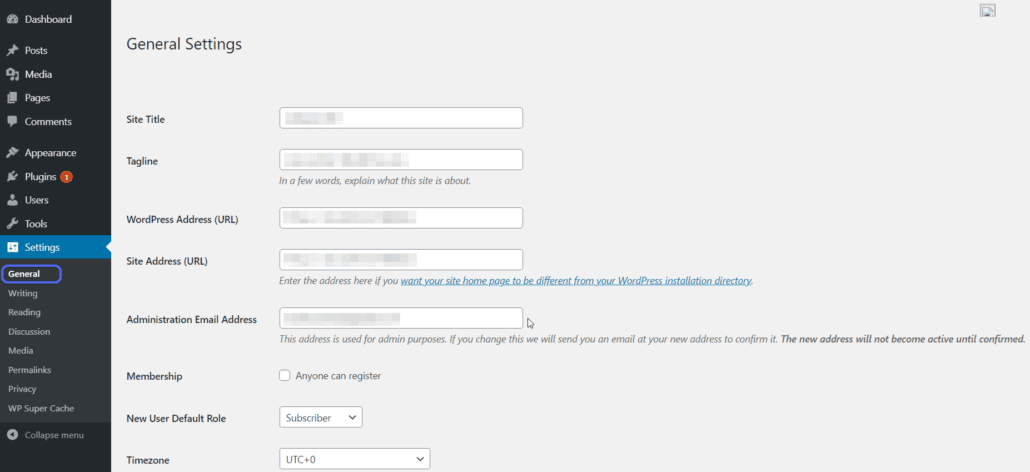
Here, you can change the title, tagline, admin email and also update your site address. We recommend leaving the WordPress address and site address URLs with their default values.
To change the structure of your homepage, click on Reading under the ‘Settings’ Tab.
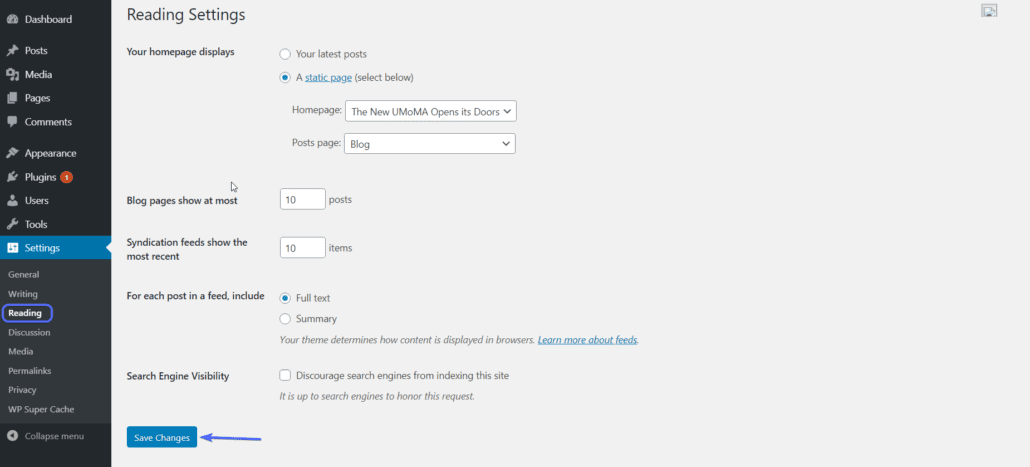
After that, you can either choose to display your blog posts on the homepage or use a separate page for the homepage and blog page respectively.
After making your selection, click on the Save Changes button to effect the change.
The last setting we will modify here is the Permalink structure for your WordPress site. Permalinks define how links to posts and pages should be structured on your WordPress site.
To update this, click on Permalinks under ‘Settings’. We recommend using the Post name as the URL structure because it is SEO-friendly and user friendly.
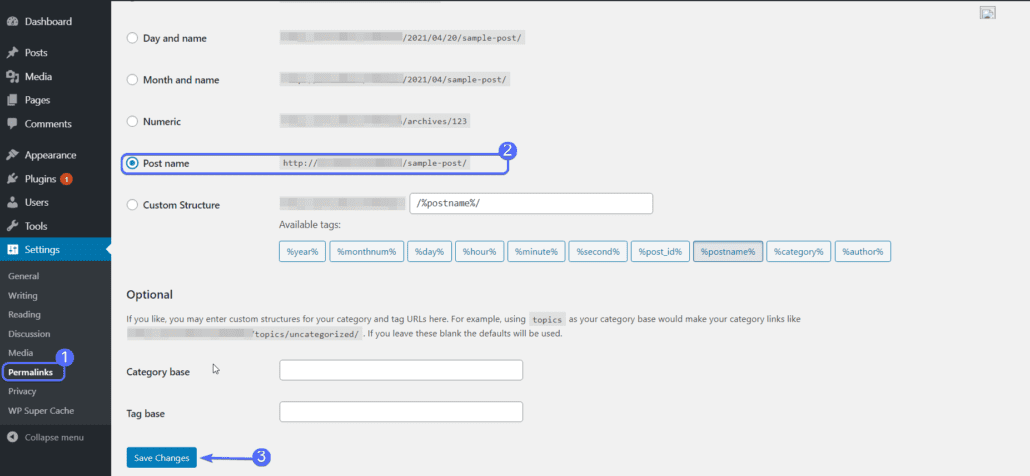
Click on Save Changes after setting the permalink structure.
Adding Contents to your WordPress Site
WordPress supports two content types by default which are; posts and pages. Although both are technically WordPress pages, there is a slight difference between them.
A blog post is intended as dynamic content that users can interact with and comment on as well. A page, on the other hand, is static content that is used to organize your site and add useful information about your brand.
Pages
You can find all the pages on your WordPress site by Selecting Pages > All Pages.
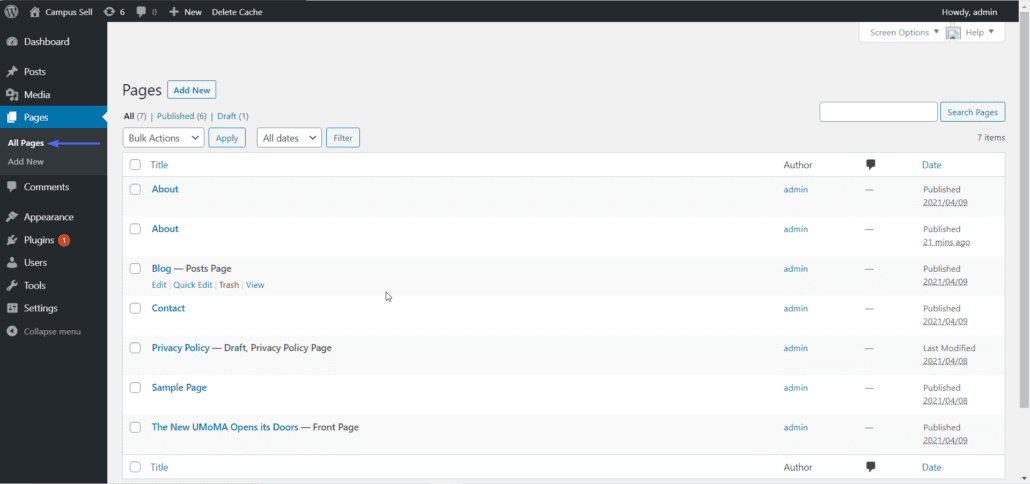
To edit a page, simply hover over the page title and click Edit.
If you want to add a page, go to Pages > Add New.
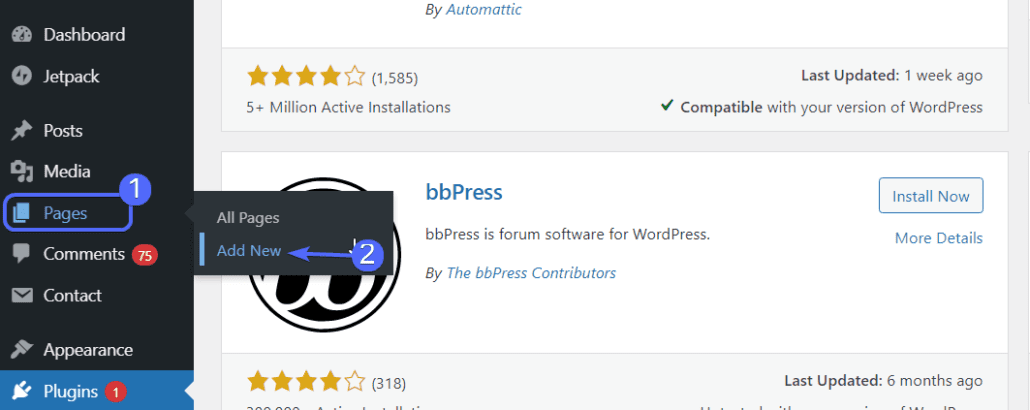
Here, you can add a title for your page and also add content such as headings, paragraphs, images, or tables.
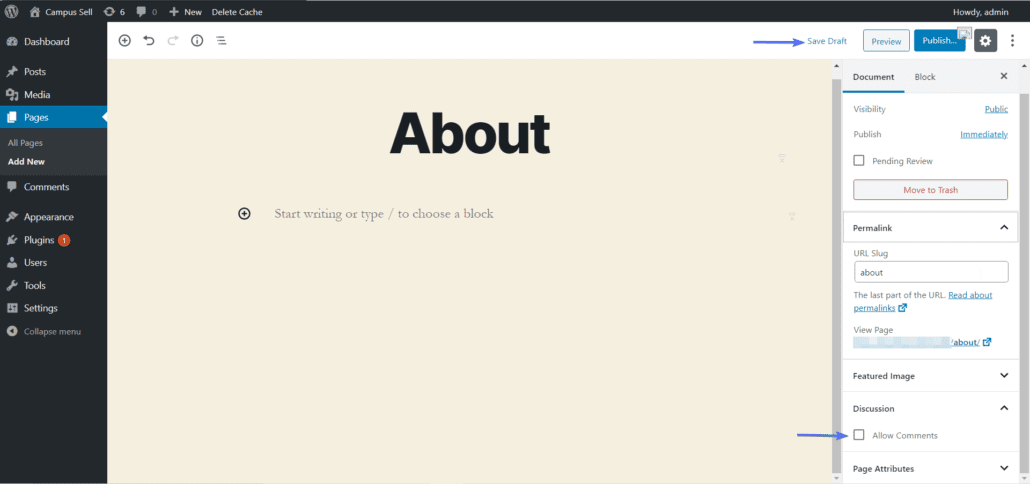
By default, comments are disabled on pages, however, you can turn them on by ticking the ‘Allow Comments’ selection box. You may click on the Save Draft button to save your page if you are not ready to publish it.
The new block editor in WordPress also lets you add widgets as well as shortcodes on any page on your website.
To add any of these items, click on the plus icon and then select the block element you wish to add. You will then set up the content for each block as you wish.
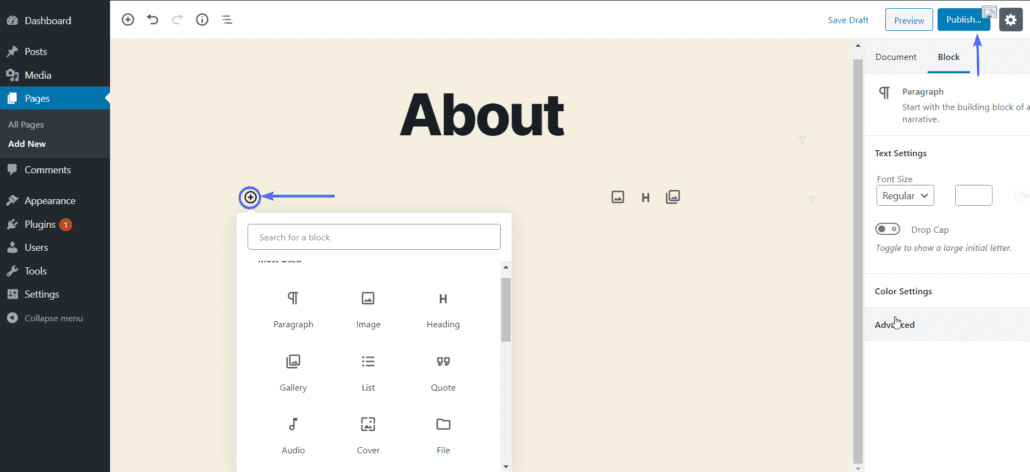
When done, click on the Publish button to display the page on your site.
Posts
Blog posts are a great way to increase your brand awareness and also help you rank your site on popular search engines such as Google.
To add a post in WordPress, go to Posts > Add New.
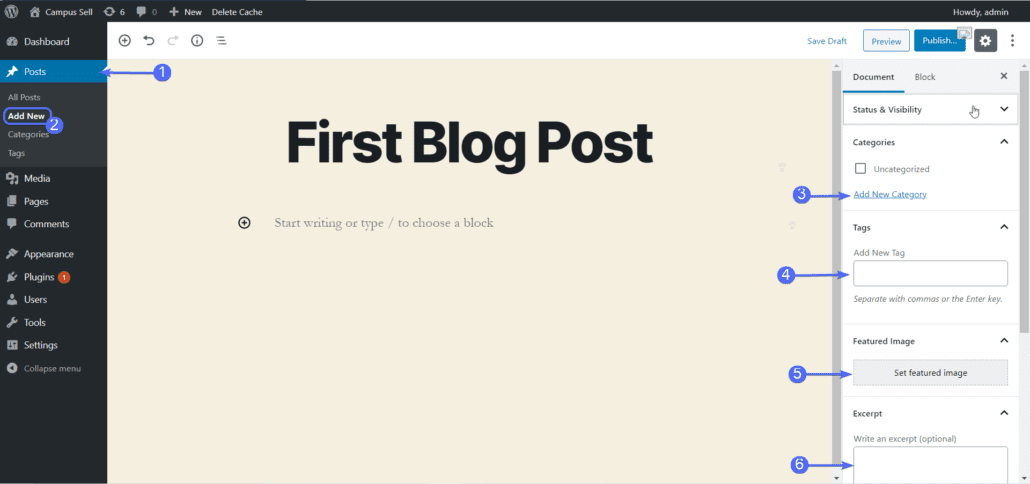
Here, you will notice that the interface is similar to that of the Page, but with additional parameters.
You can add the title of the blog post as well as the content. The content usually comprises texts, images, and videos.
With blog posts, you can also group your content by adding a category to each post before you publish.
When creating a blog post, you should add a ‘Featured image’. This featured image shows up on the blog list page as seen below.
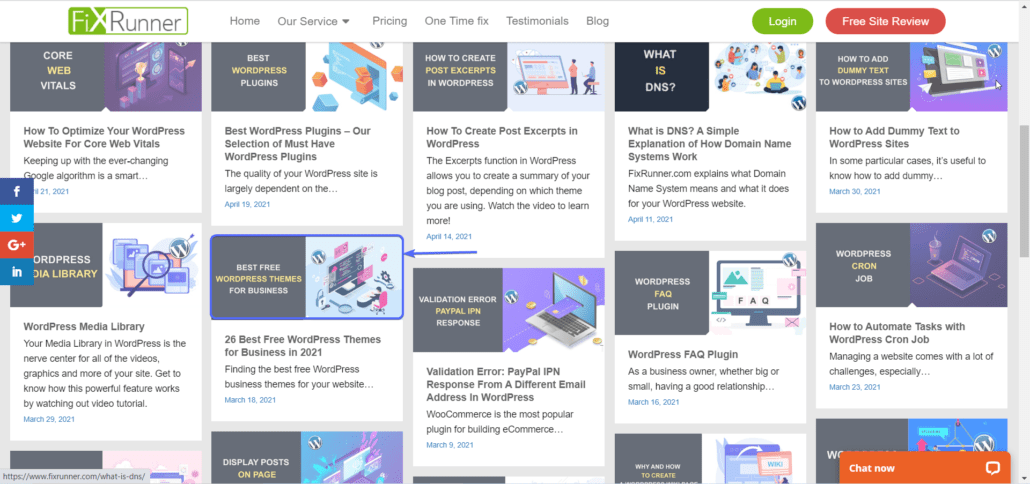
To add a featured image for a blog post, click on the Set Featured Image button.
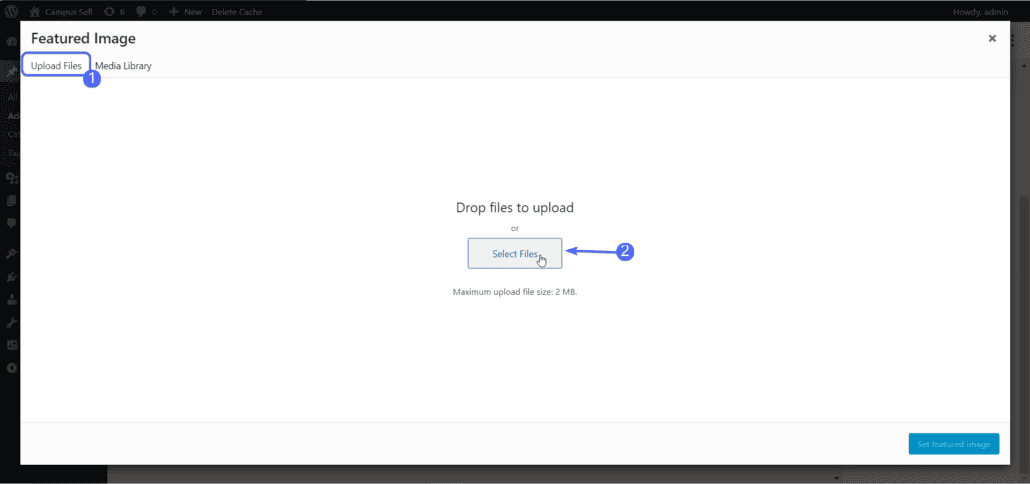
In the Upload files tab, click on the Select Files button and choose the image from your computer.
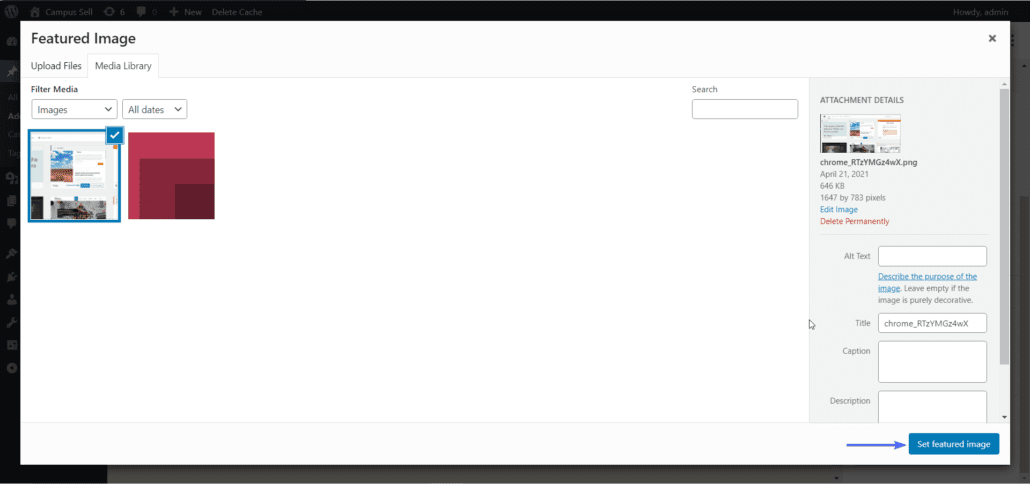
After the image is uploaded, click on the Set Featured Image button as seen below.
You can also use the plus icon to add various content blocks to your blog post.
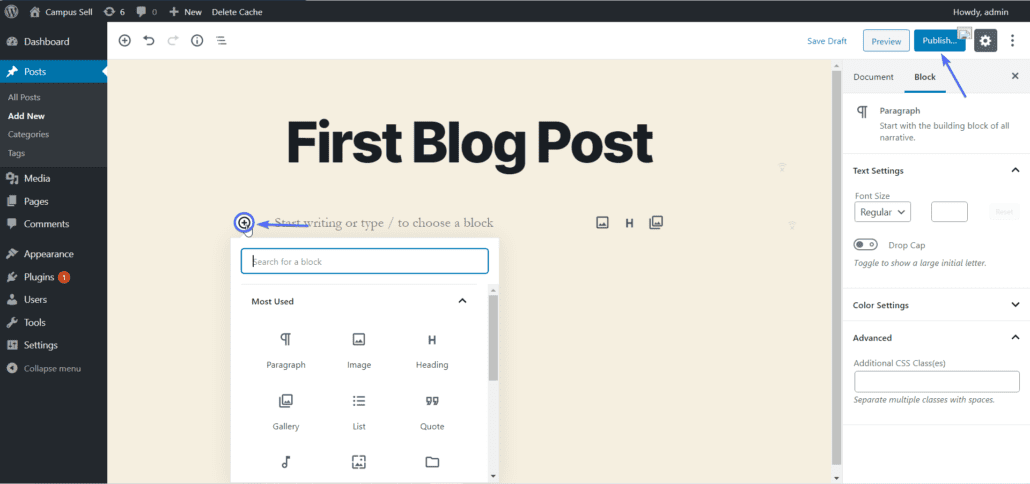
And when you are done, simply click on Publish to make the post available to the public.
To see all the posts on your website, go to Posts > All Posts.
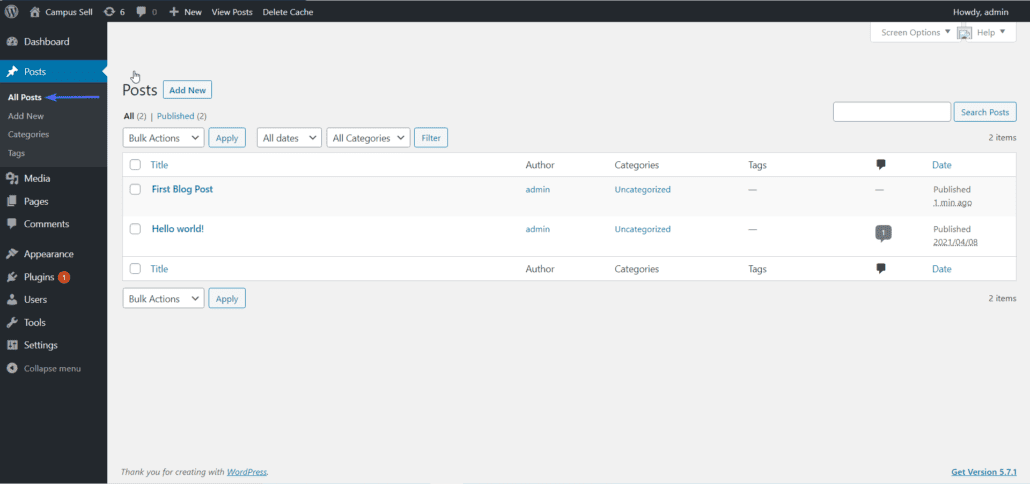
Here, you can edit a particular post, or select multiple posts and then use the Bulk Action dropdown to perform actions such as moving all selected posts to Trash.
Installing Plugins
In WordPress, plugins are like custom applications that extend the functionalities of your WordPress website.
For instance, if you want to convert your site into a discussion board, you can use a plugin like BB Press to add a Forum feature to your site.
There are over 50,000 plugins available in the WordPress plugin directory. Although there is no limit to the number of plugins you can use on your site, be careful not to install too many.
This is because having too many plugins may increase the workload on your server thereby leading to slow loading speed.
Not sure which plugins to use? Check this guide for our list of recommended WordPress plugins.
To install a plugin, go to Plugins > Add New from your WordPress dashboard.
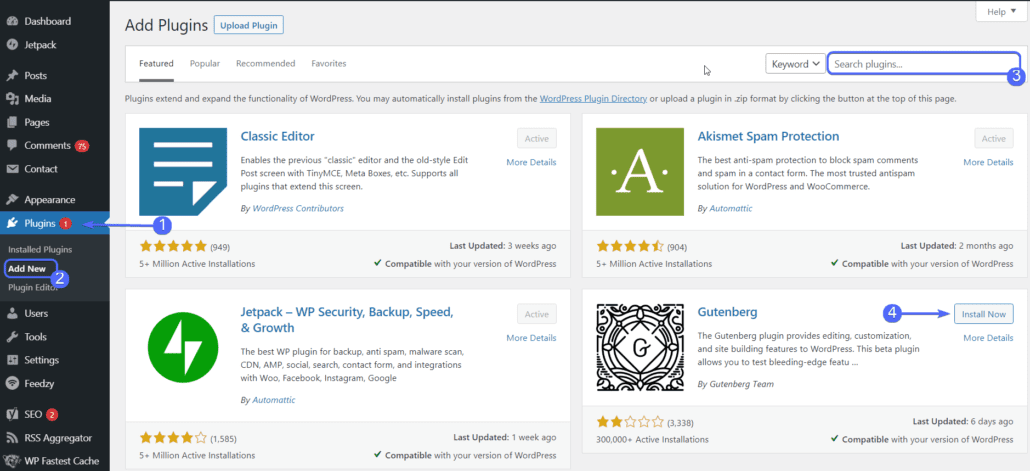
Next, search for the name of the plugin you want to install and then click on Install.
After installing the plugin, click on the Activate button to begin using it on your site.
If instead, you downloaded the plugin zip file from the WordPress plugins directory, or from another provider, you can use the upload feature to install it on your site.
First, click on the Upload Plugin button and then click Choose File.
Now, select the zip file from your computer and then click on the Install Now button.
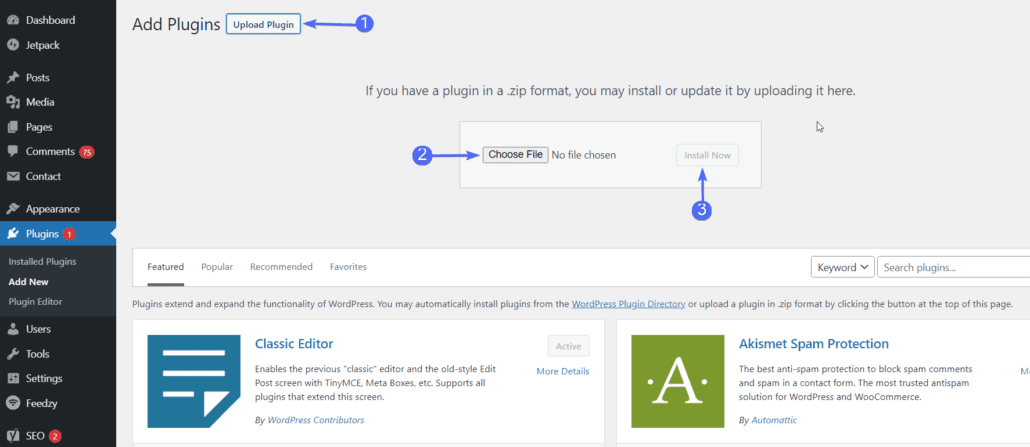
After installation completes, click Activate. Thereafter, the plugin is ready to use on your site.
To see all the plugins on your site, go to Plugins > Installed Plugins.
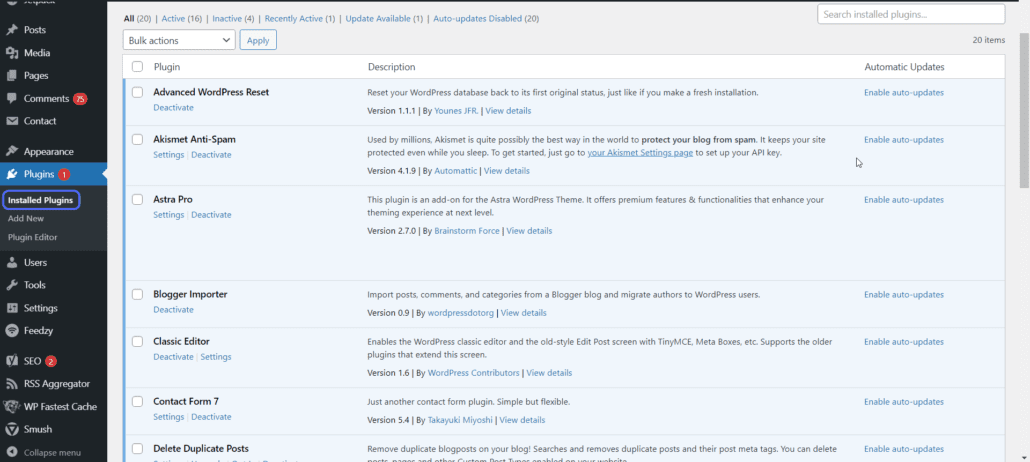
Here, you can Activate/Deactivate plugins and also permanently delete them from your site.
Installing Themes
Themes are templates used to change the look and feel of your WordPress website. There are over 5000 free themes available in the WordPress themes’ directory.
Depending on the purpose of your site, you can search for a theme and then filter based on various criteria on the ‘Feature Filter’. For instance, you can search for eCommerce themes if you want to build an online store. Then using the filter, you can restrict the search to themes that offer a right sidebar and grid layout.
There are three ways you can add themes to your WordPress site. The first method is searching and installing them from your WordPress dashboard.
Alternatively, you can download the theme file directly from the WordPress Themes Directory. Then, you upload the zip file with the WordPress dashboard.
Thirdly, you can unzip the theme file on your computer and then upload the entire folder to your site’s theme folder via FTP. This method is usually not necessary.
To install WordPress themes from the dashboard, go to Appearance > Themes.
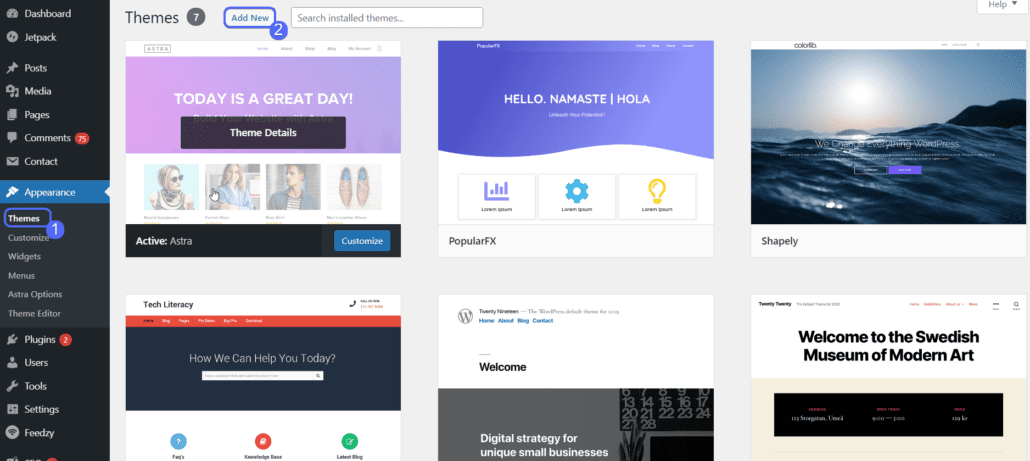
Here, you will find all the themes already installed on your site. To install a new theme, click on the Add New button as seen above.
If you downloaded the theme zip file from the WordPress directory, you can click on the Upload Theme button and select the zip file from your computer. After that, you click on the Install Now button.
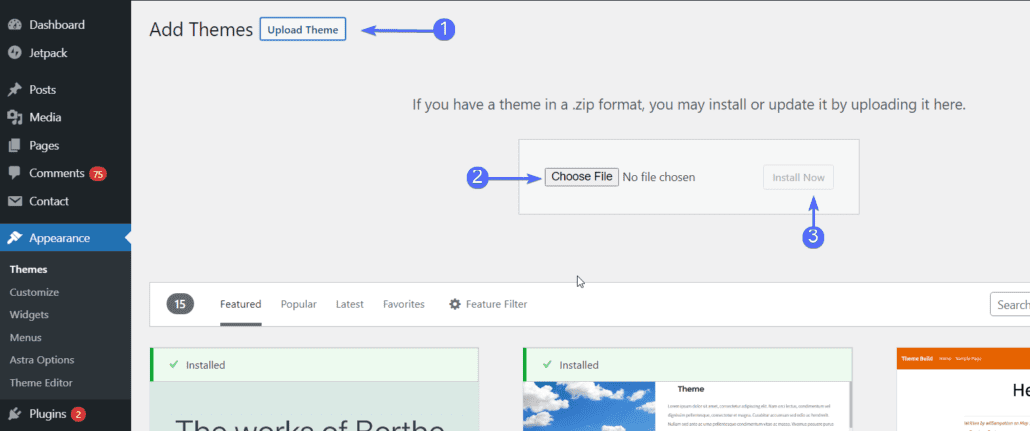
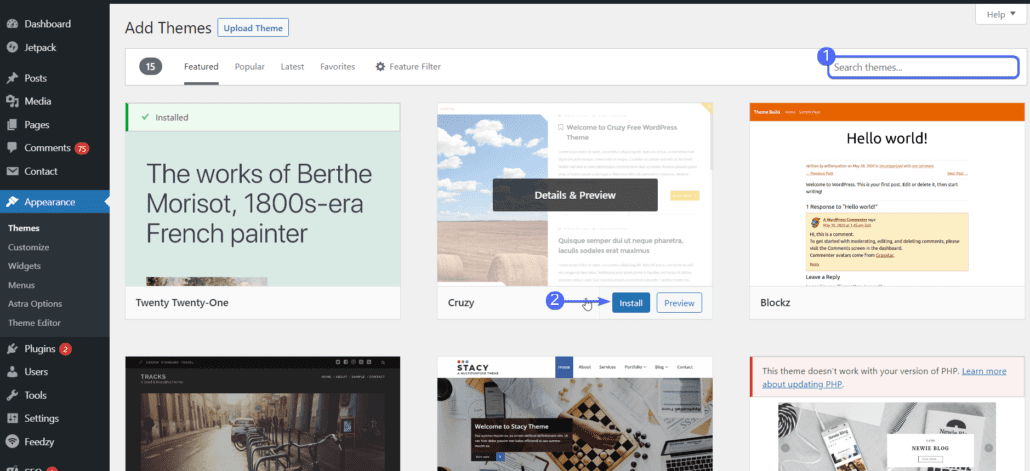
If you have not downloaded a theme, you can search for a particular theme using the search box and then click on Install next to the theme.
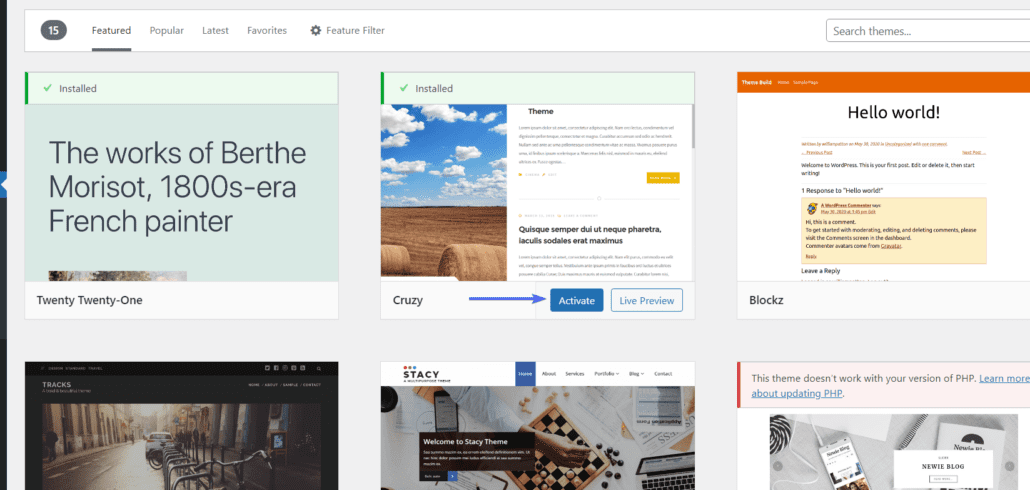
After installing the theme, click on the Activate button to set the theme as your WordPress template.
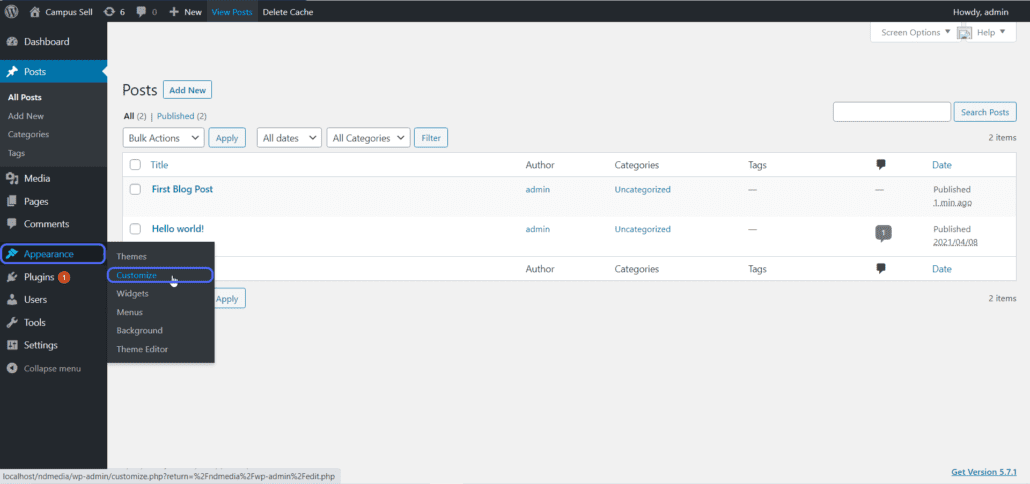
Afterward, you can make some changes in the customize menu to control how the theme appears on your site.
Customizing your WordPress Website
The customizer in WordPress allows you to make changes to your site design with a live preview that shows you how the changes look before publishing on your site.
From the live preview, you can navigate to any page on your website and make changes to the page.
To access the customizer, go to Appearance > Customize.
On the right, you will find the live preview of your site. Changes you make will reflect on the preview before you publish them on your site.

You can make changes to your site using any of the settings on the left side of the Customize dashboard.
For example, you can add a logo and edit your site title and tagline from the ‘Site Identity’ settings.
Other settings such as adding menu items, adding widgets, editing background color, and adding custom CSS can be configured from this dashboard.
If you are still not satisfied with your website’s design, you can use a page builder plugin such as Elementor to design and construct your website pages.
Optimizing Your WordPress Site
Managing a WordPress site goes beyond creating pages, blog posts, and installing themes. In addition, you need to improve the User Experience (UX) of your website.
These can be achieved by optimizing the speed of your site and also optimizing your content for search engines.
Speed Optimization
Making sure your site loads fast is essential because it can increase your site’s ranking on search engines and also reduce the bounce rate of your site. Most importantly, it is great for user experience.
One of the ways you can reduce the load time of your site is by using a caching plugin such as W3 Total Cache. Also, enabling image optimization, gzip compression and lazy loading on your site can greatly improve your site speed.
Please check this link for our detailed guide on WordPress speed optimization. However, if you would rather not go through the stress of optimizing your site, you can Hire an Expert to help you speed up your WordPress site.
Search Engine Optimization (SEO)
Although WordPress is SEO-friendly by default, you also need to perform some SEO techniques on your content to rank on search engines.
Luckily, there are SEO plugins such as Yoast SEO that you can use on your site to help you optimize your content for search engines.
These SEO plugins do not automatically optimize your content when you install and activate them on your site.
Instead, they provide SEO best practices that you can apply when creating blog posts on your WordPress blog.
Please check this guide to learn how to improve SEO for your WordPress website.
Conclusion
Understanding how WordPress works is key to building a successful WordPress site. In this guide, we have shown you how to easily setup and manage your WordPress site.
If you are using WordPress to manage your content online, there is a likelihood that you may encounter errors on your site. Whenever you are stuck with an error, our WP College contains a vast collection of common WordPress errors and how to fix them.
Also, you can reach out to our team of WordPress experts to help you fix any WordPress error you encounter on your site.

