How To Use WordPress Block Editor
 Still confused on how to use the new WordPress Block Editor? Don’t be. The WordPress block (Gutenberg) editor is easy to use. It only takes some learning to get a good grasp of it, and then you’ll be able to do amazing stuff on your website.
In this guide, we’ll walk you through the ins and the outs of the editor – how it differs from the old editor and how to use it like a pro.
Content
The WordPress Block Editor
The WordPress block editor, also known as ‘Gutenberg’, was introduced with the WP 5.0 version in December 2018. It replaced the old classic editor which has been in use since the inception of WordPress.
Content creation in the new editor can be likened to the process used in building a house. You know building a house involves placing smaller blocks incorrect positions. Similarly, the Gutenberg editor works like that too.
Every post and page you create with this editor is made up of several blocks – paragraph block, image block, video block, gallery block, widget block, table block, and more. They add up into a beautifully arranged post or page for your visitors to read.
Most content elements (paragraphs, lists, images, tables, etc.) you need on your posts are already present in the editor.
You may also consider using a WordPress plugin to add more advanced blocks.
Which is Better? The Classic Editor or Gutenberg
Several WordPress users wonder if the editor upgrade was necessary. Well, let’s compare both editors.
The classic editor has an interface similar to the popular Microsoft Word. You simply type in (or paste) your content and format. The Gutenberg editor, as we mentioned earlier, uses a block-based approach.
Although the classic editor may seem easier to use, the WordPress block editor allows you to add any type of content to your posts and pages. For instance, to add a table to your post in the classic editor, you’ll need to install a table plugin.
The Gutenberg editor, however, simplifies this process. To add a table with the new editor, simply add a table block, choose the number of rows and columns you want. Then add content to the table.
Also, the block editor sometimes eliminates the need for shortcodes. For instance, if you need to embed a contact form on a post, instead of adding a shortcode, you can simply add the form plugin’s block. On the other hand, the classic editor would require that you use a shortcode to embed the form.
Lastly, the WordPress block editor allows for easy manipulation of content and lets you create content with complex layouts.
How to Use the Gutenberg Editor
Now that you know what the block editor (Gutenberg) is all about, let’s see how to use it to create great content. We’ll start with an introduction to the interface, and then move on to how to use it like a pro.
The Gutenberg Editor Interface
To access the editor, click Posts >> Add New in your WordPress admin if you intend to create a post. If you intend to create a page, navigate to Pages >> Add New menu.
This will open the block editor.

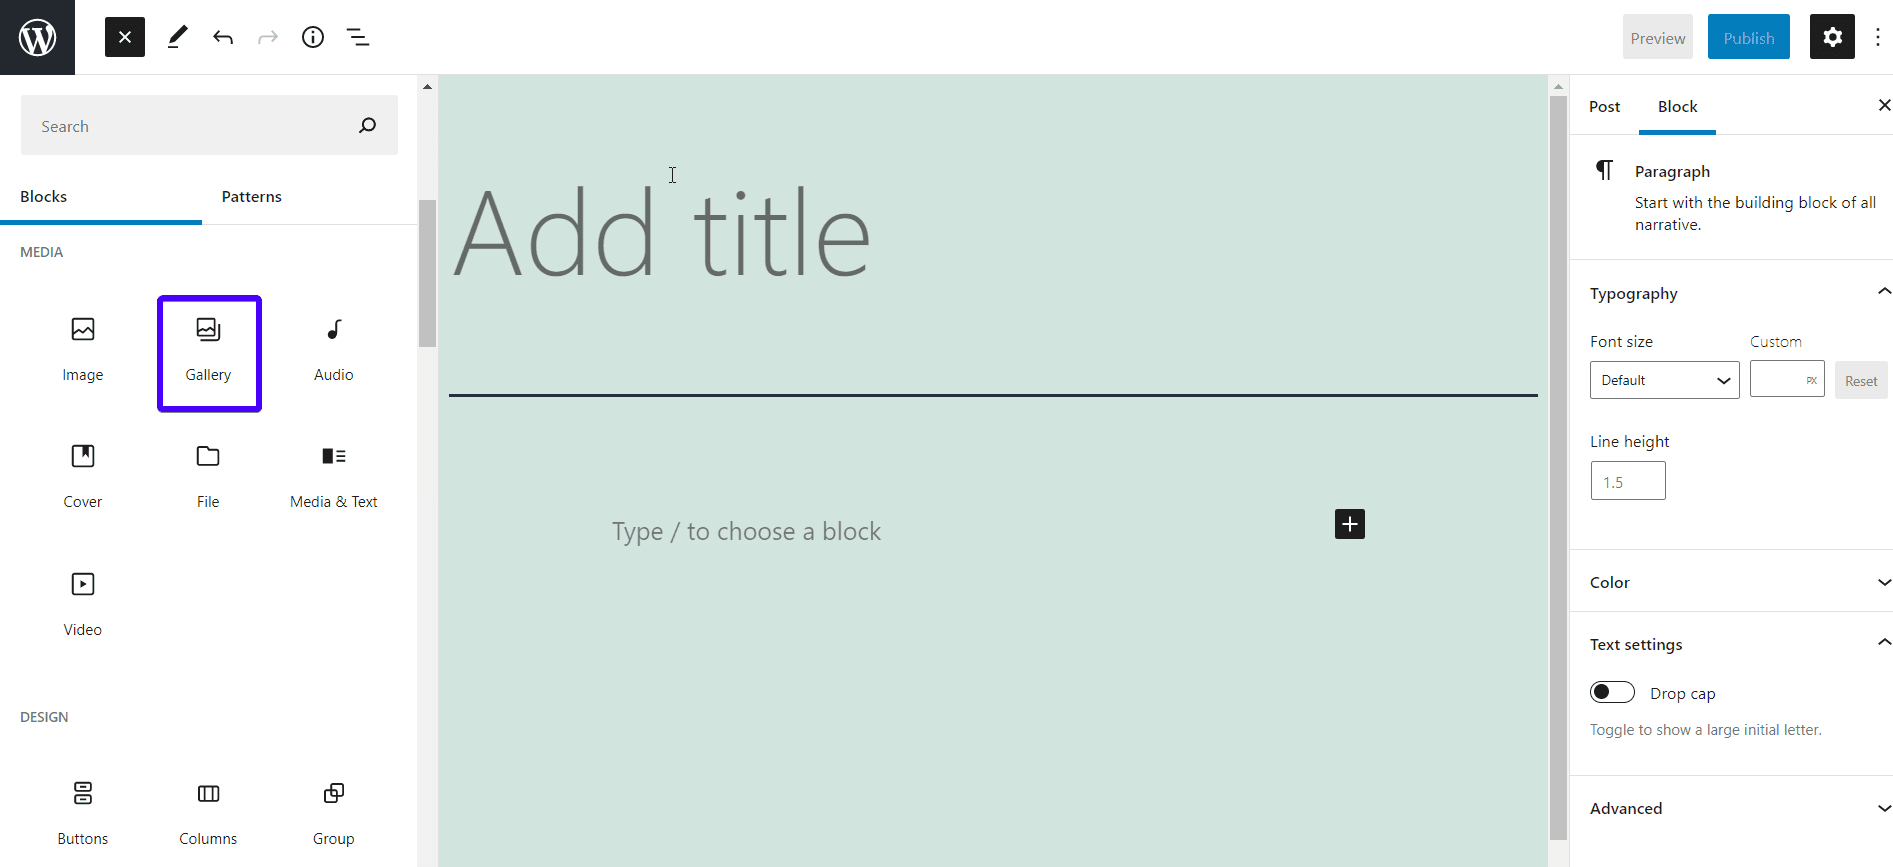
The Gutenberg block editor is a clean full-screen writing environment, with great typography and lots of space for your content to stand out.
As you can see, the editor has three parts:
- Content: This is the largest part. This is where you type your content.
- Sidebar: This is located at the right-hand side of your screen. It has two tabs – The Post tab (Page tab when working with pages) and the Block tab. The Block tab allows you to make changes to a selected block while the Post tab allows you to configure settings that relate to the entire post.
- Toolbar: Located at the top of your screen, the toolbar allows you to insert new blocks and access other settings.
If you need a larger space, you can close the sidebar by clicking the ‘gear’ icon in the top-right corner of your screen. Click the same icon to bring it back.
How Blocks Work in Gutenberg
The first block on the editor is the title block. This is where you enter your post or page title.

The next block after the title is a paragraph block. You can get into the main post right away. Simply press the ‘Enter’ button on your keyboard or move your cursor below the title and click.
However, if you need to add another content element, click the ‘add new block’ button (+) located on the top-left corner of the editor.

Clicking the button will reveal many blocks you can add, so go ahead to select a block. If you need an image block for example, simply click ‘Image block’. You may also use the search bar located on the top of the menu to quickly find a block.

Each block has a toolbar that appears on top of it. In other words, the buttons in each toolbar vary depending on the block you are editing.

For instance, the screenshot above shows an image block. Above the block is a toolbar with basic formatting buttons like image alignment, crop image, insert link, and more.
Also, each block has extra settings located on the right side of your edit screen.

Further, you can move blocks by using the arrows located close to the block or by simply dragging the blocks.

Creating Content in The New WordPress Editor
The block editor does everything the classic editor could do and even better. Let’s see how to add images, links, tables, etc.
1. Adding an Image in the WordPress Gutenberg Block Editor
To clarify, the WordPress block editor comes with a ready-to-use image block. So simply add the block by clicking the ‘+’ symbol at the top-left corner of your screen. Then, scroll to find the image block and click on it.

You can choose to:
- Upload an image file from your local device.
- Select from the media library.
- Insert from a URL.
You may also drag and drop images from your computer. An image block will be created automatically for it.
After adding the image, you can use the block settings on the right side of your screen to add alt text, change the size, and add a link.
2. How to Add an Image Gallery in Gutenberg
Adding a gallery block is similar to the way you add an image block. The only difference is that you select the ‘gallery block’ instead of the ‘image block’, and you upload multiple images.

Then you can build your gallery by uploading new files or selecting files from your media library.
3. How to Add Shortcodes in WordPress Posts Using Gutenberg
Shortcodes help insert dynamic content quickly into your posts and pages. So to add a shortcode in the WP block editor, you can use the shortcode block.

You can also add shortcodes in the paragraph block.
5. How to Add an Image Next to Text in WordPress
In the classic editor, adding an image next to a text was impossible. On the other hand, this limitation has been fixed in the modern block editor. Therefore, if you need your text and media to stay side by side, use the Media & Text block.

Now you can add an image in the media area, and then add some text in the box next to it.

5. How to Add a Button in WordPress Posts and Pages
In the previous WordPress editor, adding a button was quite a pain in the neck. You either had to write codes or use a plugin that generated a shortcode for the button.
Thankfully, the new Gutenberg editor comes with a button block. This has removed the need for installing a plugin just to add buttons on a page or post.

Don’t forget to add text, adjust the color of your button as needed, and add a link. You can perform these functions using the toolbox located at the top of the block, and the button block setting on the right of the page.

7. How to Add Cover Images in Blog Posts and Landing Pages
A cover image is a wide image used for each new section in blog posts and pages. They help your content stand out. With the WP block editor, they are easy to add using the ‘Cover’ block.

Simply add a cover block, then upload an image file that is large enough, or select one from your library.
8. Creating Tables Inside Articles
This is one breakthrough the Gutenberg editor has brought to WordPress. Previously, WP users had to create tables using a plugin or by writing custom CSS and HTML.
With the default Table block in the new Gutenberg editor, all that is in the past. Simply add the Table block, choose the number of rows and columns you want, then click Create Table.

You can also choose from the two basic styles available from the blog settings on the right side of your screen.
9. How to Create Multi-Column Content
Inability to create multi-column content was another issue with the old classic editor. The block editor, on the other hand, allows you to add up to 6 columns in a row using the Columns block. You can also use other blocks within the column block.

This can be very useful for structuring content within your pages and posts as you design them. For instance, let’s say you are trying to create a page that lists your employees, with a profile picture, some text about the person, and a link to their social pages, websites, etc.
You can create 3 columns, 1 for each set of information you want to present.

Saving and Reusing Blocks in The WordPress Block Editor
The block editor allows you to save and reuse blocks. This means you can save a block or a group of blocks and use them later in another post or page.
If you frequently need to add the same content snippets to your pages and posts, this feature will save you a great chunk of time.
To save a block, select a block. Then click on the 3 dots at the top of the block’s toolbar. From the drop-down menu, select Add to reusable blocks.

Next, provide a name for your reusable block and click Save.

And that’s it, you have created a reusable block.
Now to add the reusable block in your posts and pages, here is what to do:
Open the post or page where you want to add the block for editing. Then, click on the add block (+) button.
You will find the saved block under the ‘Reusable’ tab.

Finally, click on the block to insert it into your WordPress page or post.
You can also manage your saved blocks by clicking Manage all reusable blocks.

This will take you to a page where you can edit, trash, or export any of your reusable blocks.
Bonus Tips
Having looked at how to add blocks in the WP block editor, it may seem as though the new editor consumes too much time. Well, here are some bonus tips to help you work faster with this editor.
-
You can move the block toolbar to the top.
As we mentioned earlier, each block comes with a toolbar at its top. You can move this bar to the top of your WP editor. This allows you to access all block and document tools in one place. To do that, click the 3-dot button at the top right corner of the screen. Then select the Top Toolbar option.

-
Keyboard shortcuts
The WP block editor comes with several shortcuts to make your workflow much better. One of them is the forward-slash symbol (/).
Simply enter / in the paragraph block. It will present a list of blocks that you can use immediately.

For more shortcuts, click on the 3-dot menu on the top-right corner of your screen. Then, choose ‘Keyboard Shortcuts’.
This will reveal a list of all the keyboard shortcuts you can use. Windows and Mac users have different shortcuts.
-
Drag and drop media functionality
The block editor allows you to just drag and drop image files anywhere on your screen and it will immediately create a block for you.
You can also drag and drop multiple image files to create a gallery block.
-
Classic editor block
Let’s say you want to add some content, and you wish you could just format it using the classic editor. Well, you can, using the classic editor block.

This block creates a section that works just as the classic editor does. So there’s no need for complaint. If you miss the classic editor, just use it.
Add More Blocks to Gutenberg Block Editor
The WordPress block editor is so flexible, you can add your own new blocks. Here are some plugins that can help you supercharge the block editor with more advanced blocks.
1. Ultimate Addons for Gutenberg
This plugin lets you add a couple of unique blocks without writing a single line of code. It comes with over 20 pre-built free starter sites using the Astra theme, Gutenberg, and the Ultimate Addons for Gutenberg. Each starter site can be imported in just one click.
2. PublishPress Blocks
Here is another powerful block library that allows you to extend the Gutenberg block editor.
It comes with over 20 extra blocks, including sliders, layout options, recent posts, buttons, icons, image galleries, maps, tabs, testimonials, accordions, etc.
With this plugin, you can control who uses the blocks, choose from several layout options, and add custom CSS for blocks.
3. Stackable – Gutenberg Blocks
This is an all-in-one solution for creating a stunning website. It provides blocks for feature grid, image box, accordion, icon list, call to action, container, posts, etc.
FAQs About the Gutenberg Block Editor in WordPress
Here are a few commonly asked questions about the block editor in WordPress:
1. Are my old WordPress posts and pages safe?
Yes, they are safe even if your previous posts and pages were edited using the classic editor. You can still edit them either using the old editor or the block editor.
2. I prefer the classic editor, can I keep using it?
Sure! Although Gutenberg is now the default editor in WordPress, you can revert to the old classic editor. To do this, install and activate the Classic Editor plugin.
After activation, the Gutenberg block editor will be disabled and you’ll have the classic editor back.
Side Note: The Classic Editor will be officially supported until December 31, 2021. During this period, you can acquaint yourself with how the WordPress block editor works because it is here to stay.
3. My block editor isn’t compatible with my theme or plugin?
Although this is an uncommon occurrence, do any of the following if it happens:
- Contact your theme or plugin developer to lay a complaint.
- Install the classic editor plugin.
- Use an alternative theme or plugin.
4. My WordPress block editor is not working
This is most likely a theme or plugin conflict. To solve this, disable all plugins and install a default WordPress theme like the twenty-twenty one theme. If the problem goes away, reactivate each plugin one after the other to identify which plugin caused the conflict.
Conclusion – WordPress Block Editor
In this post, we have covered all you need to know about the WordPress block editor. If you aren’t comfortable with the editor, you can disable it by installing the ‘Classic Editor’ plugin.
However, with the extra features being added to the editor with each WP update, you may not be able to ignore it for too long.
The long-term plan of the Gutenberg project is to make it a Full Site Editor. This means you’ll be able to edit 100% of your website (header, footer, sidebar, etc.) using the Gutenberg editor. Trust us to keep you updated when this feature comes into play.
For more WordPress tutorials on how to work with your site, please check our blog.


