How To Edit WordPress Code (HTML, CSS, JavaScript, and PHP)
We love WordPress! You can take a simple WP installation and transform it into the website of your dreams – and this is probably why WordPress remains the world’s most used CMS. While plugins are valuable in making your site look and act the way you want, there are days where you have to edit your WordPress codes (HTML, CSS, JavaScript, PHP) in your core file, posts, and pages.
In this article, we’ll give you a step by step procedure on how to add/edit your WordPress codes.
Content
- Editing codes in WordPress
- Editing The Source Code in Your WordPress Theme
- Conclusion
Editing codes in WordPress
HTML, CSS, PHP, and JavaScript are the four programming languages used by WordPress – each with its own function.
HTML, for instance, defines the structure of your site’s content while CSS defines the visual appearance of your site. JavaScript, on the other hand, modifies HTML and CSS to provide dynamic functionality.
Now, let’s see how to add and edit these codes in WordPress.
How to Edit HTML code in WordPress (WP Classic editor)
Editing the HTML code of a WordPress post or page is quite straightforward. You don’t need to go beyond your dashboard to get it done. Simply, click the ‘text’ tab in your post/page’s editor.
The text editor lets you add, edit, and remove HTML code. To view changes, click the ‘visual’ tab. Don’t forget to save changes.
How to Add or Edit HTML Code in Gutenberg Editor
With the Gutenberg (block) editor, you have even more flexibility. You can either make changes to your entire page/post or to an individual block.
To make changes to the HTML of an entire post or page, simply click on the three dots located at the top right-hand side of your screen. Click ‘Code Editor’.
Now, you can edit the HTML of the post. To exit the editor, hit the ‘exit code editor’ at the top of the editor.
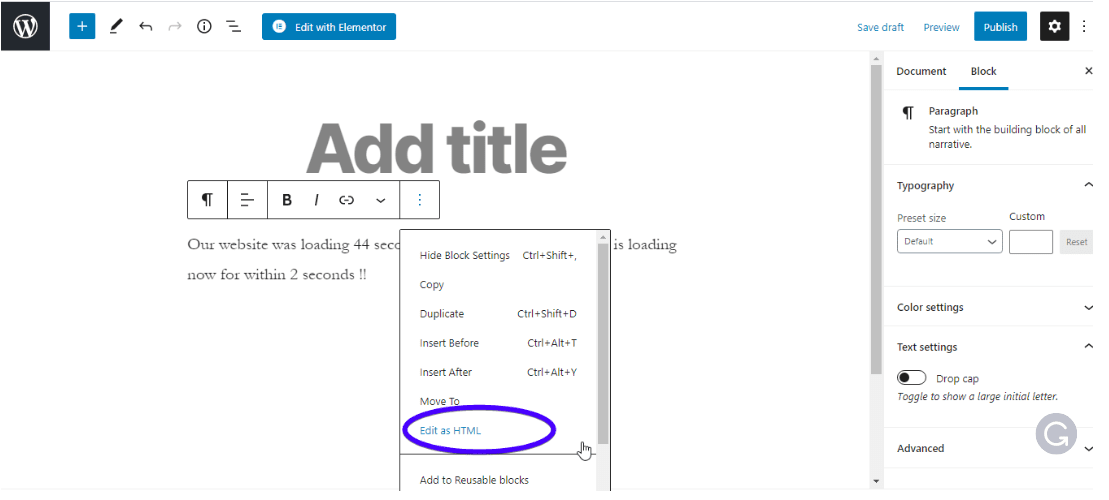
As you probably know, the Gutenberg editor consists of individual blocks that can be edited independently. To edit the HTML of an individual block, simply, go to the block. Then, hit the three dots above the block and select ‘Edit as HTML’.
You may also use a custom HTML block. Hit the ‘Add‘ symbol at the top left corner of the editor to add a block. Next, click the ‘Custom HTML’ block and type in the code in the resulting box.
 You can click ‘Preview’ to see how it looks in the front end.
Don’t forget to save changes.
How to Add or Edit HTML Code in WordPress Widget
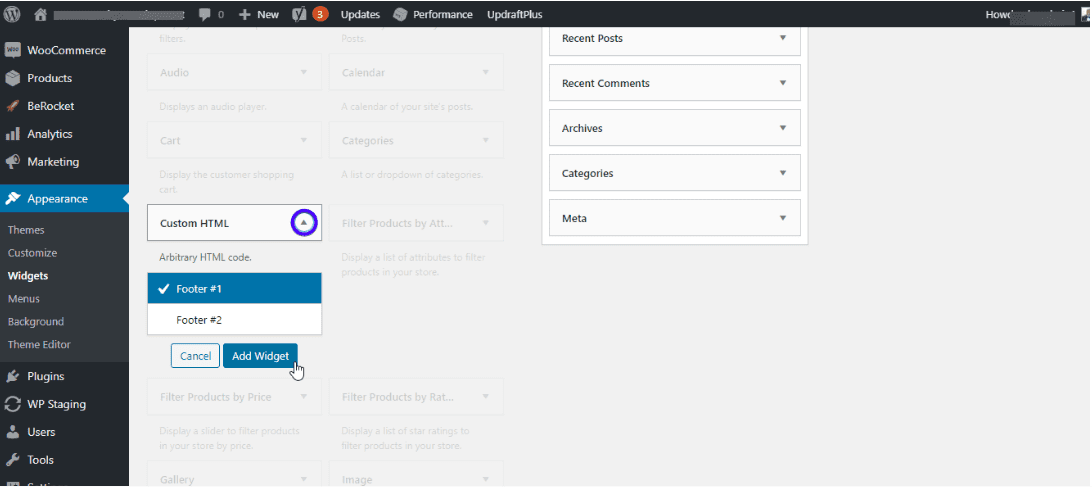
There are days you may need to add HTML code to the sidebar or footer of your site. To do this, go to Appearance >> Widgets.
Look for the ‘Custom HTML’ widget and click the drop-down to select where you want to create the widget. Next, hit ‘Add Widget’.
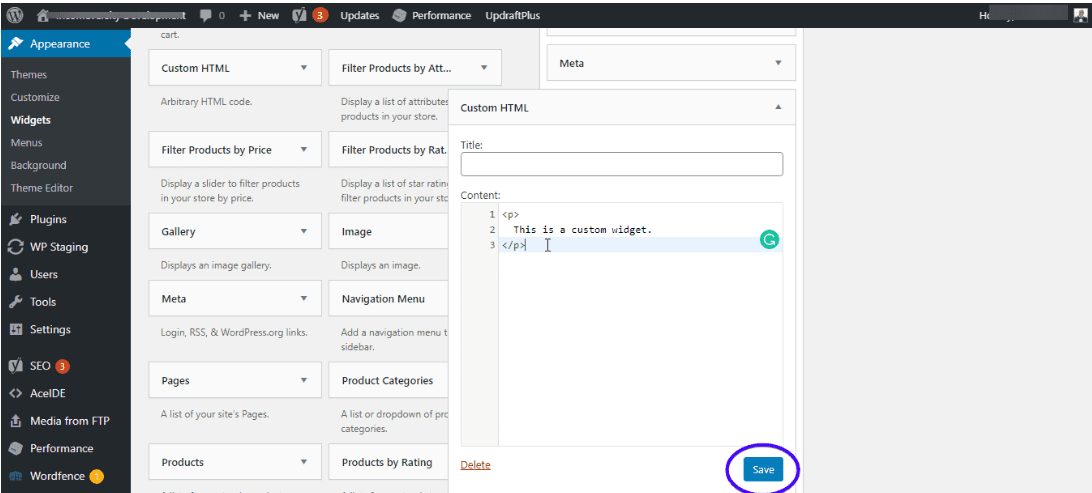
Input your HTML code and click ‘Save’.
And that’s it!
Editing The Source Code in Your WordPress Theme
WordPress themes consist of various files. These include CSS, PHP, and JavaScript files for your website. Unlike editing your site’s HTML, extra care must be taken when editing a theme’s source code. This is because you could break your entire site through the changes made to the theme.
Here are a few things to note before editing your theme’s source code.
Edit your Child Theme and not your parent theme: If you need to modify the code in your theme’s files, it is recommended that you do this on a child theme.
This is because all modifications will be gone when next you update your theme. But, when you use a child theme, your changes remain, even when you update the parent theme.
To learn how to create a child theme for yourself, check out our complete tutorial on WordPress child themes.
Do a full site backup: Before editing WordPress source files, don’t forget to backup your website. See our post on how to create a backup, to know how to do this. On the other hand, you can forgo the stress of creating backups when you get a maintenance plan with Fixrunner. We have a nightly backup.
There are 3 primary ways of editing your theme’s source code: theme editor, plugin, and FTP.
How to Edit WordPress site’s CSS
As stated earlier, your site’s CSS is responsible for its visual appearance. If you need to change font family, size, color scheme, etc, edit CSS.
You can edit CSS:
- Through your Theme Editor
- Using the WordPress Customizer
- With a plugin
Any of these will work just fine.
How to Edit WordPress CSS Through the Theme Editor
In case you do not know, WordPress comes with an in-built theme editor. You can make changes to your template files directly from here.
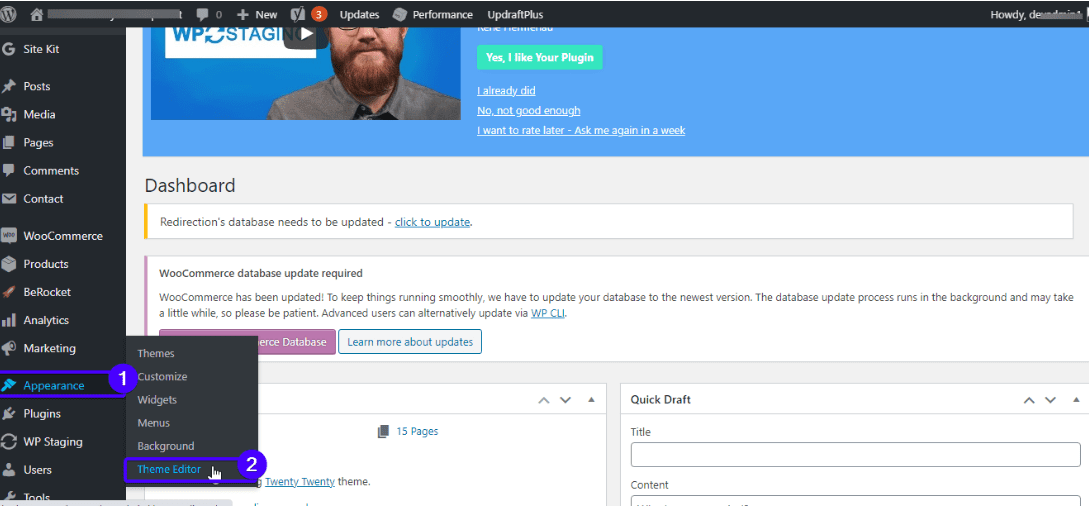
To access your theme editor, go to Appearance >> Theme editor.
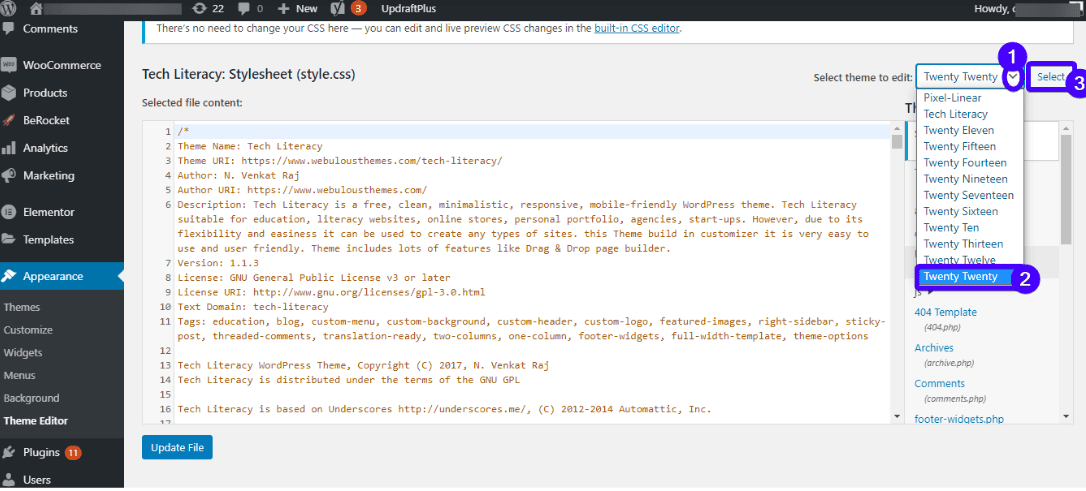
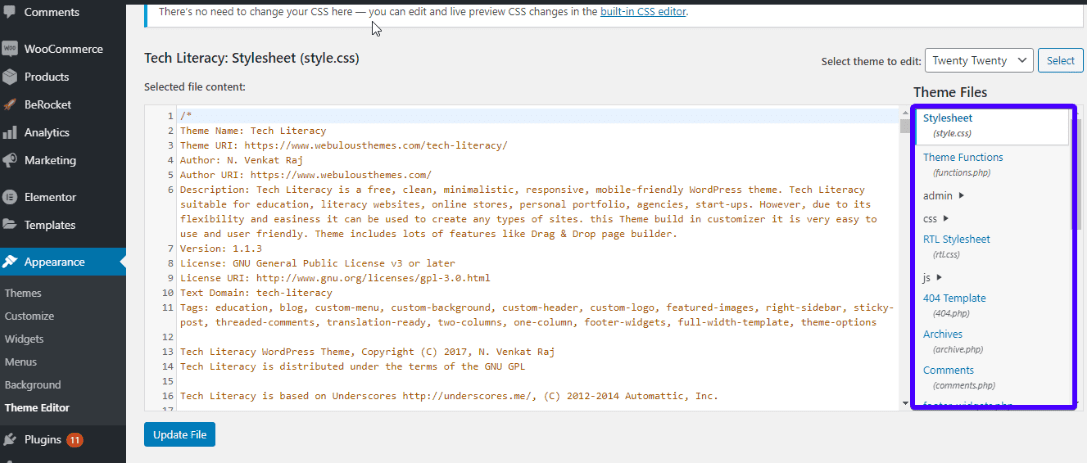
The code editor and a sidebar on the right will open up on your screen. Select any of the theme files from the sidebar, and make changes to the file.
The files you see varies from theme to theme. However, all WordPress themes contain these 2 files:
- style.css: This is where you can alter your theme’s fonts, color scheme, and general visual appearance.
- functions.php: This file contains PHP code that changes your site’s default features.
Files ending with .css extension are the CSS files. Make your desired changes and click ‘Update File’ to save.
How to Edit Your WordPress CSS Code Using a Plugin
If you have no knowledge of CSS or you prefer to just stay away from codes, you can use a plugin. This way, you’ll modify your site’s look without the need to edit your theme files.
For instance, Custom CSS and JS is a plugin that lets you customize your site’s appearance without having to modify your theme files. The plugin comes with an easy-to-use text editor with syntax highlighting.
You can add as many codes as you want and you won’t lose them when you change the theme.
To use the plugin, simply download, install, and activate it.
Other WordPress plugins used for editing CSS include CSS hero, Genesis Extender plugin, WordPress Custom CSS, etc.
Editing Your WordPress CSS code via the WordPress Customizer
Instead of using the WordPress Theme Editor, you can use the in-built WordPress Customizer.
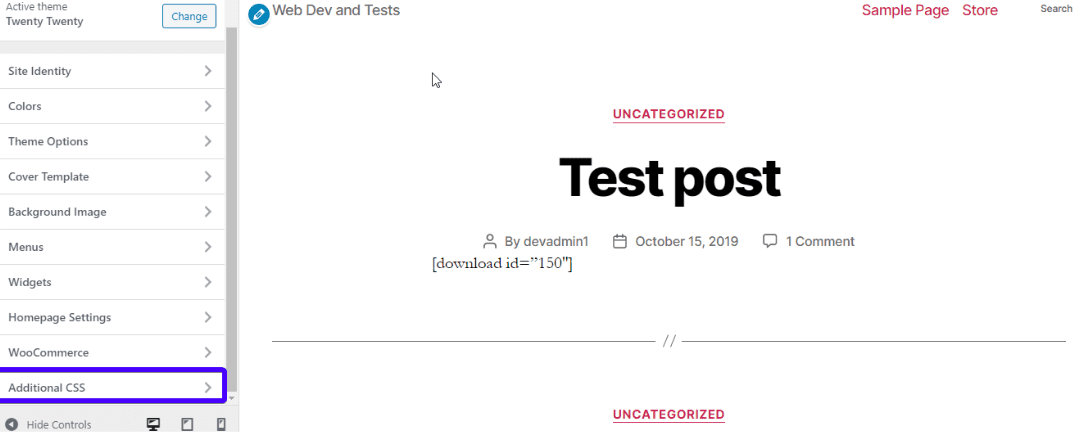
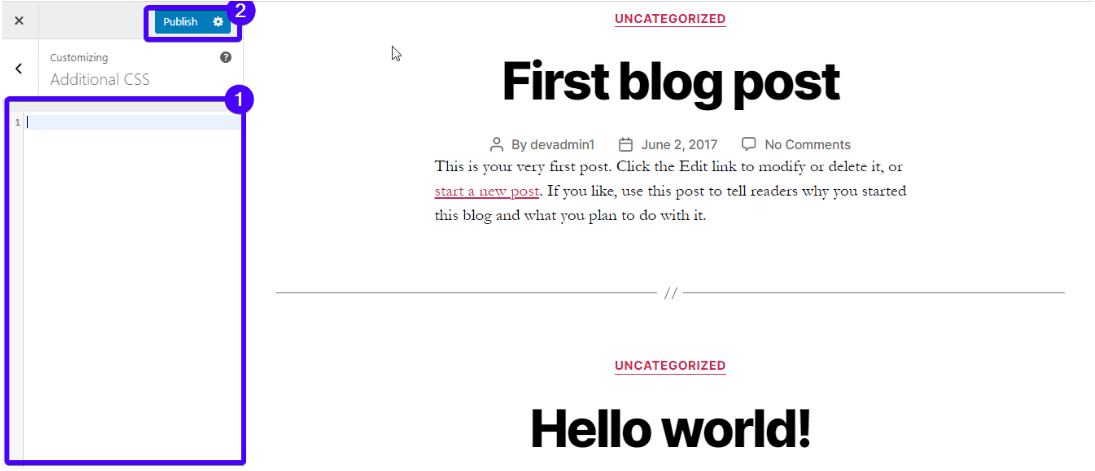
To visit the WordPress customizer, go to ‘Appearance >> Customize’ on your dashboard:
Next, click on Additional CSS.
A code editor will open up. Add your custom css and hit the Publish button.
How to Add JavaScript to Your WordPress Site
When you need to add dynamic content like animations, calculators, sliders, video-player, or related interactive elements to your website, JavaScript comes in handy.
You may also need to add Javascript to your WordPress website when you need to:
- Enhance a plugin’s functionality.
- Hook an external element like Google Analytics to your website.
- Hide, or display HTML elements.
- Run complex operations on CSS variables.
Now, adding or editing Javascript is not as easy as editing HTML or CSS. You should be careful about how you write the code and where you add it.
Primarily, there are two places where you can add Javascript:
- The header or footer of your theme: JavaScript added in these locations work site-wide
How to Add Header and Footer Scripts Using a Plugin
The easiest way to add header and footer scripts in WordPress is by means of a plugin. This method is more valuable if you want to add theme-independent scripts that remain even when you change your theme.
WordPress, by default, overwrites your header.php file during an update. But when you use a plugin, you would not have to worry about adding the code again even when you do an update or change your theme.
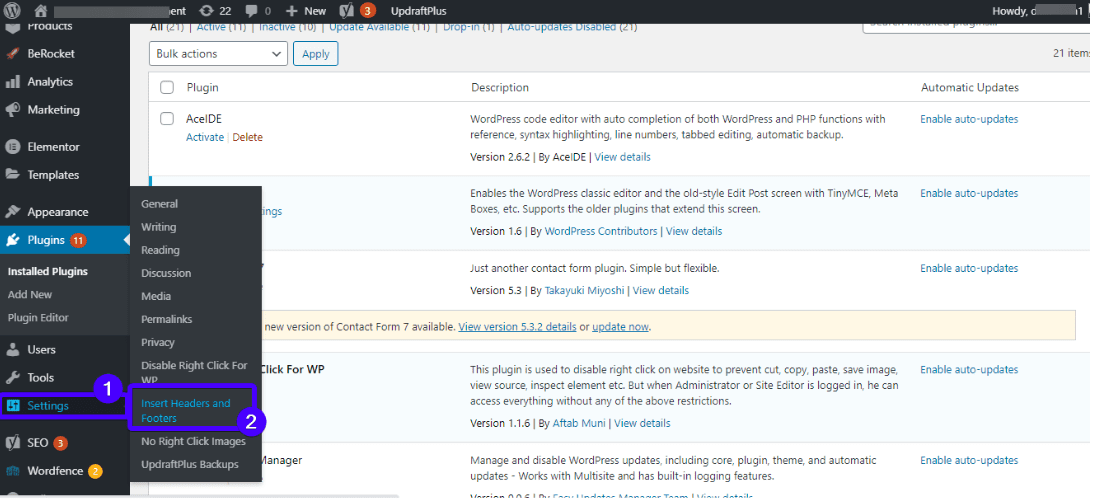
An example of this plugin is the Insert Headers and Footers plugin:
It enables you to easily add insert code to your WP site’s header and footer. When you need to add Google Analytics scripts, or Facebook pixel code, this plugin comes in handy.
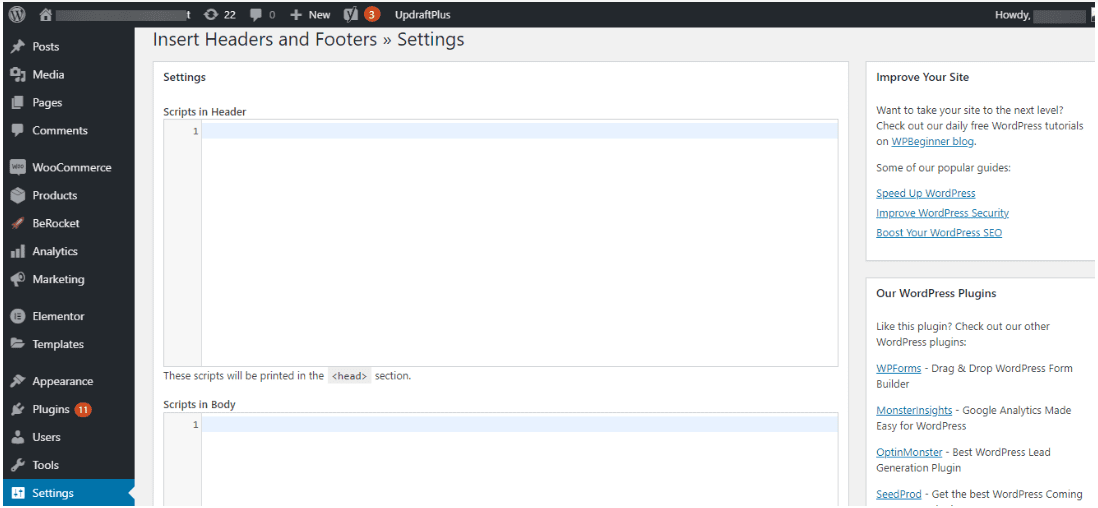
To use the plugin, install and activate it. Then, access the JavaScript editor by opening Settings > Insert Headers and Footers:
The page contains 3 text boxes where you can add scripts to your site’s header, body, and footer.
After adding your script to the desired section, hit the save button at the bottom of the page.
Side Note: some themes (like Genesis Framework) come with this kind of functionality (they let you insert codes anywhere on your site), so you wouldn’t need a plugin.
How to Add JavaScript to WordPress Posts and Pages
Apart from adding JS codes in your site’s header and footer (which works site-wide), you can add them individually to posts and pages.
The first thing to do is to install the Code Embed plugin. Then, activate it.
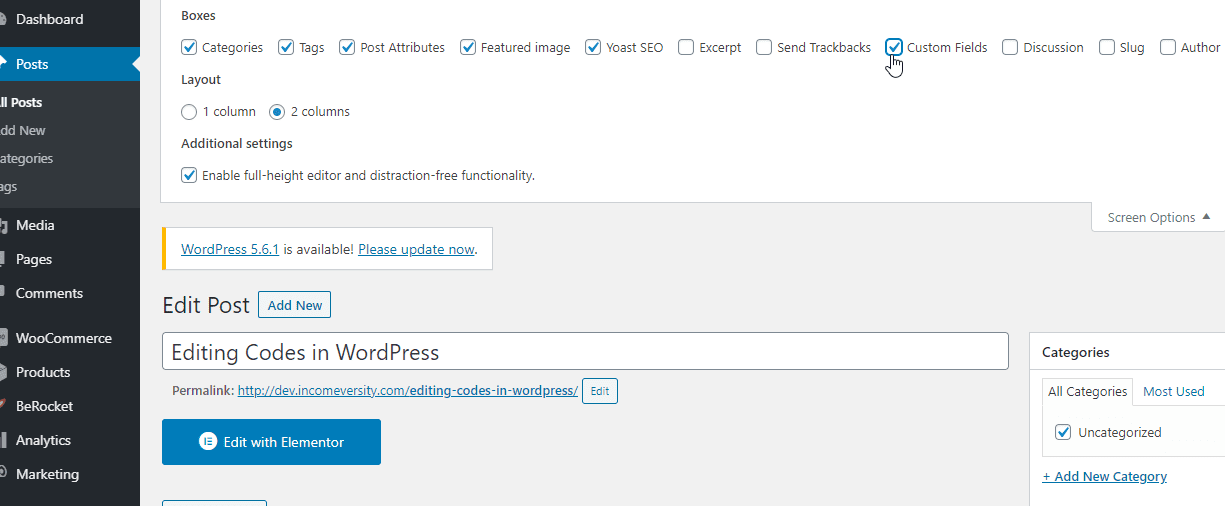
Next you will need to enable custom fields for your post or page.
If you use the classic editor, open the page or post where you need to add the JS code in your WP editor. Then, click on ‘Screen Options‘ at the top right corner of your dashboard and check the ‘Custom Fields‘ option.
If you use the Gutenberg editor, Here’s how to access the WP custom fields feature:
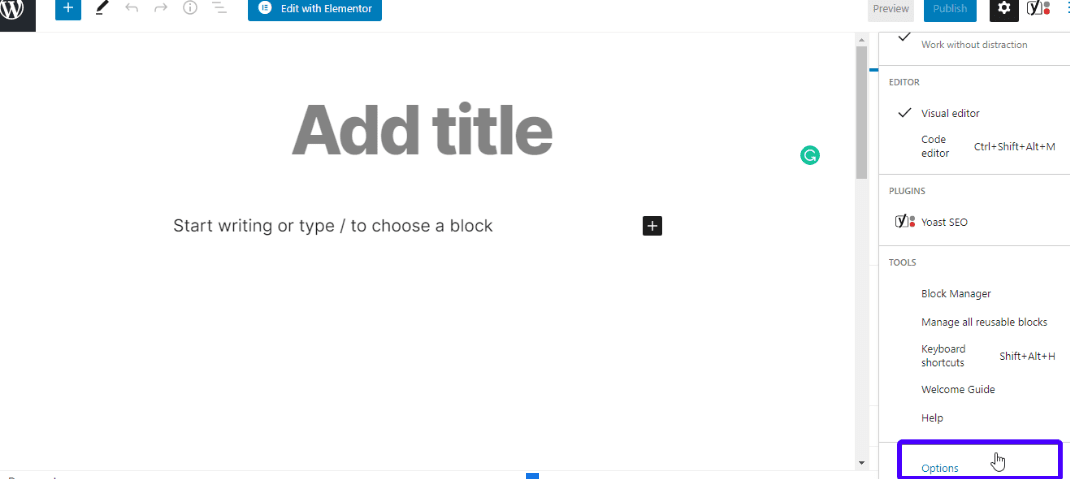
Click the 3 vertical dots at the top right corner of your screen and select Options:
Next check the ‘Custom fields’ box located under the Advanced Panels section.
Now, the ‘Custom Fields’ option is working fully on your site.
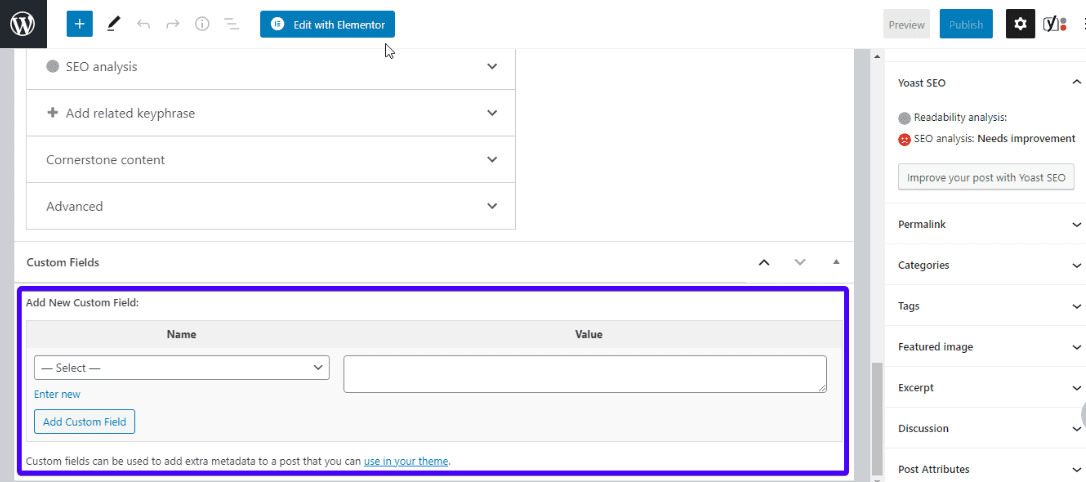
Here’s what to do next. Scroll down to the bottom of your post (either in classic or Gutenberg editor), you’ll see a section where custom fields can be added.
Click Enter new and input a name for your new custom field in the ‘Name’ box (let the name begin with the word CODE e.g. CODEjsforpage). Then, in the ‘Value’ box, enter your JS code snippet. Finally, save your changes by hitting the ‘Add Custom Field’ button.
At this point, you can insert your JS code anywhere within the post or page. Simply, add the embed code: {{CODEjsforpage}} where you want the code to be.
Editing PHP in WordPress
There are 2 primary ways of editing PHP in WordPress – WP code editor and FTP client.
1. The WordPress Code Editor
This is the easiest method of editing PHP as far as you can login to your WordPress dashboard.
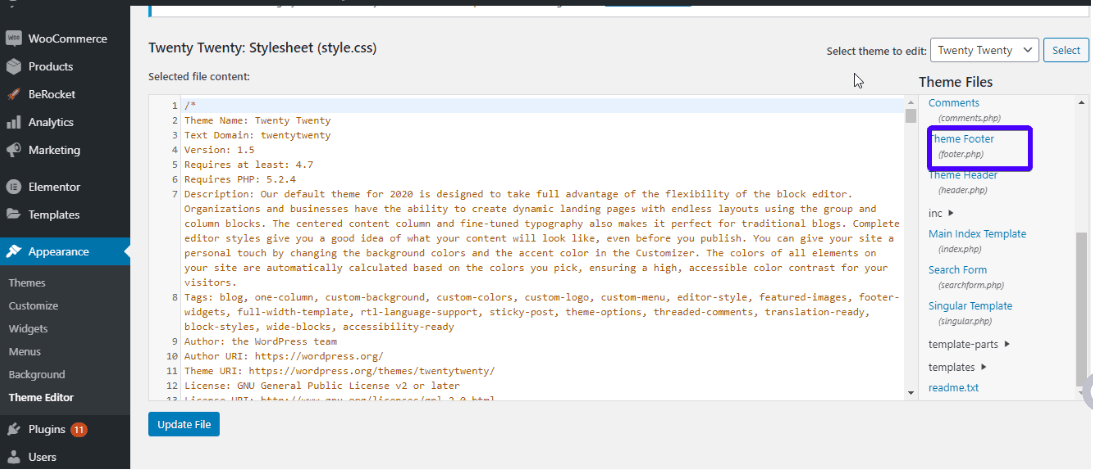
To get started, create a child theme and activate it. Next, go to Appearance >> Theme Editor.
Select the child theme you want to edit. Click to open the file you want to edit (PHP files end with the .php extension). For instance, if you need to edit your site’s footer, click the footer.php file on the right hand side of your screen. Now, edit the file in your WordPress editor.
Don’t forget to click the Update File button. This will save your changes.
2. Editing PHP code via FTP
Using an FTP client is another method of editing your php files. It is most useful when you do not have access to your WordPress dashboard, probably as a result of a WordPress error or malware attack.
If you have access to the WordPress code editor, use it by all means. It is quicker.
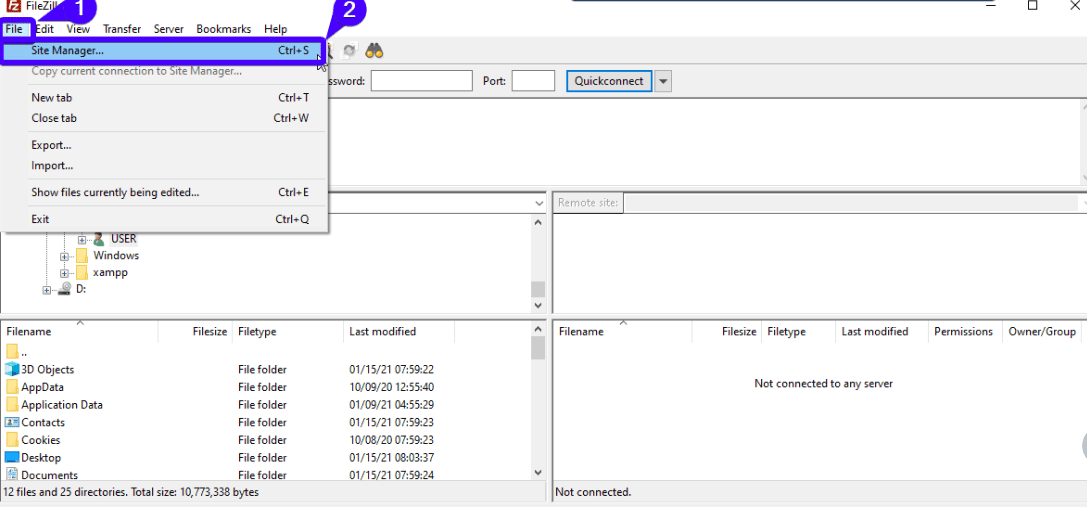
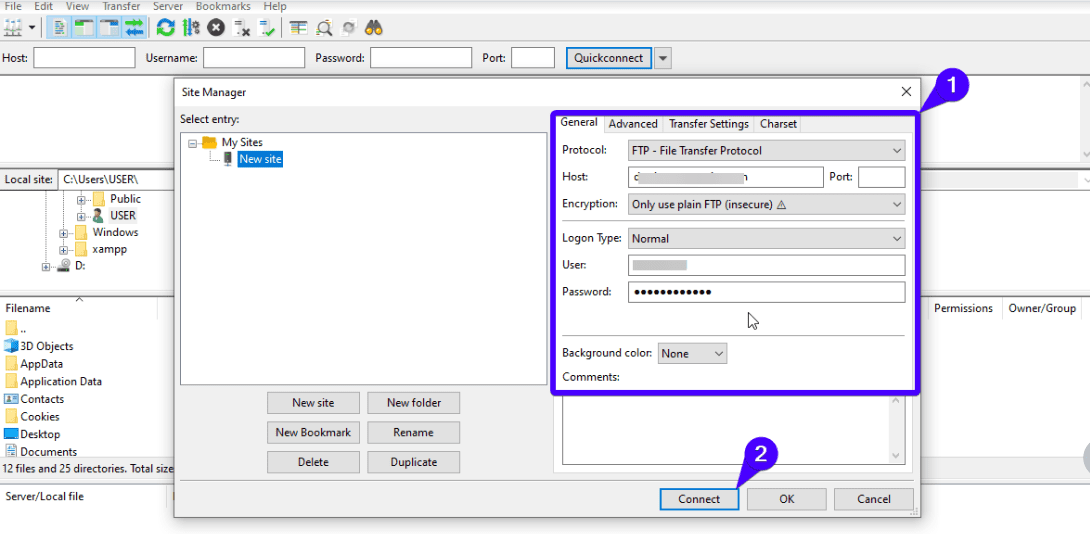
That said, the first thing you need to do here is to download an FTP client (FileZilla preferably). Then open it and click ‘file >> site manager’.
Next, enter your FTP credential login details (your domain, username, and password). These details are usually the same as your cPanel login details. If you do not know it, contact your WordPress hosting company.
Now, click ‘Connect’.
After connection, you’ll have access to your WordPress core files. To edit a specific file, say wpconfig.php, right-click on the file, and select View/Edit from the list of options. After you edit the code, save the changes and upload the edited file back to the server when prompted to do so by Filezilla.
Conclusion
WordPress is loved by many for its flexibility and robust customization options. If you do not like a feature, you do not have to stick with it. You either change it through the use of a plugin or by editing your WordPress code directly.
Hopefully, you can now edit your WordPress HTML, CSS, JavaScript, and PHP in WordPress. Feel free to explore all the beauty WordPress has to offer. However, remember to tread carefully especially when adding or editing your source codes.
To help you become a WordPress pro, we’ve got video tutorials as well as a WordPress training blog. Please check them out to learn WordPress. And, if you still need help with your WordPress site, reach out to our WordPress developers and support experts to get things going.
Banner vector created by GraphiqaStock – www.freepik.com

