How to Add Google Maps to WordPress in 4 Simple ways
 Would you love to create and add a standard Google Map to your WordPress site? Google Maps has transformed the way we give directions to our places of business.
You don’t just tell them where to locate you – Google Maps directs them to your doorsteps.
In this post, you will discover that you can create and add WordPress Google Maps to your site. Most of the methods we will show you require no prior coding skills. Instead, we will show you how to implement Google Maps on your site using one of these easy methods.
If you were ever hesitant about Google Maps, one great reason you should have it on your site is because of its impact on local SEO. In fact, 86% of people use Google Maps to locate businesses. Still, need reasons why you must add Google Maps to your website? You would like to see what’s next.
Content:
Why is Google Maps vital to your website?
It Literally Puts You On the Map
With Google Maps, your business is no longer hidden. For instance, if someone wants to find a barbershop, they easily can. Anyone in need of your services anywhere close to your establishment can find directions to you on the map. Even if you are in a remote area, Google Maps will guide your customers to you. It is a vital SEO and listing tool for any business.
It’s Free and Easy to Use
Just like any other map, Google Maps is lightweight. Moreover, you don’t need to put it on your server – it’s in the cloud.
If you are not great at describing where you do business, Google Maps was made for you. Your customers can get real-time directions to your place of business without you saying a word. And you don’t need to pay a penny for all these services!
It Keeps Your Customers On Your Site
Google Maps helps you to engage more with your customers and visitors. And so, those new to your business would spend more time on your website than usual just to get directions. Perhaps unintentionally, it serves as a lead-generating add-on.
It Promotes Other Aspects of Your Business
While your customers or potential clients look for your address, the map shows other contact details. Likewise, more information on your business will appear when your location is seen. From business lines to reviews, you stand a chance of impressing your potential clients with Google Maps.
Finally, Google Maps need no introduction since almost everyone knows about it.
How to Add Google Maps to Your WordPress Website
Now that you are convinced that you need it, let’s get started on how to use Google Maps.
Manually Embed Google Maps in WordPress
If you want a very direct way to add Google Maps to your WordPress website, then you should use this method. Adding Google Maps to your site manually takes only a few steps. And you can do it in a few minutes and get great results.
STEP 1
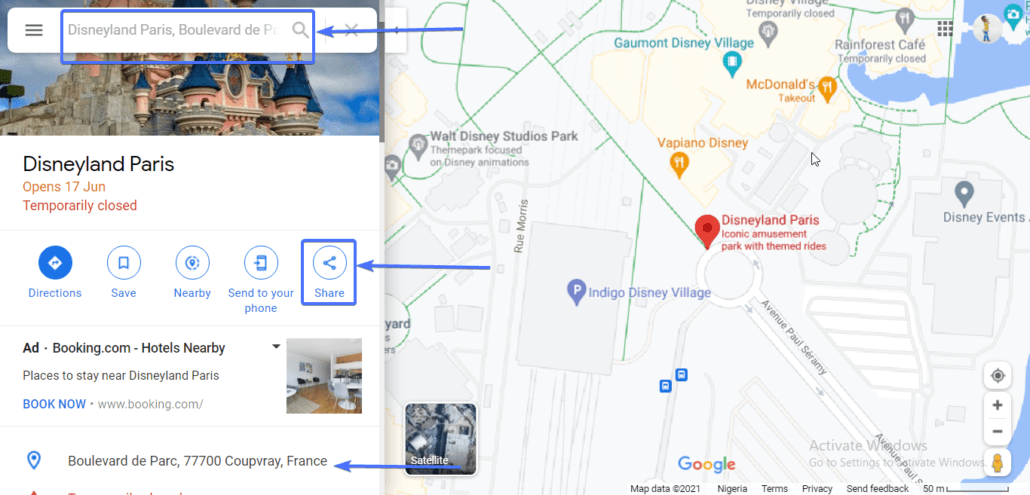
First, go to the Google Maps website on your browser. This is the usual website you go to in search of directions to any location you choose.
On the website, you will find the search bar at the top of the left side of the screen. Type in your address, and if it is a famous location simply write the name. Since Google Maps is a search engine, a simple search of your address will bring up your exact location.
STEP 2
The map will display details of your location including the full address and directions. Other information like your business number and website will appear (if available).
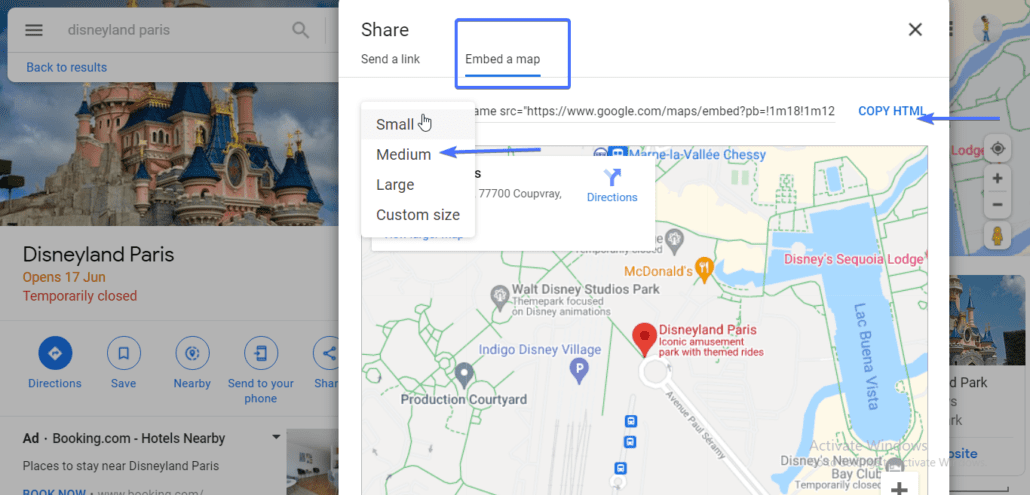
Click the Share icon and a page will pop up. Select Embed a map and you will see the map as it would be displayed. This sample map is set to medium size by default but you can change it to any size you want. Above this map, you will find the ‘HTML iframe link’ which you will copy by clicking COPY HTML.
STEP 3
Now, go to your WordPress site and login to your admin dashboard. You can add this link to any project, including posts, pages, or templates.
If you are adding this to a page, go to Pages > All Pages and locate the page you want to work on. When found, click on it to open the page editor.
In the Gutenberg editor, click the add block (plus) icon. Next, enter ‘html’ in the search area and click on the html block when it appears.
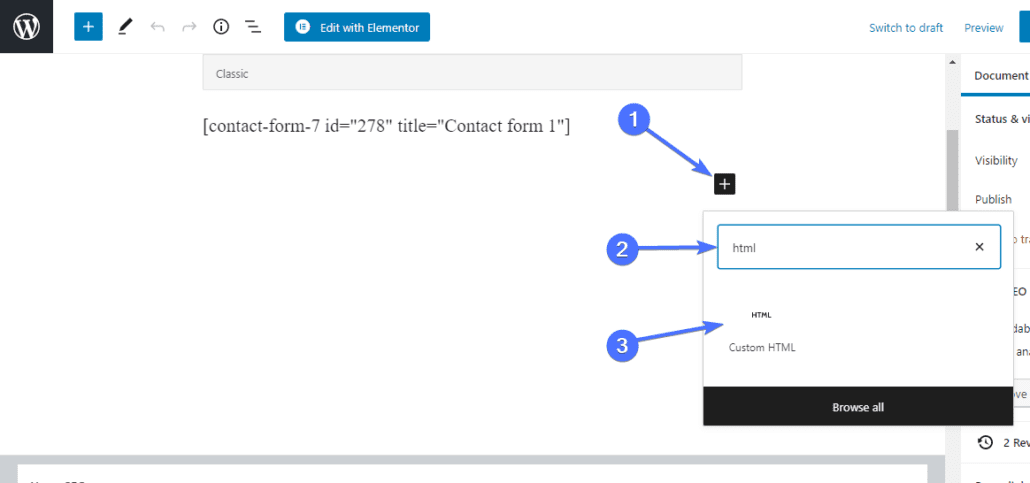
Next, paste the map code you copied earlier in the html editor. To see how your map will appear, click preview on the html block and wait a few seconds for the map to be loaded.
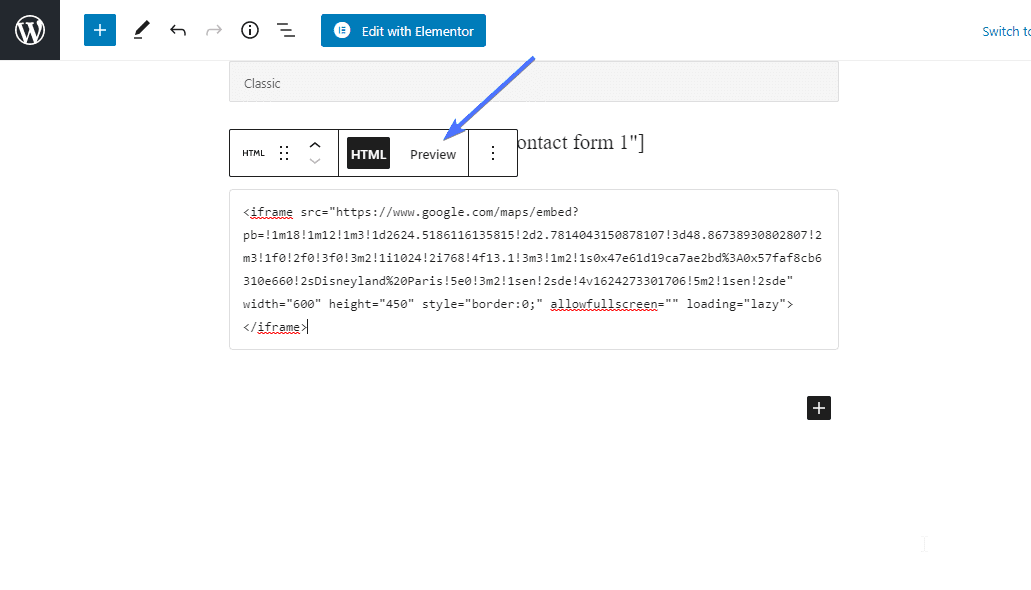
After previewing, click Update to save your changes. Voila, you have implemented maps on your page.
If you are using the classic editor, simply open the page for editing, switch to the ‘Text’ editor, and paste in the code.
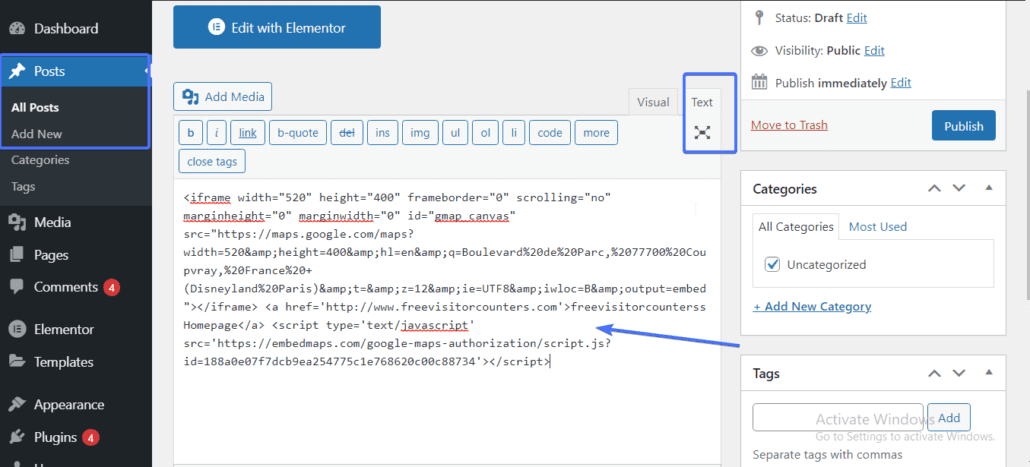
To see a preview of the map, simply switch to the ‘Visual’ editor.
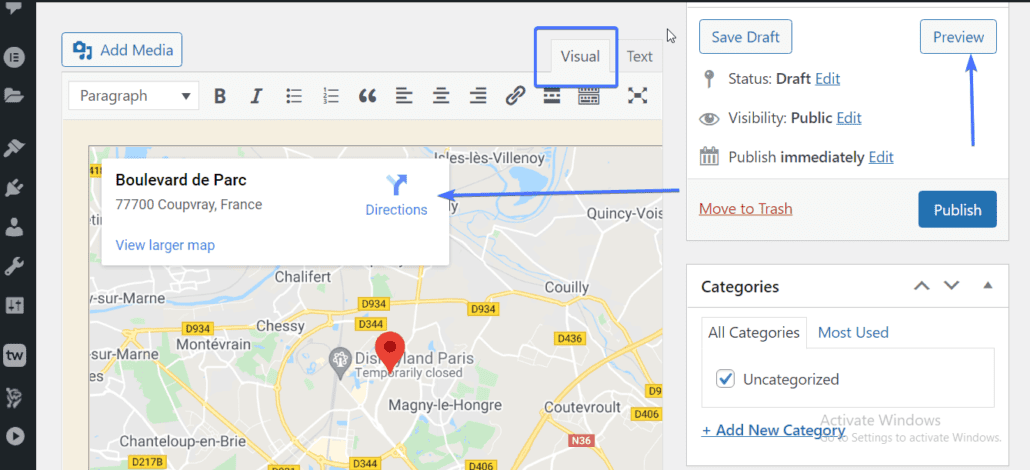
If you want to preview the entire page, use the Preview button on the right.
Of course, hit Publish or Update to save your changes. And with that, you have implemented a responsive Google Map on your page. This means that the map would appear great both on larger PC screens and smaller mobile phones too.
Install Google Maps Plugins
There are many map plugins for WordPress sites. These plugins make it easy to apply this feature and they provide more options too.
If you want to add multiple map markers, you have to use Google Maps plugins. Alternate manual methods do not have this feature while some are a bit too tedious. Also, personalizing your Google Map is easy with plugins. They let you change borders, color, and more.
Plugins enable you to create responsive maps compatible with any mobile device.
Some of the best Google Maps plugins for WordPress are WP Google Maps, MapPress, Maps Marker Pro, among others. You will find WordPress interactive map plugins among these. For this article, WP Google Maps is the Google map plugin we used.
Step One
Start by installing the map plugin. In your WordPress dashboard, go to Plugins > Add New and search for ‘WP Google Maps’. Click on Install Now, then Activate.

After the successful activation of the WP Google Maps plugin, you will be taken to the maps intro page. Alternatively, you can access the plugin’s settings anytime using the “Maps” icon on the left menu.
Step Two
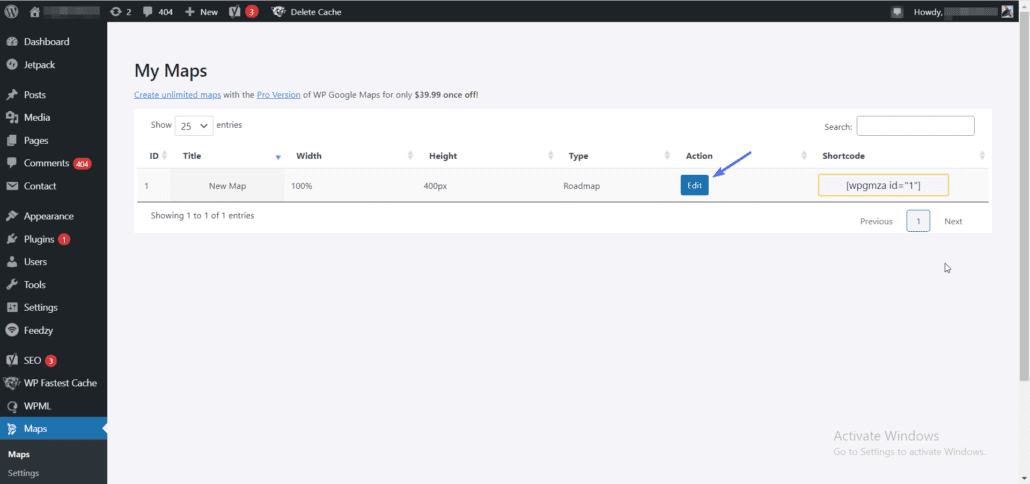
On the welcome page, you will see some tutorials on how to use the plugin. Simply click the Skip intro and create a map button.
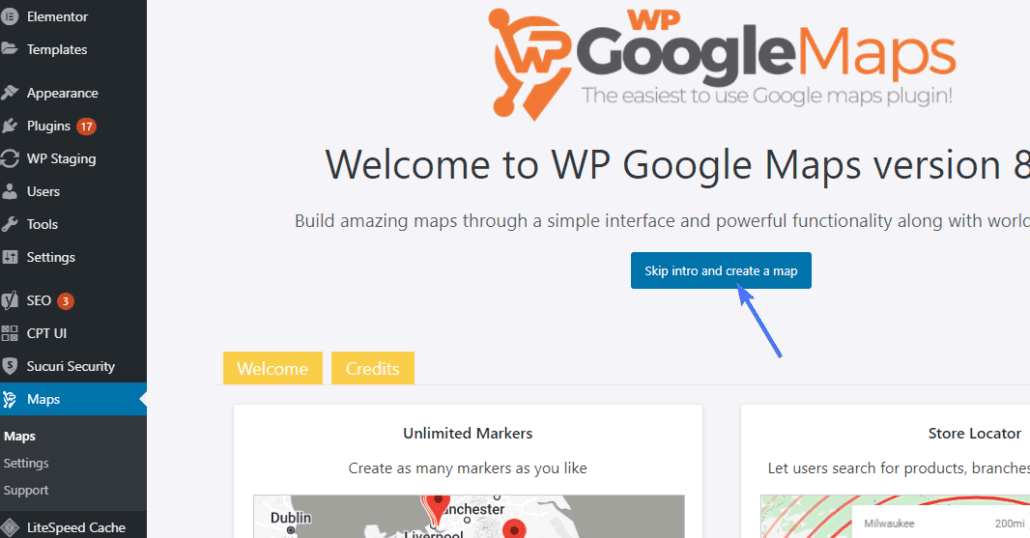
Upon clicking the button, the plugin will generate a map that is specific to your site. To customize your new map, click on the Edit button.
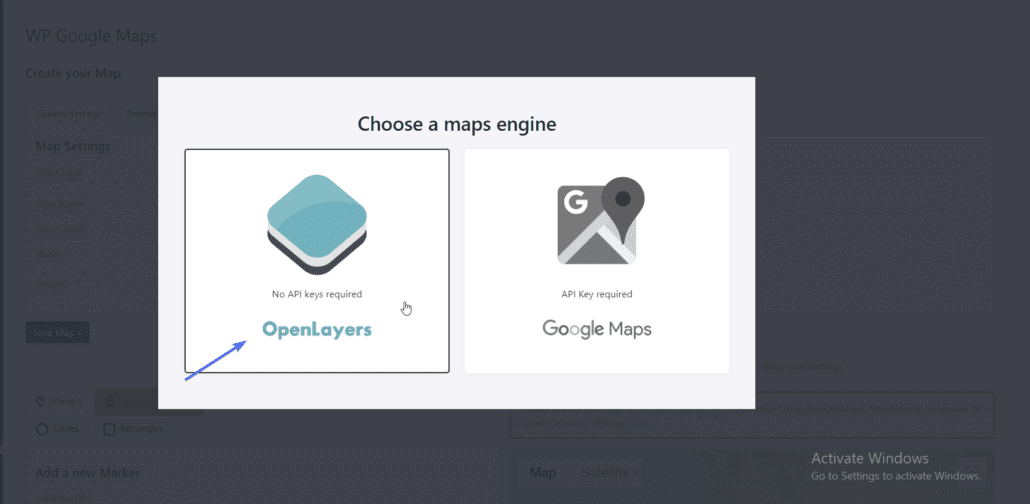
The plugin will prompt you to select the map API you intend to use. You can choose between OpenLayers or Google Maps API.
Both options work well, however, you need to get an API key before you can use Google Maps API.
You can simply use the OpenLayers option if you don’t want to go through additional processes.
But if you intend to use the Google Maps option, you can check here to learn how to get an API key.
Step Three
After selecting your Map API, you will be redirected to the maps settings page.
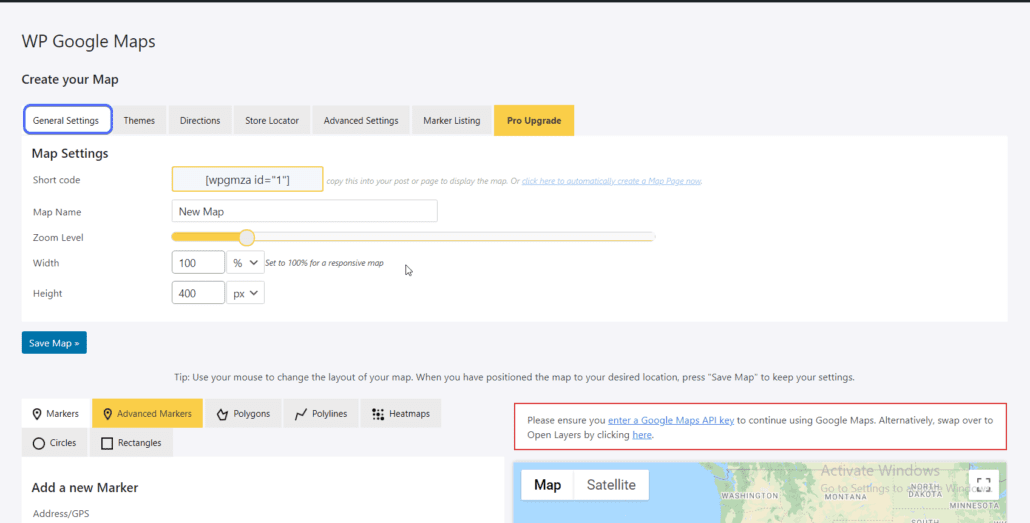
Under General Settings, you will be presented with options to customize the look and feel of your map. The “Map Settings” section lets you add a name for the map, increase the zoom level or set the width and height parameters.
Scrolling down, on the right, you will see a sample of how your map looks. While on the left, you can add a marker that will point to a particular region. A marker is simply an indicator that highlights a particular location on the map.
To add a marker, enter the location you wish to mark in the Address/GPS textbox and then click on the Add Marker button.
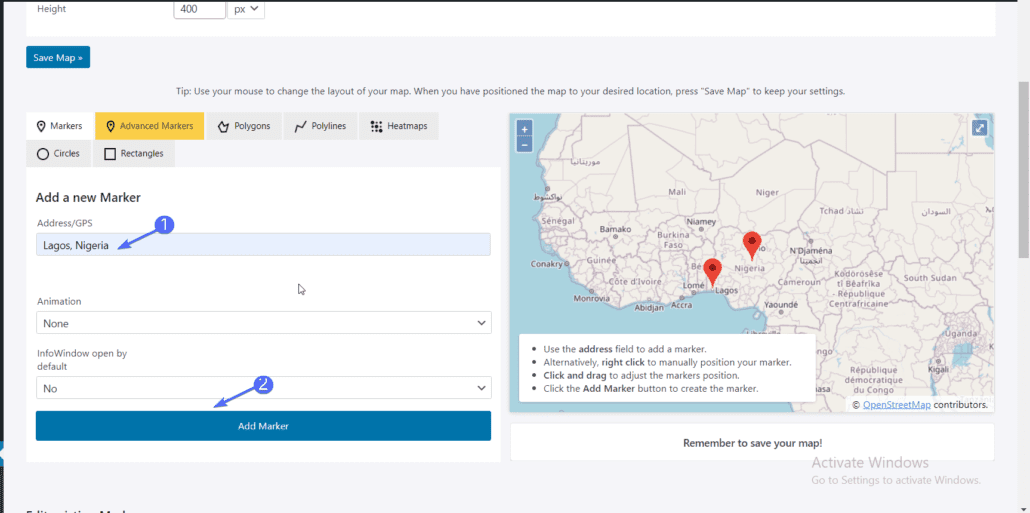
The plugin lets you add an unlimited number of markers. To view all your markers, scroll to the “Edit Existing Markers” section.
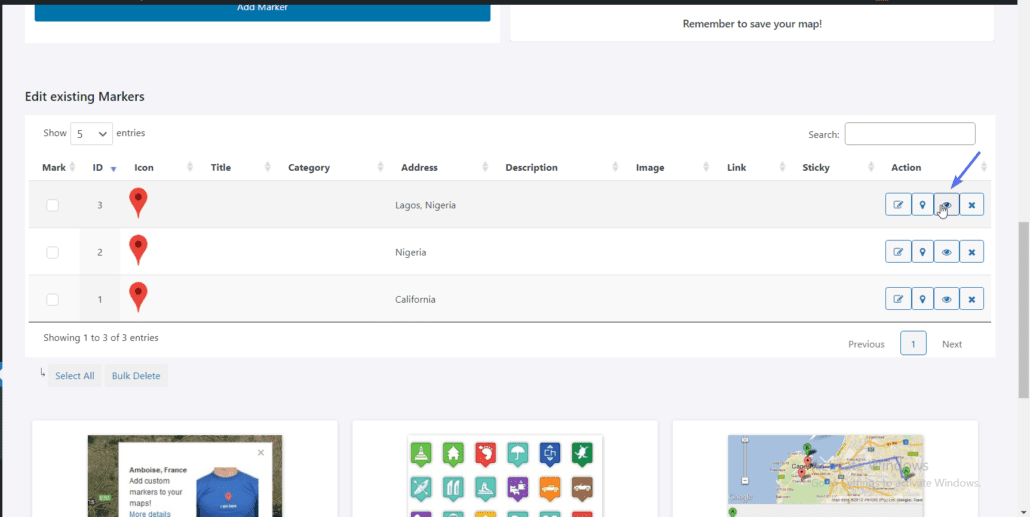
Here, you can view, edit or remove markers from your map. To view a particular marker on your map, click on the Eye icon as seen in the image above.
After customizing your map, scroll up to the “Map Settings” section and click on the Save Map button.
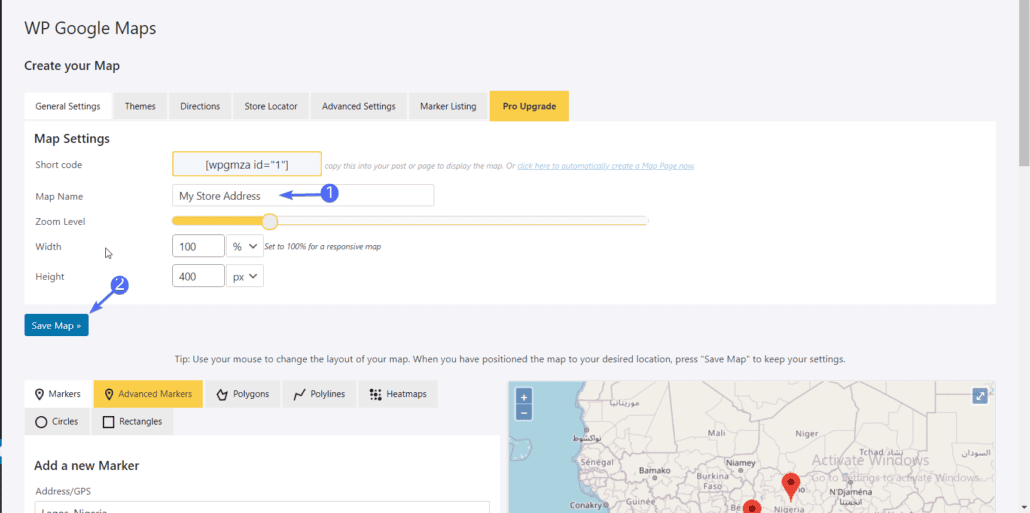
Step Four
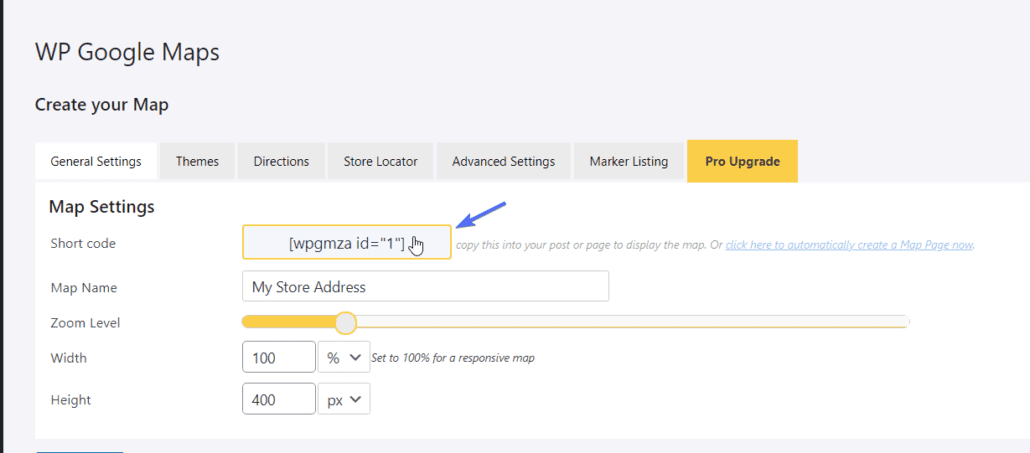
To use this map on your site, simply copy the shortcode created by the plugin and paste it into the post or page you wish to add a map.
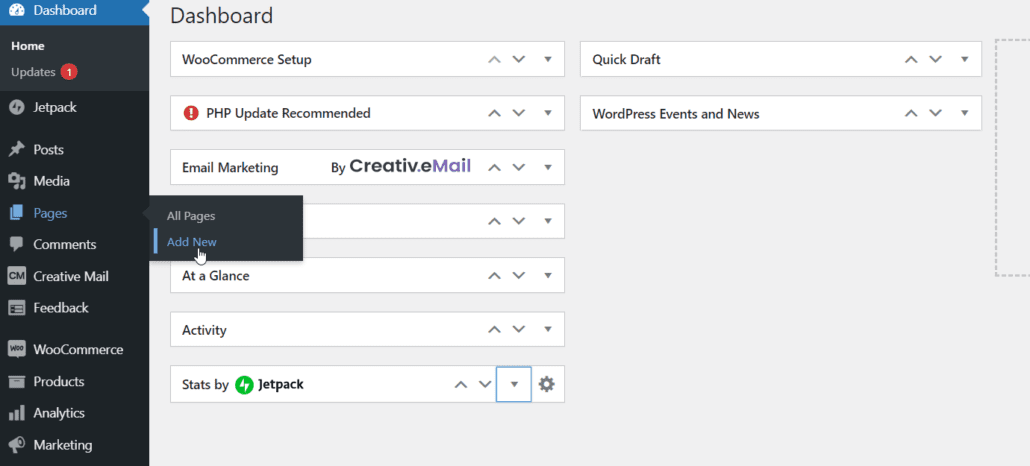
Select the page or post to edit from your WordPress dashboard. Alternatively, you can go to Pages >> Add New if you wish to display the map on a new page.
On the page editor, click on the Add Block (plus) icon and then type “shortcode” on the search box.
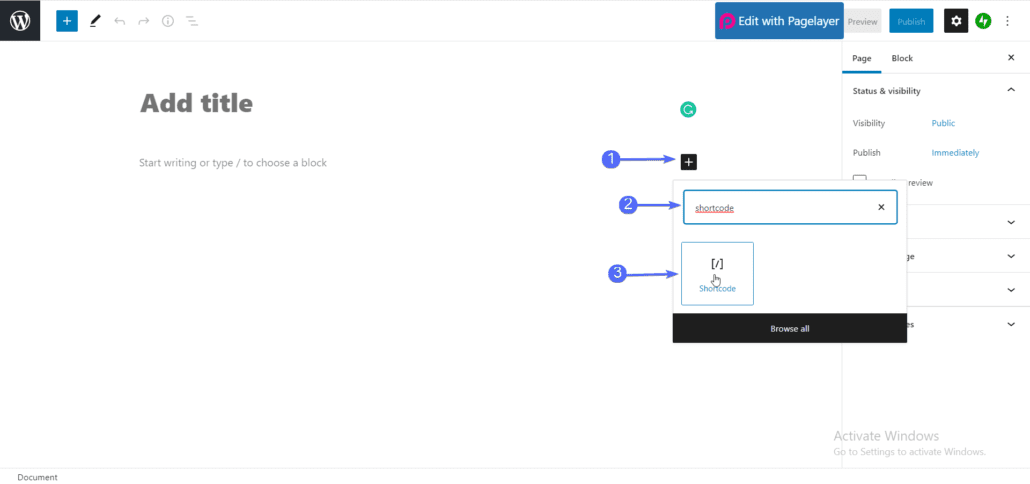
Next, select the shortcode icon and then paste the code from WP Google Maps plugin.
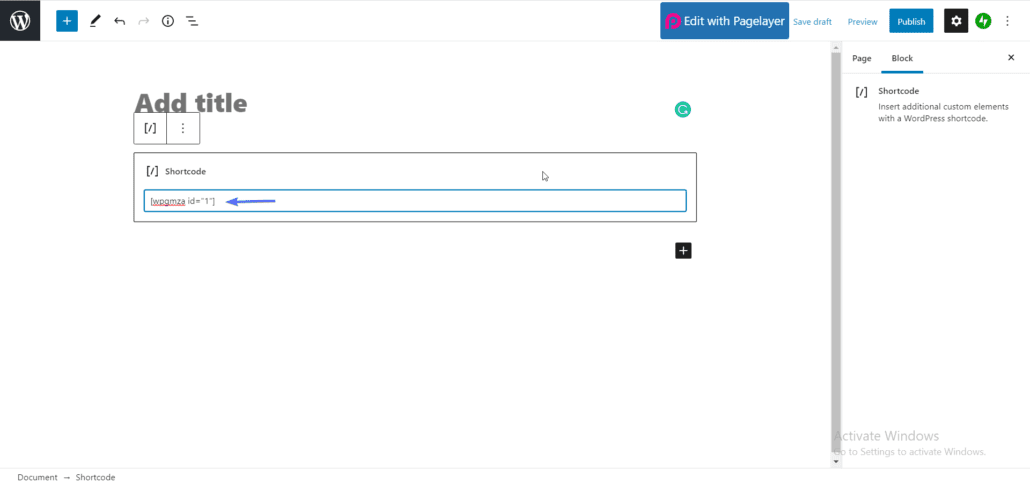
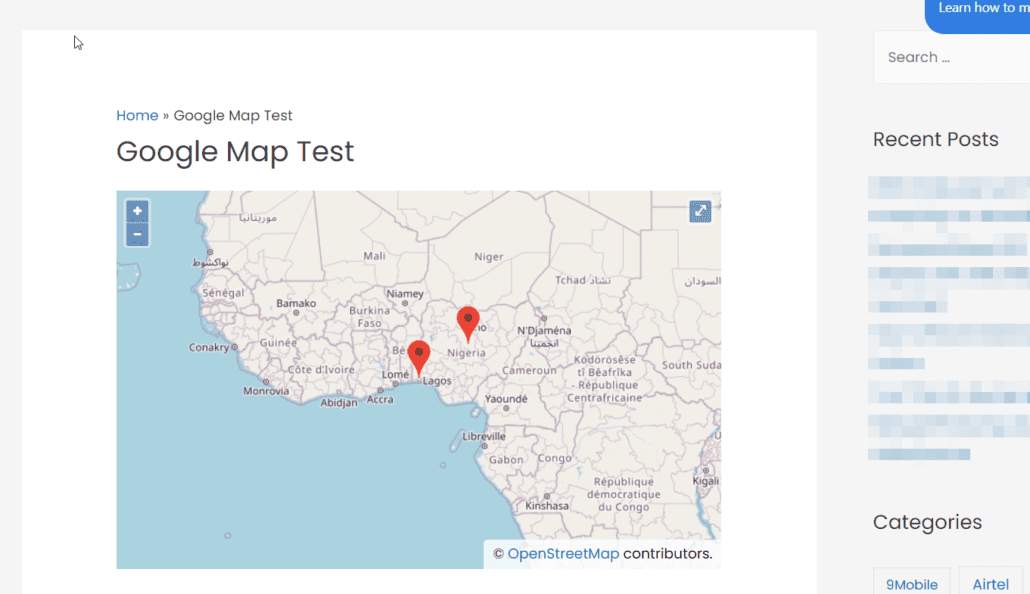
Once done, hit the Publish button. Now, preview the page to see your map in action.
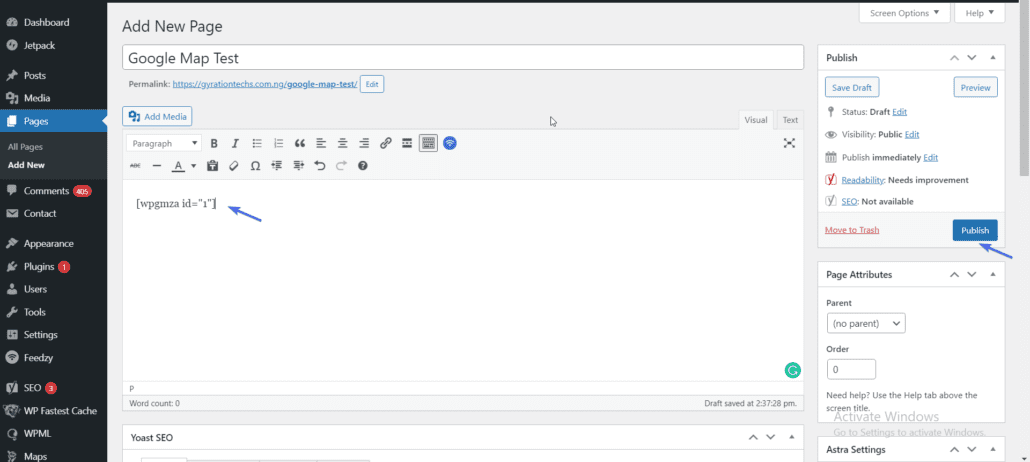
Side Note: If you are using the classic editor, simply switch to the text view and paste the shortcode in the content area. Of course, hit Publish or Update to save your changes.
Add Google Maps Widgets
Widgets help arrange your site’s front-end with a series of flexible small sections you can add and move around on the page. Unlike manually embedding Google Maps to your site, you can create multiple locations on a map with widgets.
There are several map widget plugins, but in this guide, we will be using Maps Widget for Google Maps plugin.
To start, you need to install and activate the Maps Widget for Google Maps plugin from your WordPress dashboard. Please check this guide to learn how to install WordPress plugins.
Note that you cannot use this widget without an API Key. Fortunately, you can easily generate a free API key from Google Cloud Console. Learn how to do so here.
After getting the API Key, head back to your WordPress dashboard and then go to Settings >> Maps Widget for Google Maps.
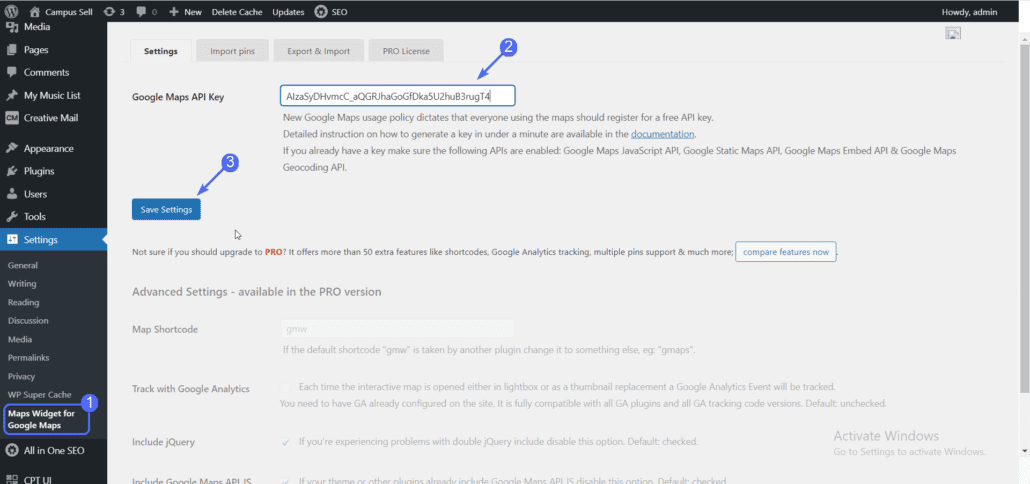
Under Settings, paste the API Key value into the Google Maps API Key textbox. Lastly, hit the Save Settings button.
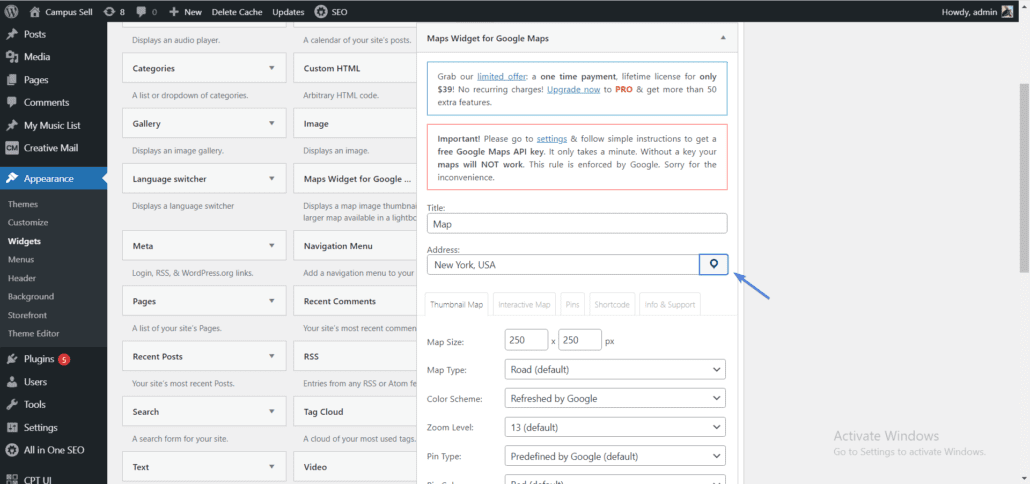
To use this plugin, go to Appearance >> Widgets and then locate the “Maps Widget for Google Maps” item.
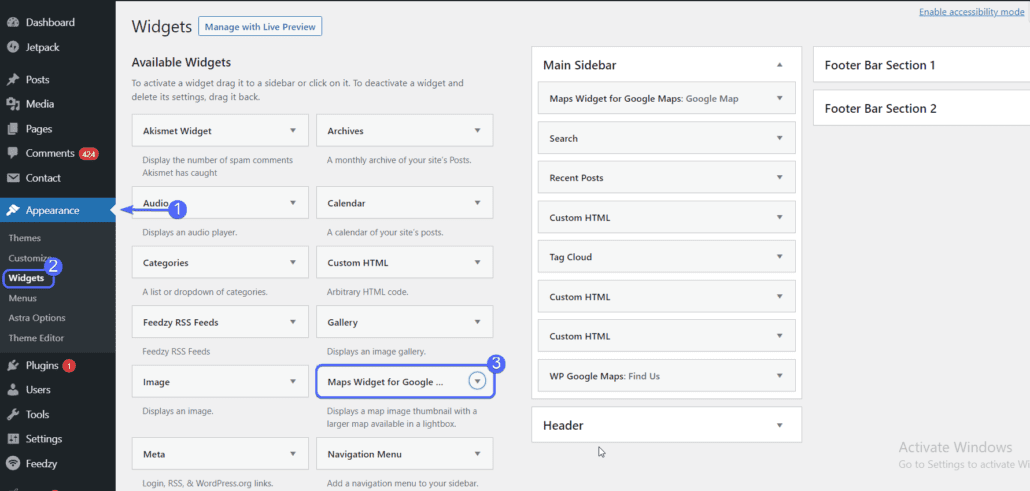
Next, click on the arrow icon and select the area you wish to add this widget to your website.
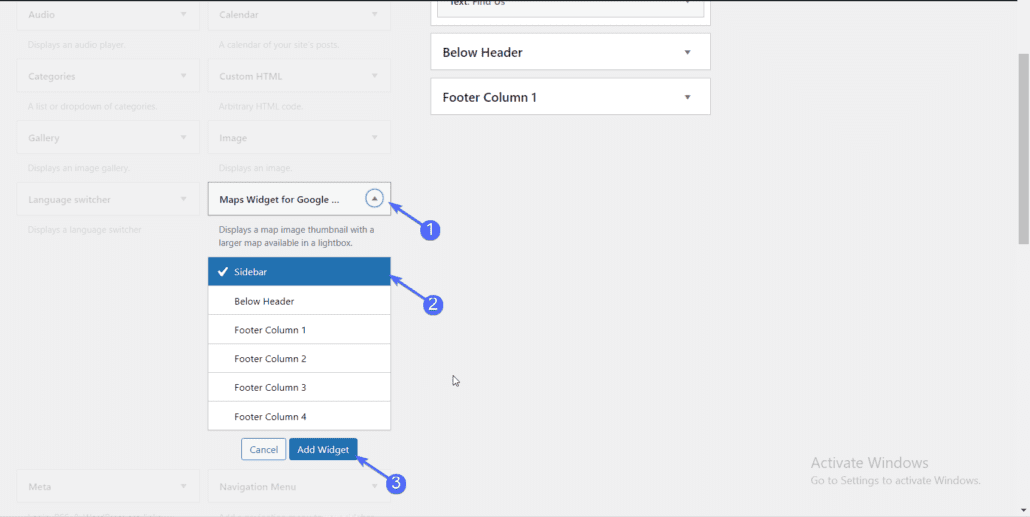
Once done, click on the Add Widget button. Alternatively, you can simply drag the widget to any section on your WordPress site.
This plugin lets you choose a location to mark on the map. It also allows you to customize the size and appearance of your map.
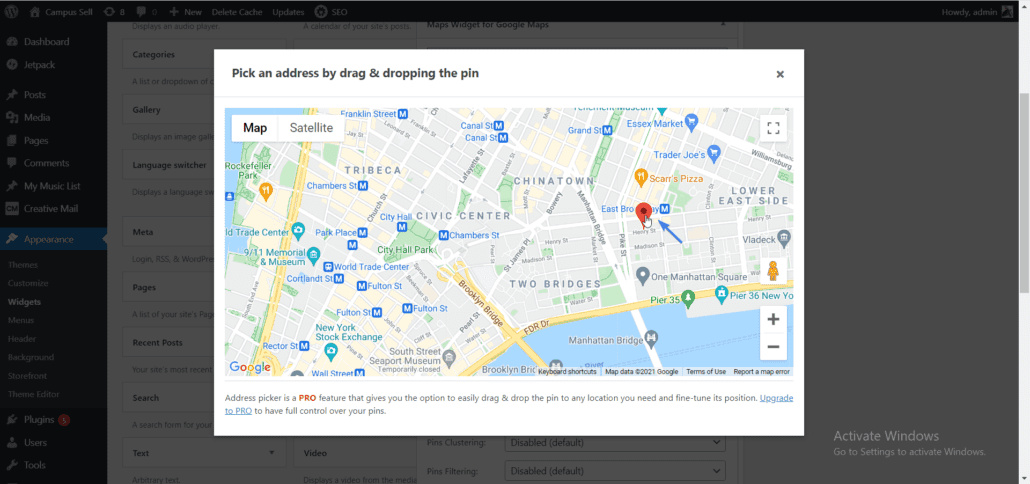
To change the address to mark, click on the location icon.
Next, drag the pointer to any location of your choice.
You may leave other settings as is because the defaults work just fine.
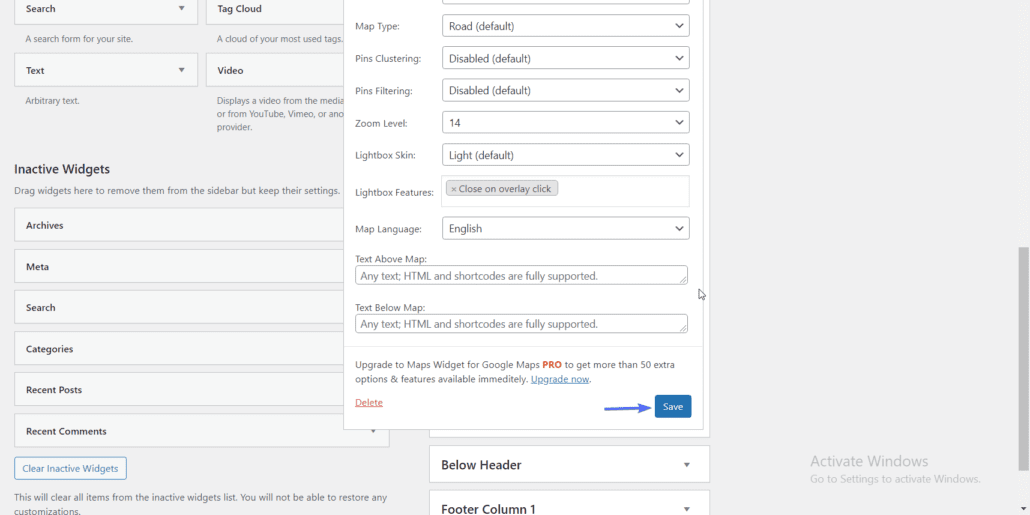
After customizing the widget, click on the Save button.
Use Map-Generating Sites
Another super direct way to create Google Maps for WordPress sites is through maps-generating websites. These websites function just like any typical widget you download and install on a WordPress site.
However, you don’t have to download them, you only have to use them to create your map, and embed this on your site. These sites generate the code you will copy and paste on your website.
We will be using Maps-generator to perform this simple task. This is a straightforward process that will only take about a minute.
Maps-generator
Open the maps-generator website on your browser. You will find an input section on the left. This is where you will put down information about your business including the address and the size of the map.
The title is the name of your business. If it is a popular place, like Disneyland Paris, simply entering the title will load the location on the map. If that is not the case, then enter the full address in the ‘Street’ input box. The map on the right should load this location after a few seconds.
You usually don’t need to add Zip and City details. Below these options, drag the height and width options to adjust the dimensions as you please.

When you are satisfied with how it looks, click the Get map widget code button.

Now head to your WordPress dashboard and open the page or post in which you want to display this map. The process to add the map is the same as the manual method (1st method) in this guide.
Simply click the plus (add block) icon, search for html, and click the html block when it appears.
In the html editor section, paste in the code. You can click Preview to see how it looks.

Satisfied? Simply hit Update or Publish and you’re done.
If you’re using classic editor, switch to text mode and paste the code where you want it to appear. Then hit Update or Publish to save your changes.
Conclusion – WordPress Google Maps
Maps have been used throughout history for getting directions to a defined destination. Google maps follow the same concept, albeit with more benefits for you and your business. Thus, when you add a map to your website, it is like holding up a sign that unmistakably directs your target customer to your business location.
In this guide, we have shown you how to add a map to your site by;
- Manually embedding a Google map,
- Installing a Google maps plugin,
- Adding Google maps widgets or,
- Creating Google Maps from map-generating websites
I hope we have been able to implement this feature together. If you have more questions or comments about WordPress Google Maps, let us know in the section below. And if you need help with anything else on WordPress, please check out these helpful solutions.


