WordPress REST API – A Beginners Guide
APIs are changing the way we interact with data from any website. Although the WordPress rest API has not gained so much popularity, it offers a lot of features under the hood which most plugin and theme developers utilize on their codebase.
The WordPress API provides an interface for programmers to access a WordPress site from outside the WP installation.
If you are looking for a beginner-friendly guide to help you get started using the WordPress REST API, then you’re in the right place. In this guide, we will explain the WordPress REST API and how to use it?
Although understanding REST API can be a bit complex, especially if you are not a developer. We will make this guide as easy to understand as possible, so anyone who is a bit tech-savvy can follow along.
Content:
- What is an API?
- Understanding what makes an API RESTful.
- Introduction to the WordPress API?
- Getting Started with WordPress API
- Conclusion
What is an API?
An Application Programming Interface popularly referred to as an API is an interface that allows two applications (client and server) to communicate with each other.
It usually provides an interface to add already built features to your application. For example, if you want to display google maps on your website, rather than coding the map from scratch, the google map API presents an already made template you can integrate on your website.
What Makes an API RESTful?
As you know, the WordPress API is called a REST API. But what exactly does that mean, and why is it important?
REST (Representational State Transfer) is one of the popular ways of creating an API. It defines a set of design rules that guide how applications communicate with each other. For an API to be RESTful, it has to conform to the five standards listed below;
- Client-Server Architecture: The server and the client should be developed separately, this way, none is dependent on the other and can be used separately on other applications.
- Statelessness: The server should only retrieve data from an API call without modifying the state of the database. This means each request from the client must contain all data needed to be understood by the server, and the server shouldn’t have to remember previous requests.
- Cacheability: A REST API Should be able to store site data temporarily on the browser to quickly load results when a call is made with poor network connections.
- Layered Structure: The API should be built such that each service can be used separately without running the entire application.
- Uniform Interface: The individual parts of a REST API needs to function using the same language and interface. The interface should be independent of the client or server and should be able to evolve.
Introduction to the WordPress REST API?
The WordPress REST API has been in development over the years and was available as a WordPress API plugin until WordPress 4.7 in 2016 when it became officially available as a service.
WordPress API follows the REST architecture. This means it follows the optimal design rules listed above.
The WordPress REST API provides an easy to use interface to interact with WordPress sites from outside. It extends the possibilities of WordPress sites beyond the WordPress core installation.
On its own, WordPress works great as a CMS. With it, you can create and publish content with ease. The REST API however turns WordPress into an application system.
This means external applications can interface directly with the WordPress database and introduce a great range of features and functions. For example, you can create a mobile app that interacts with your site.
In addition, the data from the API can interact with single-page applications (SPAs). A single page application is one that uses a single page to display any information you need. Based on your interaction with the page, parts are changed to present what you want to see, but the overall page remains the same.
This aspect of the rest API is important because single-page applications are quite popular. Gmail, Google Docs, Netflix, and Paypal are some common examples.
WordPress JSON REST API
The REST API uses JSON (JavaScript Object Notation) exclusively as the format for transmitting information between WordPress and external systems. Error responses are served in JSON format as well.
JavaScript Object Notation is a lightweight, easy to use format for storing and transferring data. It is mostly used when there is a transfer of data from a server to a client application.
For a programmer who wishes to use the WordPress API, this means you have to sharpen your JavaScript coding skills. Quite interestingly, this also means that you can develop WordPress websites even if you are not skilled in the PHP coding language. You can simply make calls to the API using JavaScript.
Why Learn WordPress API?
Earlier, we mentioned that the way we share content on the web has evolved and the future is using lightweight REST APIs to power web applications because it is reusable and relatively fast.
In addition, the WordPress REST API is already being used to create themes and plugins available on the wordpress.org dashboard. To illustrate, below are some examples of services with the WordPress rest API integration.
1. WordPress.com
Owned by Automattic, the wordpress.com platform is a Single Page Application built using the WordPress API. It is an open-source project developed for WordPress users. Also, it provides an interface to interact with your blogs and also read other blogs.
2. Event Espresso
Event Espresso is a WordPress plugin used to add events and ticket sales capability to a WordPress powered site. It is built and maintained using the WordPress rest API.
3. Block Editor
The recent block editor that was integrated into newer versions of WordPress was built using the WordPress API. The block editor lets you arrange page contents in blocks and also lets you apply block specific styles to your contents.
Getting Started with WordPress REST API
To fully understand this WordPress REST API tutorial, you need to become familiar with the basic concepts of the WordPress API.
Fundamental Concepts (Base URL, Routes and Endpoints)
An endpoint is a function you can trigger through the API. For example “update a page” or “get post content” are common endpoints you would encounter.
A route is the name you use to access the endpoint in the URL. For example, here’s a sample API url ‘http://yourdomain.com/wp-json/wp/v2/posts/789’. The section ‘http://yourdomain.com/wp-json/’ is the base url for accessing your WP API. The section ‘wp/v2/posts/789’ is the route used to access functions(endpoints) to be performed on post 789.
For this url, you may want to update the post, delete the post, or simply view the post. The corresponding endpoints for each of these actions are PUT(to update), DELETE, and GET(to view post).
We will see how to combine endpoints and routes in the sections below.
Basic HTTP Methods
The endpoints we saw above (PUT, DELETE, and GET) are HTTP methods.
Using these methods, the WordPress API is capable of performing CRUD (create, read, update, delete) operations like most web apps. Below are the commonly used operations on an API.
GET: The default operation of every web app. When we type a web address, a GET request is sent to the server to retrieve the web page.
POST: When data is written to the database such as adding a new post, new page, or creating a new user on your site. However, such operations require authentication to send data to the database.
PUT: An HTTP method used to update/edit sites content on the database such as updating a user profile or changing post status. Similarly, you need to be authenticated to update a post or page content.
DELETE: As the name implies, this method is used to delete files from the database. However, permanently deleting a post requires an extra parameter on the API endpoint.
Writing an API Call
The WordPress Rest API uses a base route (/wp-json/) from which all other endpoints can be reached and processed. You can test the endpoint below on your website or any WordPress site.
| http://example.com/wp-json |
Replace example.com with the domain of your website. It will present your entire site in JSON format.
Meanwhile, to edit your site content using the rest API, you need ssh access to the server. For this example, we will be using PuTTY, a Command Line Interface (CLI) to access the WordPress Rest API via SSH access.
If you are on a Windows Operating System, then download PuTTY from their official website.
Firstly, install PuTTY on your machine, then open the application.
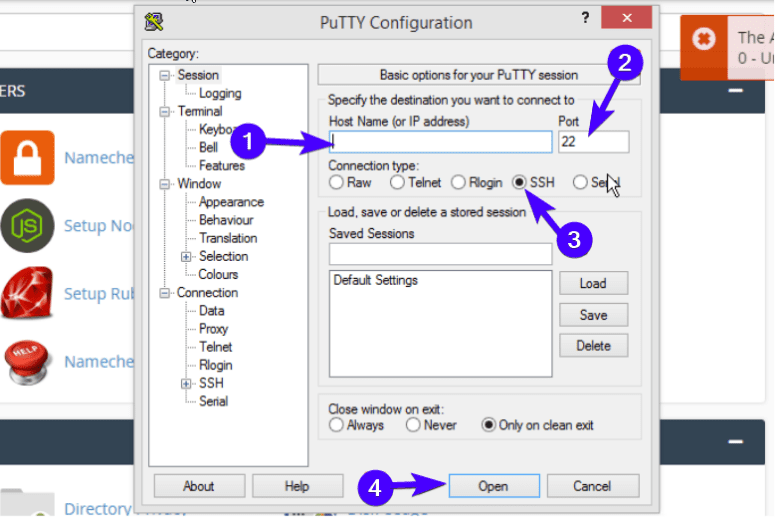
Next enter your IP address (or domain name) and your SSH port number in the boxes as seen in the image below.
After that, set the connection type to SSH then click on Open to continue. A new terminal window will popup.
Here, enter your Host username and password details.
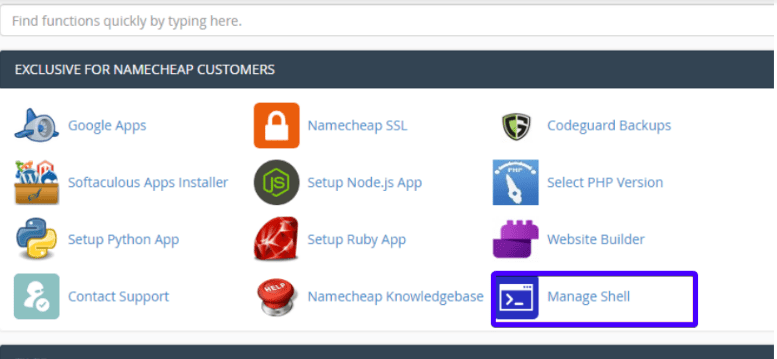
Side Note: If you cannot find some of the details for SSH access, you may contact your WordPress hosting service for them. In most cases, however, you should be able to get them yourself from your control panel. In cPanel, simply click the Manage Shell item.
After successfully connecting, you can perform ssh commands through the PuTTY terminal window.
Meanwhile, if you are on a Linux and OSX operating system, then you can simply connect via ssh to your host server using the steps below.
Firstly, Open terminal, then paste the code below.
| ssh USER@SERVER -pPORT |
Ensure you replace USER with your cPanel login username or VPS user
Then replace SERVER with your host IP address
Finally, replace the PORT with the ssh port number of your host server
Working With WordPress REST API on CLI
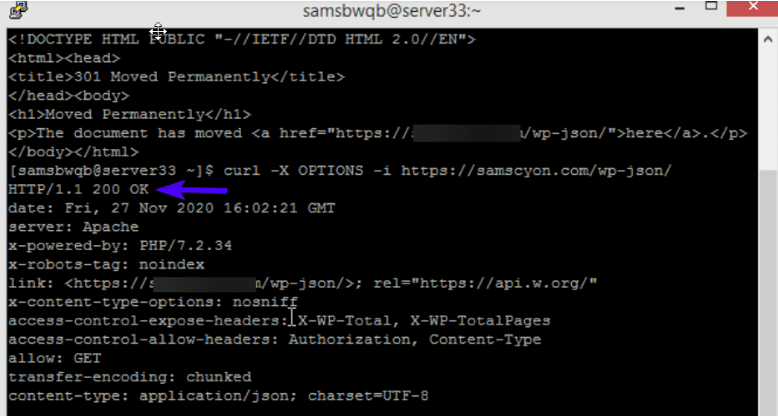
After you login into your site through SSH, you can test the connection using the cURL command below
| curl -X OPTIONS -i http://yourdomain.com/wp-json/ |
Ensure you replace yourdomain.com with your WordPress sites’ address. If you get a 200 OK response, then your WordPress site is working normally.
If you want to get a list of all the published posts on your website using the rest API, then use the following endpoint.
| curl -X GET -i http://yourdomain.com/wp-json/wp/v2/posts |
The command above returns a JSON response containing all posts data. However, to present this API response on a frontend application, you need some knowledge of JavaScript.
If you are a WordPress developer, we suggest you learn JavaScript because almost all APIs communicate using JavaScript.
You can filter the result using the post type or post attribute such as the status, date, or category. The code below shows a sample of post-filtering using categories.
| curl -X GET -i http://yourdomain.com/wp-json/wp/v2/posts?categories=wordpress |
Also, you can target a specific post using the post’s ID, which can be found from the list of posts results.
| curl -X GET -i http://yourdomain.com/wp-json/wp/v2/posts/postID |
Ensure you replace the postID with the ID of the post you are targeting.
Meanwhile, you can use the same endpoint to display a list of pages. Simply update the endpoint as follows
| curl -X GET -i http://yourdomain.com/wp-json/wp/v2/pages |
Similarly, you can add filters and target specific pages.
WordPress API Authentication
Although the WordPress API is a public REST API, some actions still require admin authentication to manipulate data and files.
For example, viewing all unpublished posts or updating user profile requires access to the WordPress admin dashboard. Since it is a REST API, authentication can get a bit tricky. However, there is a way around this barrier using a development only plugin.
If you wish to bypass this authentication, the easiest way is to use a WordPress plugin such as the Basic Auth plugin.
Firstly, download the plugin from the link above, then login to your WordPress admin dashboard and go to Plugins > Add New > Upload.
Upload the Basic Auth Plugin zip file you downloaded from the link above, then click on Install.
After that, activate the plugin on your site.
Afterward, you can access admin only files on CLI using the user argument.
| curl -X GET –user username:password -i http://yourdomain.com/wp-json/wp/v2/posts?status=draft |
Simply replace the username and password argument with the login credentials of your WordPress site.
Performing Basic CRUD Operations Using the REST API
Using the WordPress API, you can perform CRUD operations such as creating a new file, displaying files, updating a file with new changes, and deleting files.
REST APIs should be able to perform CRUD functions for it to be fully reusable across various platforms. Below are a few examples of the basic CRUD operations available via the WordPress API.
GET Operation
By default, every request that does not alter any file on the database is a GET operation. These include operations such as retrieving a list of published articles, pages, or comments.
| curl -X GET http://yoursite.com/wp-json/wp/v2/posts/?status=publish |
Note that if you omit the GET keyword in the command above, the REST API will still recognize the command as a GET request because that is the default HTTP method.
Meanwhile, you can also use an additional parameter to filter the latest post on your blog. The result from the query can be used to update or delete the post.
| curl -X GET http://yoursite.com/wp-json/wp/v2/posts/?per_page=1 |
POST Operation
The POST command creates new data on the database, such as creating a new post or page. To use the post command, simply type in or paste the command below on the CLI.
| curl -X POST –user username:password http://yoursite.com/wp-json/wp/v2/posts |
The command above creates a blank post on your WordPress site, but you can further target the post and use the PUT command to add content to the new post you created.
Similarly, you can use the POST argument to create a new page or add attachments to your website. Regardless of the post type, the base URL is always the same. If you want to add a new page, then modify the route as follows.
| curl -X POST –user username:password http://yoursite.com/wp-json/wp/v2/pages |
PUT Operation
The PUT command updates the content of your websites, such as your posts and pages. For instance, if you wish to change the status of a post on your website from draft to published using the REST API, then you can achieve this with the PUT command.
Firstly, modify the route to only retrieve a list of draft posts.
| curl -X POST –user username:password http://yoursite.com/wp-json/wp/v2/posts/?status=draft |
Afterward, you will need to take note of the post ID you wish to update from the list, then modify the route as follows.
| curl -X POST –user username:password http://yoursite.com/wp-json/wp/v2/posts/postID |
Ensure you replace the postID with the ID of the post you are targeting (e.g. 123). Then use the PUT command to edit the status as can be seen below;
| curl -X PUT –user username:password http://yoursite.com/wp-json/wp/v2/posts/postID -d {“status”: “publish”} |
Also, you can modify the post title and content as follows.
| curl -X PUT –user username:password http://yoursite.com/wp-json/wp/v2/posts/postID -d {“status”: “publish”, “title”: “Post Title”, “content”: “Some post content”} |
DELETE Operation
The DELETE operation like you would expect deletes a resource from the website. If you use the delete keyword, the post will be on the trash tab of your WordPress site.
| DELETE http://yoursite.com/wp-json/wp/v2/posts/postID |
However, if you want to delete the post permanently, then you can use the force filter as can be seen below.
| DELETE http://yoursite.com/wp-json/wp/v2/posts/567?force=true |
The command above deletes the resource from the website completely, so you should be careful when using the command because you cannot undo the deletion.
How to Disable the WordPress REST API
As we have said above, the WordPress API is a public REST API, which means anyone can access your site’s public data such as posts, pages, users, or comments, which can pose a security threat to your website.
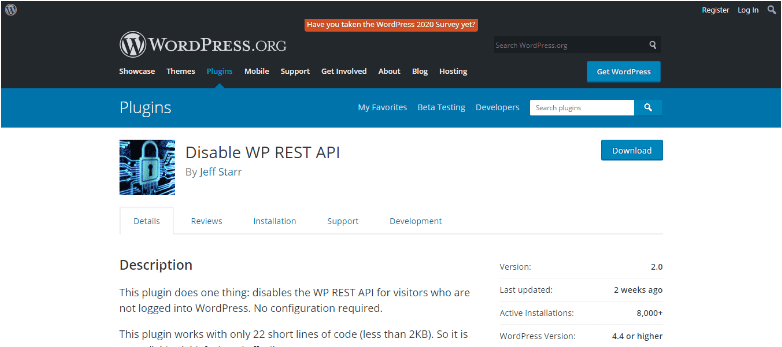
If you wish to disable the rest API on your site for unauthenticated users, you can use WordPress Rest API plugins such as the Disable WP REST API plugin. Simply, Install, and activate the plugin on your WordPress admin dashboard.
After that, it will block any request from any user without admin permissions, thereby keeping your content secure.
Conclusion – WordPress API
To sum up, the WordPress REST API is a very powerful tool for WordPress developers, it goes beyond retrieving posts and updating posts. Using the API, you can connect your website to mobile applications, SPAs, and other powerful systems.
This guide aims to give a beginner-friendly introduction to the WordPress API.
Many theme developers are already leveraging this technology to extend the power of their WordPress CMS. However, to fully understand the WordPress REST API, you need to be comfortable writing JavaScript code.
Finally, if you want to dive deep into the WordPress API, then a good resource to help you solidify your knowledge is the WP REST API Handbook.

