How To Setup PayPal on Woocommerce – Complete Guide
WooCommerce PayPal checkout makes it easy for you, as a business owner, to receive payments from your customers, regardless of their location. If you run an eCommerce store, you need a means of accepting money from customers. While there are many options you could choose from, Paypal is often one of the top choices. Why? Most online shoppers use PayPal and have become used to the PayPal payment process. On your end, receiving payments through this platform is a seamless and secure process. In this article, you will learn about the Woocommerce PayPal setup. But first, we will need to create a PayPal sandbox.
Content:
- How to Create PayPal Sandbox Account
- Installing Paypal for WooCommerce
- Set Up PayPal for WooCommerce
- Common Issues and Troubleshooting
- PayPal Plugins and Extensions for WooCommerce
- FAQs
How to create a PayPal Sandbox Account
Before deploying a PayPal payment gateway to your Woocommerce site, it’s needful to first test it to be sure everything works fine. Thankfully PayPal has an option for this: PayPal sandbox. So, in this tutorial, we shall create a sandbox account. We’ll be using it along the way.
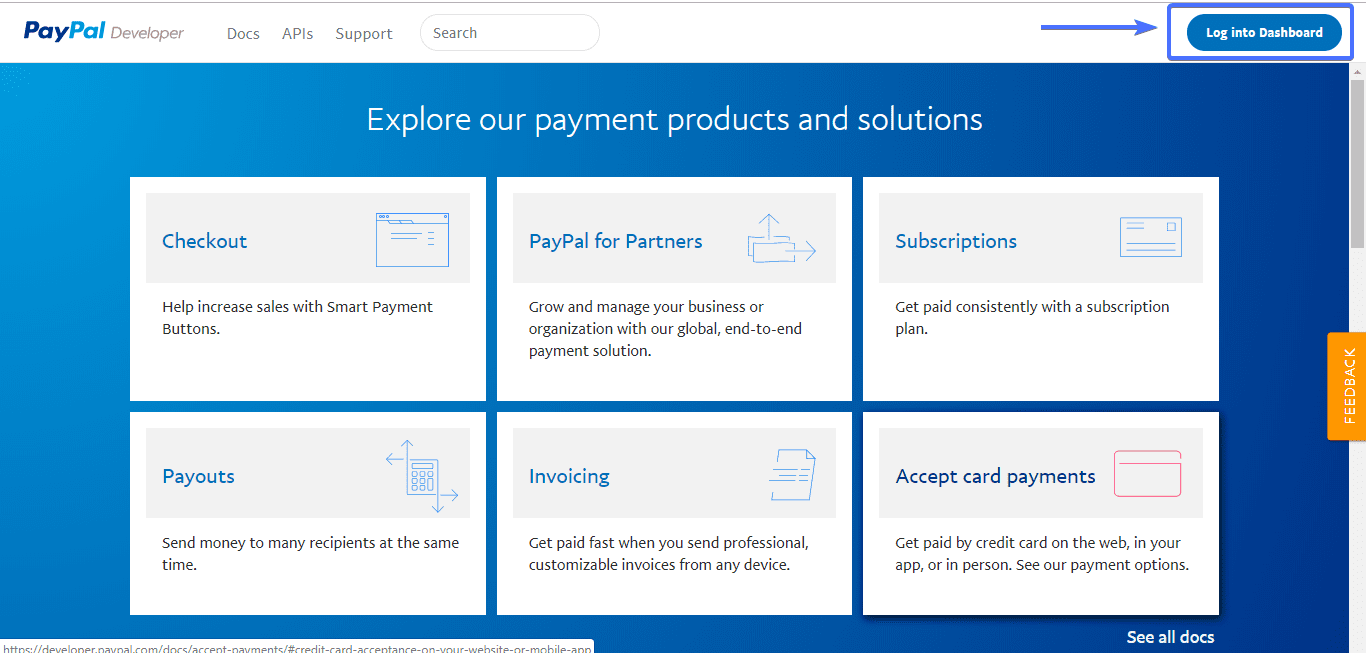
Head over to PayPal’s developer section. On the far right corner, click Log into Dashboard
Upon click, you would be prompted to sign in (if you already have an account) or sign up. In this instance, we will be signing up.
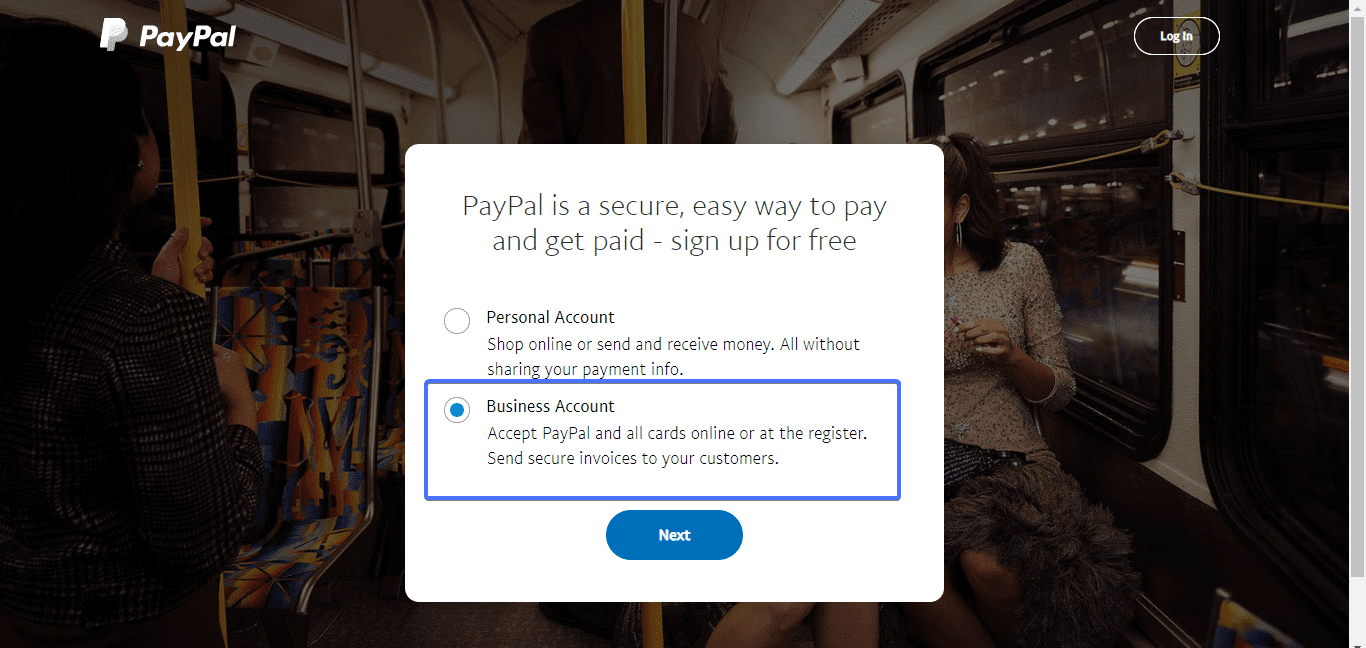
Next, select an account category: Personal or Business. Personal PayPal accounts are for those who just want to send and receive money. Since you would be doing business transactions, choose a business account.
Put in your email (personal or business email), set a password, and provide a descrip/tion of your business.
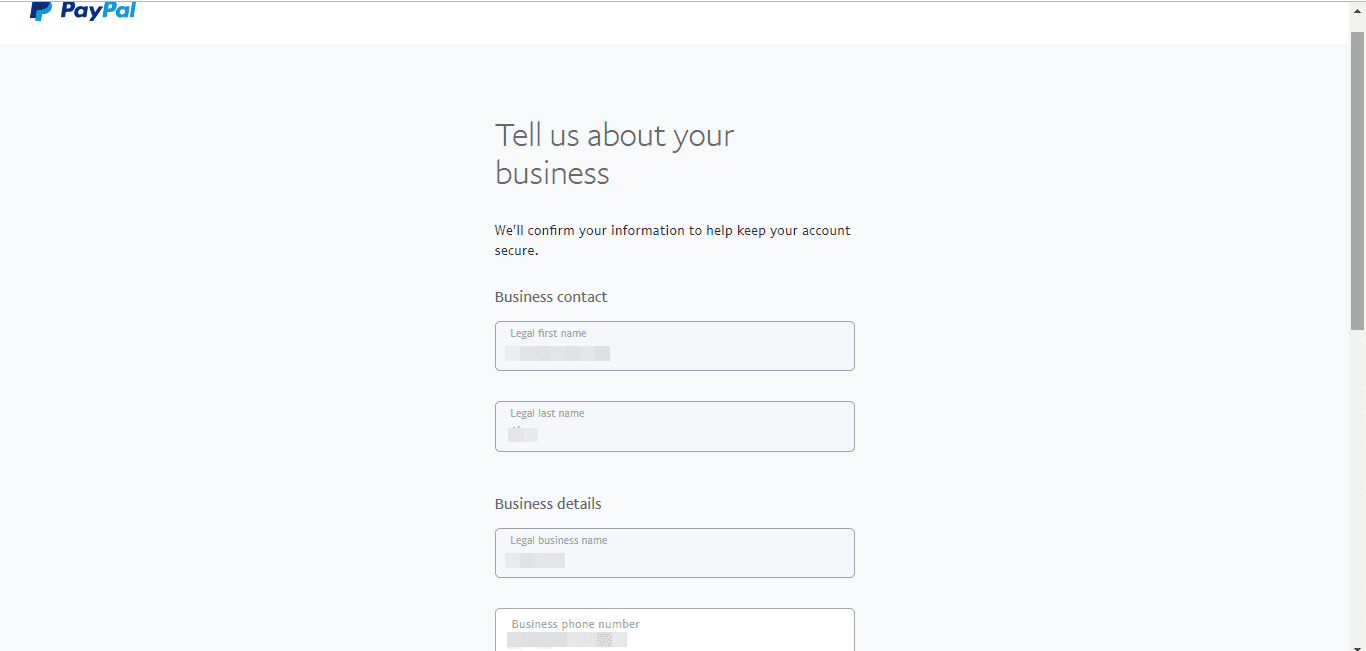
Once you are done, submit your entry. The next screen you would see is this: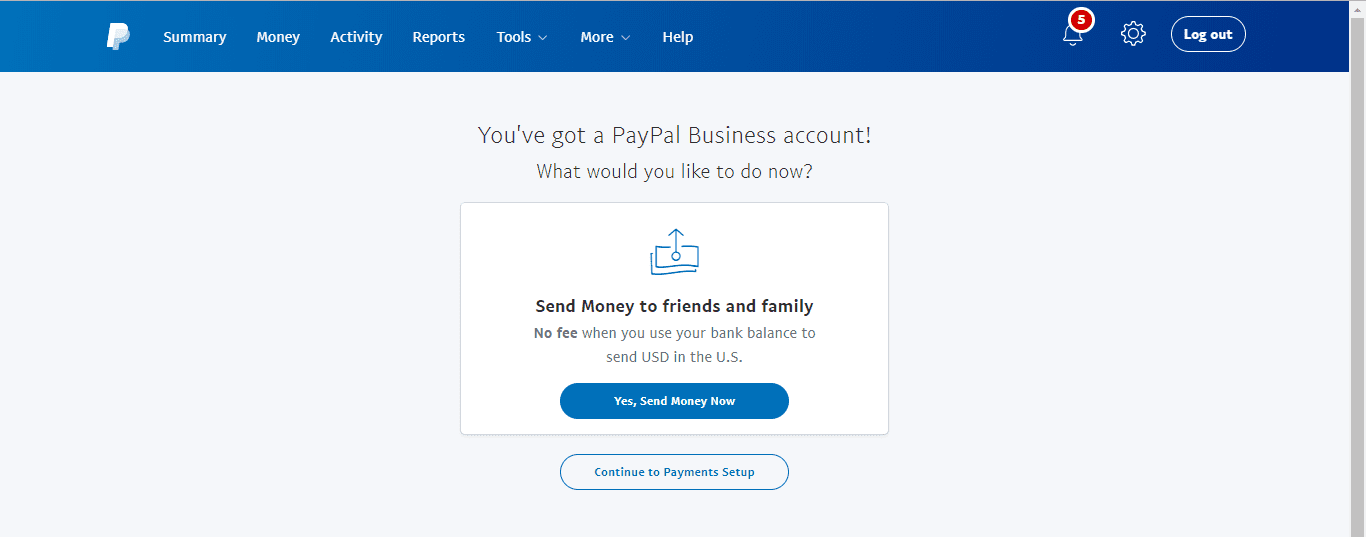
To link PayPal to your bank account, get a debit card for your business, etc. click Continue to Payment Setup. You can do that later, but for now, let’s integrate PayPal with WooCommerce.
Installing PayPal for WooCommerce
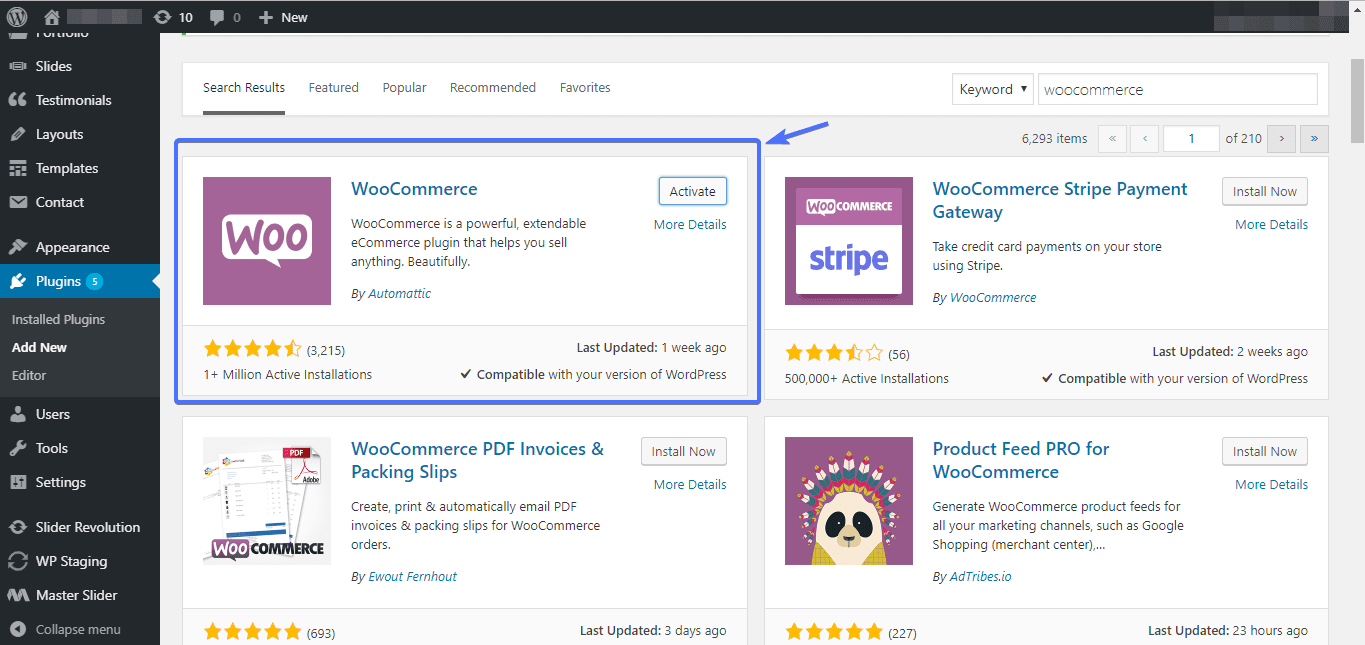
If you don’t have WooCommerce up and running on your WordPress website, go ahead and install WooCommerce and activate it now. This is done in the same way as every other plugin is installed and activated.
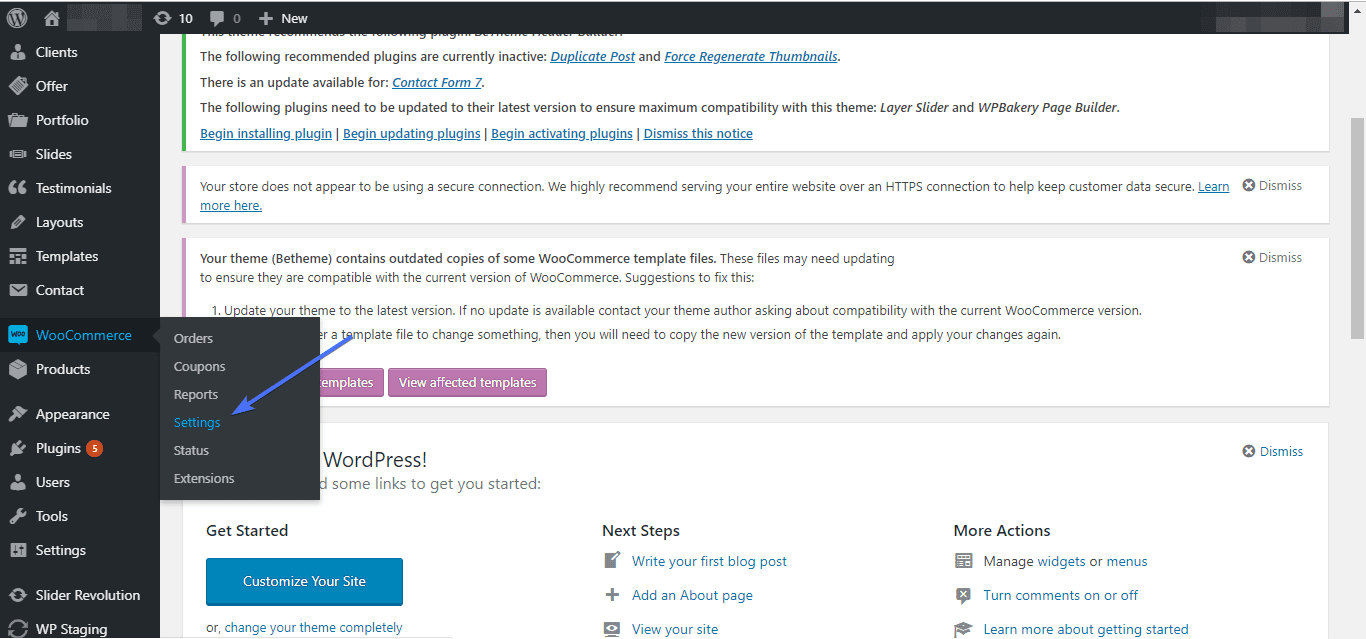
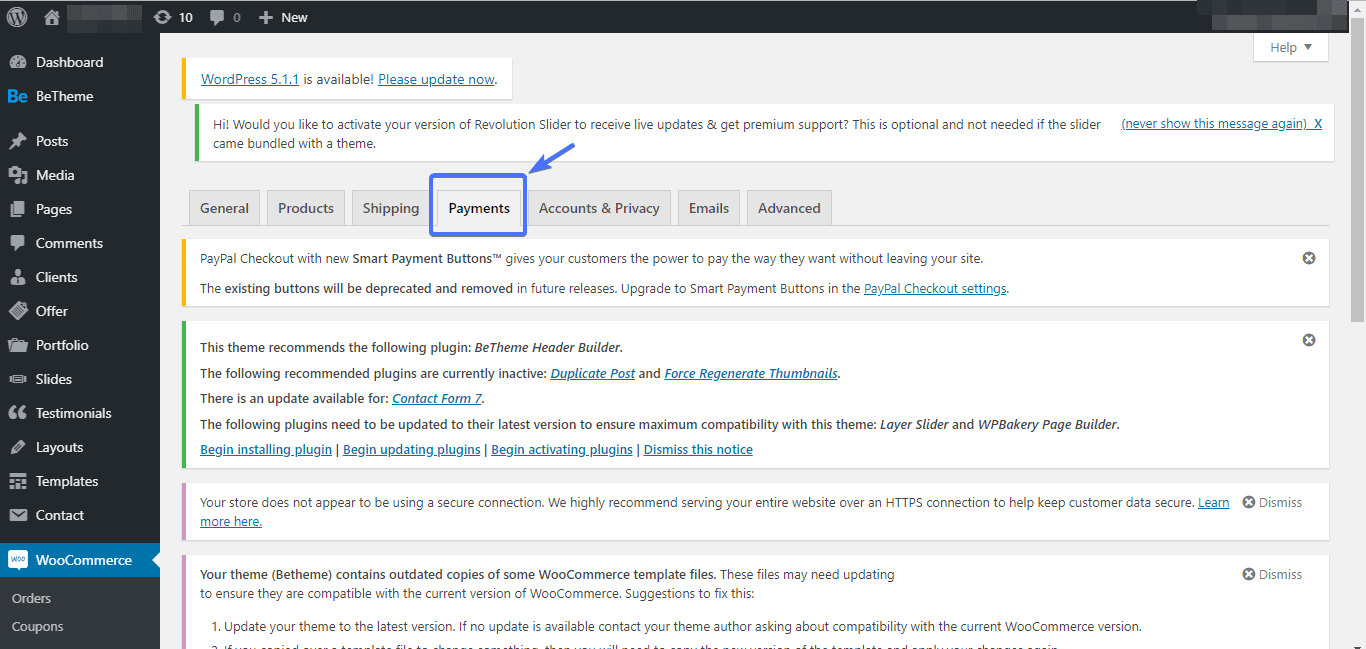
With WooCommerce installed and activated, navigate to WooCommerce >> Settings
Next, click Payments.
Note: If you are using older versions of WooCommerce, you would see Checkout in place of Payments.
Scroll down to PayPal Standard, enable it by toggling the button to the left (usually disabled by default).
Next click Set Up. The next screen you would see is this:
Yes! we have successfully installed and activated Woocommerce. Also, we have enabled PayPal. Let’s dive deeper into the WooCommerce PayPal setup.
WooCommerce PayPal Setup
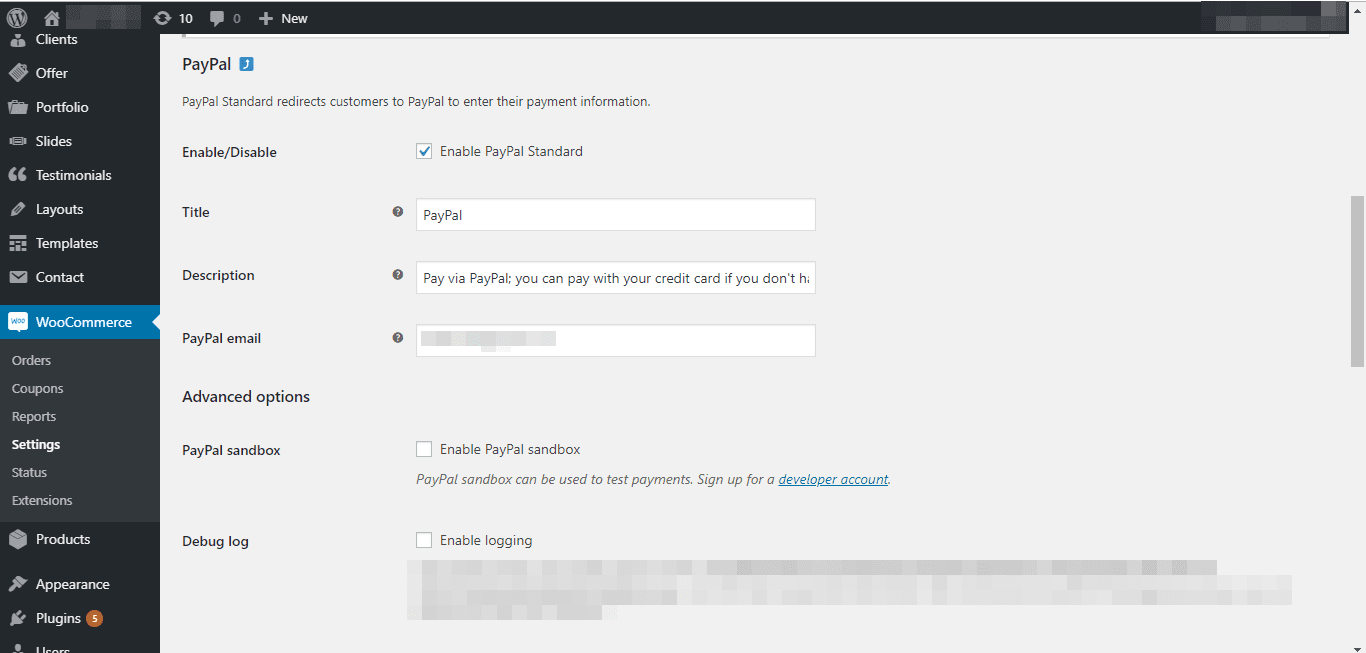
In the Title section, put in the headline you would want customers to see on landing on your PayPal checkout page. A good title would be something like this: “Pay with PayPal”.
As for the description, put in the text that would be below the headline. Remember the email you used for opening your business account? Put it in the “PayPal email” section.
Since we are still in the testing phase, check Enable PayPal Sandbox. Also, check Enable logging to capture all PayPal events on your site. Now let’s set up PayPal.
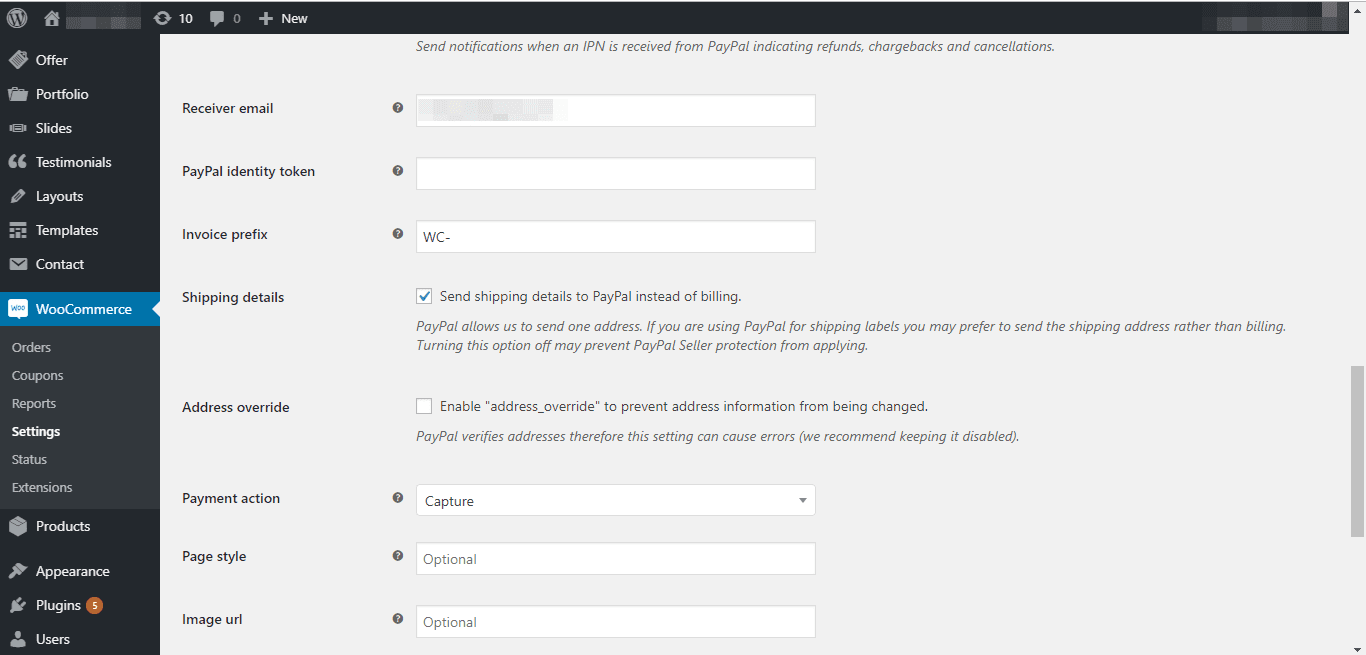
If you prefer to receive alerts in an email different from the PayPal email, put it in the Receiver email.
PayPal identity token offers a secure means to verify payment from customers without using PayPal native’s IPN (Instant Payment Notification). Also, with the identity token, you can keep track of all transactions, either ongoing or completed.
How to generate Identity Token
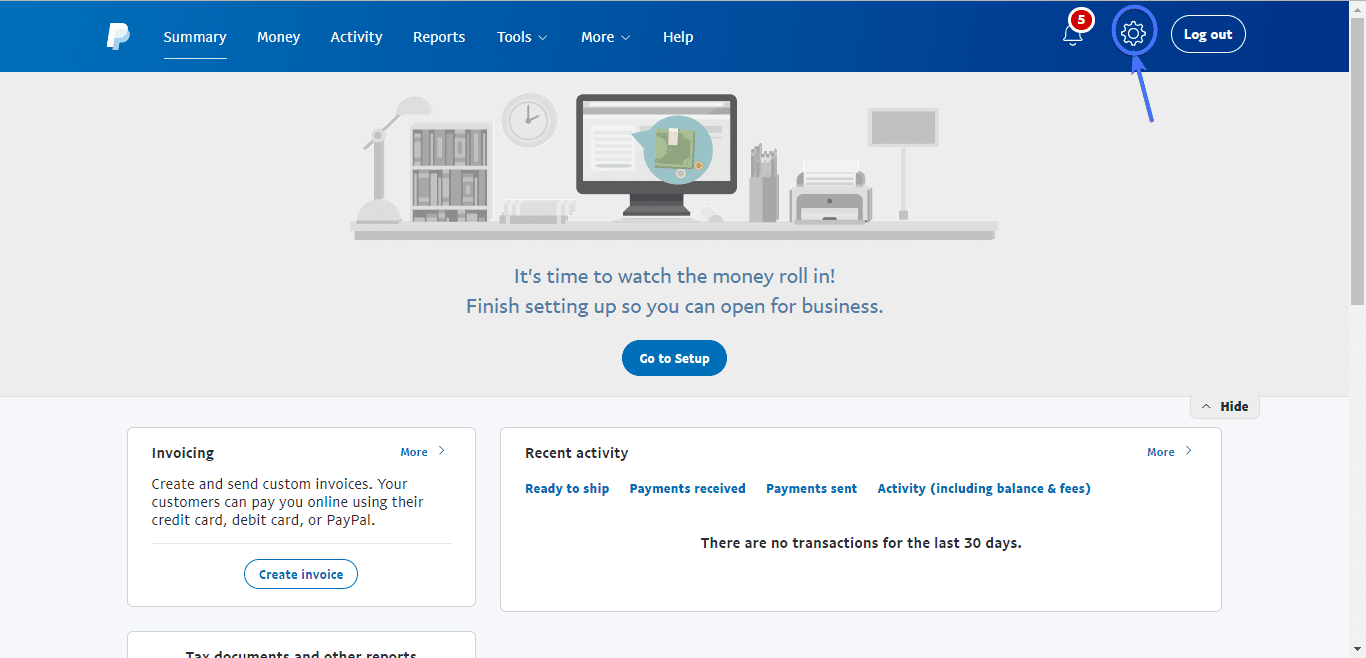
To generate Identity Token, log into your PayPal business account and click on the settings icon.
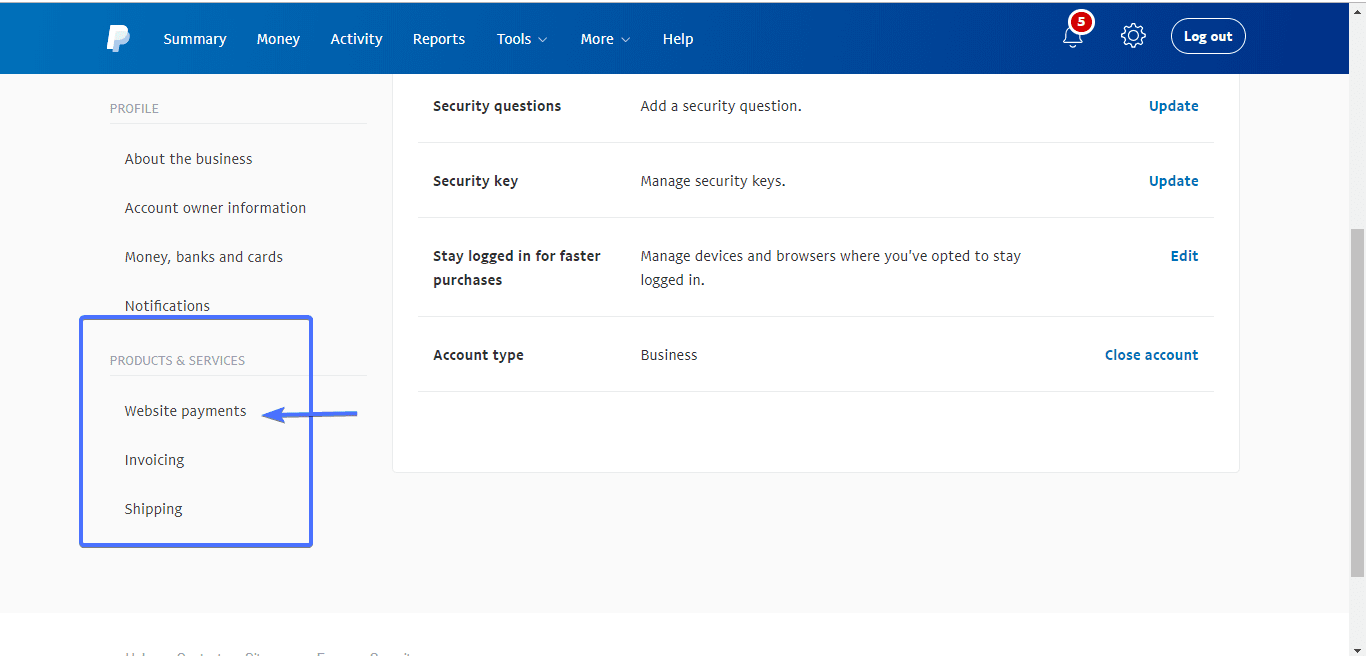
Next, on the left side of the page, under the Products and Services section, click Website Payments.
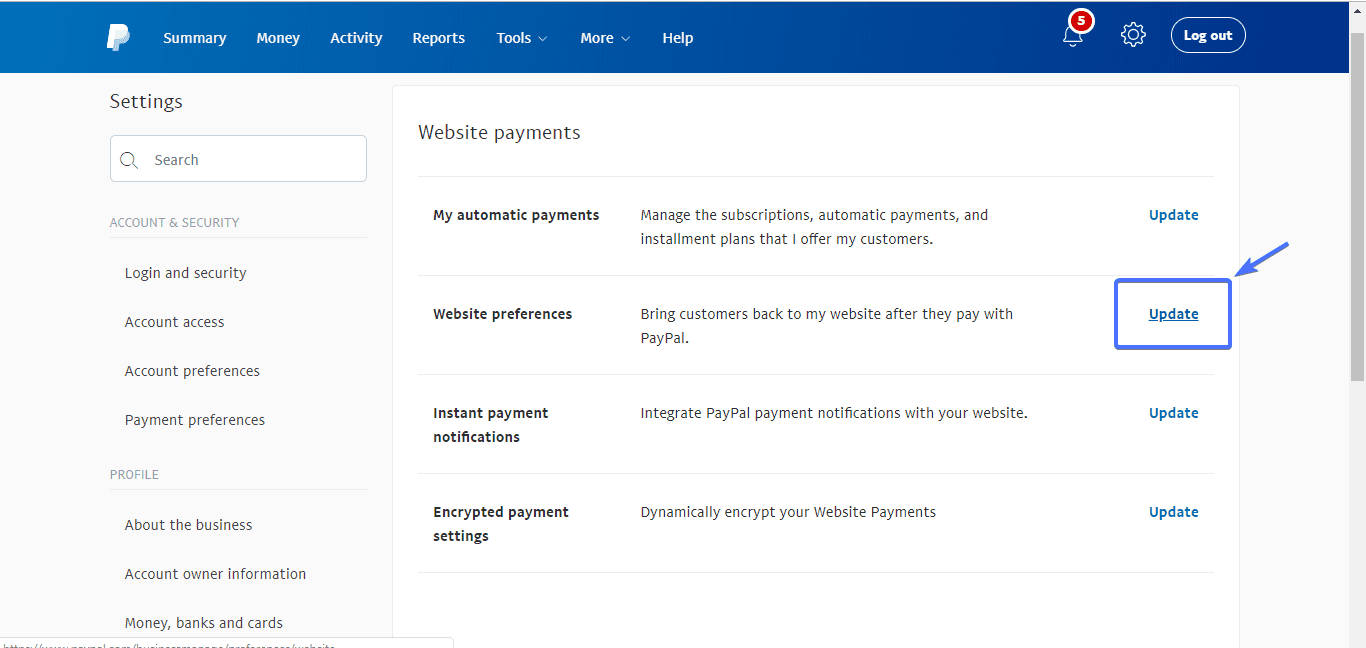
After that, click update website preferences.
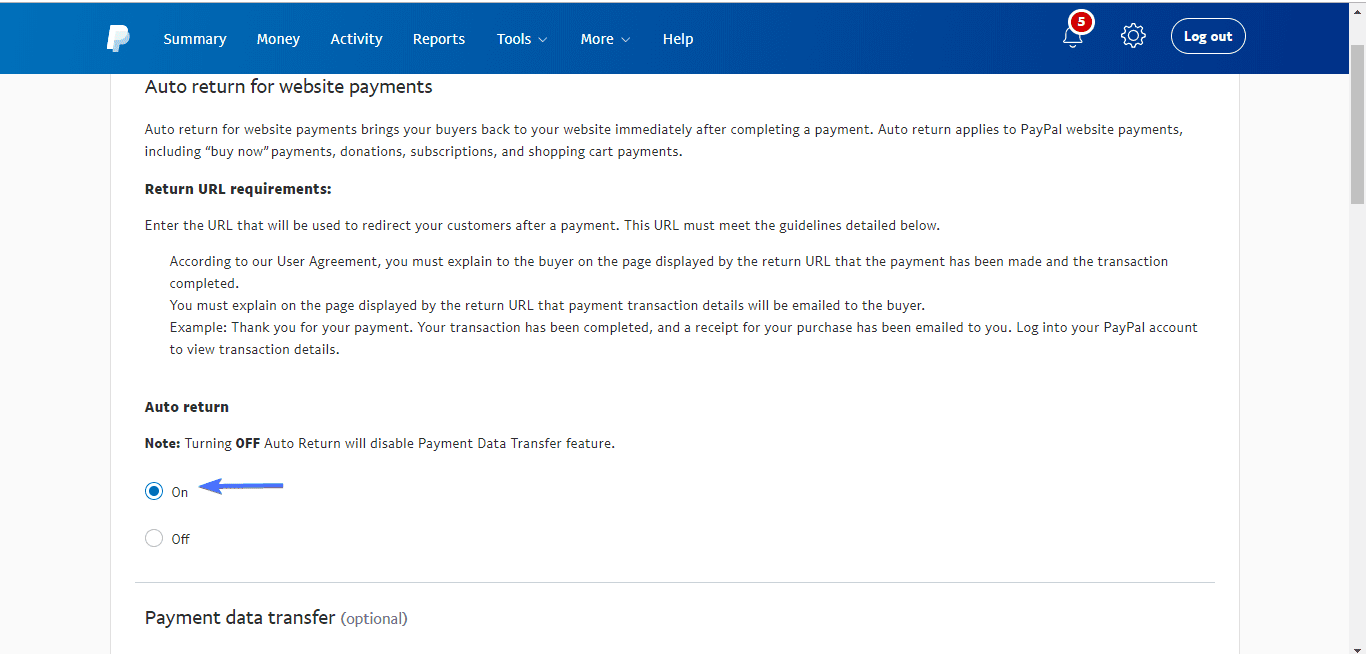
Next, turn on Auto return.
Finally, turn on Payment data transfer, put the URL to your “Thank you page”, and save. You will see your identity token displayed on the screen. Copy and paste this in the “Paypal identity token” input box in your Paypal plugin setup page.
Finishing up The Setup
In the Invoice prefix section, type in your preferred prefix for your invoices. Using unique invoice prefixes is particularly needful if you are running more than one online store. A unique prefix could be something like this: “Business Shop”. Put in your business name in place of “Business”.
If you check the Shipping details checkbox, shipping details would be sent to your PayPal address, not billing address.
To prevent the address from being changed, check the Address override.
As for Payment action, you have two options: capture or authorize. If you chose to capture, payments from customers would be processed immediately without the need for verification. If you go for authorizing, payments will first have to be verified before being processed. As you may have guessed, the authorize option is heavily time-consuming.
The rest (Page style and Image URL) are optional.
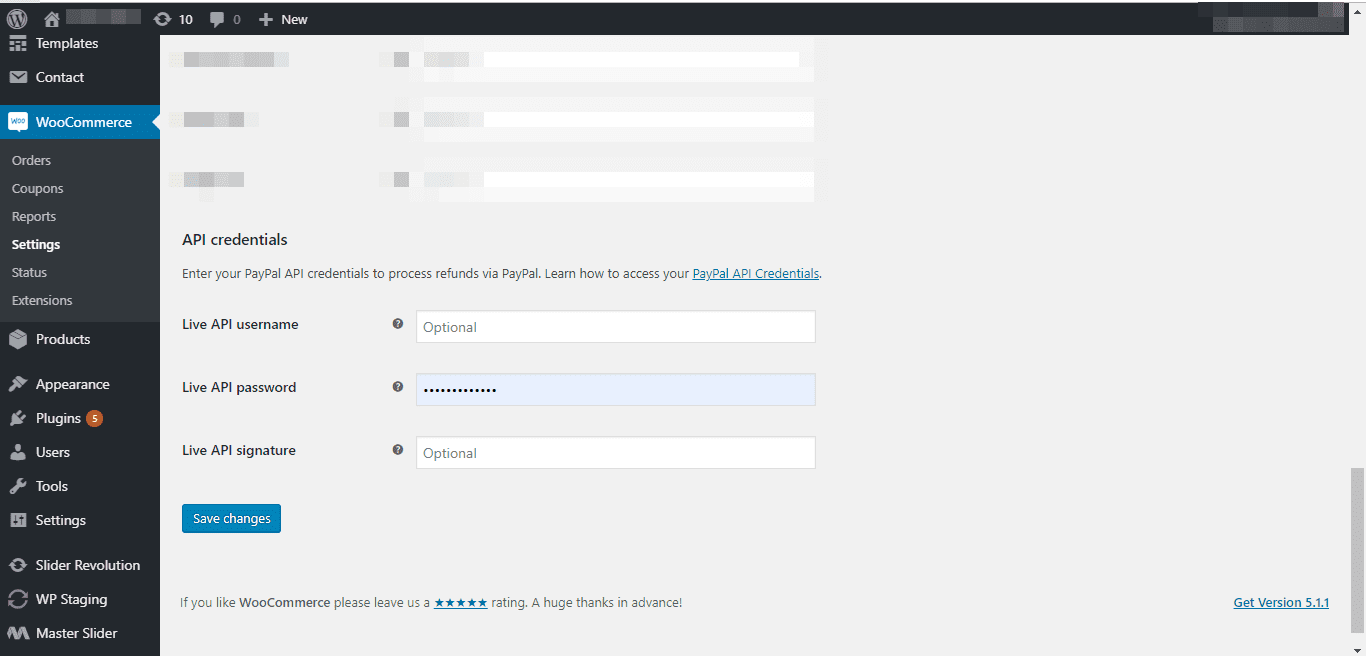
To process refunds, you will have to set up your API credentials. Head over to PayPal’s website to learn how to generate API credentials.
When you have your API details, input them and click Save changes.
To ensure the WooCommerce PayPal setup is working properly, we need to run a test purchase. This is where PayPal’s sandbox becomes handy.
How to Run a Test Purchase with PayPal Sandbox Account
First, ensure that Sandbox is enabled in the WooCommerce Setting (WooCommerce >> Settings>> Payments). Save changes.
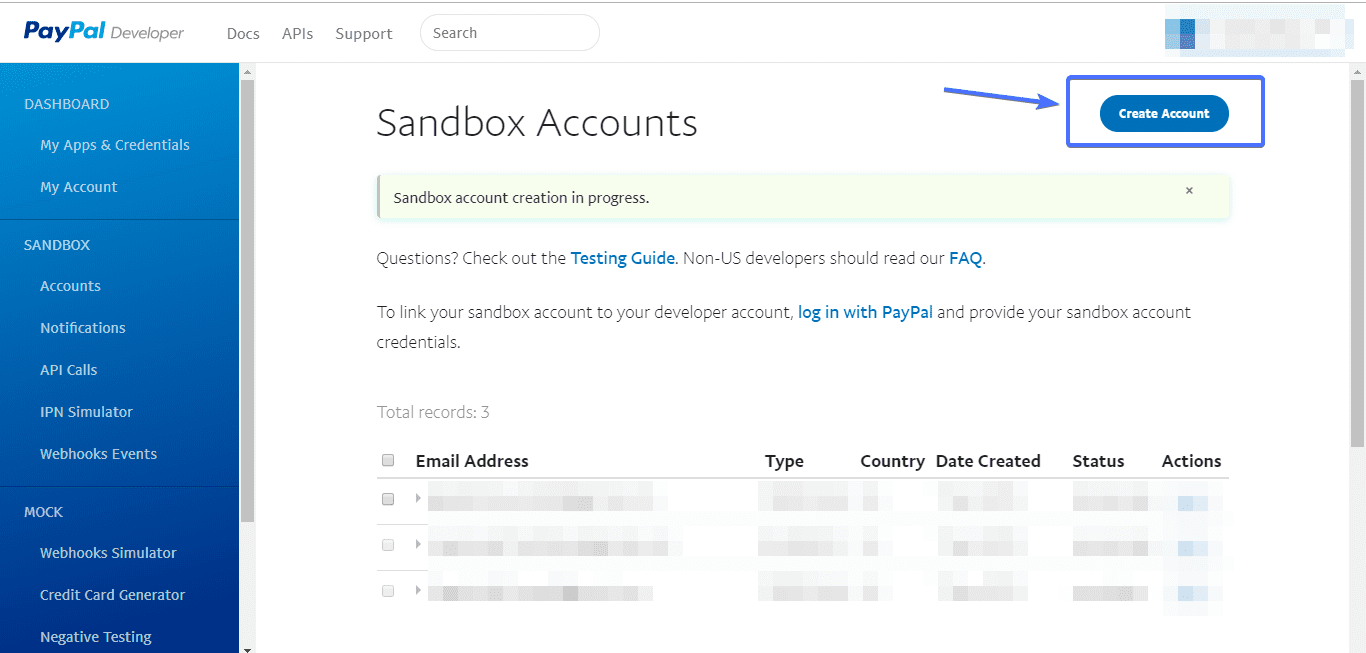
If you haven’t created a developer account (same as sandbox account) yet, follow the steps in the first section of this article to do so. Now log into the developer account you just created, go to the ‘Sandbox’ section on the developer menu (on the left), and click Accounts. Next, click Create Account.
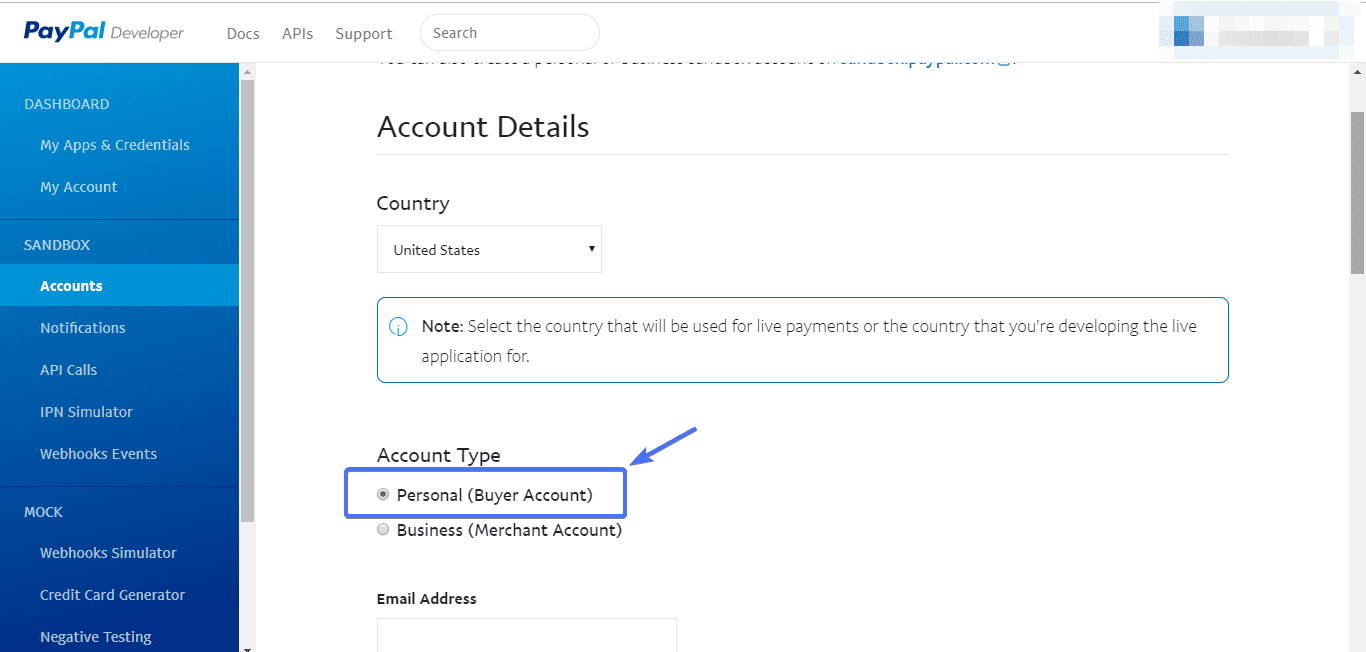
What you would see next is this:
The country you chose doesn’t really matter. Select a Personal Buyer account. Type in an email (this is the email you would be using for the test purchase). For this tutorial, we shall be using “[email protected]”. Put in a password. You can fill in or leave out first and the last name.
In the payment section, type in any balance of your choice, select PayPal as Payment Card. Then click Create Account.

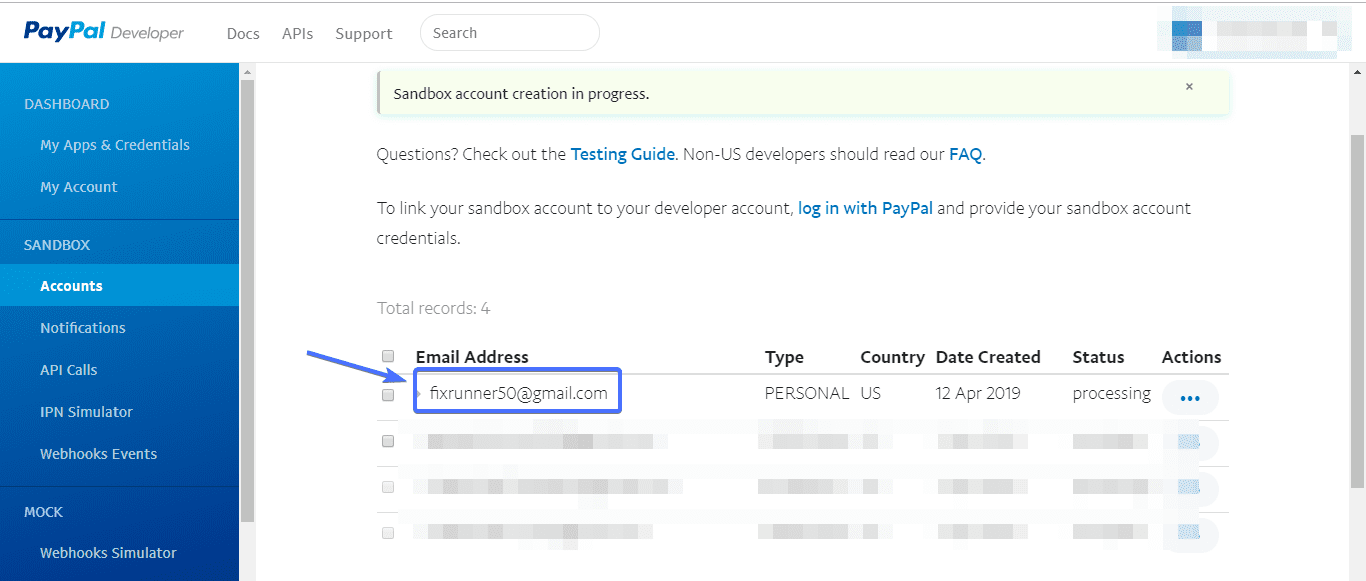
In your Sandbox dashboard, you should see the newly created account.
Now we’ve created a test buyer account to help us test our PayPal setup.
Testing our Buyer Account
Head over to your online store and make a purchase. As usual, add a product to the cart and proceed to checkout.
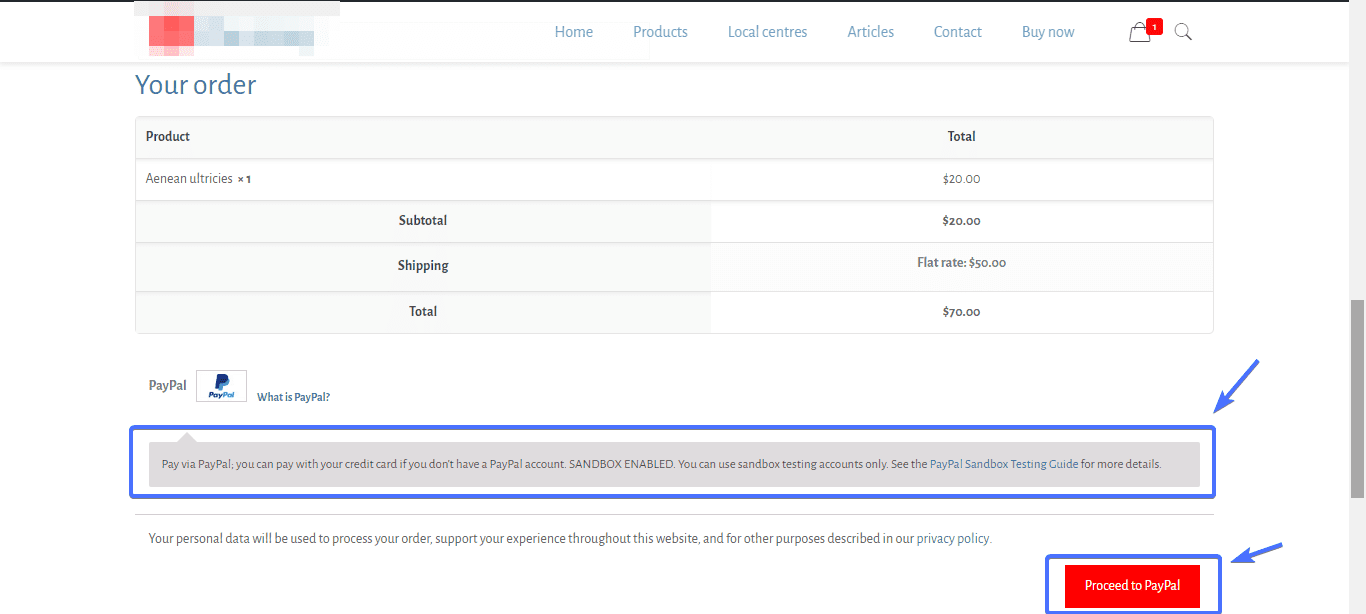
On the checkout page, fill in your normal billing details. Scroll down and click Proceed to PayPal. Just before the proceed button, you should see a dialog box telling you Sandbox is enabled.
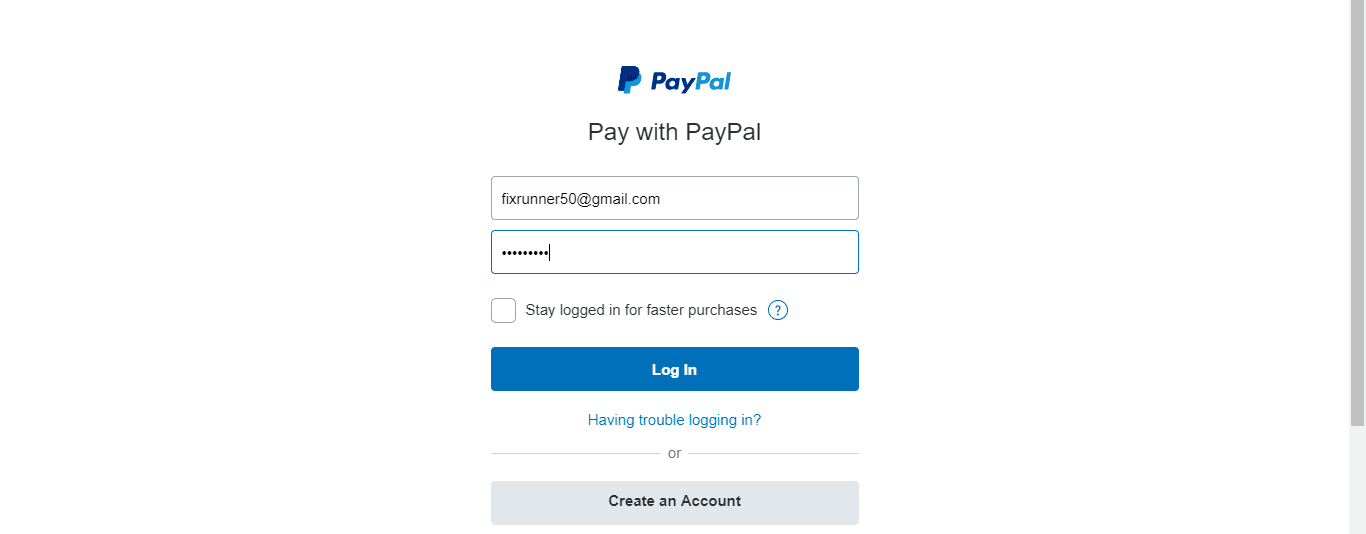
Upon clicking the proceed button, you would be redirected to the sandbox account. Log in with the sandbox buyer email and password you had earlier created.
On the next page, accept terms and conditions. Finally, click Pay Now
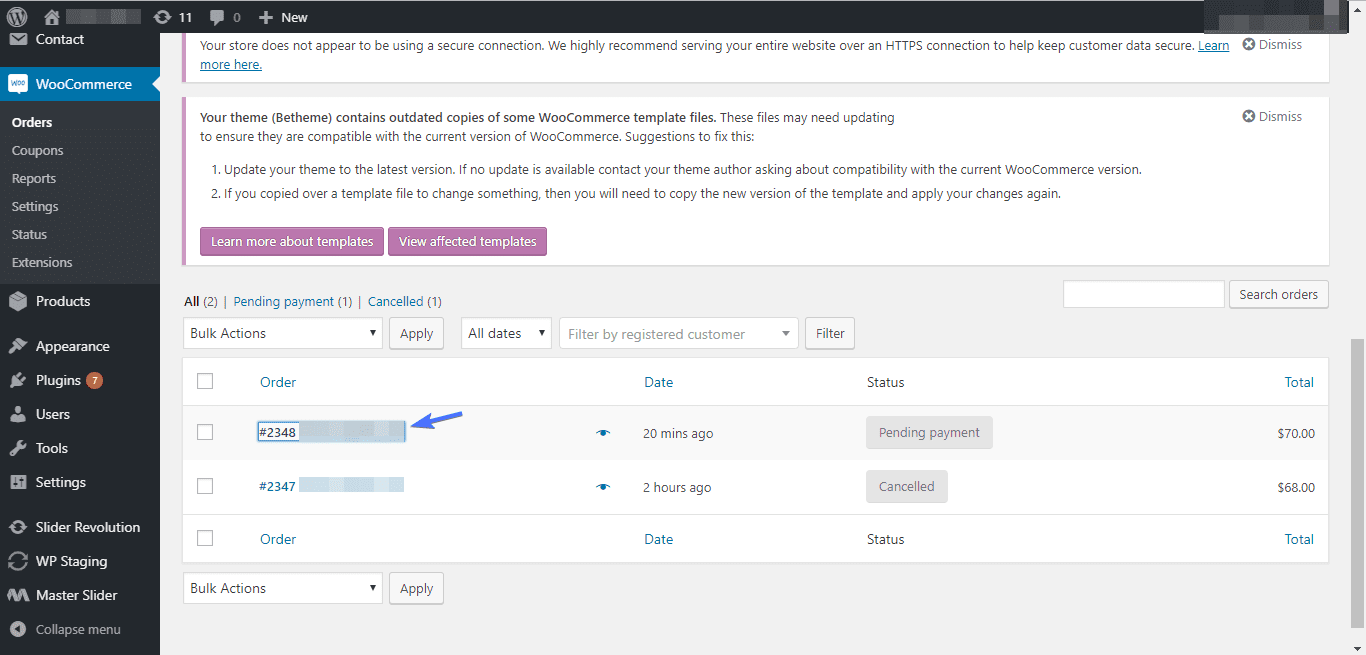
That’s it! To be sure the order went through, log into your website, go to WooCommerce >> Orders. You should see the order you just processed.
Now we have tested and verified that our WooCommerce/PayPal setup is working properly, we can now disable PayPal Sandbox. By so doing real users will be able to purchase from your store.
Common Issues and Troubleshooting in WooCommerce PayPal Setup
Integrating PayPal with WooCommerce is generally straightforward, but you might encounter some common issues along the way. Understanding these challenges and knowing how to troubleshoot them can save you time and ensure a smooth payment process for your customers. Here are some frequent problems and their solutions:
IPN Failures
Instant Payment Notifications (IPN) are crucial for updating order statuses. If IPNs fail, orders may not be marked as completed. To troubleshoot, ensure your PayPal IPN settings are correctly configured in your PayPal account, and the notification URL is accurately set in your WooCommerce settings.
Payment Not Going Through
Sometimes, customers might face issues completing payments. This could be due to incorrect API credentials or PayPal account settings. Double-check your API details in WooCommerce and ensure your PayPal account is properly set up to accept payments.
Currency Mismatch Errors
WooCommerce and PayPal must be set to the same currency to avoid transaction errors. Verify your store’s currency settings in WooCommerce match those in your PayPal account to ensure seamless payment processing.
SSL Certificate Issues
For secure transactions, PayPal requires your site to have a valid SSL certificate. If customers encounter security warnings, check that your SSL certificate is up to date and properly installed.
Checkout Page Redirect Problems
Customers should be redirected to PayPal to complete their payments. If this isn’t happening, ensure the PayPal gateway is enabled in WooCommerce and that there are no conflicts with other plugins or your theme.
Sandbox Mode Stuck
If your store is not processing real transactions, it might still be in Sandbox mode. After testing, remember to switch off Sandbox mode in your WooCommerce PayPal settings to start accepting live payments.
Missing Orders or Payments
If orders or payments are missing, it could be due to IPN issues or incorrect setup. Check your PayPal IPN history and WooCommerce order logs to diagnose the problem.
When troubleshooting, it’s also helpful to consult WooCommerce and PayPal support documentation or forums for specific solutions. Keeping your WooCommerce and PayPal plugins up to date can also prevent many common issues.
PayPal Plugins and Extensions for WooCommerce
Enhancing your WooCommerce store’s PayPal functionality can significantly improve the payment experience for your customers. Various PayPal plugins and extensions are available, each designed to cater to different needs, from simplifying the checkout process to offering flexible payment options. Here’s a look at some popular and useful PayPal-related plugins that could add value to your WooCommerce setup:
WooCommerce PayPal Payments
This official plugin by WooCommerce offers a comprehensive solution, integrating seamlessly with your store to provide a smooth payment process. It supports various payment methods, including PayPal, credit and debit cards, and local payment options, ensuring a versatile checkout experience for your customers.
PayPal Express Checkout
Speed is crucial in e-commerce, and the PayPal Express Checkout plugin delivers by allowing customers to bypass the WooCommerce checkout page, directly using their PayPal account to complete purchases. This not only speeds up the transaction process but also enhances user convenience.
WooCommerce PayPal Pro
For store owners looking to keep the entire checkout process on their site, PayPal Pro is an excellent choice. It allows for direct credit card payments on your website, providing a seamless and professional checkout experience without redirecting users to PayPal’s site.
PayPal for WooCommerce by Angell EYE
This versatile plugin offers a range of PayPal payment options, including PayPal Express Checkout, PayPal Credit, and Braintree. Its flexibility makes it a great choice for businesses looking to offer multiple payment solutions through PayPal.
WooCommerce Subscriptions
If your business model includes recurring payments, integrating WooCommerce Subscriptions with PayPal can automate this process, offering a hassle-free experience for both you and your customers. This combination is perfect for membership-based sites, subscription services, or any business that requires regular billing.
Incorporating these plugins and extensions can not only enhance the functionality of your WooCommerce store but also provide a more secure, efficient, and user-friendly payment experience. Consider your business needs and customer preferences when choosing the right PayPal plugins and extensions to integrate with your WooCommerce store.
Frequently Asked Questions (FAQs) for WooCommerce PayPal Setup
How do I integrate PayPal with my WooCommerce store?
To integrate PayPal, go to your WooCommerce settings, select ‘Payments,’ and then choose PayPal. You’ll need to enter your PayPal email address, API credentials, and configure the settings according to your preferences.
Is it necessary to have an SSL certificate for using PayPal with WooCommerce?
Yes, an SSL certificate is essential for securely processing transactions and protecting customer data. It encrypts the data transferred between your server and the customer’s browser, ensuring a secure checkout process.
Can I test PayPal transactions before going live?
Absolutely. You can use PayPal’s Sandbox mode for testing. This allows you to simulate transactions in a test environment without using real money. Ensure you switch off Sandbox mode once you’re ready to accept live transactions.
What should I do if the PayPal payment option isn’t showing at checkout?
First, check if the PayPal plugin is activated and configured correctly in your WooCommerce settings. Also, ensure that your PayPal account is properly set up and linked to your store. If the issue persists, it might be a theme or plugin conflict, requiring further troubleshooting.
How do I handle refunds with PayPal in WooCommerce?
Refunds can be processed directly from your WooCommerce dashboard. Go to the order you wish to refund, and you’ll find the option to process a refund. The amount will be automatically adjusted in your PayPal account.
Does PayPal support multiple currencies in WooCommerce?
Yes, PayPal supports transactions in multiple currencies. However, ensure that the currencies you wish to use are supported by both PayPal and WooCommerce. You might need to set up currency conversion options in your PayPal account settings.
What are the transaction fees for using PayPal with WooCommerce?
PayPal’s transaction fees vary based on the country and the type of transaction. Typically, there’s a fixed fee plus a percentage of the transaction amount. Check PayPal’s official website for the most current fee structure applicable to your region.
Can customers use PayPal without a PayPal account?
Yes, customers can pay with their credit or debit cards through PayPal’s guest checkout feature without needing a PayPal account. This option needs to be enabled in your PayPal account settings.
How do I ensure my PayPal transactions are secure?
PayPal provides robust security features, including SSL encryption and fraud protection. Ensure your website has an SSL certificate, keep your WooCommerce and PayPal plugins updated, and regularly review PayPal’s security settings for any additional measures you can implement.
What should I do if I encounter issues with PayPal transactions?
Check your PayPal and WooCommerce settings for any discrepancies. Review the transaction logs in WooCommerce and PayPal for any error messages. If the problem persists, consider reaching out to WooCommerce support or PayPal’s customer service for assistance.
Conclusion
This is all you need to know about WooCommerce Paypal setup. Hopefully, you can now receive payments on your Woocommerce store. We did our best to make it as simple as possible, but if you missed something do get in touch.
If you found this article helpful, kindly share it. You can also check our top WooCommerce payment gateways. For more WordPress tutorials follow our WordPress blog.

