 Having a professional website for your business helps you stand out from your competition. It gives you a platform to market your goods and services with exciting details and graphics and ultimately gain new customers.
In the past, you had to be tech-savvy, or you needed to hire a developer to have a website. However, with no-code website builders and Content Management Systems, you can now create a professional business website.
In this comprehensive guide, we will show you how to make a business website using WordPress. We explain every step from start to finish, such that when you get to the end of this guide, you will have a business website ready for launch!
Content:
Why Use WordPress For Your Business Website?
There are many tools and content management systems for building a business website. However, there is a reason why WordPress is used by more than 42% of all websites. This section explores some of the advantages of using WordPress to create your website.
It Is Free and Open-Source
You can download and install WordPress on your server for free. Unlike other tools, such as Wix website builder, which require subscriptions to access their service, WordPress is free and open-source.
All you need to have is your domain name and a hosting provider where you will install the software.
Customizable and Beginner-Friendly
WordPress is ideal for online beginners because you can create your business website without writing code. The default WordPress customizer and full site editing feature make it easy to design stunning web pages.
And with the help of page builder plugins such as Elementor, you get access to ready-made templates. They also come with a powerful drag-and-drop builder to design your website faster.
Search Engine Optimization (SEO ready)
By default, WordPress is SEO optimized, and your themes are already configured to be mobile responsive. When you use an SEO plugin on your site, it provides tips and changes to implement on your website to rank on search engines.
Great Community and Support from Developers
Earlier, we mentioned WordPress’ market share is more than 42%. This means there is a great community behind the software. Whenever you are stuck with any WordPress error, there are resources to help you resolve it.
Also, some brands, such as Fixrunner, provide professional WordPress support to site owners. This means there is hardly an issue on your site without a solution.
Create Your Business Site in 2 Steps
In this section, we’ll build a fully functional business website using WordPress in two simple steps.
Continue reading if you prefer the written version of this tutorial.
- Step 1. Choose Your Site Domain and Host
- Step 2. Install Your Website and Set It Up
Step 1. Choose Your Business Website Domain and Hosting
To install WordPress, you need a domain name and a hosting service.
A domain name is your site identity. It is the address users type on their browsers to visit your website (for example, mysite.com). Think of it like the office address you give your customers to locate your physical shop.
On the other hand, hosting is the web server where all your website files and configurations are stored. Using the same office analogy, your hosting server is like a cabinet in your office where you store important information about your business.
When choosing a domain name, you need to ensure it aligns with your business name and the services you render.
For instance, if you run a food blog, “tastyrecipes.com” can be a good domain choice. Finding the right name isn’t as easy as you may think, considering there are millions of websites online.
Chances are, another company has registered the first few suggestions you will come up with. It may require some trial and error to find the best fit.
Confirming Domain Availability
After choosing your domain, you need to confirm if the name is available. We have a free domain checker tool you can use for this purpose.

You can search for the availability of a domain name by entering it in the search box. If the name is available, you can purchase it from a domain name registrar. Otherwise, you may need to check other names for availability.
Purchasing Domain and Hosting
Before choosing a web host, ensure the host offers 24/7 customer support. The bandwidth provided by your host should also be sufficient for your growing business website.
In addition, you should go with a hosting company that provides free SSL to their customers. An SSL certificate helps build trust between you and your customers. It is also an important SEO ranking factor.
Meanwhile, you can check our review for the recommended hosting for WordPress sites. We recommend using the same provider for your domain name registration and hosting. This makes it easy to propagate your DNS settings.
To purchase your hosting and domain, click the Get Hosting and Free Domain button on the domain checker page.

After that, choose a package you wish to buy and select Get Plan.

On the next page, select the option to register a new domain. Then type the domain name you wish to register and click on Proceed.

Side note: If you already have a domain name with another registrar, you can select the “I already have a domain” option and then follow the prompt to add your domain.
Finally, you will need to enter your contact details and proceed to make payment for the web hosting plan you selected.
Step 2. Install Your Business Website and Set It Up
After buying your domain name and hosting, you need to install WordPress on the hosting server. There are two ways you can achieve this;
- Using one-click install
- Manually Install WordPress
Using One-click Install
Most modern WordPress hosts include a one-click install button for WordPress on their hosting dashboard. The way this appears may vary depending on your hosting provider. However, the functionality remains the same.
To install WordPress, log in to the control panel of your hosting account. You can ask your hosting providers how to access this panel if you do not know how. This is why a host with 24/7 live chat support is essential.
In this guide, we will use the SiteGround one-click installer.
Installing WordPress on SiteGround Hosting
To start, log in to your SiteGround dashboard. After that, click on the Setup Site button to begin the installation.

On the next page, click on the Select button below “Start New Website”.

Next, select WordPress as your website builder under “Choose Application”.

Under “Installation details”, enter your email address and choose a password for the new website. These are the details you will use to log into the admin panel of your website.

Once done, click on Continue. On the next page, SiteGround will suggest features to add to your website. You can skip them for now and click on the Finish button.

Now, wait for the SiteGround installer to complete the setup.

After installation, click on Manage Site to access your website’s settings page.

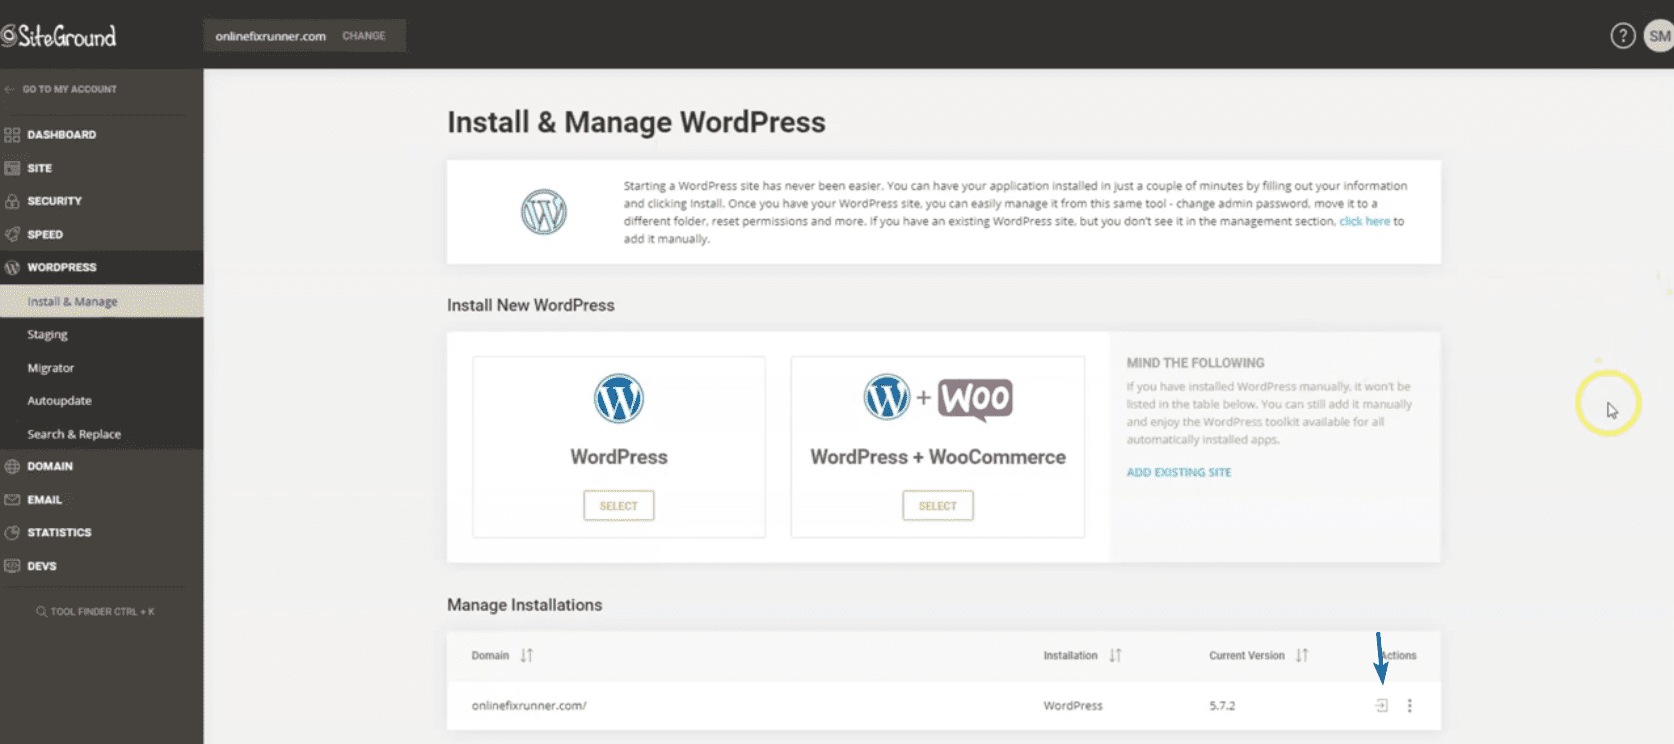
On the SiteGround dashboard, go to WordPress >> Install & Manage to open the website’s admin panel.

Now scroll to the “Manage Installations” section. You’ll need to click on the Gear icon next to your domain name to access your site dashboard.
On the next page, click on Start Now.

WordPress will ask you to choose a theme for your website. You can skip this step for now. We will show you how to install themes in the next section.
Go back, and you will be redirected to the WordPress admin dashboard. To view your website, hover over your site’s name and click on Visit Site, as seen below.

Manually Install WordPress
In the unlikely event that your host does not provide one-click installation, you can install WordPress manually.
This method requires downloading the WordPress software and then uploading the files to your server. We have a guide explaining the steps in detail. You can check here to learn how to install WordPress manually.
To access the admin dashboard after installation, add “/wp-admin” to the domain name. For example, if your site is available at “onlinefixrunner.com”, then the admin panel for your site will be “onlinefixrunner.com/wp-admin”.
Setting Up an SSL Certificate
An SSL (Secure Socket Layer) certificate is an essential feature you need on your business website. It secures your website traffic so attackers can’t access data from your site.

Can you see the padlock icon in the image above? That is how to know your certificate is valid. If your site is not secured, visitors may find it difficult to trust your brand.
So to install SSL on your business website, log in to your SiteGround account and then go to Security >> SSL Manager.

SiteGround provides a free SSL certificate for users on the starter plan. To install this certificate, click on the Select SSL dropdown and choose the Let’s Encrypt Wildcard option.

After that, click on the Get button. You will get a notification that your certificate has been installed.

To ensure everything is working, we can use a plugin to force WordPress to use secure HTTPS connections. For this, login to your admin dashboard and then go to Plugins >> Add New.

On the search box, type “Really Simple SSL”. Then click on Install Now next to the plugin name. After the installation completes, the button changes to “Activate”. Click on this button to activate the plugin.
You will be redirected to the plugins page. To configure this plugin, click on Go ahead, activate SSL!

Now refresh your website to confirm if it is working. You should see the secure padlock icon on your website.
Sidenote: If your web host does not provide an SSL certificate, you may have to purchase it. Alternatively, you can use a third-party provider such as Cloudflare to get free SSL for your website. We have a detailed guide on how to set up free SSL on Cloudflare.
Installing WordPress Themes
WordPress themes help you design your website with minimal effort from your end. Installing a new theme can change your website’s entire design and layout.
WordPress has over 9000 free themes on the theme directory for you to choose from. You’ll surely find a theme that suits your website needs from this directory.
However, if you are not satisfied with the designs on the free themes, you can get a premium theme with modern designs.
To install a new theme on your website, log into your admin dashboard and go to Appearance >> Themes.

You’ll see all the default themes on your new WordPress installation here. Click on the Add New button to install a new theme.
In the theme directory, you can use the search box to search for a particular theme. In this guide, we will install the “Astra” theme. Since Astra is a multipurpose and customizable theme that is great for business websites, we encourage you to use it too.
When you search for the Astra theme, hover over the theme and click on the Install button.

After installing the theme, the button changes to “Activate”, click on this button to set it as your default theme.

When you preview your website, you will notice the entire look and feel has been updated.
Installing WP Astra Starter Templates
The Astra theme comes with dozens of starter templates you can import to your business website. These templates are fully customizable. So to use this feature, click on the Get started button that appears after installing the theme. This will install the Starter Template plugin on your site.

Once the process completes, the installer will take you to the starter templates page. Alternatively, go to Appearance >> Starter Templates to get to the templates page.

After that, click on Build Your Website Now to access the templates.

You’ll need to choose a page builder to continue. Elementor is one of the easiest page builders to use. So select the Elementor option.

On the next page, you will see a variety of templates you can choose from. Free and premium templates are available here. The premium templates require upgrading your theme to a pro plan.
Select a Business Template
Since we are creating a business website, we can use the filter option to show business website templates.

We chose the “Business Coaching and Consulting” template for this guide. However, you can choose a different template. Just ensure it aligns with your brand.

After selecting a template, you will see a preview of the template.

You can add your logo from here before downloading the template. We will show you how to upload your logo when customizing this template. So you can skip this step for now by clicking on Skip & Continue.
Next, you can change the theme colors from the “Change Colors” panel. Choose the color that aligns with your brand color. You can also change the theme font from the “Change Fonts” section.

Any change you make will reflect on the theme preview page. When done, click on the Continue button.
On the next page, there is an option to enter basic information about your site. You can skip this step and click on Submit & Build My Website.

Now your site will begin importing the template. The installation will download all the necessary files, plugins, and images.

After the installation completes, your site’s layout will change. You can click on View Your Website to see how it looks.

From here, you just need to update the details on the template to reflect your brand identity. In the next section, we will customize the theme and add widgets as well.

Customizing your New Theme
Now let’s begin customizing the theme. To start, go to Appearance >> Customize.

This is where we will customize the whole theme. You can see the changes in the preview on the right side of the page.

Changes you make here will be made on the global level. This means any change you make will appear on your whole site.

After making any changes, you’ll need to click on the Publish button to update your site with the new changes. This section will show how to customize important parts of your website.
Global Site Settings
First, let’s go to the global setting. Here you have five options: typography, colors, container, buttons, and the block editor.
On the “Typography “ menu, you can change the fonts and text on your website. You can also change the preset and heading font from here.

The “Colors” settings menu lets you change the colors for elements on your site. For instance, you can change colors for links, headings, or the background of your site. You can also change the theme color from this panel.

Then we have the “Container” settings. Here you can configure the layout of the site. But it is best to leave these settings set to the default value.

On the “Buttons” tab, you can change the buttons preset. You can also change the text and background color of your theme buttons from here.

Adding Site Logo
To upload your brand logo, click on the Header Builder menu. Alternatively, you can click on Site Identity to get to this page. Next, click on site title and logo.
Here you can add the logo of your business. To change your site logo, click the Change Logo button and upload your logo image.
You can adjust the width to increase the size of the logo. If you do not have a logo for your business website, you can use the site title and tagline feature to show your business name.

After that, click on the Site icon button to add your favicon.

Favicon is this small icon that appears near your website title on the browser tab.

To add your favicon, click Select Site Icon and upload the icon the same way you did with the logo. You can skip this setting if you do not have a favicon image.

Blog Settings
If you plan on creating blog posts on your business website, you can configure the layout for single posts and the blog list page in the “Blog” settings option.
By default, the sidebar option is disabled on this template. But you can enable it from the sidebar menu. Adding a sidebar on the blog page can be beneficial for displaying widgets on your website.

Footer Builder Settings
The footer builder in WP Astra theme allows you to add and edit elements on your website’s footer. To edit a widget, hover over the widget and then click on the Pen icon to open the editor.

Here, you can edit the title and content of the widget. Any change you make will automatically reflect on the preview panel.

You can add or remove social media icons by clicking on the “Pen” icon next to the social widget.
Follow the same process to edit other widgets on the footer section of your business website.
Adding Navigation Menus
Navigation menus improve user experience by making your site easy to navigate. The template we are using has a primary navigation menu. However, you can edit the menu items or even create new ones from the “Menus” tab.

The main menu is the primary navigation menu at the top bar. Click on the Main menu to edit the menu items.

You can click on a menu item on the next page to edit it. Drag and drop the menu items to rearrange them in any order.

To add a new menu item, click on the Add Items button. You can add new or existing pages to the menu. Additionally, you can add blog posts, categories, and landing pages to your menu items.
To remove a menu item, click on the item to expand the options, then click Remove.

Side note: We have a detailed guide on how to create navigation menus in WordPress. You can check it out to learn more about WordPress menus.
Mobile Responsiveness
By default, most WordPress themes are mobile responsive. However, when customizing your site, you should check how the content looks on smaller screens.
For this, you can use the icons at the bottom section of the customizer menu to preview other screen sizes.
Other options to explore include adding widgets to the sidebar and the footer section of your website. After customizing your business website, click the Publish button to update the changes.

Setting Up Website Pages
In general, when building a website, there are some necessary pages you need to include. Some of the pages are:
- Homepage
- About page
- Contact page
- Services page (Optional)
- Privacy Policy
The Home page is the first page users will see when they visit your website. So you should spend time designing this page up to standard.
The About page describes who you are and the purpose for creating the website. In other words, it gives users more information about your brand.
On the Contact page, you list the various options for contacting your team, including social media platforms. You can also include a contact form on the page so users can get in touch with you by filling out the form.
The Services page shows the various services your brand offers in detail. Here you should also include your unique value proposition — a convincing statement to urge users to patronize your brand.
The Privacy Policy page contains details about user information you intend to collect on your website. This page is required by law in some regions.
Editing the Home page
We will use the Elementor plugin to customize the pages on the website. Elementor is one of the best drag-and-drop builder plugins for designing robust web pages. It has more features than the default WordPress block and classic editor.
You should already have Elementor installed on your website if you imported a starter template.
To edit a page, go to Pages >> All Pages. Then hover over the page you wish to edit and select Edit with Elementor.

Alternatively, when viewing the page, you can access the Elementor builder by clicking on the Edit with Elementor button.

On the Elementor builder, you can customize your page and edit the dummy data from the starter template.

You can edit an element by clicking on it. When you do, a text editor will appear on the left sidebar. You can change the content of the block from this editor.

To change the background image of a section, click on the icon to select the entire block. Next, click on the Style tab to open up the customization page.

Here, you can choose a different image from your media library. You can upload your business images to your website and select the one you wish to display here.
When selected, click Insert Media to use the image as your background.

Next, let’s show you how to edit a button. Click on the button and then change the text from the sidebar menu. You can also link your button to a different page. For this, add the page URL to the “link” box.

Editing other Elementor blocks on a page follows the same steps explained above. The template we imported uses dummy data and placeholder texts on some of the elements. So you need to replace the dummy data with your business information.
Adding a New Section
To add a new Elementor section, click on the Plus icon next to the location you wish to add the section. After that, select the structure you want for the section.
To add elements to the new section, click on the Plus icon and then choose the element you want to add. You can also drag and drop elements, as shown above.
There are many elements available for you to choose from, such as text, heading, and images. After editing your page, click the Update button to save your changes.

Sidenote: We have tutorials on how to use Elementor on our YouTube channel. Follow this link to watch the videos on YouTube.
Editing the About Us Page
To edit another page within the Elementor builder, click on the 3 horizontal lines icon.

Next, click on Finder and enter the name of the page you want to look up in the search box.

Once you select the page, Elementor will redirect you to that page. Following the same procedure we explained above, you can add or edit elements on the page.

If you want to remove a section, click on the X icon, which will delete the entire section.

Similarly, click on Update after making your changes.
Customizing the Contact Us Page
First, use the finder to navigate to this page within the Elementor builder. You need to add your business address and contact information on this page.

The page also has a contact form widget. The form is made using the WP Forms plugin. Therefore, we do not have access to edit the form fields from the Elementor builder.
However, you can create a new form by selecting the New Form button.
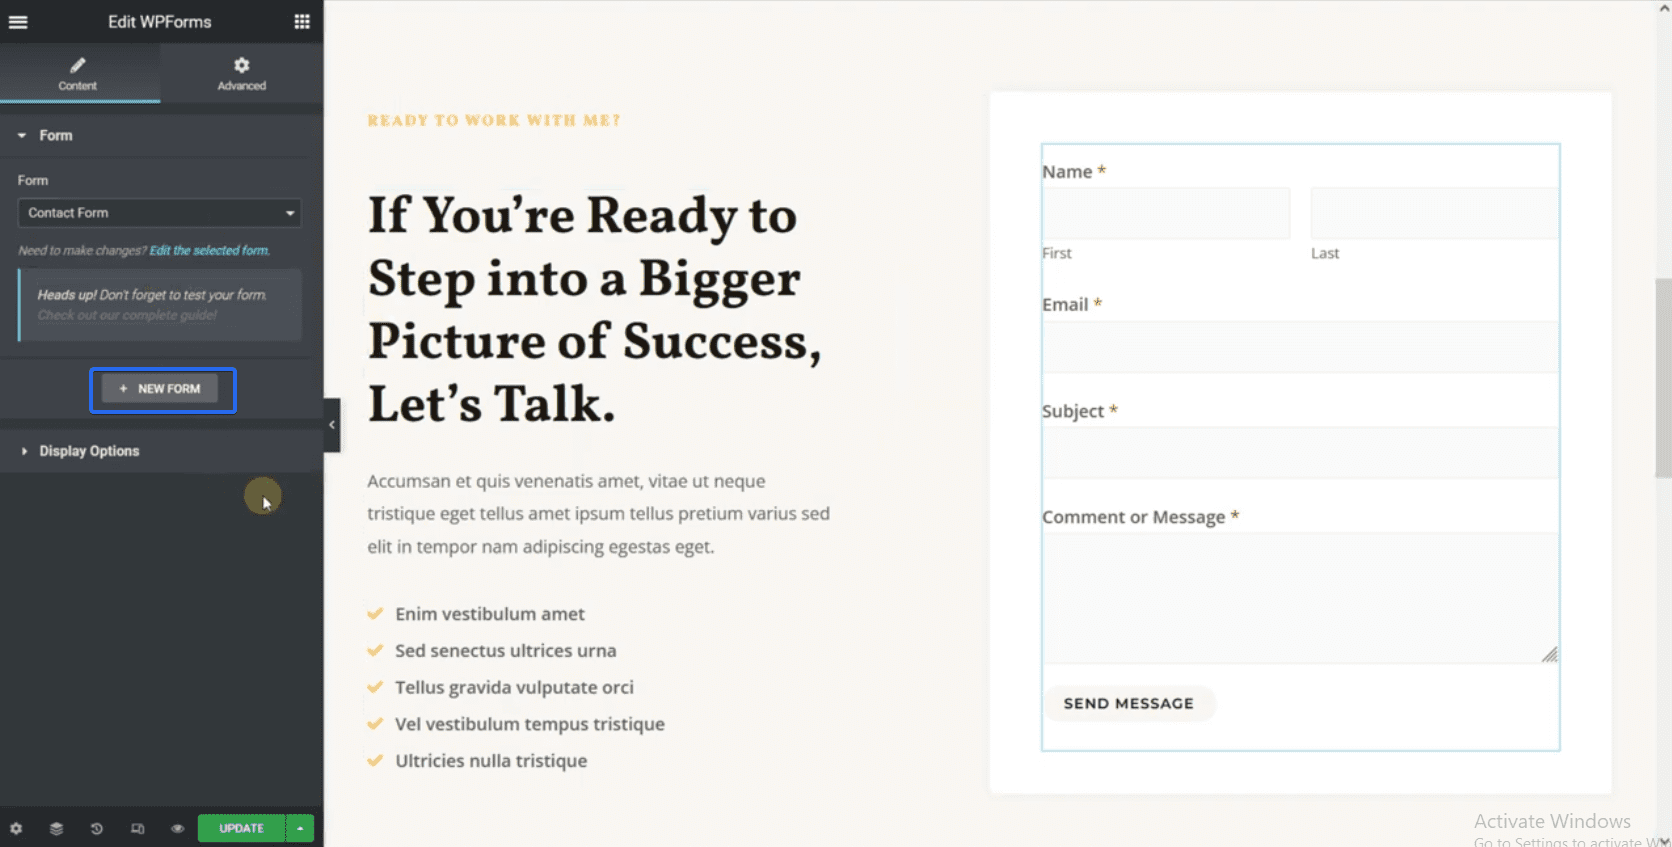
Next, select the Simple Contact Form option. This will generate a new contact form for you.

You can select a field to edit it. After configuring your contact form, click on the Save button to create your form.

The new form will automatically populate the form field. After editing the page, click on Update to save your changes.

Editing the Services Pages
You can navigate to the services page using the Finder feature in Elementor. On the services page, you need to update the dummy data to include information about your business.

You should include all the services you render on this page. Remember to save your changes after editing the page.
Now when you view your website, you will see all the changes you made.
Creating a New Page on Your Business Website
To create a new page, go to Pages >> Add New. On the post editor, click the Edit with Elementor button to customize the page with Elementor.

From there, you can start adding elements to the new page. After customizing the page, click the Publish button to save your changes.

If you need to create more pages on your business site, simply follow the same process explained above.
Generating the Privacy Policy Page
To create your privacy policy page, go to Settings >> Privacy. On the “Settings” tab, you have two options available. Either use an existing page or create a new page. We will create a new page here. For this, click on the Create button.

WordPress will load a template containing your site’s privacy. Update the information on the page to suit your brand. Finally, click on the Publish button to save and publish the page.

Now you need to add this page to your navigation menu so users can access it. For this, go to Appearance >> Menus. Next, select the new page you just created and click Add to Menu.

Finally, click on the Save Menu button to update your menu. When you view your website, the navigation menu will include the link to the privacy policy page. You can click on it to visit the page.

Great Job! Your brand new business site is up. You can extend your business website to support selling online.
Adding an Online Store (Optional)
Many businesses include an eCommerce section on their website. This is essential if you want to sell products on your site.
Making an eCommerce website traditionally would be tedious because you have to build the functionalities and logic for the store. Fortunately, WordPress makes the process easy for anyone to build eCommerce websites without having to write code.
To create an online store, you need the WooCommerce plugin. This plugin converts your website into an online store.
WooCommerce comes with the logic to handle payments as well as process taxes. And the best part is that you can automate some of these processes.
We have a complete guide on how to install the WooCommerce plugin. The guide explains the steps in detail so beginners can follow along.
Installing Useful Plugins
Installing a few essential plugins after building your website and setting up your online store will enable you to manage your business website easily.
Before proceeding, we recommend you check this guide to learn how to install WordPress plugins. With that in mind, here is a list of useful plugins for WordPress sites.
Security Plugin
Security should be your priority as a website owner. This is because if you do not secure your website, you risk getting hacked.
Using a security plugin on your website adds an extra layer of protection that keeps hackers and malware at bay.
There are many security plugins for WordPress websites. You may get confused about choosing the right plugin for your site with many options available.
To avoid such, we have reviewed the best security plugins for WordPress sites.
Backup
Performing regular backups on your website will save you a great deal in case of data loss. If you lose access to your website due to an error, you can simply restore the backup you saved.
Some web hosts include a backup feature to their plans. In addition, you can use a backup plugin to improve the process. For this, please check our guide on performing regular backups in WordPress.
Image optimization
Your website’s speed can affect your ranking and performance on search engines. So one way to improve the speed of your website is to compress the images and media files you upload on your site.
When images are optimized, the size they occupy on the server will significantly reduce. This, in turn, will free up server resources and improve your site’s loading speed.
To get you started, we have a complete guide on how to optimize images for the web. You can also check our guide on organizing your media library files.
One-click accessibility
This plugin adds an accessibility feature to your website, so users can choose how content is displayed on their browser. With an accessibility plugin, users can increase/decrease font size, change colors, and contrast on the page.
To add this feature, log in to your WordPress dashboard and then go to Plugins >> Add New. On the search box, enter “one click accessibility”.

After that, click on the Install Now button next to the plugin name. Activate the plugin after the installation completes.
Now go to Accessibility >> Settings to open the plugins’ settings page. Here, you can choose the options to enable on your site. Ensure you click on the Save Changes button after making your selection.

On the “Toolbar” page, you can choose the screen sizes you wish to enable accessibility for. We recommend choosing all screen sizes. Other options are available here, but the plugin can function properly with the default options.

To see how the accessibility tool works, visit your website and observe the Wheelchair icon at the top-left side of your page.
Clicking on the icon opens up a modal with various options, such as increasing or decreasing text size, etc. You can use the Reset link to restore the default design of your page.

Meanwhile, there are other tips you can implement on your site to improve accessibility. For this, we recommend going through our guide on .
Cookie consent
Cookies are small pieces of code that website owners add to their websites to keep track of user activity while they access their website.
In many regions, you are required by law to ask for user consent before monitoring their browsing activities. We have a guide that explains how to add a cookie consent popup in WordPress.
Yoast SEO
An SEO plugin is essential for any website that wants to rank on search engines. Yoast SEO is one of the best SEO plugins for WordPress sites.
This is because of its intuitive design and user-friendliness. Note that installing an SEO plugin does not automatically drive traffic to your business site.
However, they provide SEO checklists to help you optimize your blog posts for search engines. When done right, it gives you the boost to rank on search result pages.
Meanwhile, we have a detailed guide explaining how to install and use the Yoast SEO plugin. Do check it out to learn more.
Caching Plugin
A caching plugin stores static content of your site on the server. WordPress then displays the stored version of your site to users.
This can save your server resources and speed up your site, especially for big sites that receive multiple requests per second. To set this up, you need a caching plugin.
SiteGround has a caching plugin available that you can use for this purpose. To activate this plugin, go to Plugins >> Installed Plugins. Next, locate the SiteGround Optimizer plugin and click on Activate.

Now go to SG Optimizer >> Caching to open the plugins’ settings page. Here, you need to enable dynamic caching for your business website. Also, enable the option to automatically purge all cache when you update your site.

Important WordPress Settings
After setting up your website, there are some necessary settings you need to update. For example, you need to change the permalink structure of your site. This is because the default permalink is not SEO friendly.
Updating Permalinks
To update your permalink structure, log into your WordPress dashboard and then go to Settings >> Permalinks.

Next, choose the “post name” option and click the Save Changes button. This will update your permalinks to use readable links that are SEO-friendly. We recommend doing this as soon as you first create your website.
If you make this change when your website has a lot of content, it may lead to broken links.
Adding New Users
If your business has other employees you wish to invite to the website, you can create an account for every employee on your team.
To add new users to your business website, go to the Users section. Here you will see all users on your website. Click on the Add New button to create a new user.

On the “Add New” user page, enter the username and email for the user. Also, enter a password.

Now click on the “Role” dropdown menu and choose a role for the user you are creating. The default role is “Subscriber”, and this user has no admin privileges.

You would want to assign users the “Author” role so they can create and edit posts and pages on your website.
After making your changes, click on the Add New User button. You can also see our detailed guide on user registration in WordPress to learn more about this.
For those looking to simplify the website creation process even further, our WordPress AI Website Builder offers a hassle-free, AI-assisted way to build a professional business website quickly.
What Next After Building Your Business Website?
Now that you have learned how to build a business website using WordPress, you need to know how to manage and grow your business site.
If you are new to WordPress, check our guide to learn how to navigate the WordPress admin dashboard.
Also, we showed you plugins that help in SEO and those for website security. For more performance tips likewise, check our WordPress SEO and speed optimization guides.
And if you run into any issues, we have a comprehensive tutorial on common WordPress errors. Further, if you are using the WooCommerce plugin, also check out our common WooCommerce issues tutorial.
For businesses seeking professional assistance, our client-focused WordPress services provide comprehensive support.
Finally, our team at Fixrunner is always available to assist with any WordPress issue you may encounter. You can subscribe to our maintenance service and let our experts take care of fixing and updating your site while you focus on running your business.