 Do you want to learn tips that’ll make you a better Elementor web designer? Elementor is one of the most popular website page builders for WordPress. It comes with lots of features that make implementing modern web designs easy.
Although it is popular, you may not know the useful tips that can save you much time when building your website.
So in this tutorial, we’ll share helpful Elementor tips and tricks to make you a power user of this amazing drag-and-drop builder plugin. Some of the tips we’ll share can only be accessed with the premium version of Elementor.
Table of Content:
- Is Elementor Good For Beginners?
- 14 Elementor Tips and Tricks You Should Know
- Use a Starter Template
- Easily go to Section Using the Navigator
- Switch Between Pages Using the Finder
- Utilize the Power of Keyboard Shortcuts
- Save Sections as Templates
- Use Global Widgets
- Add Global Settings
- Use Revisions to Revert Changes
- Copy and Paste Sections and Styles
- Custom CSS
- Background Carousel (Image Slideshow)
- Add Parallax Effects to Images
- Replace URLs
- Extend Elementor With 3rd Party Addons
- Frequently Asked Questions
- Conclusion
Is Elementor Good For Beginners?
Like we mentioned earlier, Elementor is one of the most popular website page builders. The reason for this popularity is its intuitive interface and easy-to-use tools.
With Elementor, you can build a functional website with its drag-and-drop builder. Also, this is ideal for beginners because no coding skills are required to use the Elementor plugin.
14 Elementor Tips and Tricks You Should Know
In this section, we’ll share useful tips for web designers to save time when using the Elementor page builder plugin.
Before getting started, you’ll need to have the Elementor plugin installed and activated on your WordPress site. Believing that you have done that already, here are 14 useful Elementor tips for WordPress websites.
Use a Starter Template
Elementor has a library of pre-designed templates and blocks to use as a starting point for your designs. These templates and blocks are fully customizable, so you can easily change the colors, fonts, and other design elements to match your branding.
Once you open the Elementor builder, click on the Starter Template icon to get started.

On the “Pages” tab, you’ll find free and premium templates you can import to your page by clicking on any of them.

Elementor templates with the Premium tag can only be accessed with the pro version of the plugin.
If you’d like to import just a section, click on the Blocks tab. You’ll find a list of page sections available to import into the Elementor builder.

These blocks can be useful for adding testimonial, pricing sections, and other similar modules to your page.
Quickly Go to a Section Using the Navigator Feature
As the page you’re building becomes bigger, it’ll be difficult to locate sections within the Elementor builder. But with the Navigator feature, you’ll see a list of all the sections you’ve added in hierarchical order. You can click on a particular section to navigate to that section.
To use the navigator option, click on the Navigator icon at the bottom of the sidebar.

It’ll open the Navigator menu in the preview area. You can click on a particular section to access it.

Switch Between Pages Using the Elementor Finder
When working on multiple pages, you may need to quickly switch to another page from within the Elementor builder.
Instead of exiting the current page and opening the new page from your WordPress dashboard, you can use the Finder option to locate the page you wish to edit.
To use the finder tool, click on the 3 horizontal lines icon on the sidebar menu of the Elementor builder.

Next, select the Finder option under Navigate From Page.

A new search box will pop up in the Preview area. You can type the name of the page you wish to find, then click on it to switch to that page from within the page builder.

Alternatively, you can use the shortcut key Ctrl + E to open the Finder option. This also works when you are on the WordPress admin dashboard.

Note: This feature is accessible to both free and premium users.
Utilize the Power of Keyboard Shortcuts
Elementor includes several keyboard shortcuts to help you work faster and more efficiently. For example, you can use the Ctrl+S shortcut to save your changes or the Ctrl+Z shortcut to undo an action.
Below is an image containing a list of available keyboard shortcuts from Elementor.

Save Sections as Templates – Useful Elementor Tip
Let’s say you have an entire section on your website that you want to reuse across multiple pages. It’ll save you a lot of time if you can quickly access the section as a template.
To save a section as a template, right on the section you’d like to save. Then select the Save as Template option.

On the popup that appears, enter a name for the template, then click Save to save your template.

Once it’s saved, you can access the template from the My Templates section in the Elementor builder, and you can then reuse your section templates from here.

You can also use the shortcode Elementor generates to add the saved template to your posts or pages in WordPress.
To get the shortcode, go to Templates >> Saved Templates from your WordPress dashboard. On the “Saved Templates” tab, you’ll find a list of all the templates you’ve previously saved.

On the “Shortcode” column, you’ll find the shortcode for each template. Copy the one you’d like to use, then simply add it to the post you want to display the template on.
Saving sections as templates make it easy to reuse common sections across various Elementor designed pages. It’s also a great idea to use this feature to avoid duplicating your efforts.
Use Global Widgets – Elementor Tip
With Global widgets, you can create a widget once and reuse it on multiple pages or posts. This can save you time and make it easy to maintain consistency across your site.
To create a global widget, simply right-click on the Widget icon and select the Save as a Global option from the available options.

Next, you’ll need to enter a name for the Global widget. Then, click on the Save button.

After that, you’ll be able to access this widget from the Global tab on the Elementor sidebar menu.

You can also use it on any page you edit with the Elementor builder by simply clicking on it or dragging it to the widget area where you wish to add the Global template.

Once you add it to the preview area, you can edit the widget globally and update it everywhere the widget has been used.
Alternatively, you can click the Unlink button to separate the one you imported from the Global widget. Doing this allows you to edit and update the widget only on that page. The Global widget, however, will remain untouched.
Note: This feature is available with Elementor Pro. So you’ll need to upgrade to the premium version of Elementor before you can use it.
Add Global Settings
If you have multiple pages on your WordPress site that’ll use the same layout and elements, you can use the Global settings feature to create a default layout for your pages.
Global Settings allows you to set fonts and colors, theme styles, layouts, make changes to your site identity and lightbox, etc. Basically, your website’s global elements are controlled from one place.
To open the Global Settings menu, click on the 3 horizontal lines icon within the Elementor builder.

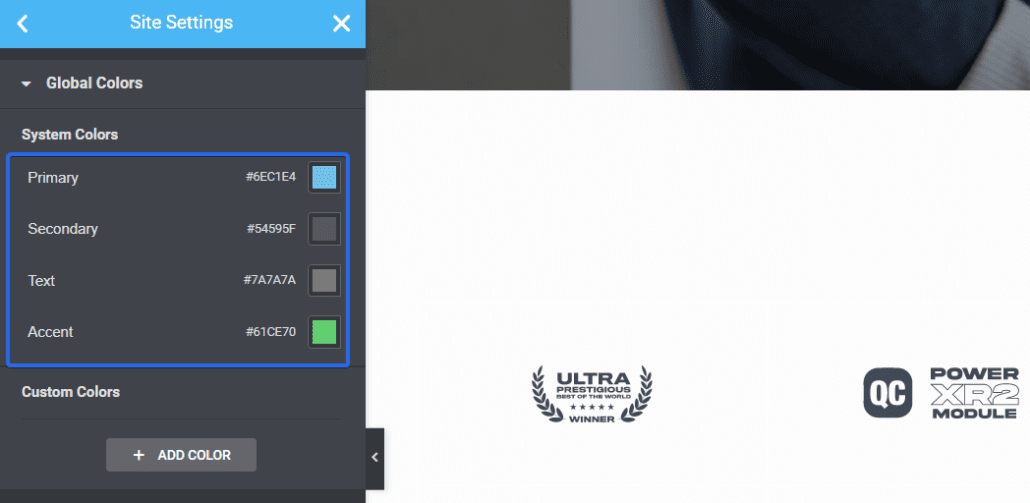
Under the “Settings” section, select the Site Settings option.

You’ll find various customization options on the Site Settings panel.

With Global Colors, you can set default global colors (Primary, Secondary, Text, Accent) or select and save your own.
The Global Fonts feature makes setting default fonts and typography styles easy through Elementor’s Site Settings.

Theme Styles allow you to control your website’s design (buttons, headings, backgrounds, contact form fields, image styles, etc.)
Go ahead and use the settings in this section to create standards for your whole site.
Use Revisions to Revert Changes
Elementor keeps a revision history of your designs, so you can easily go back to a previous version if needed. This is useful for undoing any changes you don’t like or that cause problem with your design.
To quickly access the revisions settings, click on the Revisions icon at the bottom of the sidebar.

It’ll open up a section that contains all the recent actions you’ve done since you opened the editor. You can click on any of them to revert the changes made.

On the Revisions tab, you’ll find the versions at each point where your Elementor changes were saved. At the top, it’ll contain the current version. As you scroll down, it shows older versions of the changes.

The revisions will also show the author that made the change on the Elementor page. If you’d like to revert your changes, simply choose an earlier version from the Revisions menu.
You can access this feature on the free and premium versions of Elementor.
Copy and Paste Sections and Styles
If you have a section on your Elementor page that you’d like to reuse, you can copy the section and paste it on a different page in the Elementor builder.
If you’d like, you can also paste the styles you copied from another section into a new one. This would save you from repeating customizations on all your Elementor sections.
To copy a section, right-click on the section you’d like to copy. It’ll open available options. Click on Copy to copy the entire section.

To use the widget you just copied, scroll to the section you want to add it to, then right-click and click on Paste.

If you’d like to paste only the styles, right-click and choose the Paste Style option.

It’ll add any customization you’ve set up on the widget to the new widget.
Custom CSS – Pro Elementor Tip
The custom CSS class option allows you to add CSS styles to any element on your page. This is useful for fine-tuning your design and adding custom effects. You’ll find this option useful if you are a tech-savvy user.
To add custom CSS in Elementor, you’d need to click on the section where you wish to apply the custom CSS.

Next, click on the Advanced tab on the sidebar menu to access more options, then scroll down and click on the Custom CSS option.

Within the textbox, you can add custom CSS styles, and it’ll reflect in the Preview section.

Please note that this feature is ideal for users with some knowledge of CSS. If you are not tech-savvy, you can still utilize the drag-and-drop builder to build your Elementor website.
Note: This feature is only available with the premium version of Elementor.
Background Carousel (Image Slideshow)
With Elementor, you can select images that’ll display on the background of a section. This is helpful if you want to add a slideshow in the background while maintaining the content of that section.
The background image slideshow works like an image carousel added to a page.
To add a slideshow as the background in Elementor, click on the Edit section icon. It will open up options for this section on the left sidebar.

On the left panel, click the Style tab and select the Slideshow icon.

From there, you’ll be able to choose images from your media library. To add images, click on the plus icon. It’ll take you to your media library, where you can either upload new images or select existing images.

After selecting the images, click on the Insert gallery button.

It’ll add all the images you selected and display them as a slideshow.
There are options available to further customize how the slideshow works. You can change the duration, animation, background size, and position of the images.

You can access this feature with the free version of Elementor.
Add Parallax Effect To Images
Parallax scrolling is a technique that’s used to create 3d effects on your page. With parallax effects, some elements will appear to move faster than others. This gives the users a stunning experience while browsing through your page.
To enable parallax scrolling effects in Elementor, click on the section you’d want to enable it on to open the available options.

On the sidebar menu, click on the Advanced tab, then select the Motion Effects tab. From here, toggle the Scrolling Effects option to the ON position.

Once you enable scrolling effects, it’ll open additional options. Each available option will add effects as you scroll past the widget area.

You’ll see a preview of how it works in the preview area while editing your page. Be sure to update your changes after adding the scrolling effect.
Note: Scrolling effects is an Elementor pro tip, accessible to premium users only.
Replace URLs – Elementor Tips
Elementor has a find-and-replace feature that allows you to update links on your website. This can be useful when you migrate from an insecure HTTP connection to a secure SSL (HTTPS) connection.
To access this feature, log in to your WordPress dashboard and then go to Elementor >> Tools.

Then click on the Replace URL tab. Here, enter the old and new URLs in their respective boxes. Once you’ve done that, click the Replace URL button to update your links.
Extend Elementor With Third-Party Addons
Elementor is a robust plugin that’ll likely contain all the features you need to get your website up and running. However, there are many addons for Elementor that you can use to extend the features of the plugin.
For instance, if you’d like to design navigation menus on Elementor, you can use the Sticky Headers and Menus addon to enable the Elementor plugin to manage your site navigation from the drag-and-drop builder.
There are free and premium addons for Elementor that you can download from the Elementor marketplace.

You can use this link to access and download Elementor Addons.
Frequently Asked Questions
Below are responses to some of the questions Elementor web designers ask about using the plugin.
What is the best way to learn Elementor?
The best way to learn anything online is by practising how to use it. You may make mistakes at first, but that’s part of the learning process. The more you practice, the better you’d become at using Elementor. You can also read guides like this one, or consult online tutorials to speed it up.
Is Elementor Pro worth it?
It depends on your use case. If you want to use Elementor to design your website without all the extra features, then there is no need to opt for the pro. Also, if you’re tech-savvy and like the manual approach, you can implement some Elementor pro features by writing some lines of code.
However, if you need more design flexibility without having to write code, then opting for the pro version of Elementor can be beneficial. It gives you access to premium resources and features we explained in this guide.
Conclusion – Elementor Tips
There you have it! 14 useful tips to streamline your Elementor workflow. These tips for Elementor work for beginners as well as seasoned web developers.
Elementor is a feature-rich plugin. While this is great, it could have the side effect of slowing down your website. If you’d like to speed up your Elementor website, be sure to check our speed optimization guide for a complete tutorial.
And if you’d like to learn how to use Elementor to build a complete business website, check out our ‘how to make a business website in WordPress’ guide.