How to Add Paypal Donate Button in WordPress
Adding a PayPal donate button to your website is a great idea if you run a nonprofit or charitable organization. People are usually willing to donate to causes that help people like religious services and donations towards disaster relief.
But good fundraising ideas are not enough to collect significant donation amounts. It is essential to use proper fundraising tools to make it easier to donate and adding a PayPal donate button can go a long way. In this article, you will learn how to add a PayPal donate button to your website and webpages.
Table of Content
- Why Should You Use PayPal for Donations?
- Setting Up PayPal for Nonprofits
- How to Add PayPal Donate Button in WordPress
- Adding a Thank You Page for PayPal Donate Button
- Tips for Accepting Payment on PayPal as a Non-Profit
- How to Customize PayPal Donate Button’s Appearance
- Troubleshooting Common Issues with PayPal Donate Button in WordPress
- Conclusion
Watch Video:
If you learn more visually, then first watch this video that details the steps to add PayPal donate buttons on WordPress.
Why Should You Use PayPal for Donations?
Here are the top reasons to use PayPal for your donation website:
1. PayPal is simple and quick to use. This means that donors can make contributions with just a few clicks.
2. Many people know and trust PayPal. This trust can encourage more people to donate, knowing their payments are handled by a reliable service.
3. PayPal allows donations from anywhere in the world. This means nonprofits can receive support from people everywhere.
4. PayPal accepts different payment methods like credit cards, debit cards, and bank transfers. This flexibility makes it easier for people to donate using their preferred method.
5. It’s easy to implement PayPal on your website. Whether you decide to go with WordPress plugins or to use PayPal’s donate function, you should be ready to start accepting them on your site instantly.
6. PayPal provides detailed records of all transactions. This is helpful for nonprofits to track donations and ensure transparency in their fundraising.
How it Works
A PayPal donate button makes fundraising super easy. With a PayPal link in place, you don’t need a fundraising strategy. You just need to register with PayPal and set up your donate button to start collecting donations.
Here are some use cases for the PayPal donate button.
- Nonprofit Organizations: Charities, foundations, and other nonprofit entities can use PayPal Donate buttons to facilitate easy, secure donations from supporters worldwide.
- Individuals: Personal fundraising campaigns, such as those for medical expenses, education, or community projects, can benefit from the simplicity and reach of a PayPal Donate button.
- Community Groups and Clubs: Local clubs, societies, and community groups can use the button to raise funds for events, activities, or specific causes within their communities.
- Churches and Religious Groups: Religious institutions can use PayPal Donate buttons to collect tithes, offerings, and special donations for various missions and charitable activities.
- Crowdfunding Campaigns: Independent creators, activists, and entrepreneurs launching crowdfunding initiatives can use PayPal Donate buttons to gather financial support from their audience.
- Educational Institutions: Schools, colleges, and educational nonprofits can use the button for fundraising campaigns, scholarships, and other financial needs.
- Artists and Content Creators: Musicians, writers, bloggers, and other content creators can use PayPal Donate buttons to receive financial support directly from their fans and followers.
Before we go into creating PayPal donate buttons, let’s look at the steps to create a PayPal account for a non-profit.
Setting Up PayPal for Nonprofits
PayPal offers special services and reduced transaction fees for registered nonprofit organizations. Nonprofits get a discounted rate of 2.2% + $0.30 per transaction compared to the standard rate of 2.9% + $0.30.
Here’s how you can set up PayPal for your nonprofit to enjoy reduced transaction fees.
1. Create a PayPal Business Account
First, you need to create a PayPal Business account. If you already have one, you can skip this step.
- Visit the PayPal website.
- Click on “Sign Up” and select “Business Account.”
- Fill in your organization’s information and follow the prompts to complete the setup.
2. Upgrade to a Nonprofit Account
Once your Business account is set up, you can upgrade it to a nonprofit account to benefit from reduced transaction fees.
- Contact PayPal:
- Log in to your PayPal Business account.
- Go to the “Help & Contact” section at the bottom of the page.
- Search for “nonprofit discount” or “apply for nonprofit status.”
- Follow the instructions to contact PayPal’s customer service.
- Submit Required Documentation: PayPal will ask for specific documentation to verify your nonprofit status. Commonly required documents include:
- Proof of nonprofit status: This can be your 501(c)(3) determination letter from the IRS or other official documentation confirming your tax-exempt status.
- Bank statement: A recent bank statement in your organization’s name.
- Government-issued ID: A photo ID of the account holder (e.g., driver’s license or passport).
- Wait for Approval: After submitting the required documents, PayPal will review your application. This process may take a few days to a couple of weeks. Once approved, you’ll receive a confirmation email, and your account will be upgraded to nonprofit status.
3. Obtain Reduced Transaction Fees
Once verified as a nonprofit, you can now benefit from reduced transaction fees on donations.
To apply for reduced fees:
- Log in to your PayPal Business account.
- Navigate to “Settings” (gear icon) and then “Account Settings.”
- Under “Account Options,” select “Getting Paid and Managing Risk.”
- Find “PayPal’s Nonprofit Discount Program” and follow the application instructions.
PayPal has this extensive guide to setting up a PayPal account for your nonprofit.
How to Add PayPal Donate Button in WordPress
After setting up your PayPal account, you will need to add the button to your donation website. There are three ways you can do this: You can use the PayPal Donate Button Creator, a PayPal donations plugin or a form builder.
i. Add PayPal Using the Donate Button Creator
You can implement PayPal buttons on your site without using the PayPal Button Creator. Although this is a bit more technical, it isn’t hard.
To create the button, go to the PayPal Button page and sign in with your PayPal email and password.
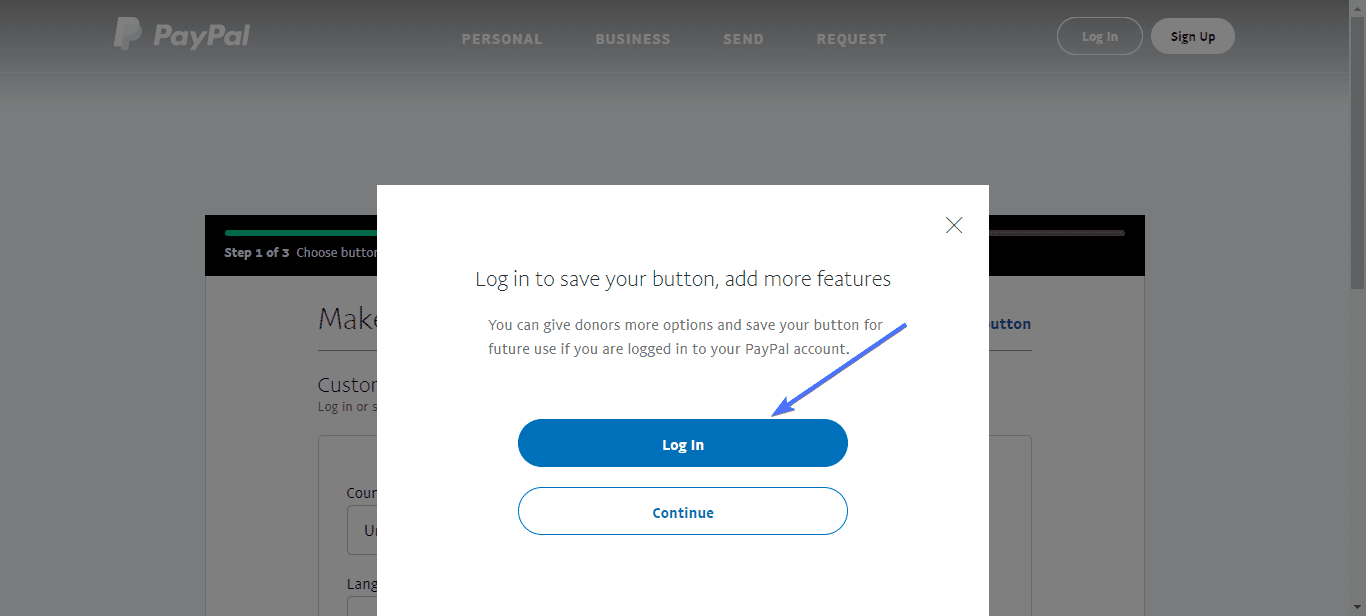
Once you’ve signed in, follow these steps to set up the PayPal Donate Button:
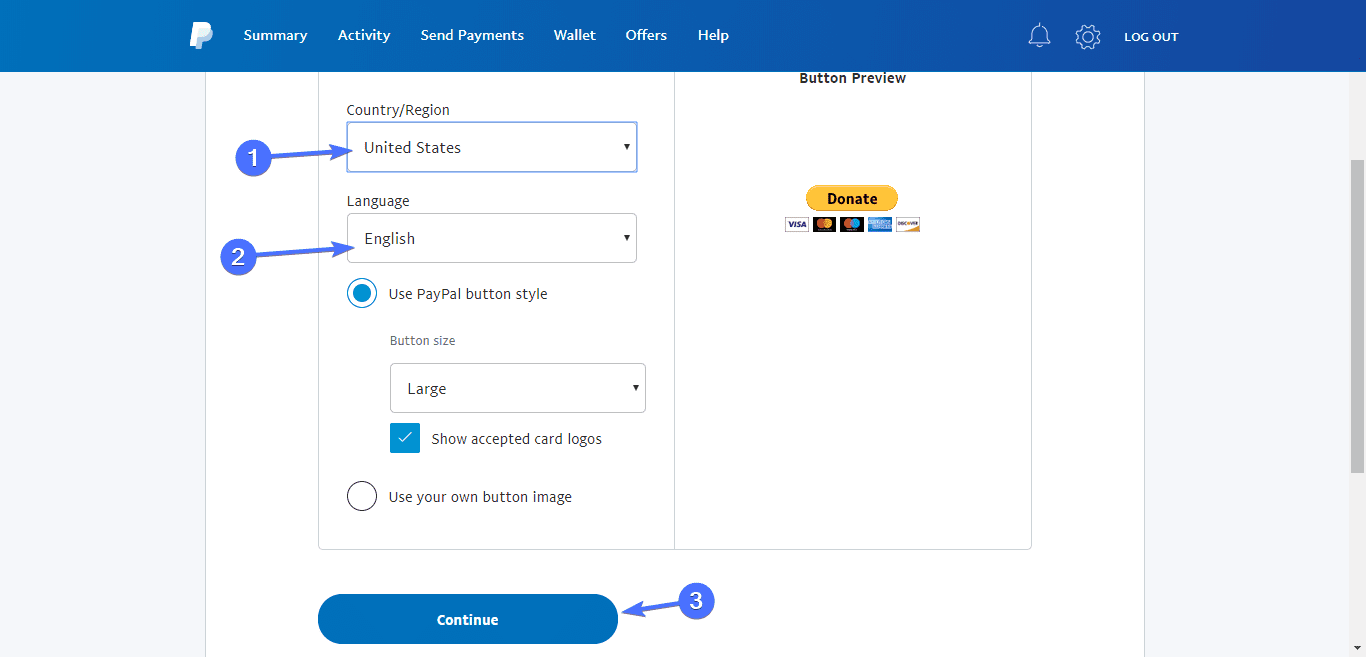
Step 1: Choose Country, Language and Button Style
In this step you will be required to choose your country and language. Usually, you won’t need to change any of these options as it will pull correctly from your account.
Next, choose the donate button style and type. If you want a smaller button, select Small from the Button size option.
You can see a preview of the donate button on the right. There’s also the option to use your own button image instead of the default button.
Click Continue once you’re done.
Step 2: Outline Donation Purpose
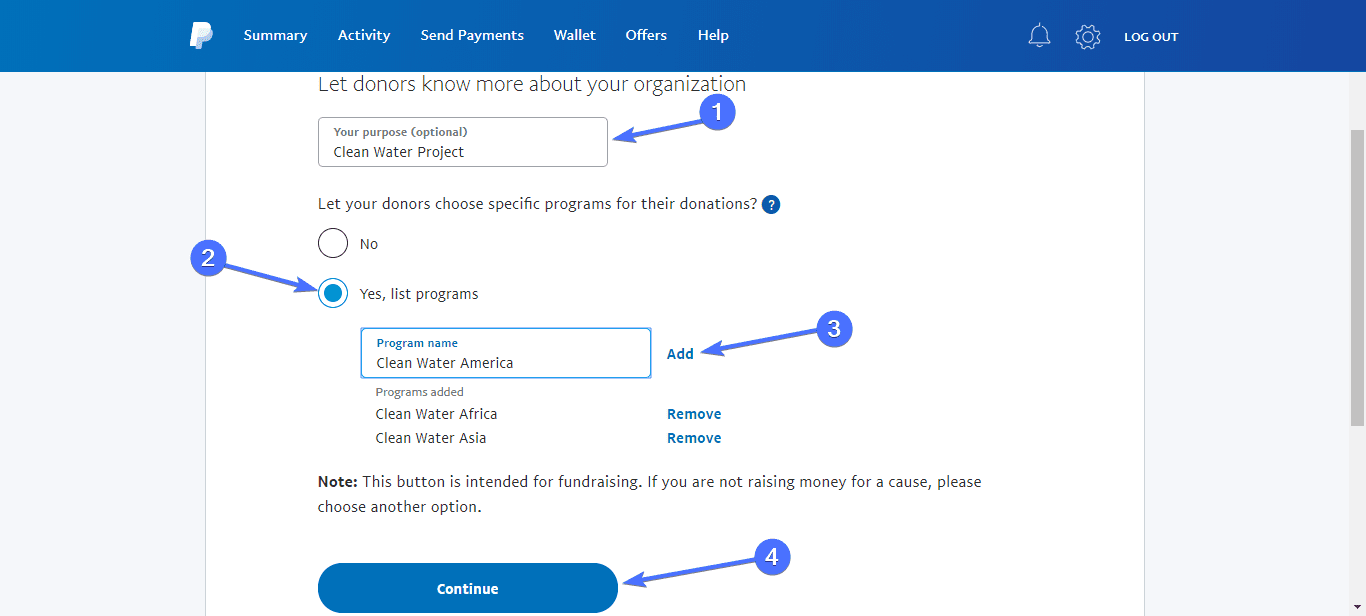
Next, you will be required to enter the purpose of your donation. If you are running a nonprofit organization, PayPal lets users know the specific cause for which they are making donations.
Note: If you want users to choose a particular sub-program to donate to, tick Yes, List Programs. Next, type in a program name in the box and click Add. Repeat this process until you’ve listed all your subprograms.
Then click Continue.
Step 3: Set Donation Amount
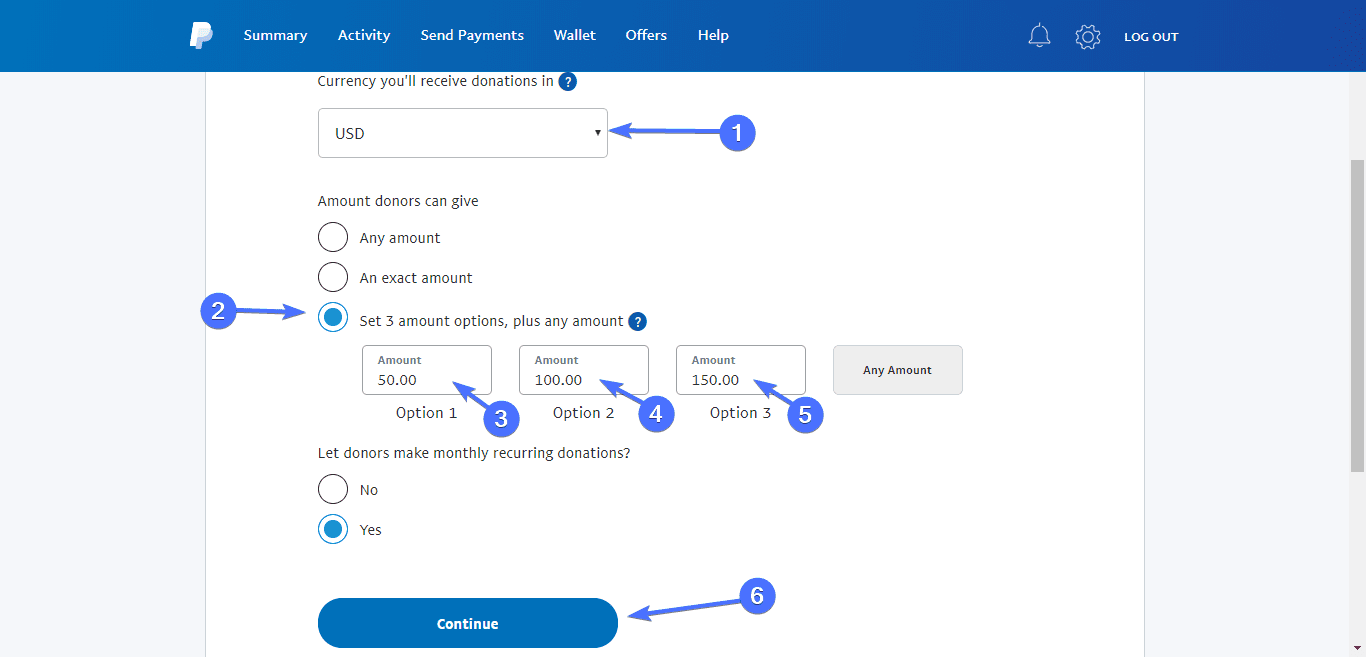
Next, set your preferred currency in the “Currency you’ll receive donations in” input box.
In the “Amount donors can give” section, you can set either an “Any amount”, “An exact amount”, or 3 amount options plus any amount.
The first two are straightforward. If you choose “Set 3 options, plus any amount”, enter 3 amounts in the boxes that appear in increasing order. This means that the second amount should be higher than the first amount and the third amount should also be higher than the second.
If you want users to be able to choose a recurring option for donations, set the “Let donors make monthly recurring donations” to Yes.
Click Continue.
Step 4. Additional Setup
The final step has optional settings that you may wish to use. Let’s take you through them.
Get info from donors:
If you expand this section, you will see settings that allow you to receive information from prospective donors. You can choose to receive their email address and allow them to send a note along with their donation. Just Tick yes or no for each option.

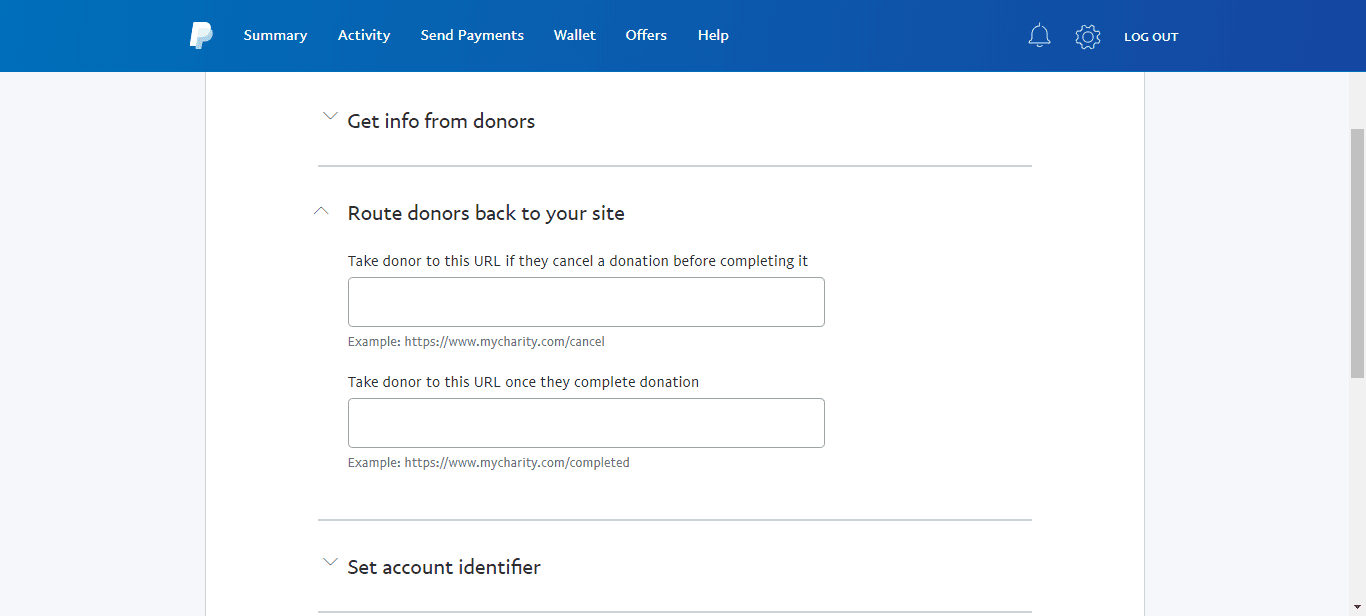
Route donors back to your site:
The next section allows you to add a cancel URL and a completion URL. The cancel URL is the page the user will be taken to if they cancel the transaction. The completion URL is a thank you page after the donation is made.
Set account identifier
This section allows you to hide your PayPal login email on the donations page. It’s usually better to display a Merchant Account ID instead of your email.

Add extra HTML button Variables
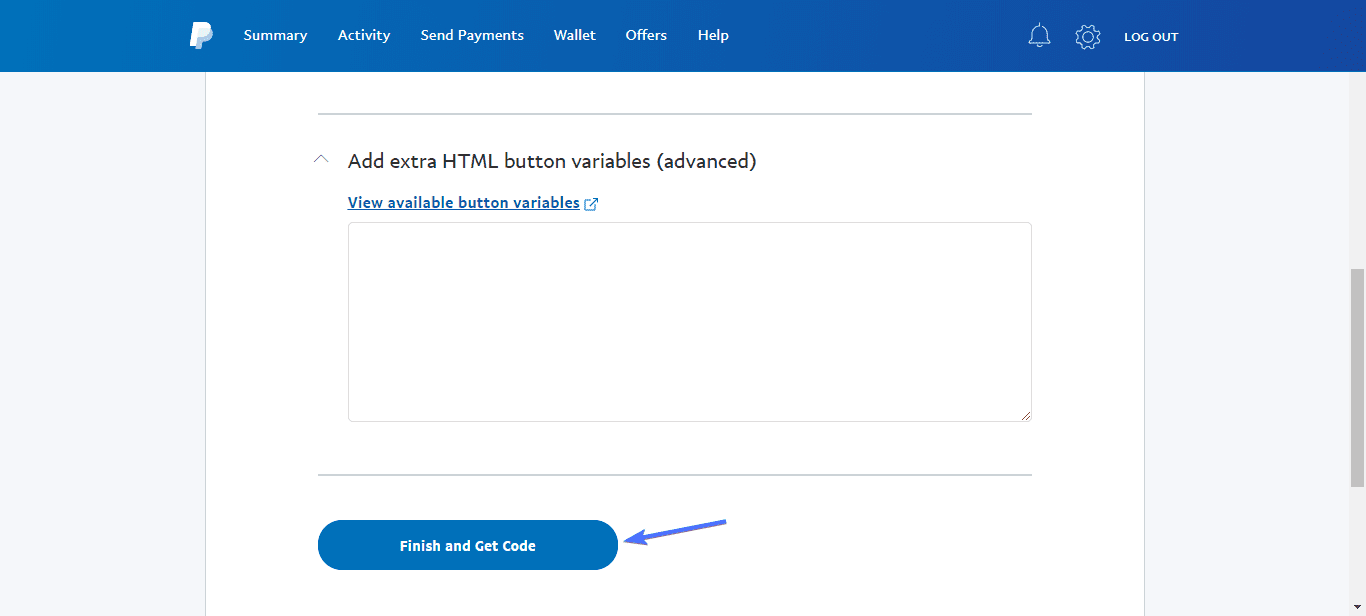
This section is for developers who want to control the way the donate button interacts with PayPal features. You can add custom HTML to control how the button behaves.
Note: Leave this option untouched unless you know what you are doing.
Next, click Finish and Get Code.
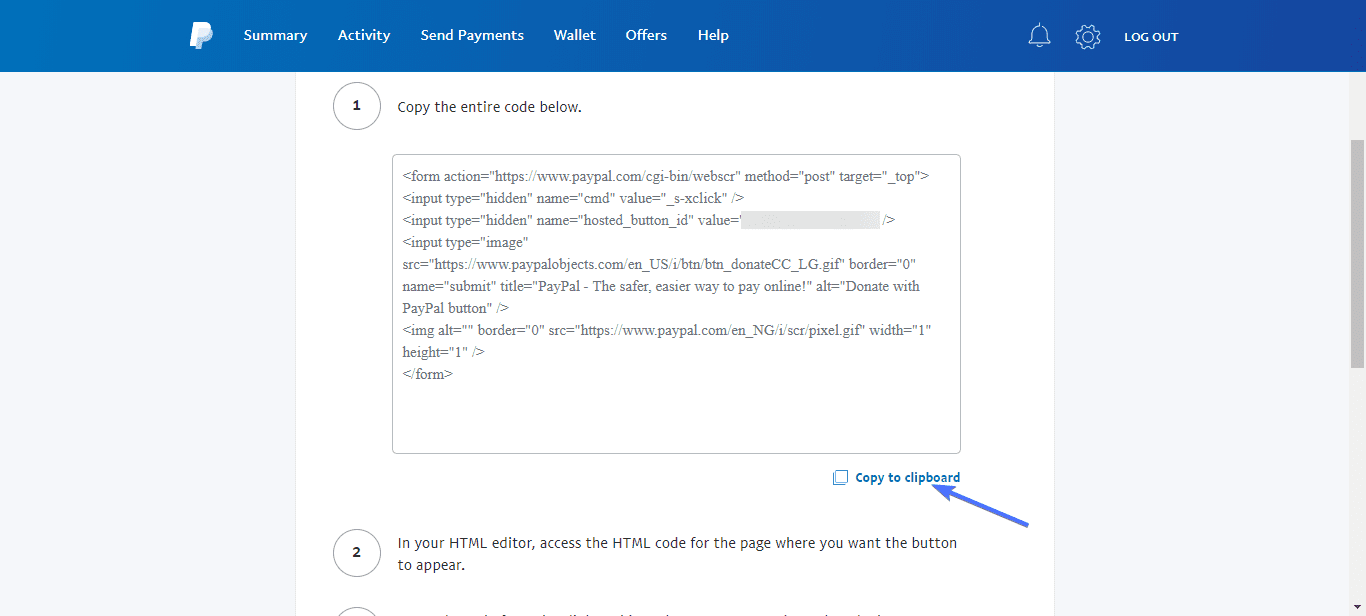
On the last page, you would see your button HTML code. Click Copy to clipboard.
Step 5. Embed Button to Page
To embed the PayPal donate button on your website, you need to paste the code you copied in the page you want the button displayed.
Note: Leave this page open in case you find out you have not copied the code, or you have copied something else over it).
Step 6. Create Page
If you want to add the button in a pre-existing page, go to Pages > All Pages and click to open the page.
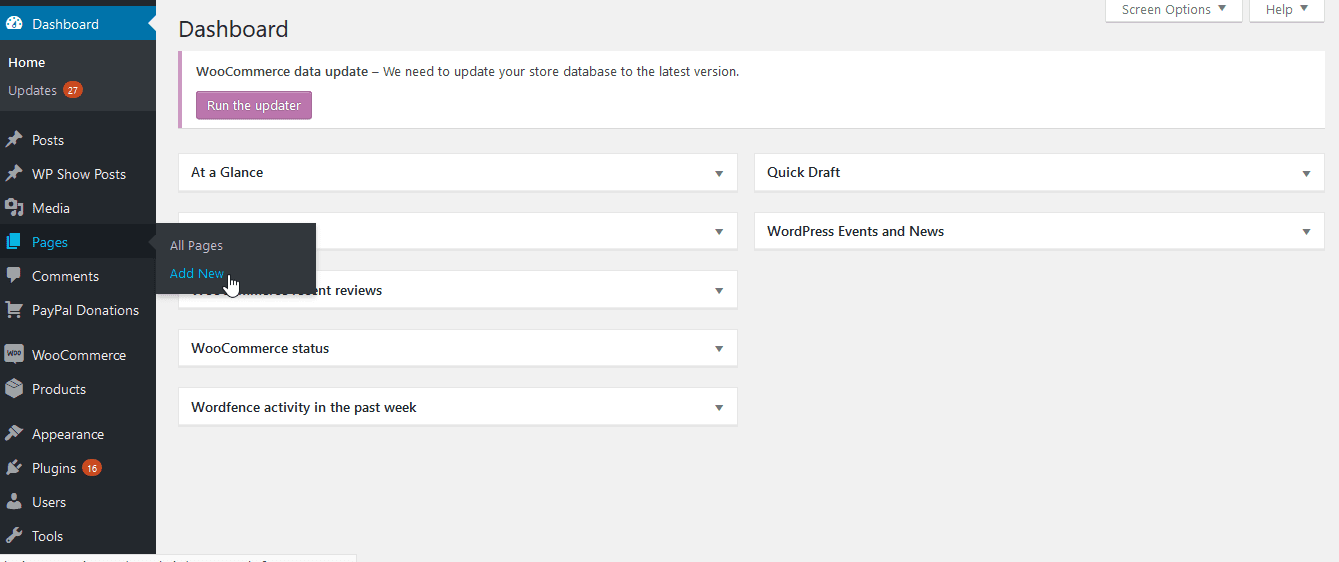
However, If you haven’t already created a page, then you need to create one. Navigate to your WordPress dashboard and go to Pages > Add New.
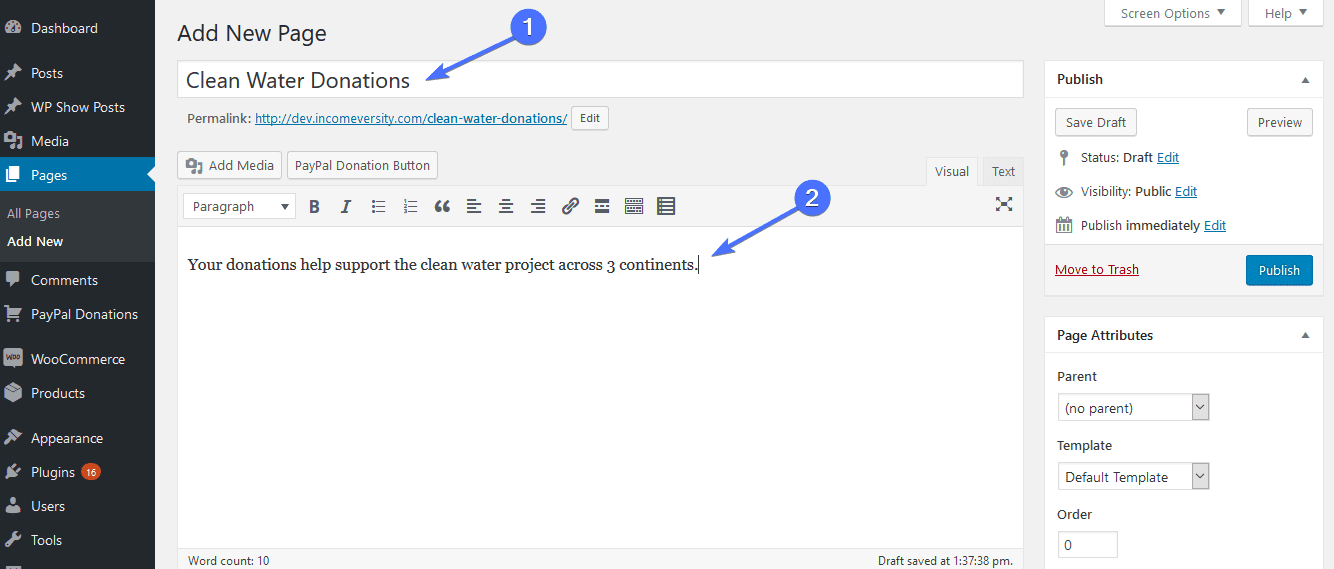
Type in the title of the page and then go to the content editor and type in some introductory message about your donation.
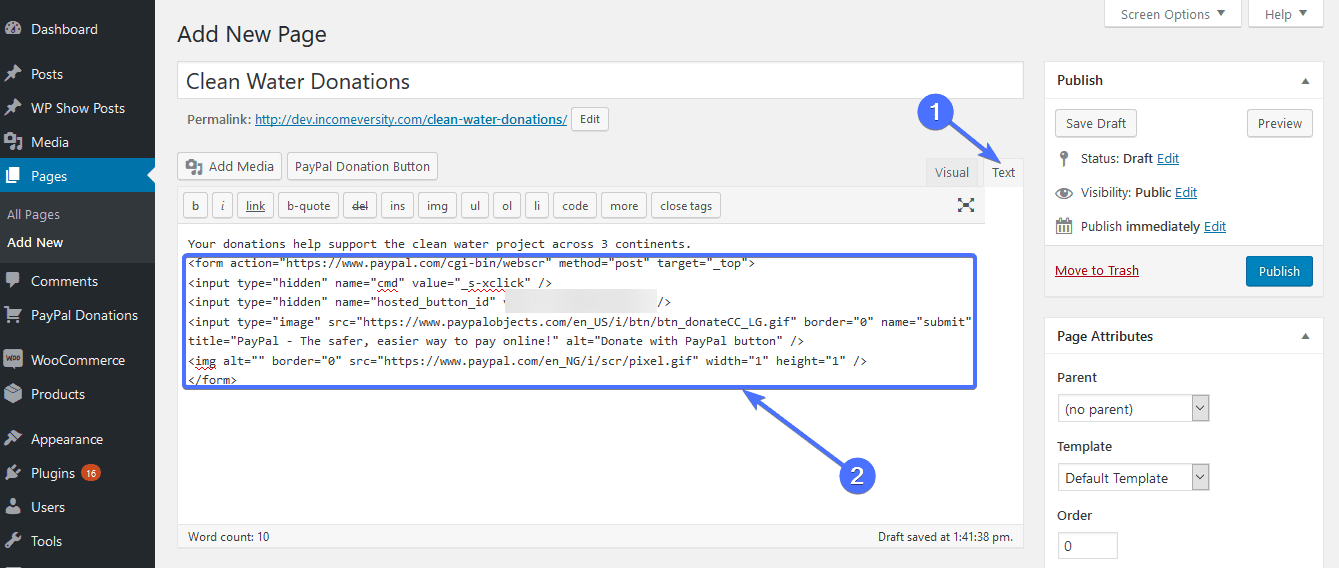
Next, switch the editor to “Text mode” and paste in the code you copied where you want the button to appear. Then click Preview to view the page.
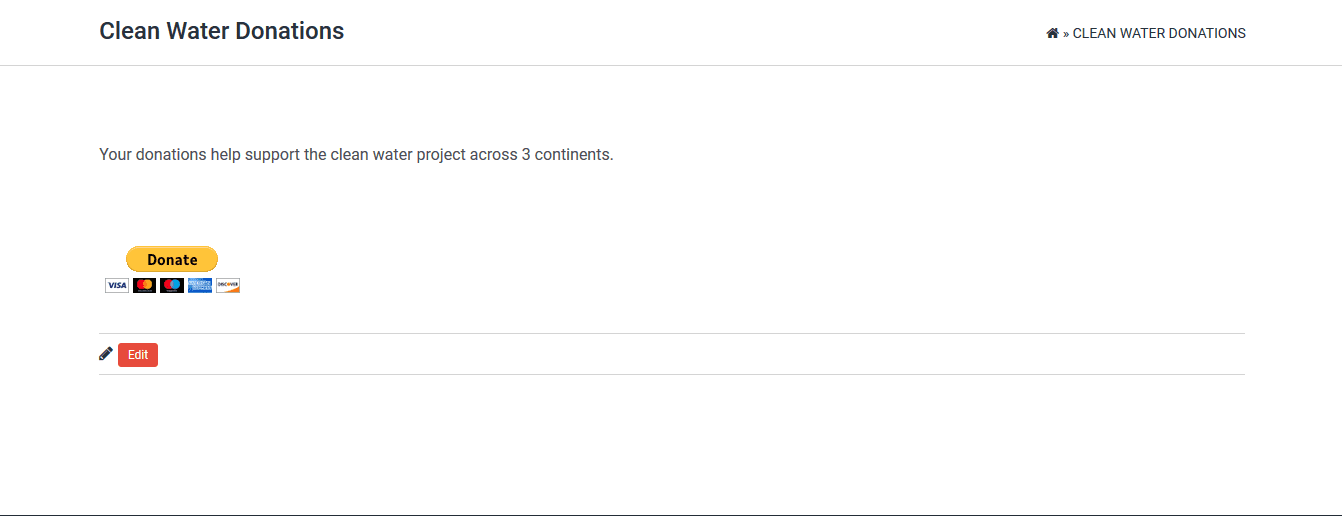
Your donate button should look like this:
All good. Go back to your WordPress page editor and click Publish. That’s it, your button is ready!
ii. Use a Plugin to Add PayPal Donate Button
There are several plugins that allow you to add a PayPal donate button. Here are some of the top PayPal ones:
1. Accept Donations with PayPal & Stripe

Accept Donations with PayPal & Stripe offers a simple setup with easy-to-follow instructions for creating PayPal and Stripe accounts, including sandbox accounts for testing. The plugin supports placing donation buttons anywhere on your site and enables customers to donate using their PayPal account or credit card via Stripe.
2. GiveWP – Donation Plugin and Fundraising Platform:

GiveWP is known for its customizable PayPal donation forms with built-in reporting. It emphasizes security and convenience for accepting online donations. Users can start using GiveWP for free and benefit from unlimited donation forms that make donors feel secure.
3. Donations via PayPal:

Donations via PayPal adds a PayPal donation shortcode and sidebar widget to your website. It offers customizable donation buttons, optional settings for donation purpose and reference, currency options, and return pages. Users can also easily configure their PayPal ID and other settings.
4. Donation Forms by Charitable

Donation Forms by Charitable is a top-rated WordPress plugin for creating and managing high-converting donation forms and fundraising campaigns. Charitable supports various fundraising needs, including ongoing donations, time-sensitive campaigns, and specific fundraising goals.
5. Simple Payment Donations & Subscriptions Plugin by Paymattic

Simple Payment Donations is an easy-to-use plugin for accepting payments on WordPress. It features Stripe checkout and a built-in form builder for creating various payment forms, including product orders and subscription payments. Users can build customizable payment, buttons, forms and collect payments quickly and efficiently.
How to Set Up PayPal Add Button Using the Accept Donations with PayPal & Stripe Plugin
To use Accept Donations with PayPal & Stripe plugin, you first need to install it. Go to your WordPress dashboard, then search and install the “Accept Donations with PayPal & Stripe” plugin. Here’s our guide on installing WordPress plugins to help you through the process.
Once you have the plugin installed and activated, you will find a “Donations with PayPal & Stripe” option on your WordPress dashboard.

Set Up the Pugin
Once installed, you need to set up the plugin. To do this, go to Donations with PayPal & Stripe>>Settings.

This will take you to the “Getting Started” tab of the plugin.

Click on the “Language and Currency” tab and choose your preferred language and currency.

The PayPal tab allows you to connect the plugin to your PayPal account. Scroll down and click on Get Started.

This will reveal the “Setup PayPal Account” screen.
Click on Connect, and log into your PayPal account with your email ID to connect.

Leave the PayPal Option at the bottom of the page at its default: “Sandbox Mode” set to Off, and the “Disable PayPal” set as No.

Now click on the “action” tab.
Here you can set the PayPal payment screen to open up in the same or a different window. You can also set to prompt buyers to input their shipping address or leave a note with their donation.
This is also the screen where you set your cancel URL and Thank you URL. Once everything is set, click Save Settings at the top-right side of the screen.

Create a PayPal Donate Button
Once you are done with the initial setup, it’s time to create the PayPal Donate Button.
To do this, go to Donations with PayPal & Stripe > Buttons.

Once on the Easy Donation buttons page, click on New PayPal Donations Button.

Fill out the Purpose/Name of the donation in the “Main” section. Leave the amount empty, otherwise, donors will be restricted to donating the amount you set and they may want to donate less, or even more.
Leave the “Language and Currency” and “Other” sections as is.
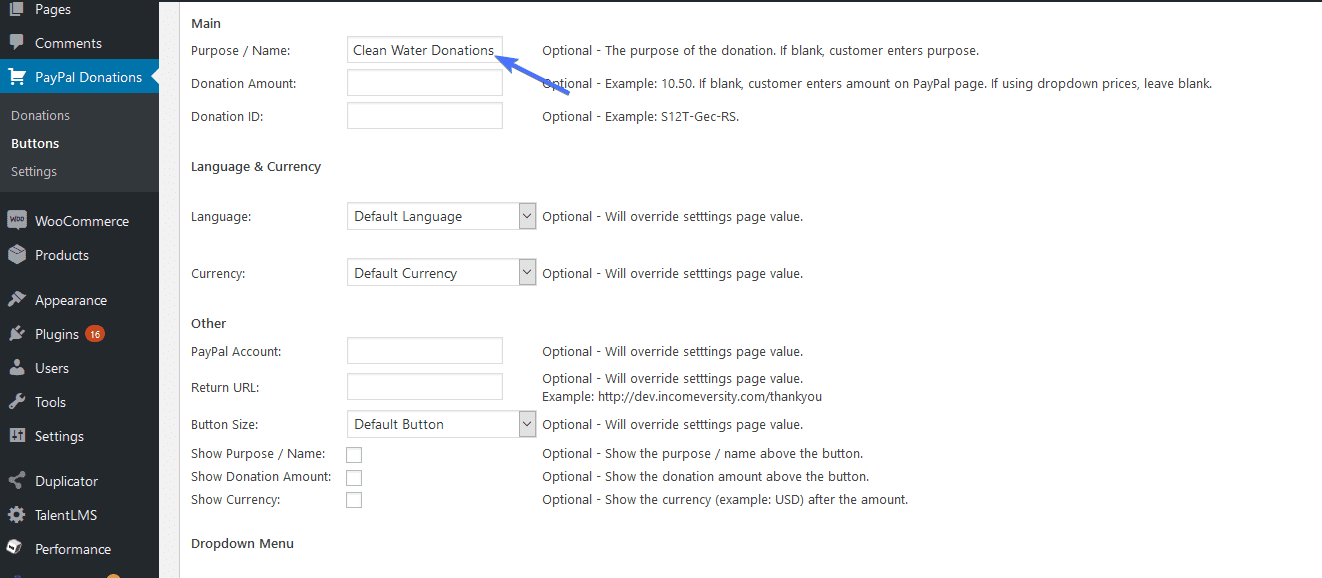
Now scroll down to the “Dropdown Menus” section. You only need to set up this section if you want to give users a dropdown menu with different amounts of payments to choose from.
Leave this section untouched if you want donors to enter any amount they choose.
Otherwise, enter a name for this menu in the “Amount Menu Name” textbox.
Underneath that, you will see Option/Amount pairs. The left box shows the amount that will be displayed to the user, the right box is the amount that will be sent to PayPal for processing when this option is selected.
So if you want to give the donor the option of $10, you have to enter $10 in the left box, and 10 in the right box. Again, the $10 is for the user to see what they are selecting, and the 10 is used to process the donation.
Fill out the boxes accordingly.
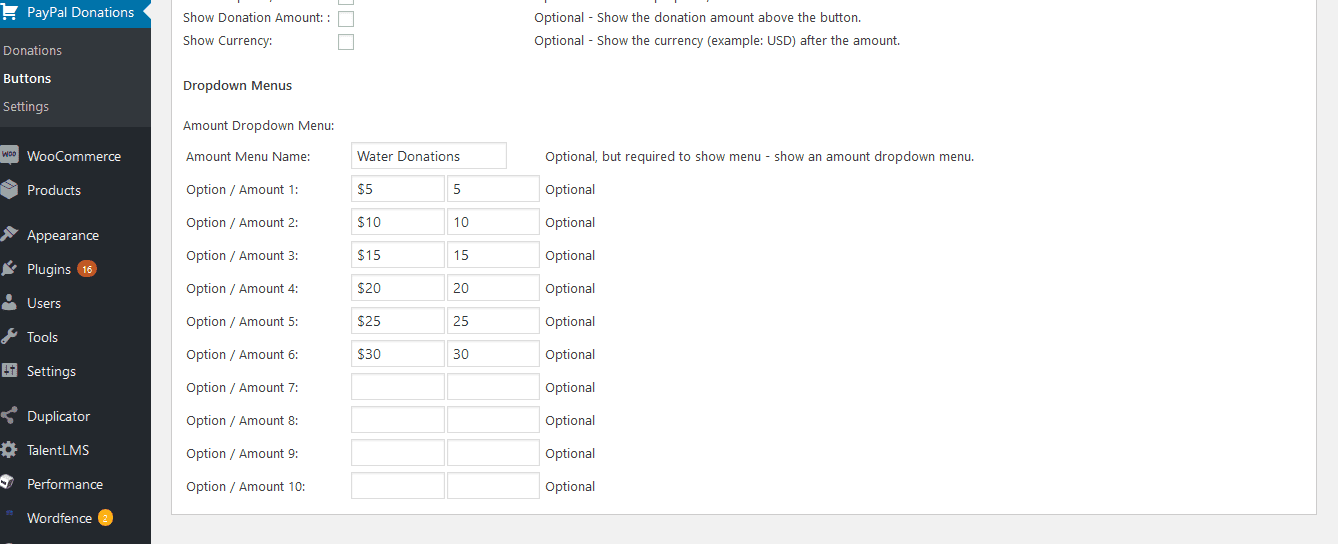
When done, scroll up and click Save PayPal & Stripe Donation Button.

Add the PayPal Donate Button on Your Donation Page
To embed the button we just created in a page, go to PayPal & Stripe Donation Button>>Buttons. Then Copy the shortcode for the button.
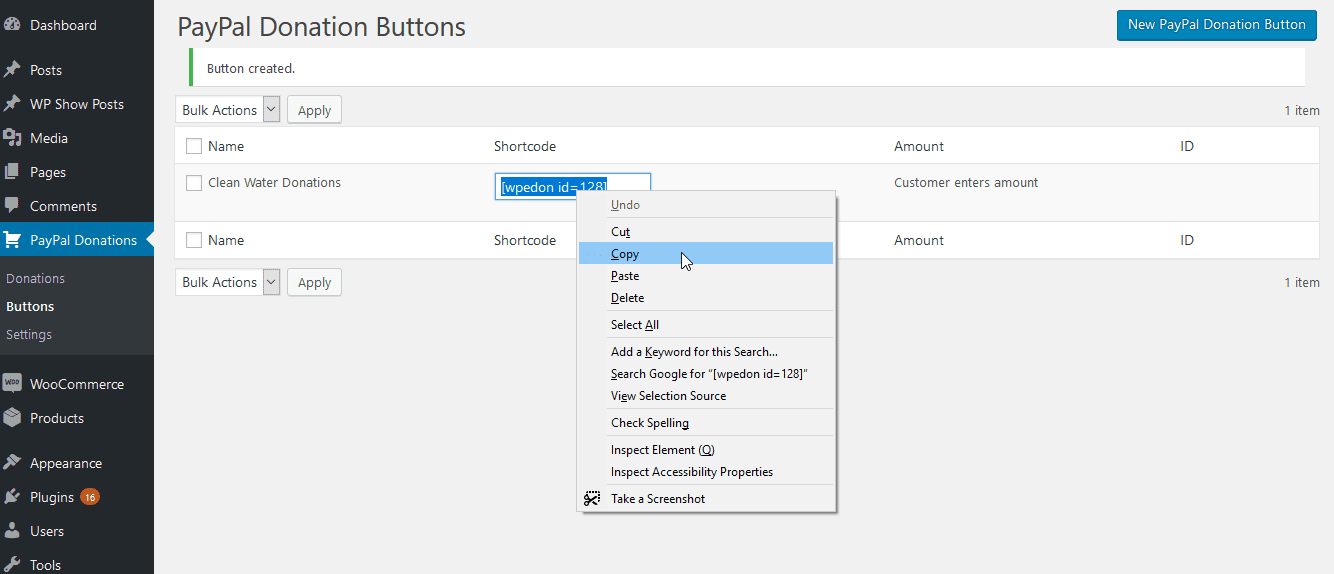
Next, go to Pages > All Pages and click on the page you want to add the button to. This page will be opened in the WordPress editor.
Within the editor, click on the point where you want to display the button and paste the shortcode you copied.
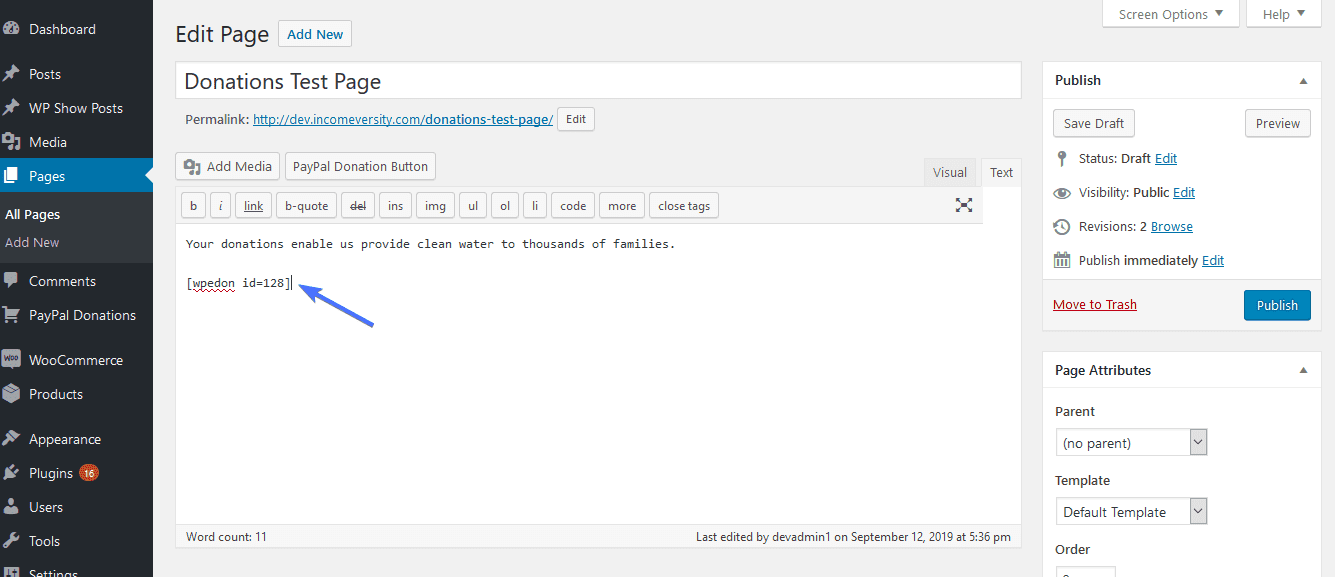
Next, click Preview on the right to see how your brand new donate button looks.
If you followed the steps correctly, it should look like this:
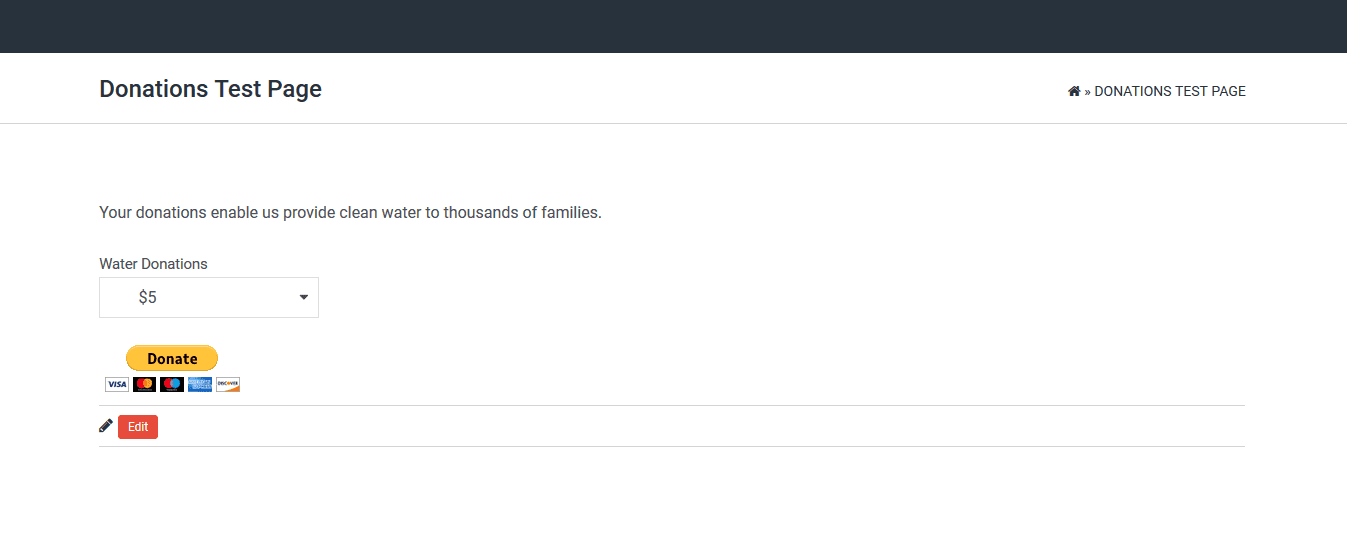
Now go back to the page editor and click Publish. That’s it. You’re done!
You may decide to test out the donation by going to the published page, selecting an amount, clicking Donate, and completing the donation in PayPal.
iii. Use a Form Builder to Add PayPal Donate Button
Another way to add PayPal Donate button to your site i to create a a donation form. Fortunately, most form builders like WPForms, Contact Form 7, FormSmarts and 123FormBuilder provide the option to add a PayPal donate button to your form.
To get started, you first need to install and set up the plugin. For this example, we will use WPForms.
How to Use Add PayPal Donate button using WPForms
First you need to install the WPForms plugin. Navigate to your WordPress dashboard, then go to Plugins>>Add New Plugin. Search and install the WPForms plugin. Once installed, the plugin will appear on your WordPress dashboard.
WPForms has a free version. But you will need the premium version to create a donation form that can accept PayPal payments. You can purchase the premium version on their website.
Once you’ve ade the purchase and have the license, head over to your wordpress dashboard. Then go to WPForms>>Settings.
Next, enter the license and click Verify Key.

After verifying the plugin, click on Addon, then search for PayPal.
Install the “PayPal Commerce” Addon.

After installing the addon, you can now start building your donation form. Go to WPForms>>Add New

Create New Form:
Once on the form creation dashboard, start by naming your form.

You can create a form from scratch or use a template. WPForms offers several Templates you can use. You can narrow down the options to only donation templates using the search option.

In this example, we will use the “General Donation Form” template. Click on the Use Template button next to it.

The form looks like this and has fields for names, donation amount, email, comment and three check button options. You can customize these fields as you want; remove and add fields. WPForms has an extensive form customization documentation to guide you.

Next, you need to change the submit button to “Donate.” To do this, click on Settings, then change the submit button text from “Submit” to “Donate.”

Connect to PayPal:
Now you need to connect your PayPal account to WPForms if you haven’t done that already. Click on Payments, then on PayPal Commerce. Next click on Connect to PayPal.

This will redirect you to the WPForm payment tab. Scroll down to the “PayPal commerce” section and click on Connect with PayPal Commerce.

This will popup the PayPal login screen where you can connect your PayPal account to WPForms by logging into your account. Here’s a WPForms guide on how to connect your PayPal account.

Once you are done with the setup, click Save. Here’s an expensive guide on how to create PayPal donation forms using WPForms. The guide highlight other changes you can make to your form.

Once saved you can now embed your form to any page on your website. To do that click on Embed. You will have the option to:
- Choose a page to embed to form into
- Create a new page
- Embed the form manually
- Embed using shortcode.
If you click on use a shortcode, you will reveal the form’s shortcode. Copy it and paste it on the page you want the form displayed as we did in the other steps to display your form.

Your form may look something like this:

Adding a Thank You Page for PayPal Donate Button
PayPal allows you to redirect users to a thank you page after they make a donation. The “Thank you” page as the name sounds allows you to show your gratitude for their donation. But it’s not just about creating a page, the way the page is designed can get your donor to give more right now or in the future.
Fortunately, creating a thank you page is quite straightforward whether you used the PayPal donate feature or a plugin.
How to Create a Thank You Page on WordPress
To create a page, first think about the message you want to communicate to the donor. In the example earlier, we illustrated using donations to the Clean Water Project. Our thank you page should contain a simple message and an image gallery that depicts clean water.
To illustrate our thank you page set, we grabbed some free images from Pexels.com and Pixabay.
Once you have your images, it’s time to create your page. Go to Pages > Add New.

Now type in the subject of the page in the input box at the top. In the content editor below, enter your thank you message and any image you want to use. Click Preview to see the page.
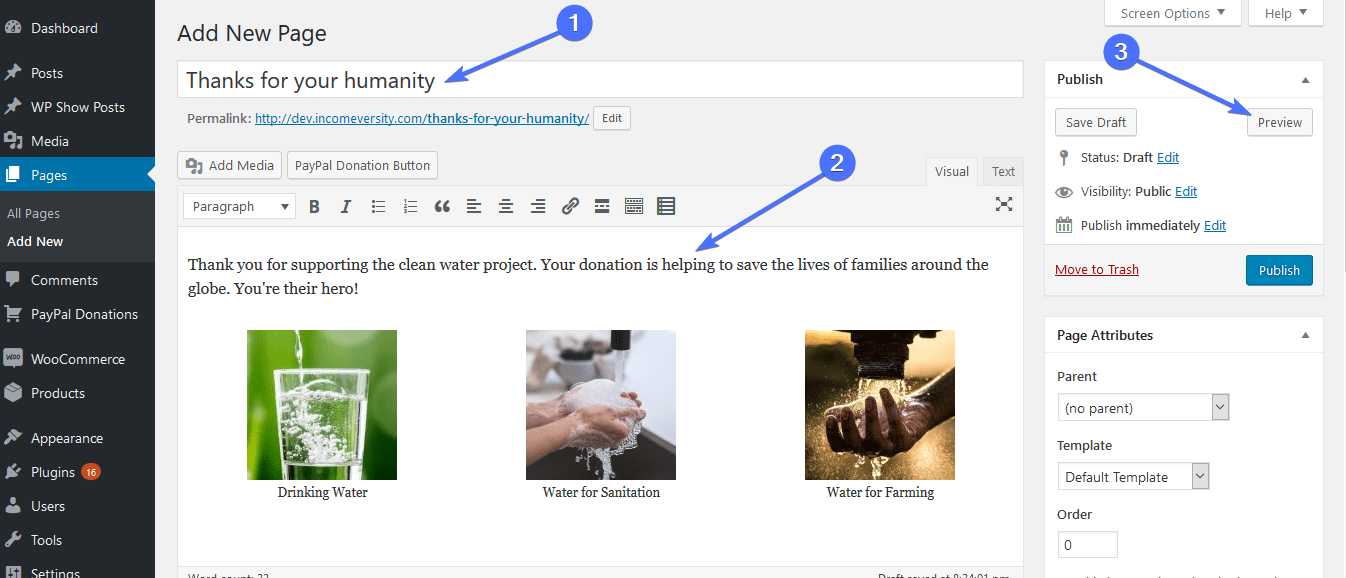
If it all looks good. Then come back to the WordPress editor and click Publish. Now you have your thank you page. At the top, you would see the permalink for the page.
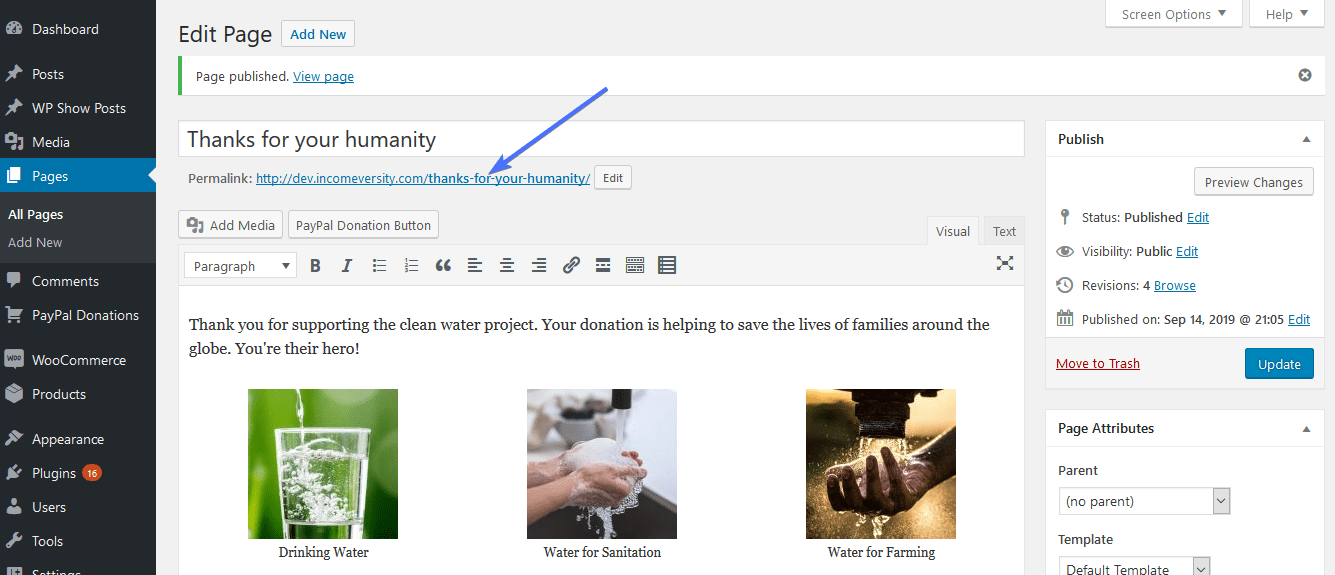
Copy this link and add it as your Thank you URL using any of the methods you used earlier. Here’s how its done.
I. Add a Thank You Page Using the PayPal Donate Feature
If you used the PayPal Donate feature, you can edit the button created to include a thank you page.
First, go to the button page to view all your PayPal buttons.
Locate the button you want to work with and go to Action>>Edit Button.
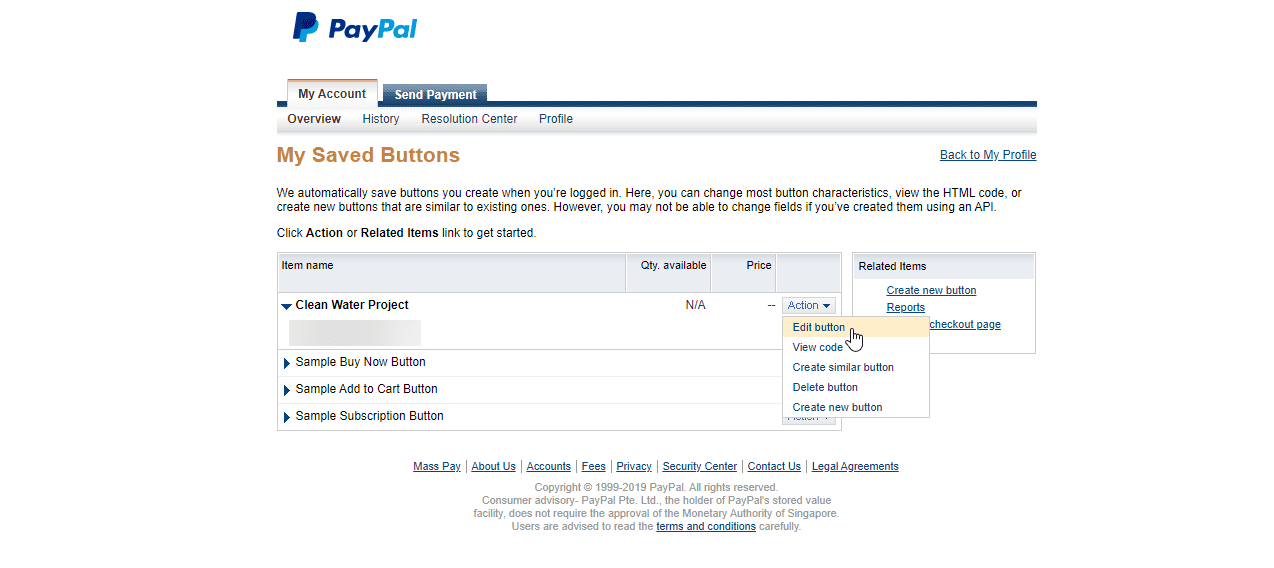
Click Continue until you get to ‘step 4’ and expand the “Route donors back to your site” section.
Paste the URL of your thank you page into the text box labeled “Take donor to this URL once they complete donation”. Next, click Finish and Get Code.
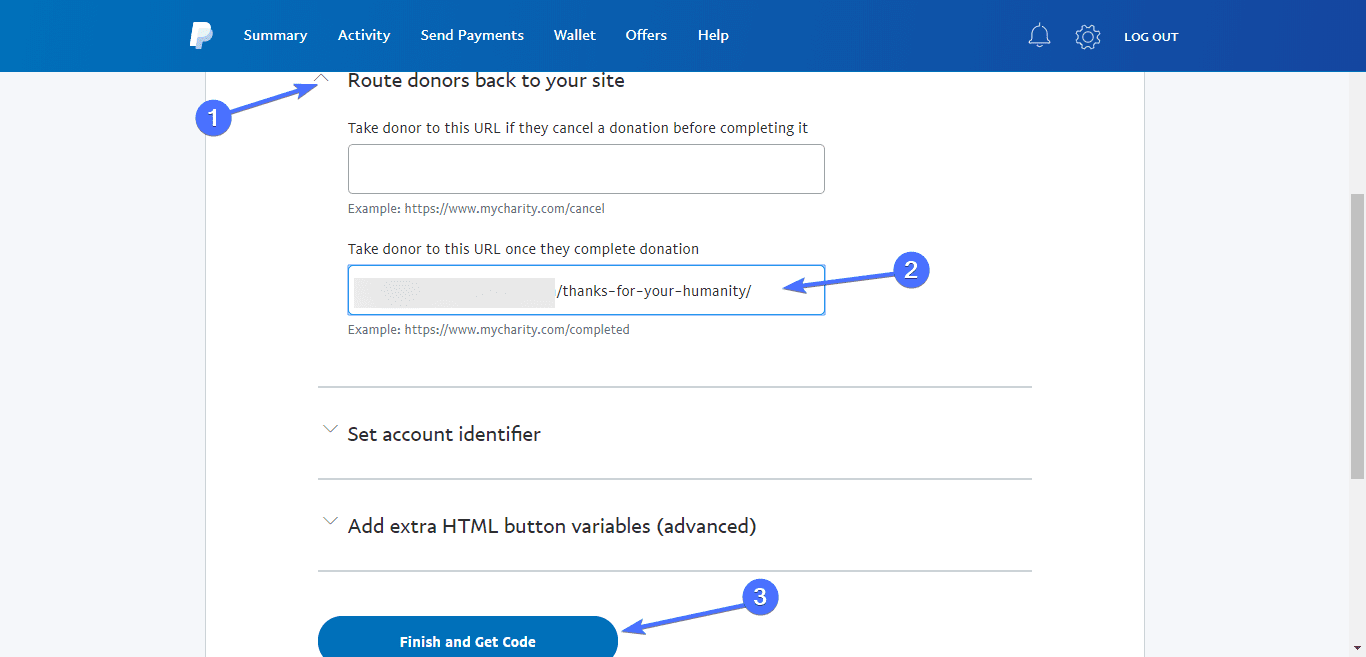
Your updated button code will be displayed. Copy this code and use it to replace the code in your donations page.
ii. Add a Thank You Page Using PayPal Donations Plugin
If you used the PayPal Donations plugin to create your Donate button, adding a thank you page is pretty straightforward.
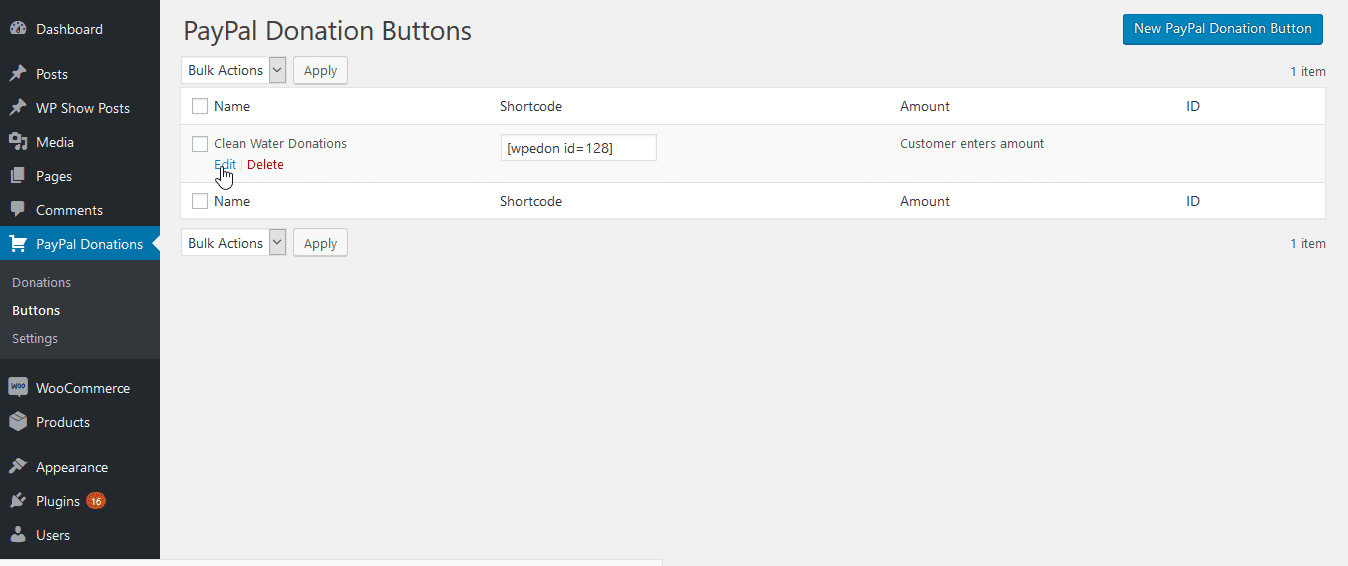
In your WordPress Dashboard, go to PayPal Donations > Buttons.
Hover over the button you want to work with and click Edit.
Scroll down to find the “Return URL” text box and paste the link for your thank you page in there.
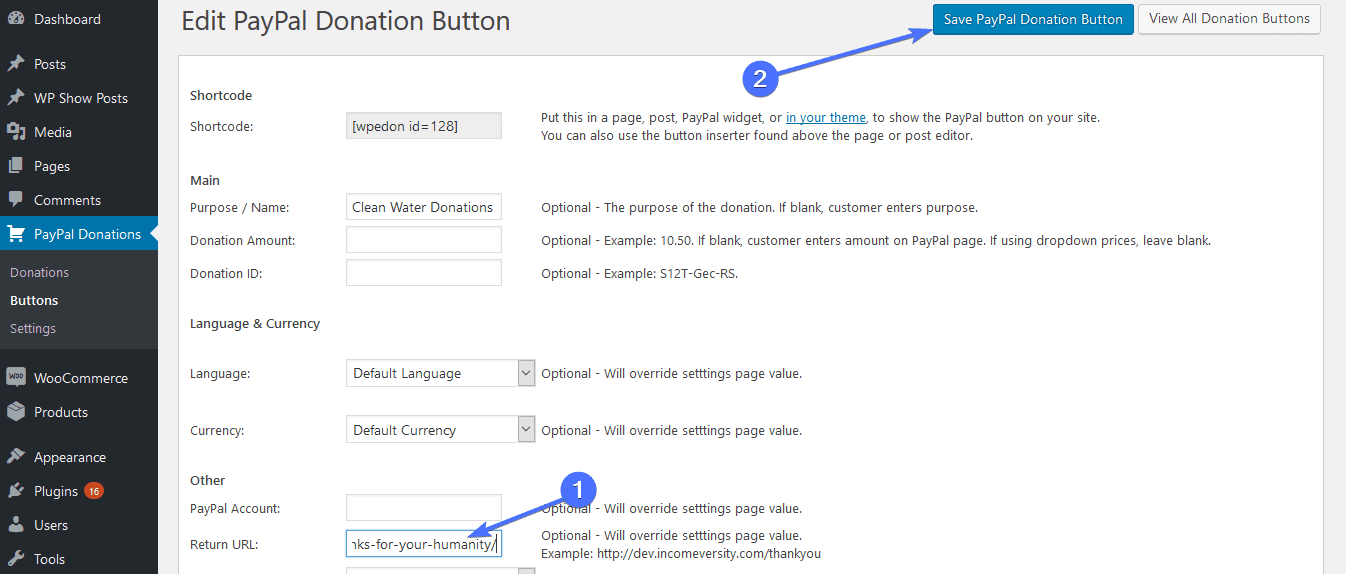
Lastly, click Save PayPal Donation Button.
Tips for Accepting Payment on PayPal as a Non-Profit
Here are some tips that can come handy when using PayPal for donation:
- Security and Fraud Prevention: Ensure secure donations by enabling PayPal’s fraud detection tools and SSL encryption on your website. Regularly update your software and plugins to protect against vulnerabilities. Use strong passwords and enable two-factor authentication for your PayPal account.
- Integration with Email Marketing and CRM Tools: Integrate PayPal with email marketing platforms like Mailchimp and CRM tools such as Salesforce. This allows you to track donor information, send automated thank-you emails, and segment your audience for targeted campaigns.
Mobile Optimization: Optimize your donation page for mobile devices to provide a seamless experience for donors using smartphones and tablets. Ensure the PayPal donate button is prominently displayed and easy to click on smaller screens. - Legal and Tax Considerations: Understand the legal and tax implications of accepting donations through PayPal. Maintain proper records of all transactions, and ensure compliance with local regulations regarding charitable contributions. Apply for nonprofit status with PayPal to benefit from reduced transaction fees and provide donors with tax-deductible receipts.
How to Customize PayPal Donate Button’s Appearance
Here are some tips for customizing the appearance of the PayPal Donate button to match your website’s style:
1. Customize With PayPal Donate Button Feature
PayPal allows you to specify a custom button image. You can upload an image that matches your website’s branding. In the button creation form, under the Customize button section, select Use your own button image and provide the URL of your custom image.
2. Use Custom CSS
To style the button, you can add custom CSS to your WordPress theme. Go to Appearance > Customize > Additional CSS, and enter your custom styles.
3. Use Plugins for Advanced Customization
Several WordPress plugins allow for advanced customization of PayPal buttons. These plugins often come with easy-to-use interfaces for non-coders. Just navigate to the setting section of the PayPal donate plugin to change the color, text or image.
Troubleshooting Common Issues with PayPal Donate Button in WordPress
When adding a PayPal Donate Button to your WordPress site, you might encounter some common issues that can hinder its functionality. Here are some troubleshooting tips to help you resolve these problems:
1. PayPal Button Not Displaying
- Ensure that you have correctly inserted the shortcode or HTML code for the PayPal button. Any missing or incorrect characters can prevent the button from displaying.
- Deactivate other plugins temporarily to see if there is a conflict. If the button appears after deactivating a plugin, reactivate them one by one to identify the conflicting plugin.
- Switch to a default WordPress theme (like Twenty Twenty-One) to check if the issue is with your theme. If the button appears, your current theme may need adjustments.
2. PayPal Button Not Functioning Properly
- Double-check the URL in the button code to ensure it directs to your PayPal donation page.
- Clear your browser cache or try accessing the page in an incognito/private window to rule out cache issues.
3. PayPal displays an error message when you click the Donate button:
- Verify that the PayPal email address in the button code is correct and matches the one associated with your PayPal account.
- Ensure your PayPal account is active and capable of receiving donations. Sometimes, restrictions or limitations on your PayPal account can cause errors.
- Use PayPal’s button creation tool to generate a new button code. Copy and paste the new code into your WordPress site to ensure it is up-to-date and error-free.
4. Styling Issues: PayPal Donate Button does not blend well with your website’s design.
- Use custom CSS to style the button. You can add custom CSS to your theme’s stylesheet or through the WordPress Customizer (Appearance > Customize > Additional CSS).
- PayPal offers different button styles. Experiment with various options provided by PayPal to find one that fits your site’s design.
5. Hide PayPal Name for Donations
One of the biggest concerns for people who receive donations with PayPal is that their personal info (full name and surname) is shown in the payment summary to the donor. Some people don’t feel comfortable with this (for privacy reasons).
So if you have a PayPal personal account, the only way to hide PayPal name for donations is to upgrade to a business account. Then, when you fill up the form for a PayPal business account, you can choose any business name, and that name will be shown in the donations payment summary. By the way, there are no extra charges for the PayPal business account upgrade.
Conclusion
If you want to accept donations from people for your charity, nonprofit, disaster relief, you need to learn how to add a PayPal donate button in WordPress.
In this step by step guide, we have covered two simple methods of adding PayPal donate buttons to your WordPress website. We recommend you go with the PayPal feature as this eliminates the need for a plugin. However, if you want greater flexibility, feel free to use a payment plugin or a form builder.
If you want to learn more about setting up PayPal on your website, then checkout our guide on how to Setup PayPal on Woocommerce. You should also remember to reach out to us if you need any help with your website. Our team of WordPress experts are available to help you fix any issue you have, starting with a free site review.


