How to Find and Fix a Broken Image in WordPress
 You’ve probably seen an image icon on your website that looks like a torn picture. That is a broken image and it can negatively affect your website if you do not replace it.
Images are important to most websites. Among other things, they make your page more engaging, convey key information, and improve your search engine ranking.
Therefore, it is important to find and fix broken images on your website as soon as you notice them. In this guide, we will explain what a broken image is, and show you how to fix them on your WordPress site.
Contents:
- What is a Broken Image?
- Detecting Broken Images on your Website
- How to Fix the Broken Image Issue
- Conclusion
What is a Broken Image?
Put simply, a broken image is an image whose source link is unavailable or corrupted. When a user scrolls to a section with a broken image on your site, they will see the broken image icon. It can be due to a misspelled URL, improper file path, or you may be linking to a site that no longer exists.

This is a critical issue as it negatively affects user experience. When users encounter missing images on your site, they tend to leave your site for a competitor.
As a result, bounce rates will increase on your website. So to prevent this from happening, always scan your site for broken images and fix them. Let’s see how to do that in the next section.
Detecting Broken Images on your Website
The easiest way to detect broken images on your WordPress website is using a plugin. One of such plugins is the Broken Link Checker. With this plugin, you can scan your site’s internal and external links for any broken links and images.

After installing and activating the plugin, you can access the plugin’s settings page via Settings >> Link Checker.
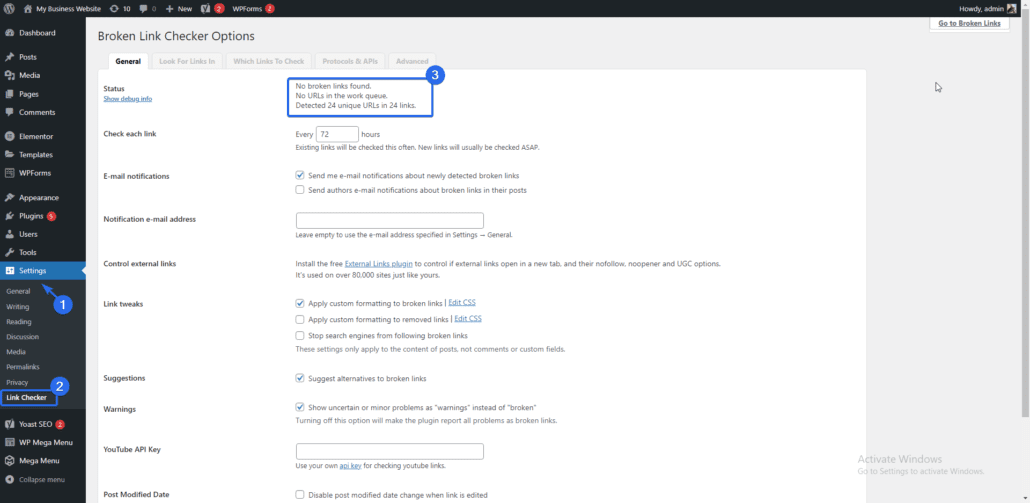
The Broken Link Checker plugin scans your website for broken links. If there are any issues, you will see them from here or get notified by email.
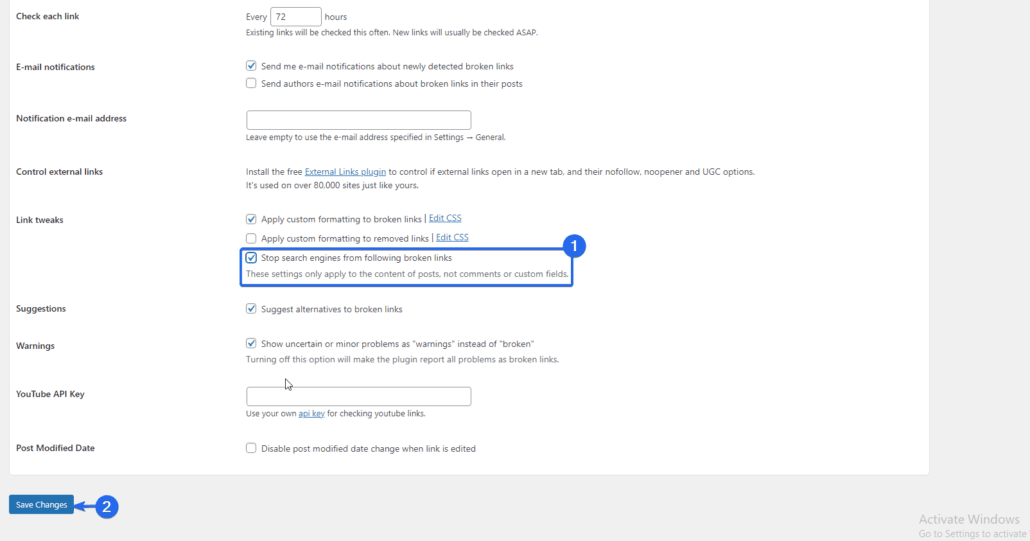
The plugin also provides you with the option to prevent search engines from following the broken links. You can enable this option so the broken image doesn’t affect your SEO rankings.
Fixing Broken Images
There are several scenarios that may lead to missing images on your WordPress website. In this section, we will be discussing the reasons and how to fix them.
Incorrect File Path
When adding images to your website, WordPress creates a file path that specifies the images’ location. Web browsers use the path in the image src attribute to locate the image. If the path to the image is incorrect, the image will not load and will not be displayed.
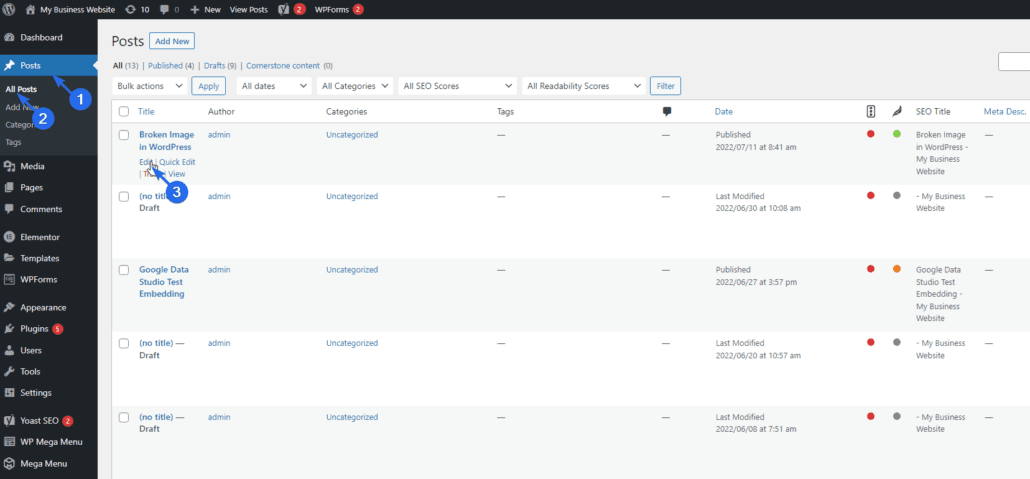
To fix this, simply locate the post or page with the broken image icon and replace it with a new image. For this, log in to your dashboard and navigate to your WordPress post page. Then hover over the post with the broken image and select Edit.
On the post editor, scroll to the section with the broken image, then click on it and select Replace. You can choose an image from your media library or upload a new image.
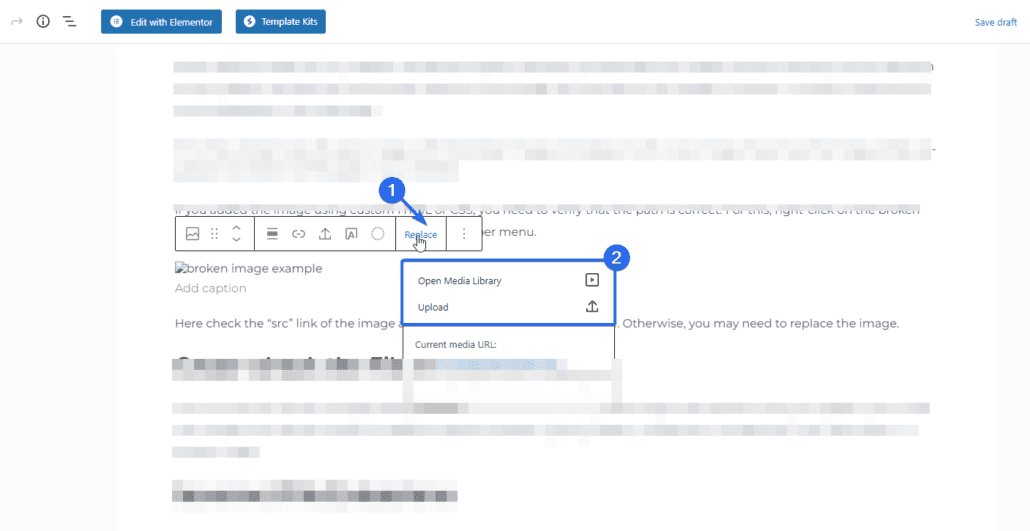
After replacing the broken image, click on Update to save your changes.

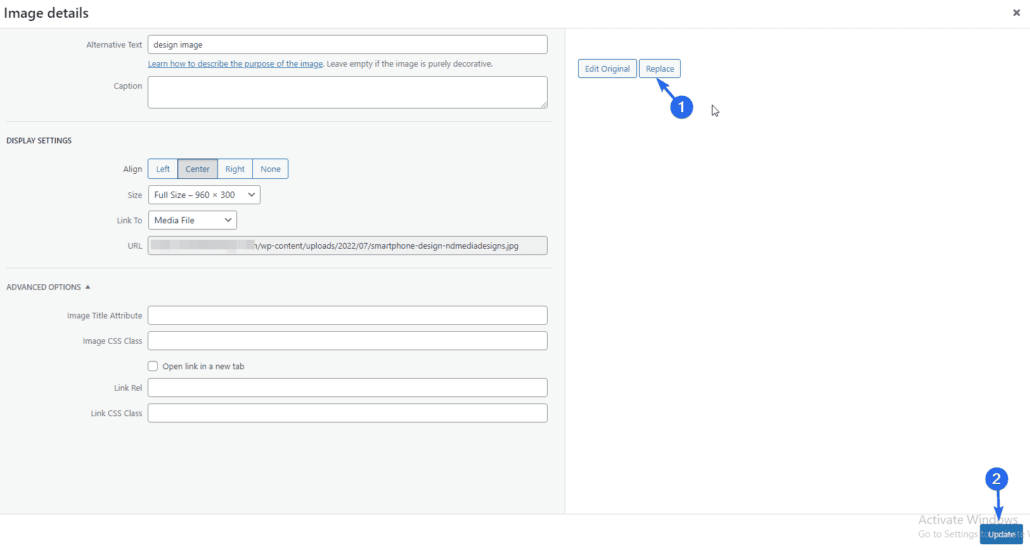
If you are using the classic editor, click on the image and then select the Pen icon to edit the broken image.

Here, click on the Replace button and then choose an image from your media library. Finally, click on Update to replace the image.
Replacing Custom HTML Images
If you added the image using custom HTML or CSS, you need to verify that the path is correct. To verify this, you need to check the location where you added the image. It could be on the Additional CSS block. If this is the case, then follow the steps below.
Side note: Replacing images in your template can be technical. If you are new to WordPress, you can have our experts help you fix your template issues.
First, log in to your WordPress dashboard and then go to Appearance >> Customize.

After that, select the Additional CSS block or Custom CSS menu.

On the code editor, locate the line of code where the image was added and highlight the path to the image. Next, right click and then select Go to path-to-file…
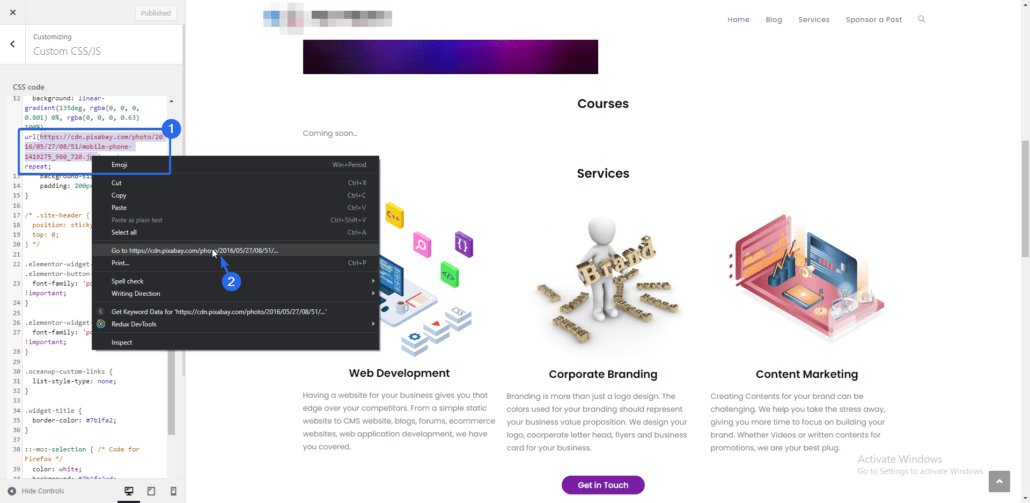
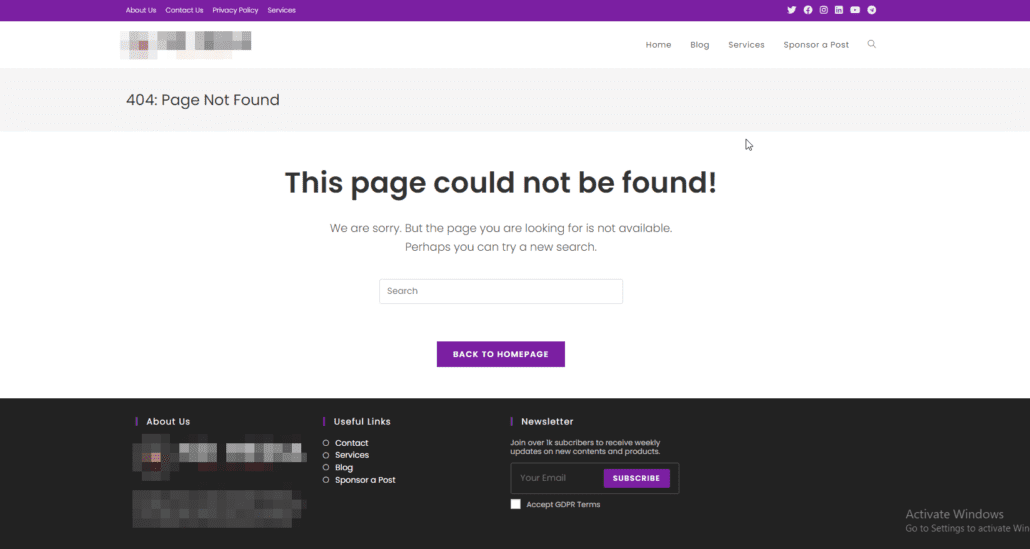
If the image is not available, you will get a 404 not found error. You can simply re-upload the image to your website and then copy and paste the link to the file here.
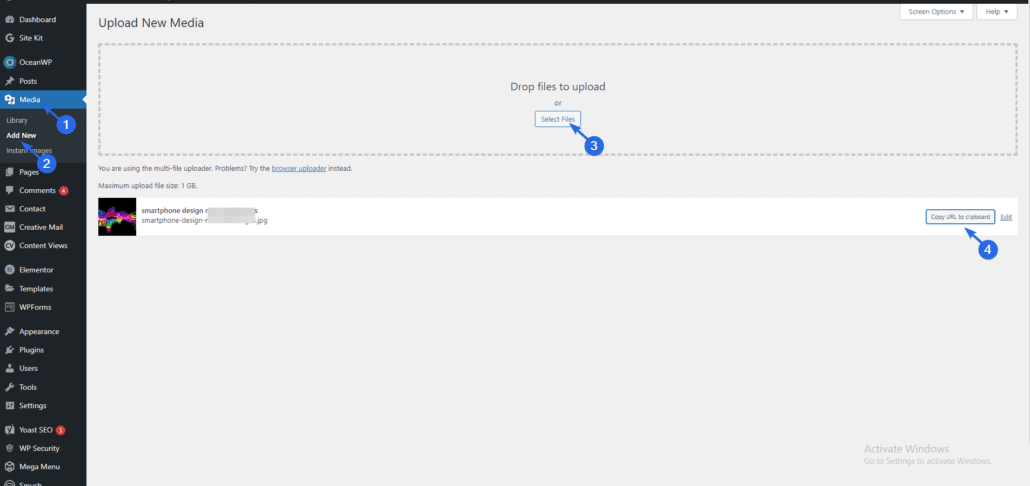
To upload the image, go to Media >> Add New. After that, click on Select Files and then choose the image file. Once the upload completes, click on the Copy URL to Clipboard button.
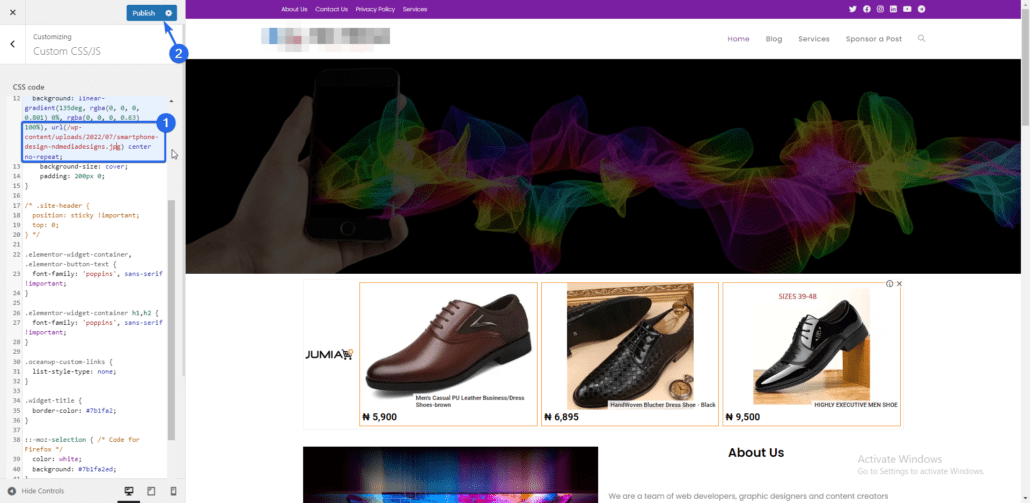
Now go back to the customizer page and replace the broken image link with the one you just uploaded. Finally, click on Publish to save your changes.
Cross-check the Filenames
This is a common cause of image loading problems. Ensure the spelling of the image is the same as the one in the media library. The mistake can also be as little as a different special character. Typing an underscore (_) instead of a dash (-) can result in a broken image.
To fix this issue, you need to compare the filename on the post or page to the original image on the media library. For this, login to your WordPress dashboard and then go to Media >> Library.
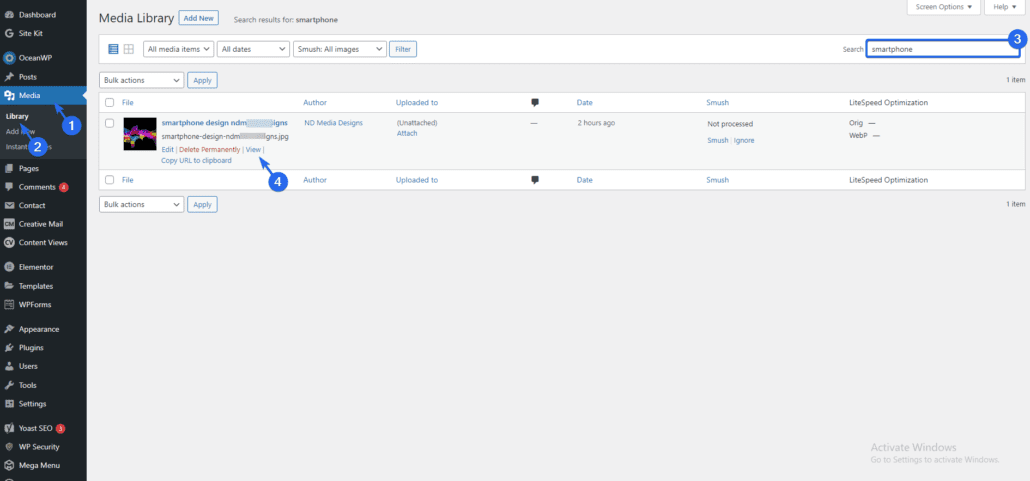
Now, use the search box to find the image you want to compare. After that, hover over the image and then select View.
On the address bar, you will see the path to the image. The highlighted part is the name of the image as seen below.
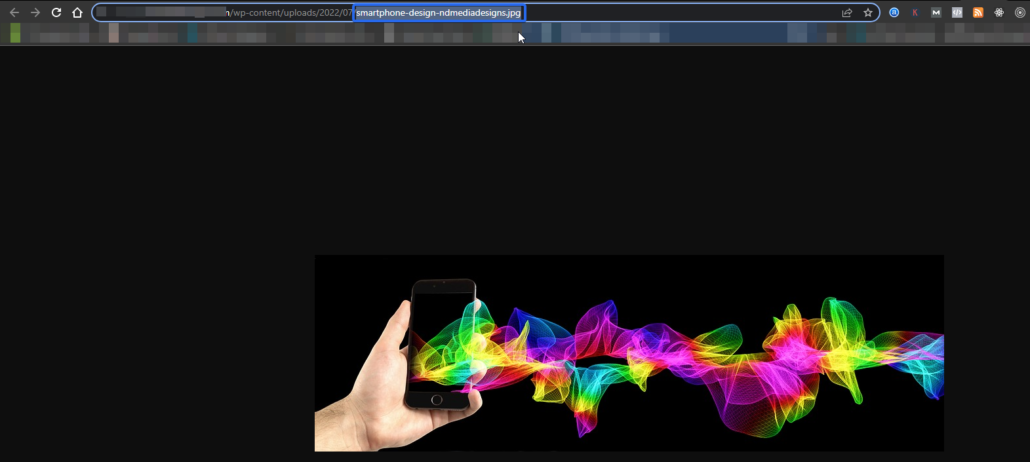
Now head over to the post with the broken image and verify the file name as well. For this, open the page on your browser, then right click on the broken image and select Open image in new tab.

If there are discrepancies between both file names, it could be the cause of the image not showing. You will end up seeing a 404 not found error.
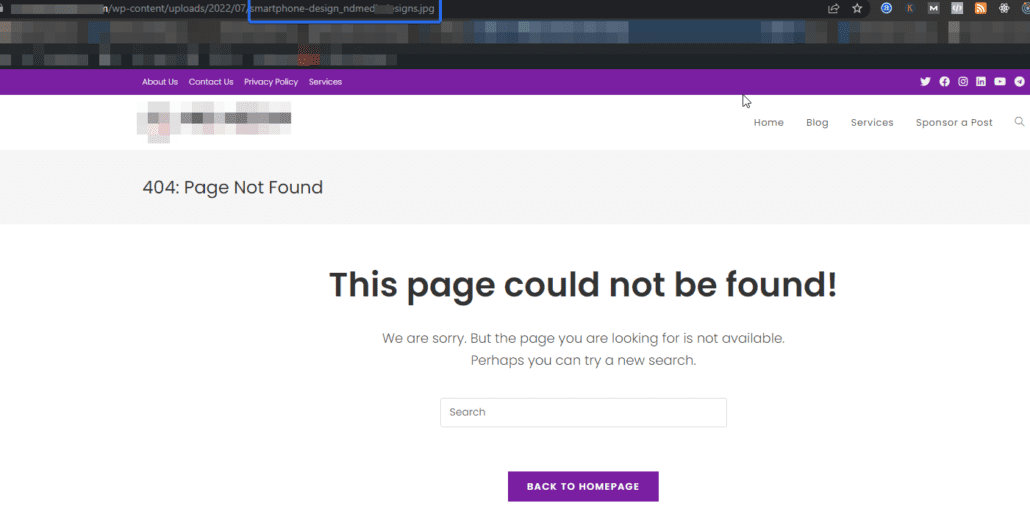
To fix this issue, you need to edit the post with the broken image and replace the wrong file name with the one on the media library.
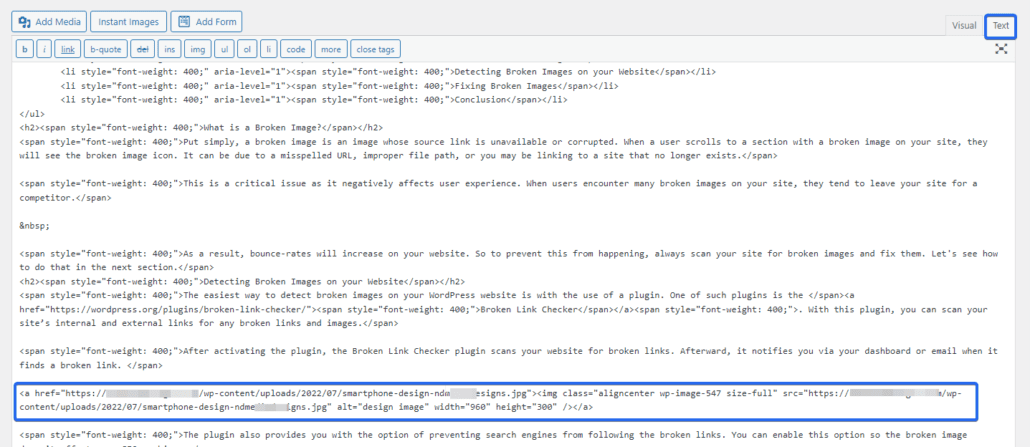
After correcting the file names, you should see the image displayed on the post editor. If not, you can re-upload the image and add it to your post. Ensure you update the post to save your changes.
Incorrect File Extensions
You should also check the file extensions. Sometimes, the file name could be spelled correctly, but the file extension may be incorrect. For instance, you can have an image uploaded as a .jpg file, but in the code, it is a .png extension. This can cause problems.
Another common issue occurs with the “jpg” and “jpeg” image extension. Although both formats are the same, you may run into a broken image error if you interchange one for the other.
Use a Relative File Path
A relative path links to a file in relation to the homepage URL. In WordPress, a relative path takes out the domain name, and only uses the path after the domain.
So in the “src” attribute, instead of “https://example.com/wp-content/uploads/image.png”, the source becomes “/wp-content/uploads/image.png”. And your images will work fine with the short link.
One of the benefits of using a relative path is that your images will work even if you change your domain name. That would be the case as long as the files are still hosted on the same server.
You can use a plugin such as the Make Paths Relative plugin to force WordPress to use relative paths for your media files. The plugin is easy to install and set up.

After installing and activating the plugin, go to Make Paths Relative >> Settings to open the plugins settings page.
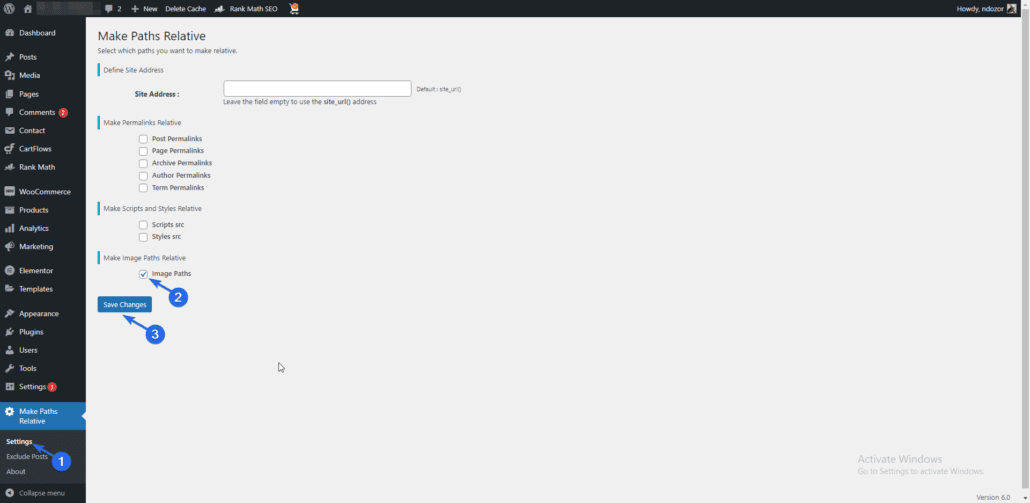
Here, tick the option to enable relative paths for images and then click on Save Changes to register your changes. You will now be able to display images on a page using relative paths.
Ensure the Image Exists
You may have linked to an image hosted on a different website. If that site goes down or relocates to a different server, the images will cease to exist.
In addition, linking directly to another site increases server usage on the site from which you are getting the image. If the host website disables hotlinking, it will prevent your image from showing.
To prevent this from happening, it is best you upload every image to your website before adding them to the page. Also, avoid using images from third-party websites except you have permission to use it.
Transfer Issues
This is not a common issue, but it does happen. Sometimes, your server becomes overwhelmed and cannot load all page assets fast enough before the request timed out.
It happens mostly with cheap web servers. To resolve this, you need to upgrade your server’s capacity or migrate to a reliable web host.
You can also use a plugin to enable lazy loading for your images. When you enable it, your server will only load images when the user scrolls to the section. This will free up your server resources and also speed up your website. You can learn more about this in our speed optimization guide.
Frequently Asked Questions
What is a broken image in WordPress?
A broken image in WordPress occurs when an image on your website doesn’t display correctly or displays a broken image icon. This typically happens when the image file is missing, the URL is incorrect, or there is a problem with the file permissions.
How can I find broken images on my WordPress site?
You can find broken images on your WordPress site by manually checking each page and post, using the built-in “Inspect” tool in your browser, or using plugins like Broken Link Checker or WP Broken Image Checker.
Can I fix broken images directly from the WordPress dashboard?
Yes, you can fix broken images directly from the WordPress dashboard. Go to Media Library, find the broken image, and either replace the file or correct the file URL.
How do I replace a broken image in WordPress?
To replace a broken image in WordPress, you can either:
- Edit the page or post where the image is located and upload a new image using the Add Media button.
- Go to the Media Library, find the broken image, and click on “Replace Media” to upload a new image file.
What causes broken images in WordPress?
Broken images in WordPress can be caused by a variety of factors, including:
- Incorrect file URLs
- Missing image files
- File permission issues
- Changes to the site’s domain or URL structure
- Issues with image optimization plugins
Can a plugin help me find and fix broken images in WordPress?
Yes, plugins like Broken Link Checker and WP Broken Image Checker can help you identify and fix broken images on your WordPress site. These plugins will scan your site for broken images and provide you with options to fix them directly from the plugin’s interface.
How can I prevent broken images in WordPress?
To prevent broken images in WordPress, consider the following best practices:
- Use descriptive and unique file names for your images.
- Ensure your images are properly uploaded to the Media Library.
- Be cautious when changing your site’s domain or URL structure.
- Regularly check and update image URLs, especially when moving or renaming files.
- Use reliable image optimization plugins and ensure they are properly configured.
Can broken images impact my website’s SEO?
Yes, broken images can negatively impact your website’s SEO. Search engines like Google consider broken images as a sign of poor website maintenance, which can result in lower search rankings. Additionally, broken images can negatively impact user experience, causing visitors to leave your site more quickly, which can also harm your search engine rankings.
Summary – Fixing Broken Images
It is not uncommon for websites to experience issues with broken or missing images, but it is quite a serious issue that should be handled promptly. If you have an online store, you may lose potential customers if users can’t see product images on your store.
In this guide, we explained some of the causes of broken images as well as tips on how to fix them on WordPress websites.
Fixing broken images is one way to reduce bounce rate on your website. You also need to optimize your images to improve your site’s performance. For a detailed tutorial on this, check our image optimization guide.

