WordPress HubSpot Plugin – How To Integrate It

WordPress is a popular content management system used to create and manage websites. Although a robust website builder, WordPress doesn’t provide an out-of-the-box CRM solution. Fortunately, third-party tools like HubSpot make it incredibly easy to manage customer relationships in WordPress.
HubSpot is a marketing and content automation tool that improves lead generation and helps businesses grow their online presence to attract more customers.
But can you use HubSpot with WordPress? The answer is yes. You can use the HubSpot CRM system from your WordPress admin area. We’ll show you how to integrate and use the HubSpot WordPress plugin in this guide.
Content:
- Benefits of Using HubSpot With WordPress
- How to Integrate HubSpot on WordPress
- How to Use HubSpot Features on WordPress
- Tips For Getting the Most Out of Your HubSpot Integration
- Conclusion
Benefits of Using HubSpot With WordPress
HubSpot is a favorite Customer Relationship Management (CRM) tool for WordPress websites. Some of the reasons people use HubSpot include:
Integrated marketing platform: HubSpot provides all-in-one sales, marketing, contact management, and customer service tools. These tools help online businesses to make their operations more efficient and profitable. You can use Hubspot to manage email marketing, create a blog post, and manage your social media from a single dashboard.
Seamless integration: HubSpot offers powerful features businesses can leverage to capture leads. You can create signup forms, popups, and landing pages to increase conversion rates and turn visitors into leads. If you use a WordPress hosting platform such as WP Engine, you will get this integration by default.
Marketing automation: HubSpot’s powerful marketing software makes it easy to automate the inbound marketing operations of your online store. You can set up automated workflows that respond based on user actions.
Analytics and reporting: HubSpot has powerful features that websites can use to track online traffic, performance, and leads. HubSpot Analytics tools help online businesses to make data-driven decisions when creating a marketing campaign.
How to Integrate HubSpot in WordPress
You can integrate HubSpot and WordPress by following the steps below:
1. Install and Activate the HubSpot Plugin
HubSpot integration with WordPress is available via the HubSpot plugin, which can be installed and activated from the WordPress plugin directory.
To install the HubSpot plugin, log in to your WordPress dashboard and navigate to Plugins >> Add New.
Locate the search bar at the top right and type ‘HubSpot’. Next, HubSpot will appear on the search result. Click on the Install Now button next to the plugin name to install the plugin.
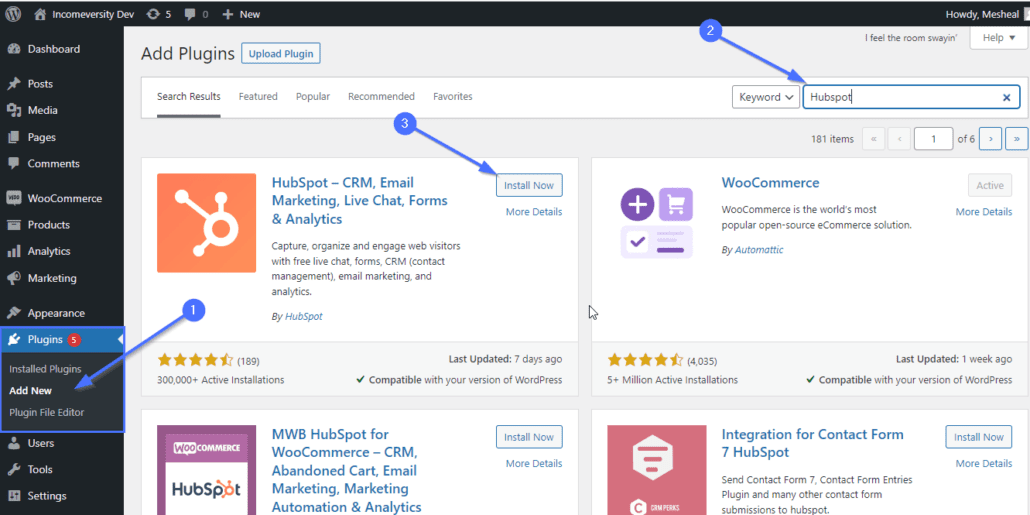
Once the installation completes, the button changes to ‘Activate’. Click on this button to activate the plugin.
2. Create a HubSpot Account and Connect It to Your Website
After activating the HubSpot plugin, you will be required to create a HubSpot account which will be linked to your company website.
To start, enter your email address and name, then click Next to continue. Alternatively, you can sign up using the Continue with Google option.

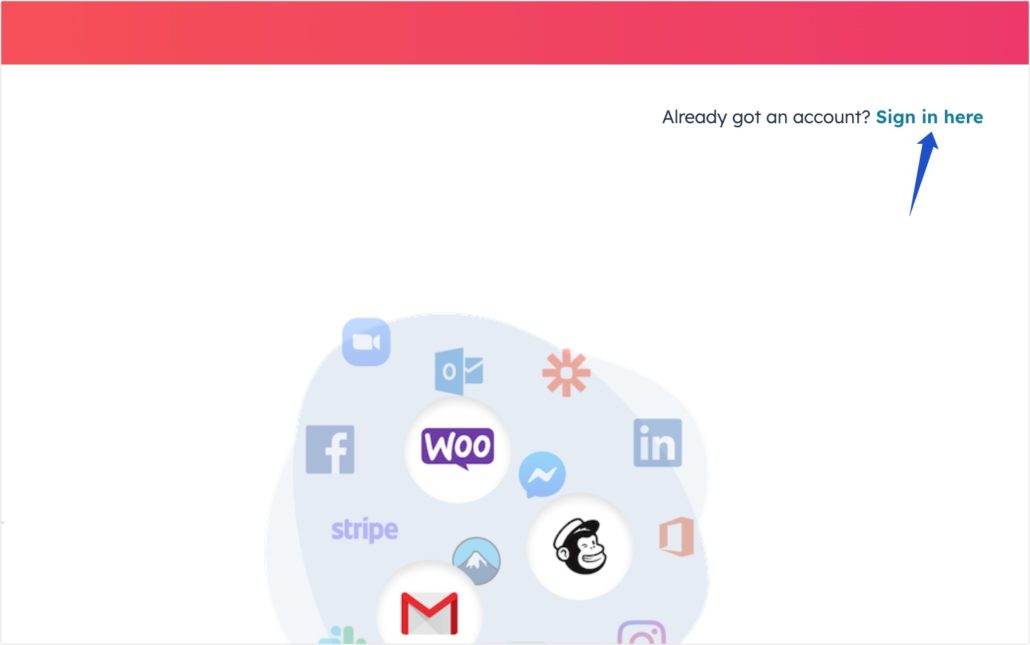
Side note: If you already have a HubSpot account, click the Sign in here link to login and connect your account.
Now, you’ll need to enter basic information about your business, including your company’s name, job role, company size, and website. Hit the Next button after entering each detail to continue.

Next, select the ‘I have never used a CRM’ option to proceed. If you are familiar with HubSpot CRM, you can choose the second or third option as it applies to you.

After that, HubSpot will send a verification code to your email. Open your email, copy the code, and paste it into the text box. Click Verify email to proceed.

Next, create a strong password for your HubSpot account.

Finally, choose where you want your data to be hosted. The two regions available are the EU and US. We recommend choosing the one that is close to your region.
Once you choose a host region, click Create Account to complete your HubSpot account creation process.

HubSpot needs to verify they are dealing with a human as an extra verification step. Click the reCAPTCHA button to solve the challenge, and then click Continue.

Your HubSpot account is ready. However, you need to connect it to your WordPress site to use the features available on the platform.
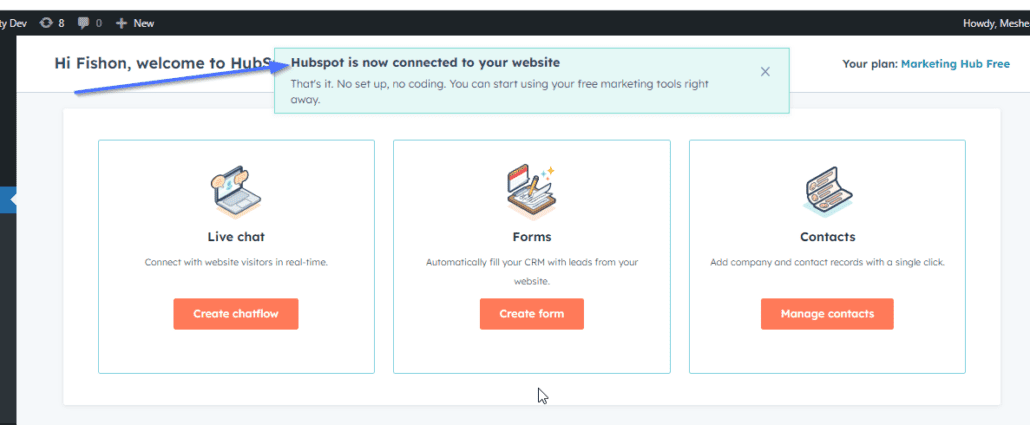
To connect your HubSpot to WordPress, click Connect website from the configuration page. This process will run automatically.

HubSpot is now connected to your WordPress site, and you can enjoy all the features HubSpot CRM offers.
How to Use HubSpot Features in WordPress
To get the most out of your HubSpot WordPress integration, you must know how to use some essential features of HubSpot.
Although you could get the help of WordPress experts, it is still important to learn how to use the following tools HubSpot offers.
- Contacts
- Forms
- Live chats
- Emails
Managing HubSpot Contacts in WordPress
The HubSpot contact section contains information about customers that interact with your website.
From the contacts page, you can create and manage your contacts and also sync contacts from other sources.
You can access the contacts page by navigating to HubSpot >> Contacts. From there, you’ll be able to create contacts and manage your existing ones.
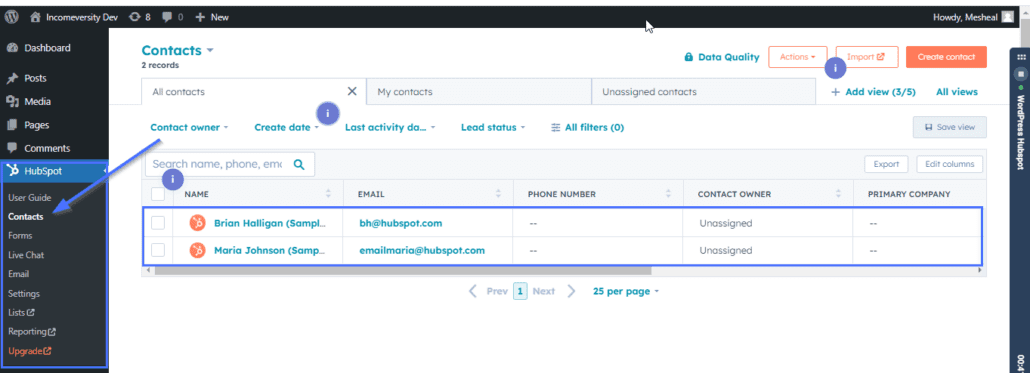
There are 2 ways you can add contacts; either by adding them manually or by importing the contacts from an external source.
Adding Contacts Manually
You can add contacts individually on HubSpot from your WordPress dashboard. To do that, follow the steps below:
First, navigate to HubSpot >> Contacts and then click Create contact.

After that, enter contact information such as name, email, phone number, etc. Then click on Create to create the contact.
You can modify the form fields to match the information you intend to collect by clicking Edit this form.
Importing Contacts to HubSpot Automatically
Manually adding contacts can be slow and inefficient for most businesses. HubSpot provides an import function that allows you to import contacts from an external file.
To import contacts, navigate to HubSpot >> Contacts from your WordPress admin area. Then click on the Import button at the top right.

Importing contacts can be done by either importing a data file from your computer or by using a HubSpot Addon such as Google Contacts, MailChimp, and Intercom. For this guide, we’ll import contacts from a CSV file.
Import Contacts From a CSV File
To import contacts files from your computer to your HubSpot account, click the Start an import button.

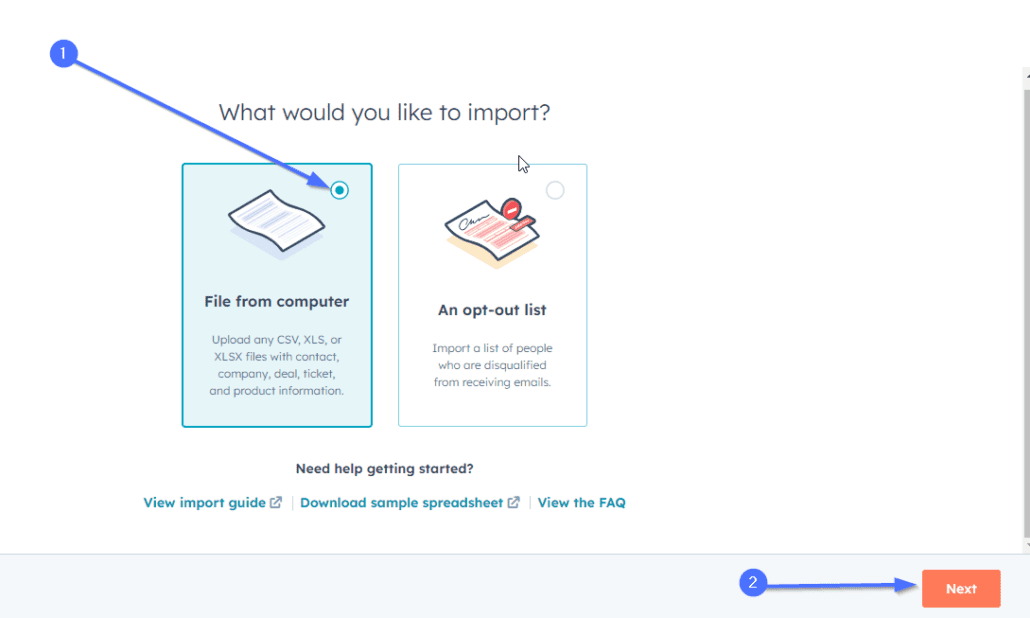
Next, select the File from computer option and click Next to proceed.
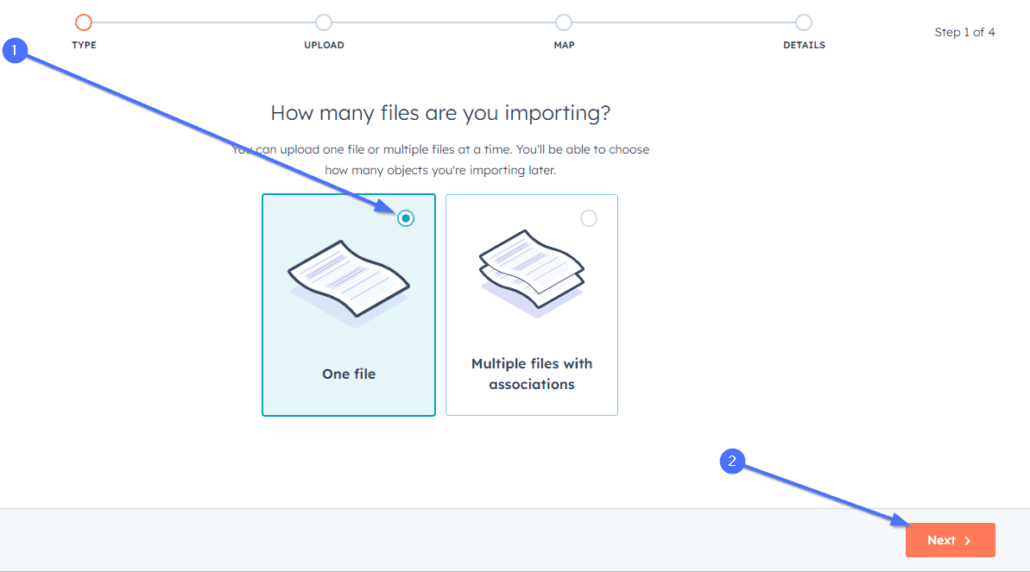
Select the number of files you wish to upload. You can upload multiple files in different formats. For this tutorial, we will upload one file with data from 50 customers in CSV format.
Click the One file option and then click Next to continue.
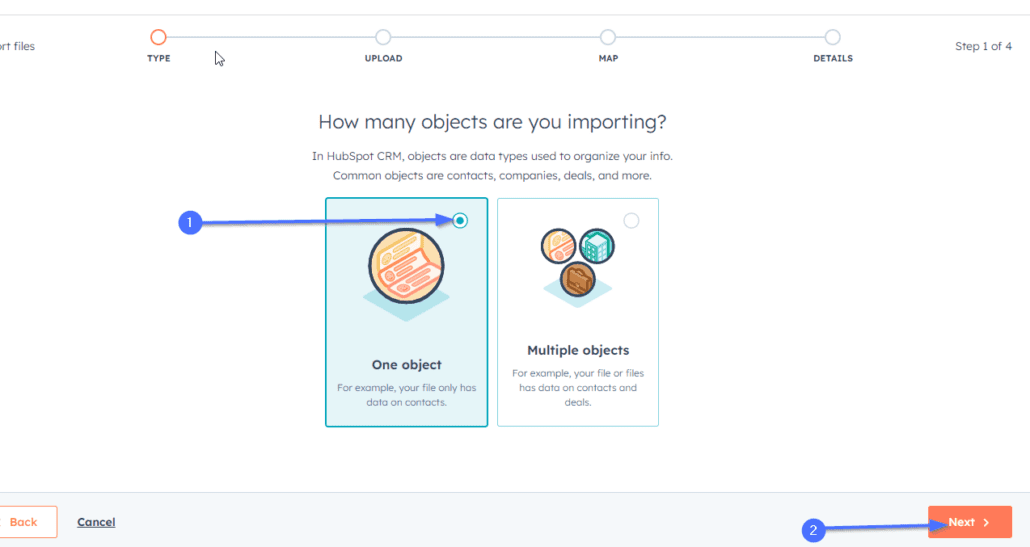
Next, select whether your contact files contain one or multiple objects. In HubSpot, objects are the type of relationships.
HubSpot objects include contacts, tickets, deals, and companies. If you are importing only one object (e.g. contacts), click One object and then click Next to proceed.
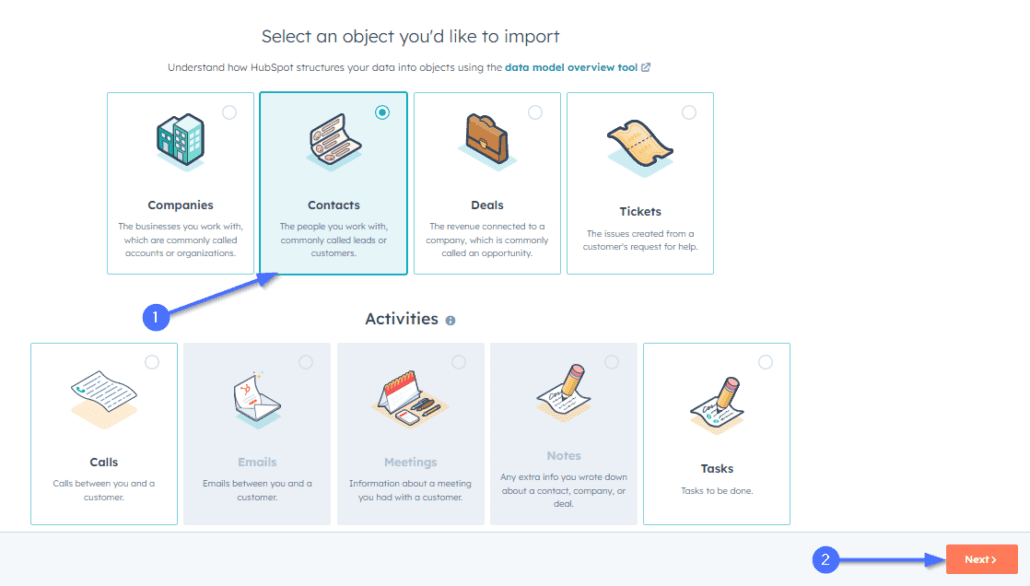
Select the type of object you want to import. In this case, we are importing a CSV file that contains the contact information of potential customers or leads. Select Contacts and click Next to continue.
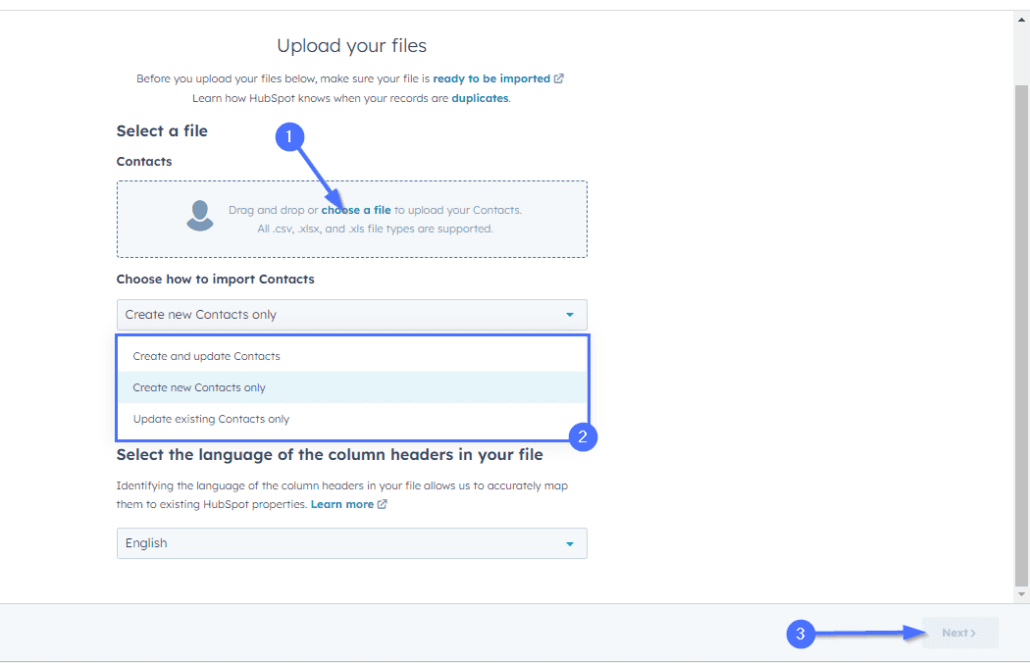
Next, click on choose a file to upload the CSV file. After that, click Create new contacts if you are creating these contacts for the first time. Choose the language of the document and then click Next to continue.
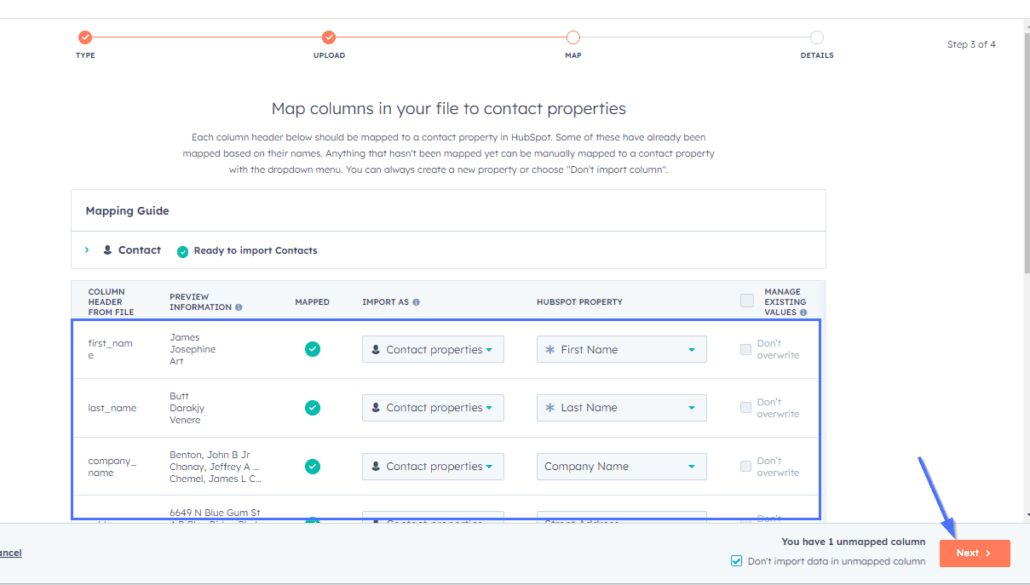
The imported data will be mapped to the appropriate HubSpot property, and you can modify this mapping if needed. Click on Next to proceed.
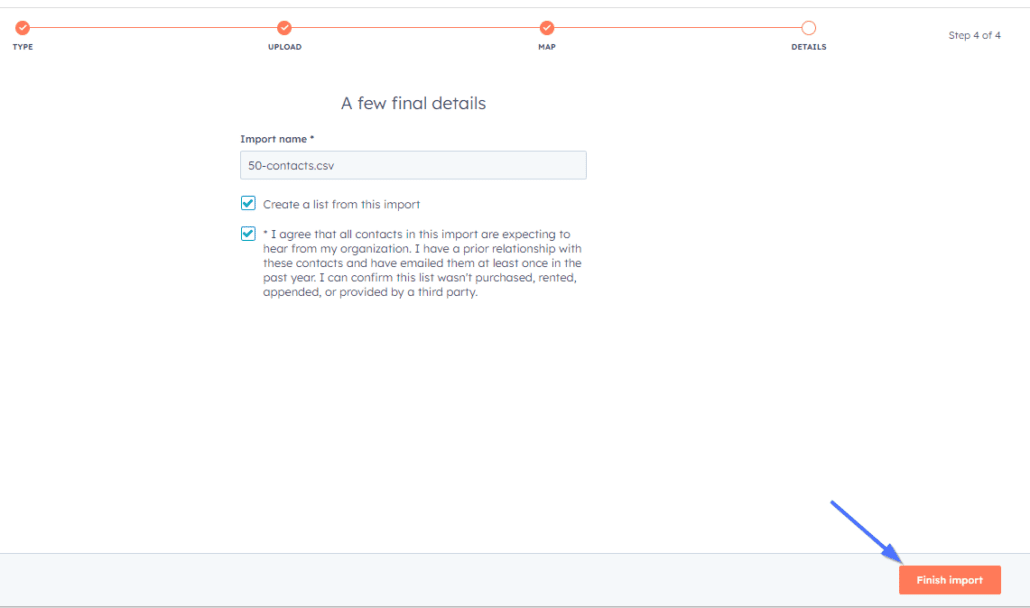
Finalize your contact import by ticking the agreement checkbox and then click Finish import.
You can now access the HubSpot contacts by navigating to HubSpot >> Contacts from your WordPress dashboard.

Managing HubSpot Forms in WordPress
You can create and insert different types of forms such as a contact form, job application form, and event registration form. With these, you can use HubSpot to capture leads, register event attendees, and collect customer feedback.
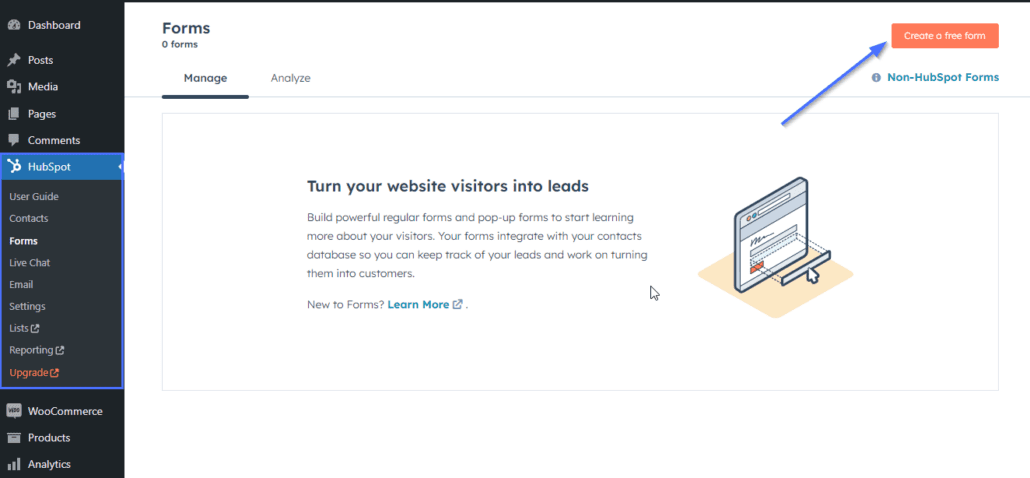
To create a form, login to your WordPress dashboard and then navigate to HubSpot >> Forms.
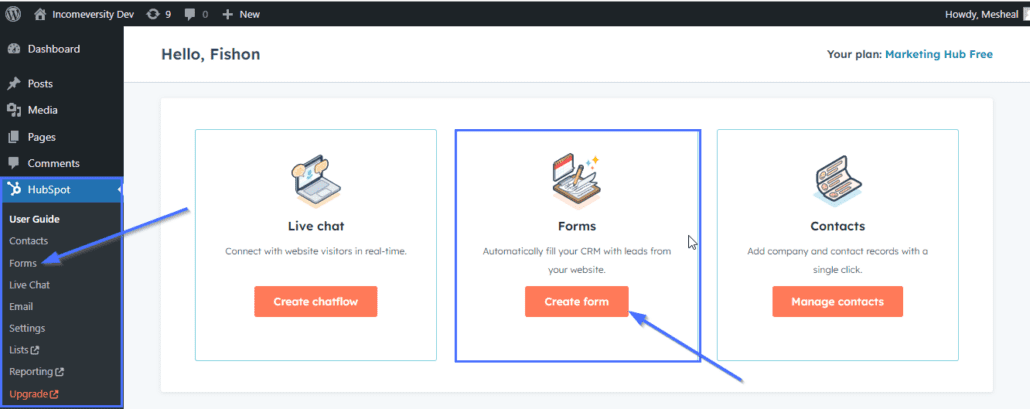
In the forms page, locate the Create a free form button at the top right corner of the page and then click on it.
Next, choose the type of form you want to create based on your specific need. For this tutorial, we will create a simple dropdown form. Select the Dropdown banner option and then click on Next to continue.

After that, customize your form settings and choose a callout text, CTA button, theme color, and form link. Click on Next to proceed.
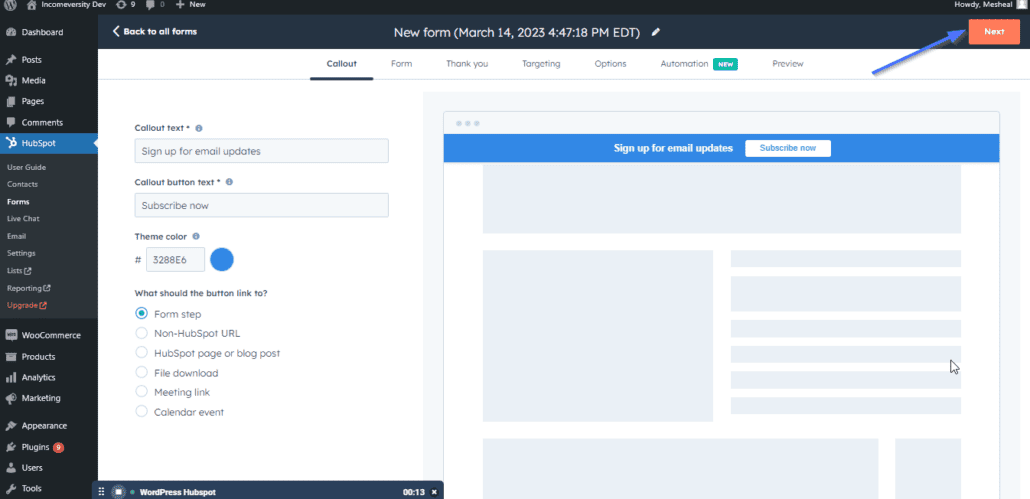
You can make other changes to your form by further customizing the settings from this dashboard.
Once satisfied, click the Next button until you complete the form configurations.

Your HubSpot form is now ready to be published. You can edit the form name and then click on Publish to make the form live on your website.

Your form is now live on your website and will show as a popup form when a user visits your site.

When a new subscriber enters his email, you will receive a notification and an email informing you about it.
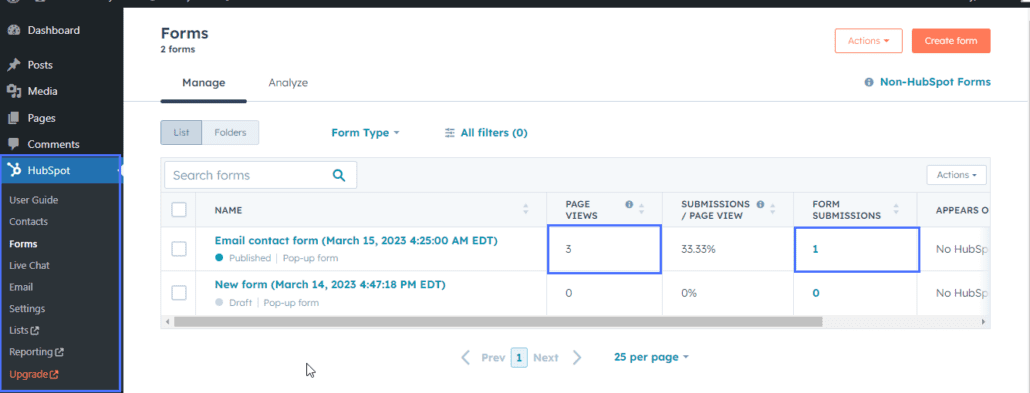
To manage your WordPress forms, head back to your WordPress dashboard and navigate to HubSpot >> Forms. From there, you can view and manage your forms and popups and also monitor views and forms submissions.
Live Chats
HubSpot LiveChat allows you to communicate with your website visitors in real-time. You can create chat flows that match your brand style and identity using the HubSpot live chat software.
To enable LiveChat on your website, follow the steps below:
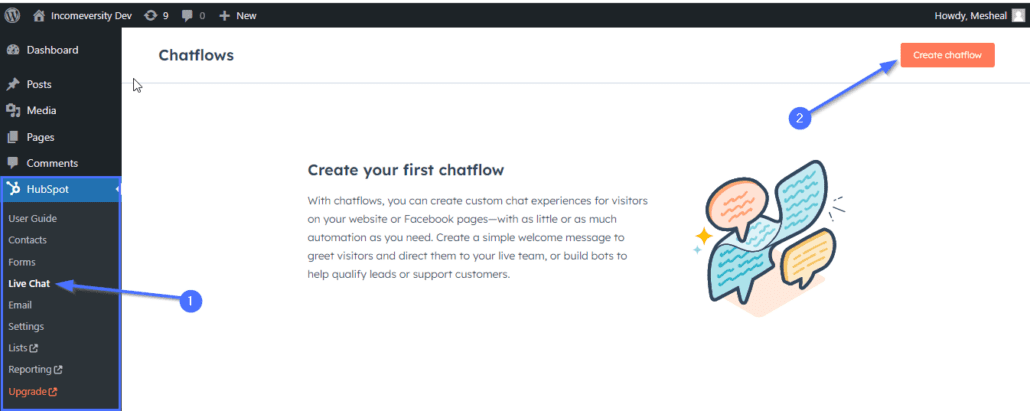
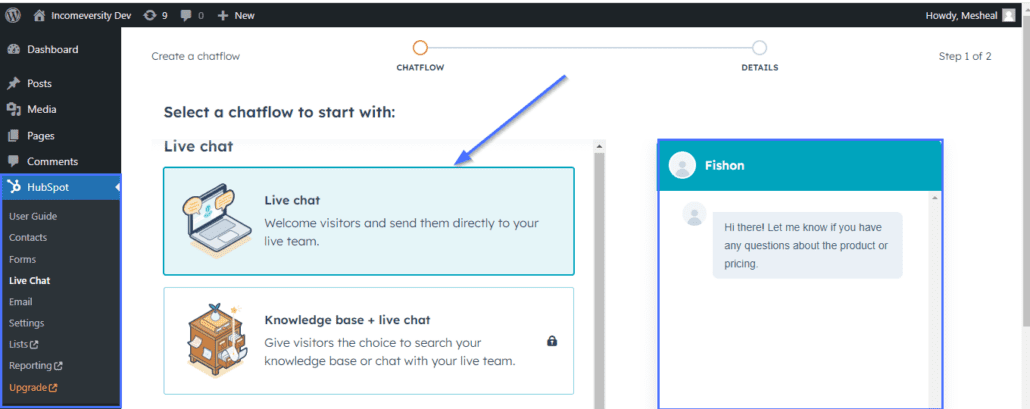
First, navigate to HubSpot >> Live Chat from your WordPress dashboard and then click on the Create chatflow button.
There are different types of chatbots you can create. Depending on your needs, you can create a simple chatbot with a knowledge base, or an offline chatbot.
For this tutorial, we are creating a simple chatbot. Select the Live chat option, then scroll down and click Next to continue.
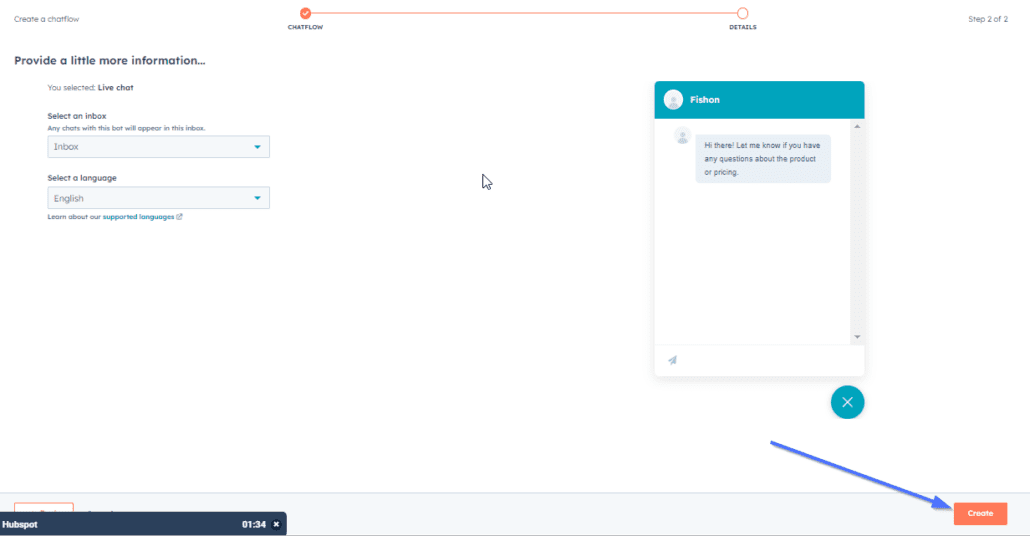
Click the Create button to create your chatbot.
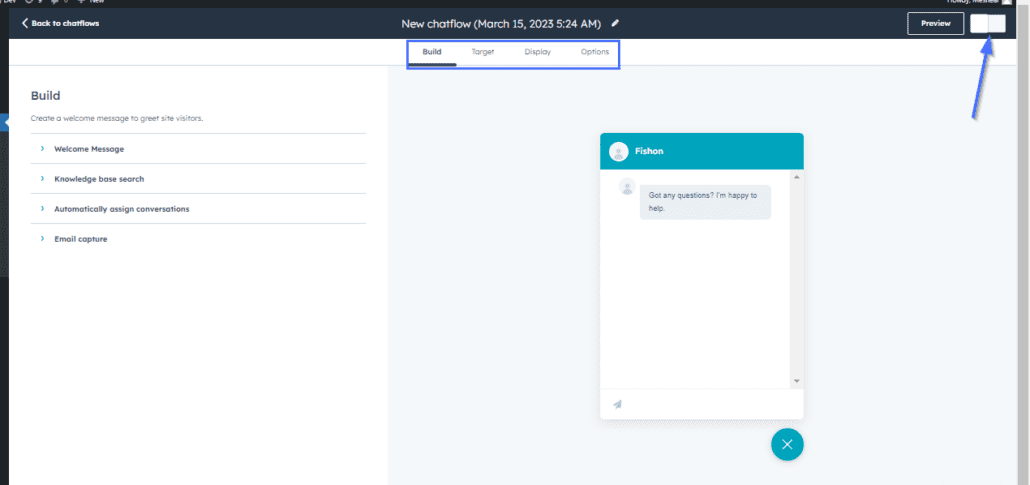
Your chatbot is now ready to go live. You can enable the chatbot by toggling ON the enable switch at the top right corner.
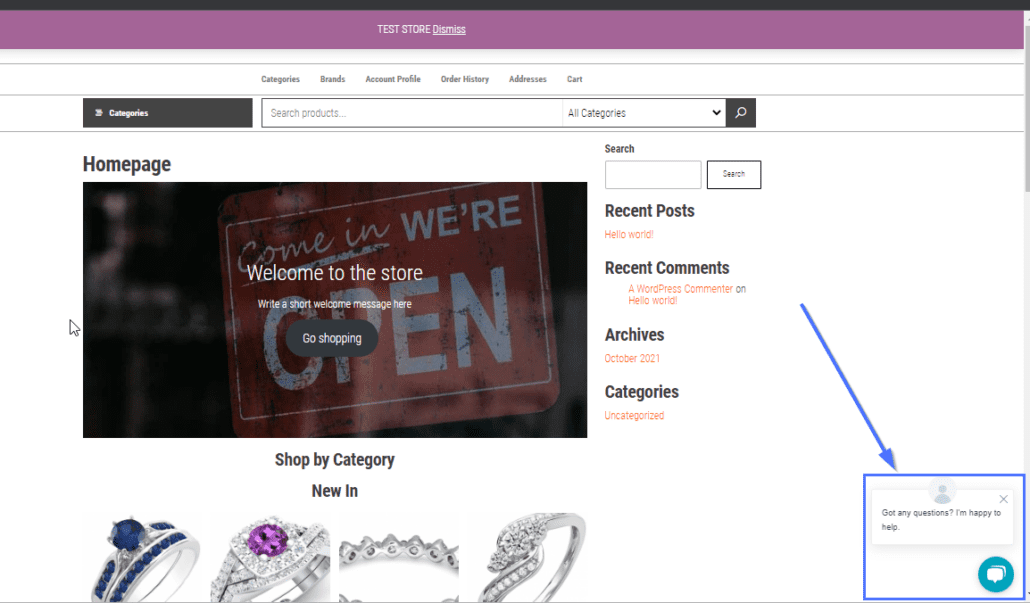
HubSpot live chat is now successfully activated on your WordPress website. You’ll be able to interact with your customers in real-time.
Monitoring and Responding to Live Chats
You can monitor and respond to live chat and chatbot prompts from your HubSpot account.
HubSpot typically sends a notification via email when a new message is sent. You can view and respond to messages from the inbox section of your HubSpot account.
To do that, log in to your HubSpot account using the details you created earlier in this tutorial.
Once logged in, click on the Conversation dropdown menu and then click on Inbox.
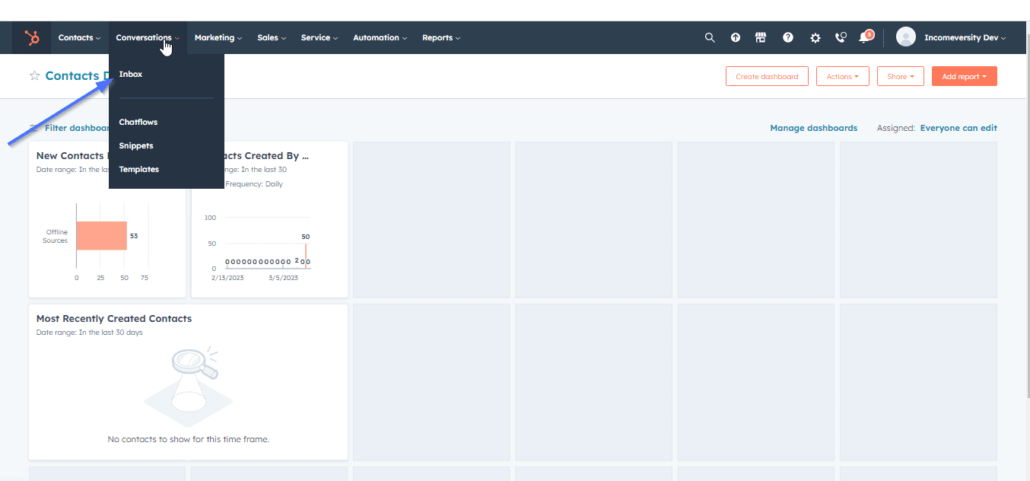
You can reply to messages and inquiries from the inbox page using the live form created in your blog. To respond to a chat, first select the chat you’d like to reply to. This will open up a chat box where you can enter your reply. After you’ve added your reply, click Send to reply.

Managing Emails With HubSpot and WordPress
HubSpot’s email tool allows you to send personalized emails to your customers based on their interests and demography.
You can use emails to target customers and influence them to take action or notify them about a new product or general business updates.
To access this feature, go to HubSpot >> Email from your WordPress dashboard. On the ‘Marketing Email’ page, you can create an email and send it to your existing contacts by clicking Create email at the top right corner.
Alternatively, you can connect to external providers like Mailchimp and import your existing contacts and email workflow from those platforms.

Clicking the Create email button will require you to select the type of email you want to send. There are three available options: Regular, Automated, and Blog emails.
For our example, we’ll choose the Regular email option. However, you can select one of the three according to your needs.

Side note: You’ll need to upgrade your HubSpot account to use the Automated option.
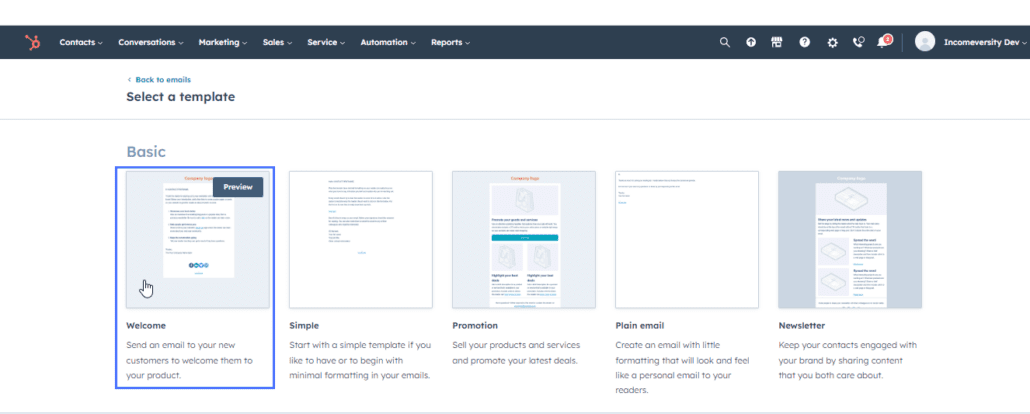
After selecting the Regular option, you’ll see a list of ready-made email templates that you can use for your email campaigns.
Customizing Your Email Message
We will be sending a welcome email to our new customers. Click on the Welcome option.
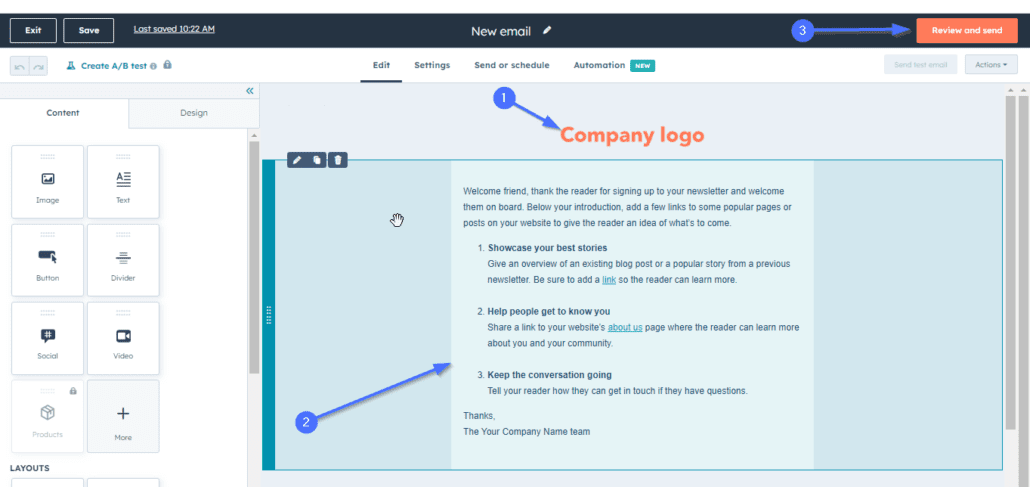
Next, upload your logo by clicking the Company logo text and selecting your logo from the WordPress media library. Next, customize the message you’d like to send to your users. Lastly, click Review and send to proceed to continue.
You’ll be required to add recipients and provide information about your business. Click on each of the required options to fill in the information.

For recipients, you can choose from your existing contacts or import new ones if you have not done so.
Once done, you can click Preview to see how your email will look. When you’re ready, click Send to send the email.
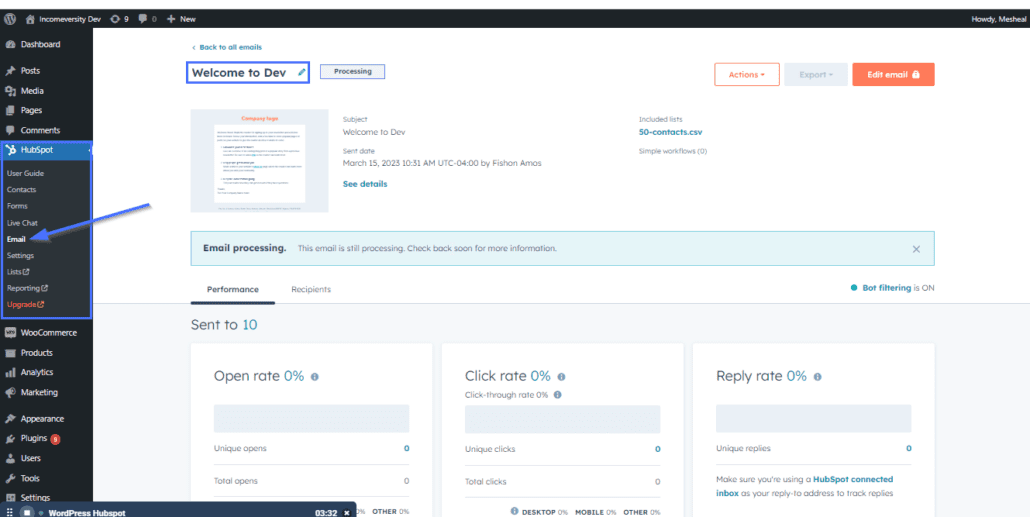
HubSpot allows you to view the performance of each email sent through your HubSpot account. To do that, navigate to HubSpot >> Email and click on the email you want to view.
You’ll see the total emails sent, open rate, click-through rate, and other vital information that will help track the performance of your business emails.
Tips for Getting the Most Out of Your HubSpot Integration
Here, we’ll share some useful tips to help you maximize your WordPress HubSpot integration.
Monitor Performance
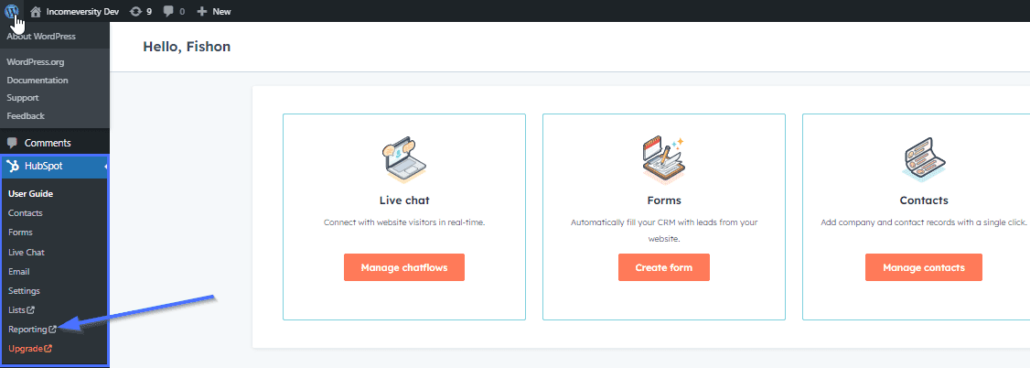
You can use the HubSpot reporting tool to monitor the performance of your emails, forms, and other marketing activities.
To view your reports, head to HubSpot >> Reporting for a general overview of your contact performances. This will help you to know what’s going great and what to improve.
Connect Third-party Apps
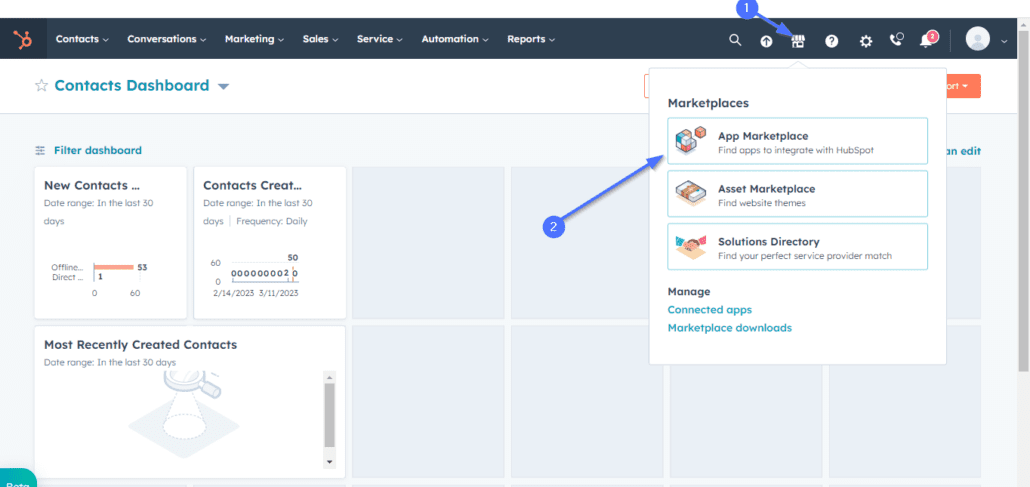
The HubSpot app marketplace allows you to install third-party tools to help make your WordPress HubSpot integration more effective.
So to add a third-party app to your HubSpot Integration, you’ll first need to log in to your HubSpot dashboard. Next, click on the Marketplaces icon and then select App Marketplace.
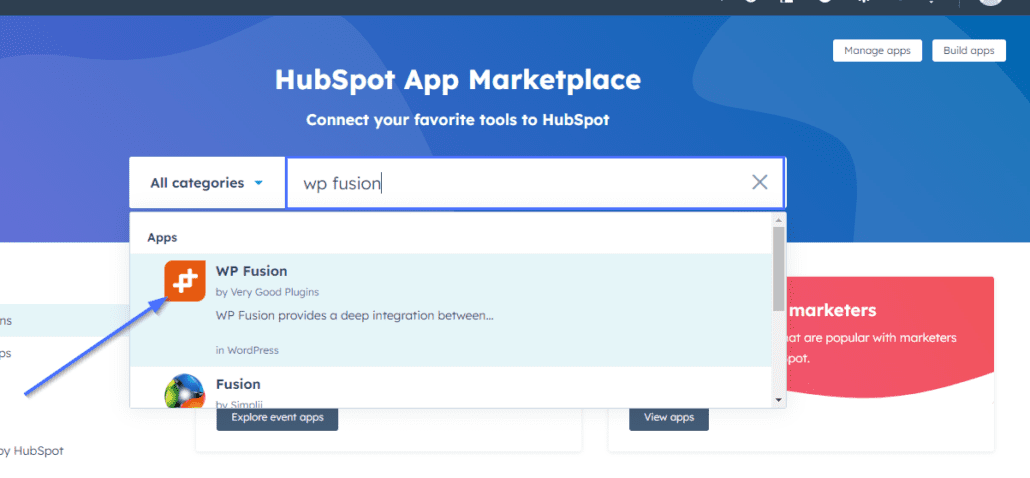
After that, enter the name of the application you want to install into the search box and then click on it when it shows up. You can install third-party apps such as WP Fusion, Google Analytics, Google Calendar, Mailchimp, etc.
Conclusion
To sum up, WordPress HubSpot integration will help improve your customer relationship management process. Optimizing your marketing and outreach plan will attract more visitors and potential leads to your website.
In this tutorial, we’ve shown you how to integrate HubSpot and take advantage of its features to improve customer relationships on your WordPress website.
Using a CRM plugin on your WordPress site improves your workflow and helps grow your online business. If you’d like to learn more, check out our tutorial on how to grow your business online with WordPress.


