How to Enable GZIP Compression in WordPress
Enabling GZIP compression on WordPress sites is one sure way of improving your website’s loading speed.
When it comes to user experience and SEO – loading speed is super important. The faster a website loads, the better it tends to perform. As such, speeding up your website should always be your priority.
Of the many ways of improving the loading speed of a website, enabling GZIP compression is one of the easiest. The technology has been around for over a decade now, and most modern browsers support it.
Everything you need to know about this speed-boosting technique will be discussed in this article. On top of that, you would be able to enable GZIP compression on your WordPress website by the time you finish reading this.
In this article:
- What is Gzip Compression
- How it works
- SEO Implications of GZIP Compression
- Ways to check if Gzip is enabled
- How to enable Gzip compression
- Server-Specific Instructions for Enabling GZIP Compression
- Troubleshooting and Common Issues with GZIP Compression
- Conclusion
What is GZIP Compression in WordPress?
GZIP is a file compressing software which helps to reduce the size of a webpage before it’s served to a client (a browser).
Essentially, GZIP works by breaking up heavy HTML, CSS, and Javascript files into smaller bits, thus reducing the time it will take a browser to load them. It doesn’t work on images, to learn about images, please read our image optimization guide.
The technology isn’t exclusive to WordPress, it works on virtually any website with a web server. So whether your website runs on WordPress, Magento, Drupal, etc. you can enable GZIP compression on it.
How It Works
When developers write the codes for a website, they add whitespaces, comments, page breaks etc. so as to make it easy for the human eyes to follow. The problem is, this formatting takes up space, and can significantly add to the size of a webpage.
What GZIP does is to take away this formatting, because to browsers it means nothing. The end result is that it compresses webpages by as much as 80%.
Like earlier said, all modern browsers support GZIP, so you don’t have to worry about compatibility problems.
SEO Implications of GZIP Compression
In today’s digital landscape, the speed of your website is not just a convenience for your users. It’s a critical component of your site’s search engine optimization (SEO) strategy.
Search engines, particularly Google, place a significant emphasis on page load times when determining rankings. This is where GZIP compression can play a pivotal role in enhancing your website’s SEO performance.
Direct Impact on Page Speed
GZIP compression reduces the size of your website’s files, including HTML, CSS, and JavaScript. By serving smaller file sizes to your visitors, you significantly decrease the time it takes for your pages to load. Faster page load times directly contribute to better user experiences, a factor that search engines consider when ranking websites.
A swift, seamless user experience keeps visitors engaged, reducing bounce rates and encouraging longer site visits, which search engines interpret as a sign of quality and relevance.
Enhanced User Experience
User experience (UX) is at the heart of SEO. Search engines aim to provide users with the most relevant and efficient results for their queries. A website that loads quickly and displays content without delay contributes to a positive UX, which search engines reward with higher rankings.
By implementing GZIP compression, you’re not only speeding up your site but also enhancing the overall user experience, aligning your site with search engines’ goal of user satisfaction.
Mobile Optimization
With the increasing prevalence of mobile browsing, your site’s performance on mobile devices is more crucial than ever. Mobile users expect quick, responsive sites, even on slower mobile networks.
GZIP compression is especially beneficial for mobile SEO, as it helps to minimize load times in bandwidth-constrained environments, ensuring that your site remains accessible and user-friendly across all devices.
Improved Server Performance
GZIP compression lightens the load on your server by reducing the amount of data transferred between the server and the client’s browser. This improved efficiency can lead to better server performance and reduced downtime, factors that indirectly influence your site’s SEO.
A reliable and responsive server is essential for maintaining consistent site availability and speed, both of which are vital for sustaining your SEO rankings.
Competitive Edge
In competitive niches, every second counts. Implementing GZIP compression gives you an edge over competitors who may not have optimized their site’s load times.
By ensuring your site is as fast as it can be, you position yourself favorably in the eyes of both users and search engines, potentially leading to higher rankings and increased visibility in search results.
Ways to Check If GZIP Compression Is Enabled on WordPress
Some web host providers enable GZIP compression by default. So before going through the hassles of enabling it, it makes sense to first test if it’s been enabled.
There are a couple of ways of running this test, but for this tutorial, we will be considering just two:
- Using online checking tools
- Google Chrome’s developer tool
How to Use Online Checking Tools
Using an online tool is the easiest way to check if file compression is enabled on your website.
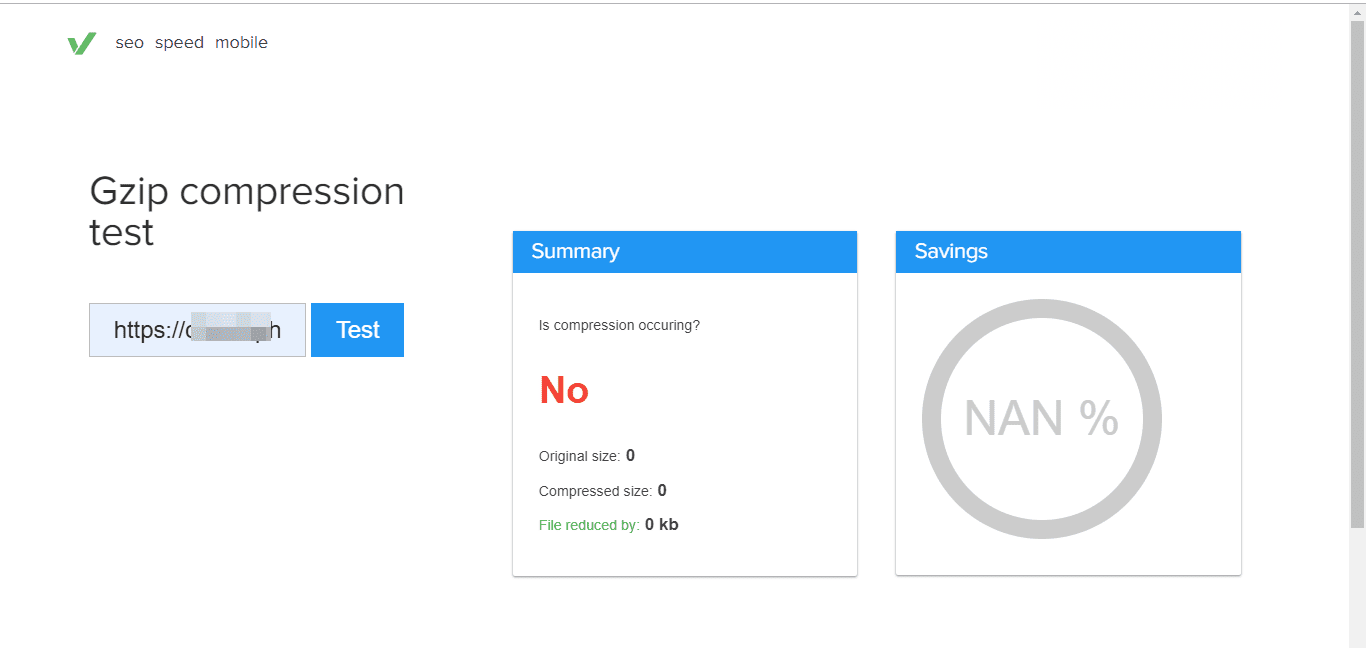
There are several checking tools online you could use, but for this tutorial, we will be using Varvy tool.
If file compression isn’t active on your website, it tells you instantly. Just copy and paste the URL to your website, and the rest is taken care of.
If GZIP compression is enabled on your WordPress site, it will give you a breakdown analysis of your website.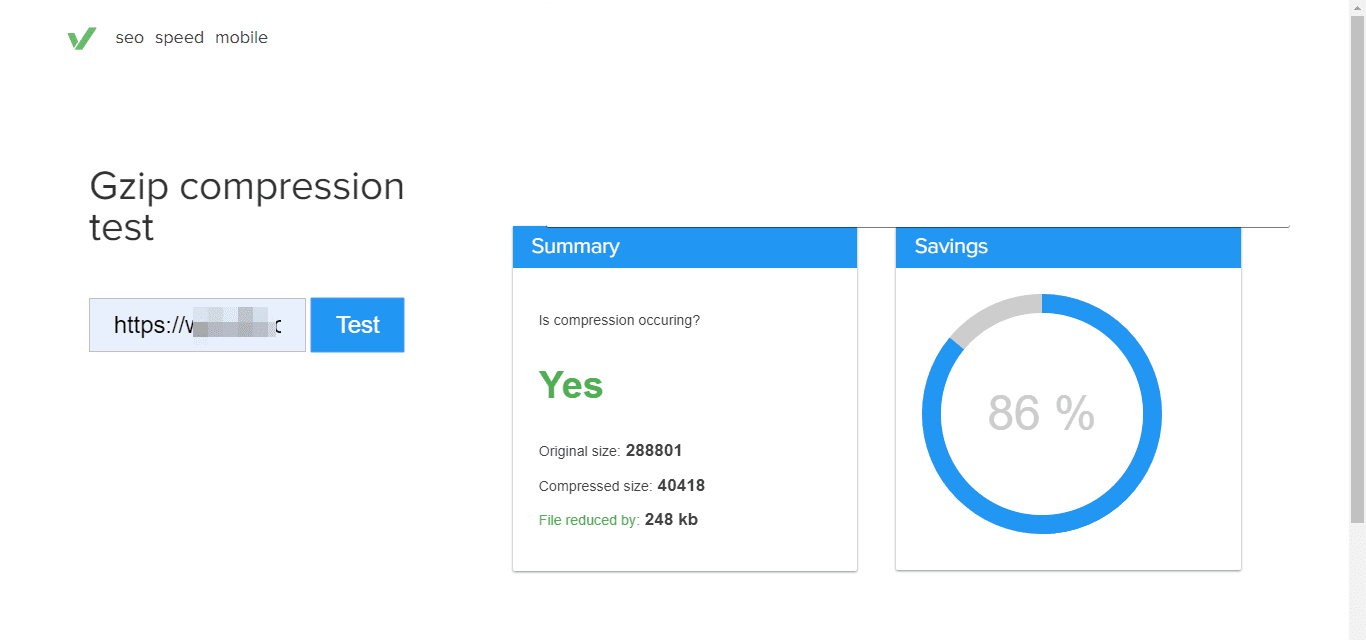
It’s that easy!
Using Google Chrome’s Developer Tool
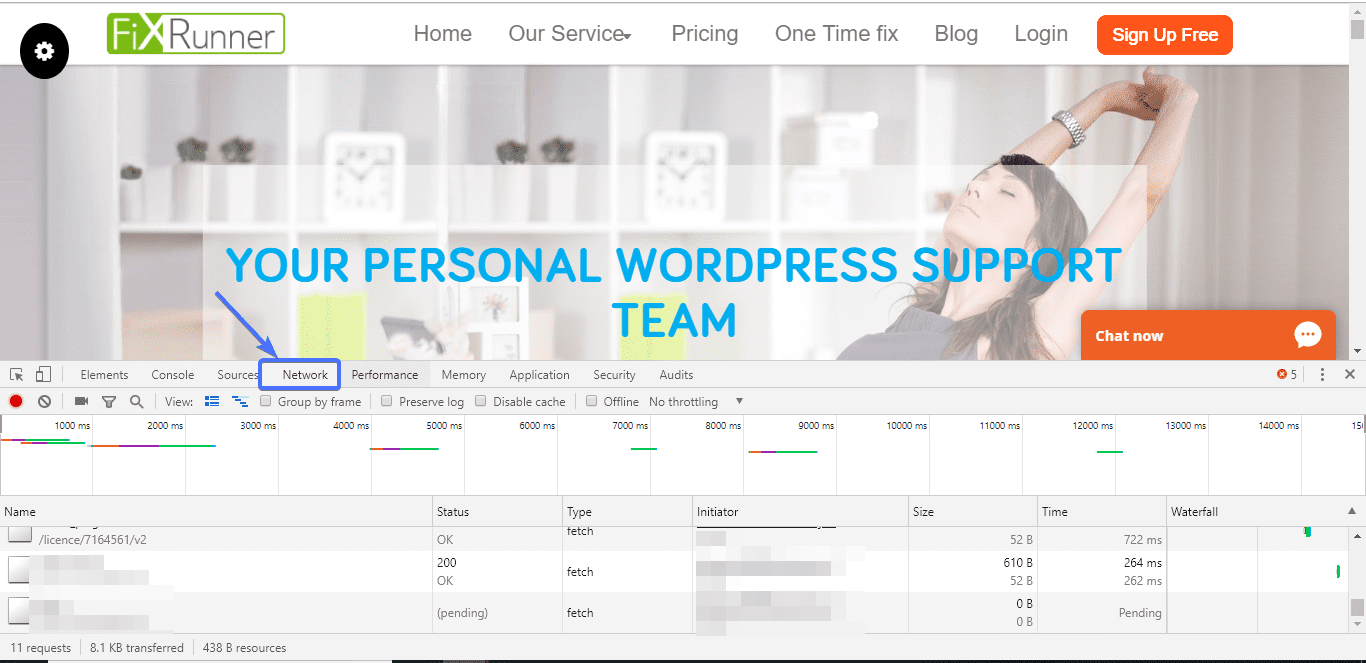
If you use Google Chrome, you can readily check if GZIP is enabled on your website. To do so, open your website in Chrome and open developer tools with the keyboard shortcut Ctrl Shift I (Command Shift I Mac). In developer tools, click on the Network tab.
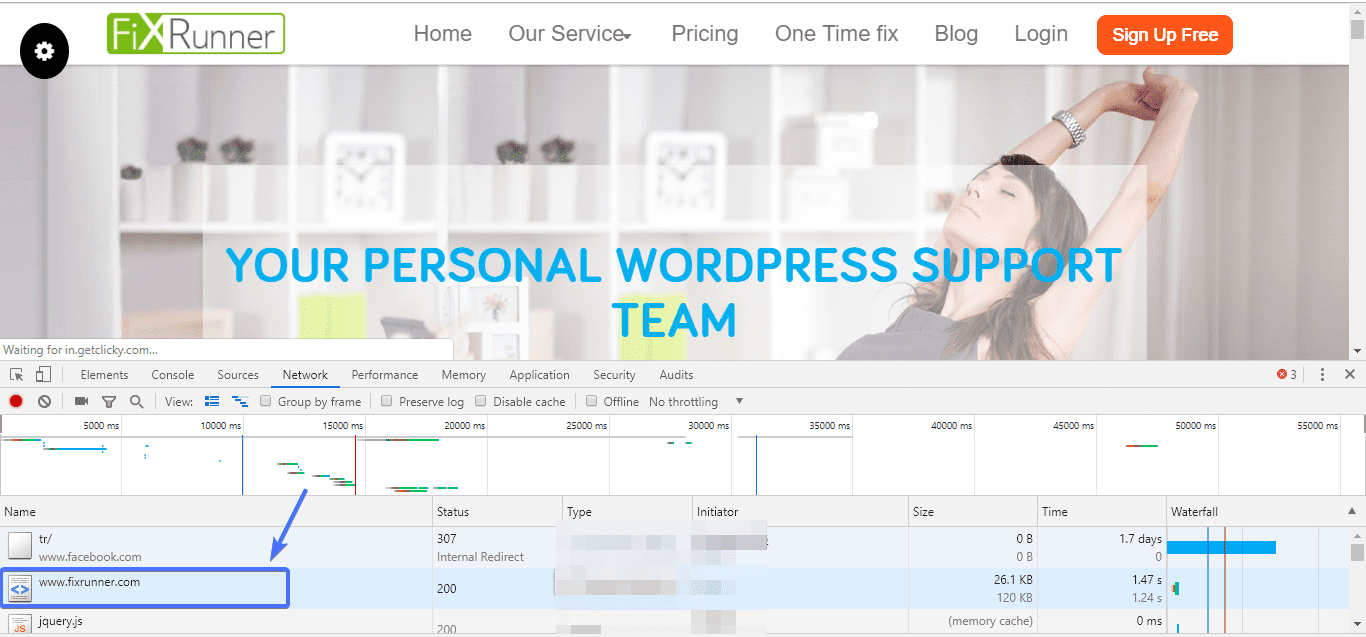
Next, reload the page. After the reload scroll up in the developer tools section until you find your website’s URL at the left column.
Click on the URL once and switch to the Headers tab if you are in a different one.
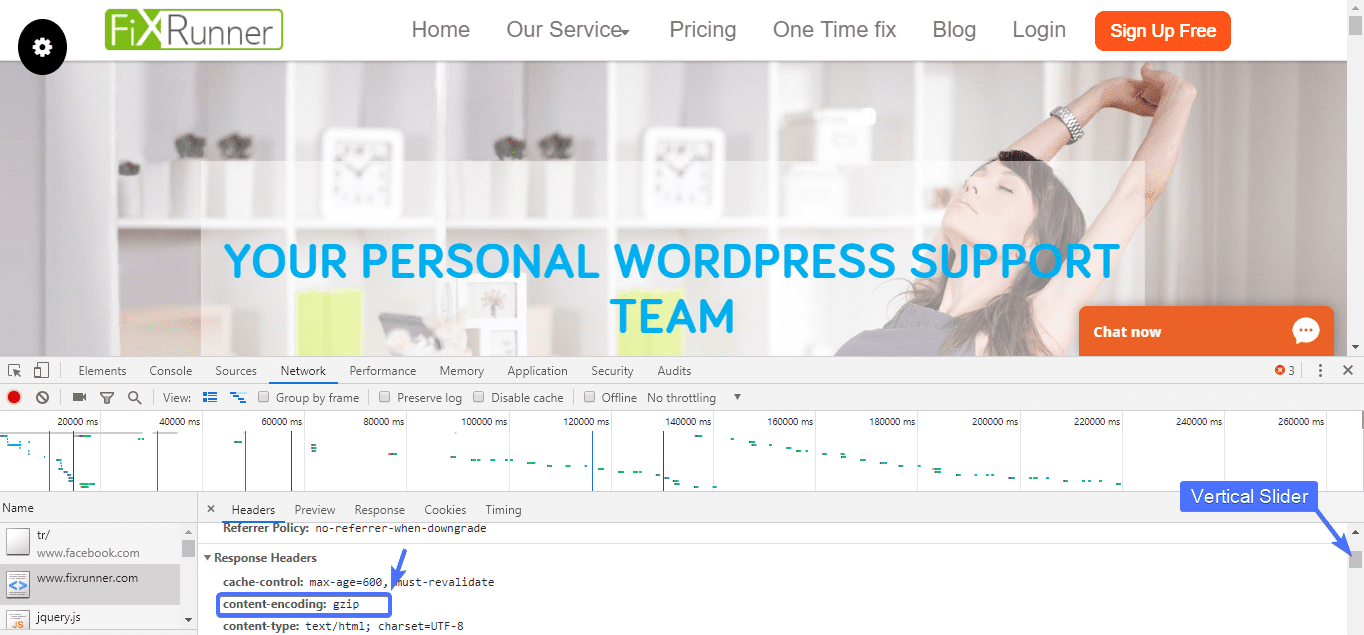
Then scroll down using the vertical slider in this section until you get to the Response Header section. If GZIP is enabled, you will see:
content-encoding: gzip
If it’s not enabled, you will see
content-encoding: br
If it turns out file compressing isn’t enabled on your website yet, that can easily be fixed.
How to Enable GZIP Compression on Your WordPress Website
Enabling GZIP isn’t as hard as it might seem at the surface. There are a couple of ways to go about it, but we will be considering just 3, starting from the easiest.
Method #1 Contact Your Web Host Provider
GZIP is a technology that works on the server-side, and as such your web host provider is in the best position to help you out with it. So reach out.
Usually, hosting providers do this from their own end without you having to click a button. However, in some cases, they will provide instructions. It all depends on the provider, but by all means, reach out.
Note that we recommend having your host enable this feature. Other solutions should only be used if there are issues with this method.
Method #2 Use a Plugin
In WordPress, besides GZIP compression, there’s a plugin for virtually every task. Here are a couple of plugins that finish the job.
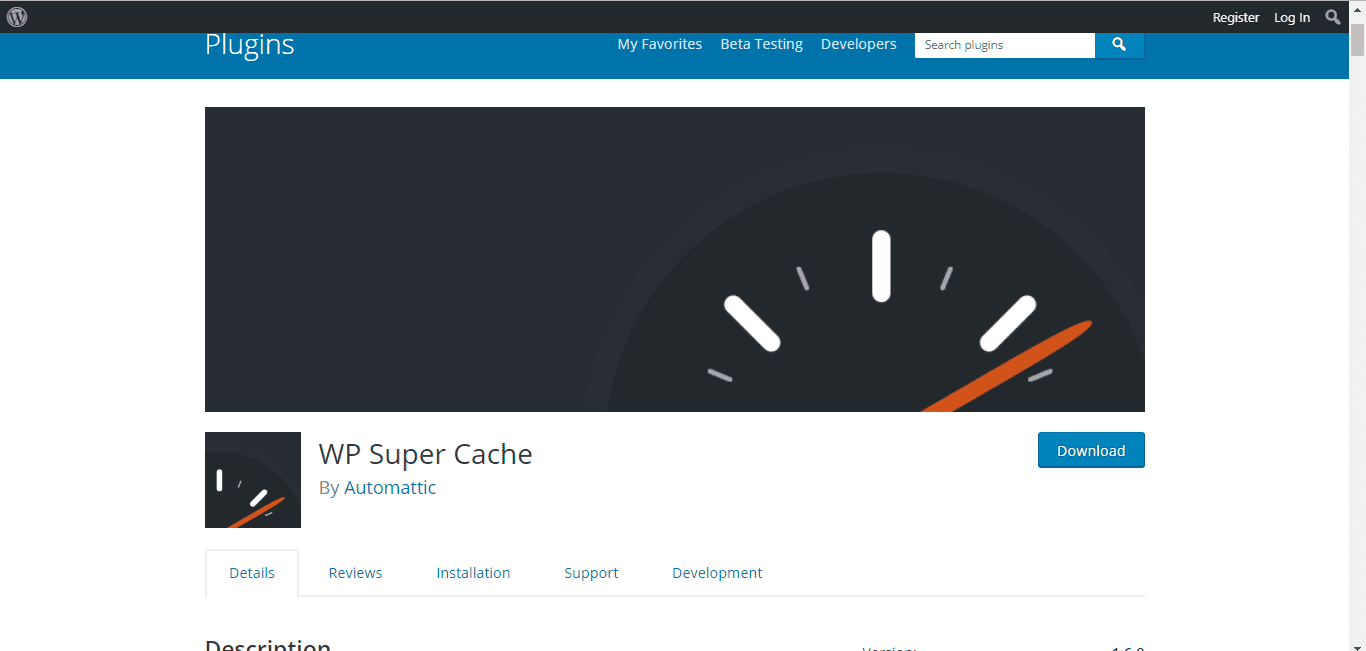
WP Super Cache, though primarily a caching plugin, also does a good job at compressing web files.
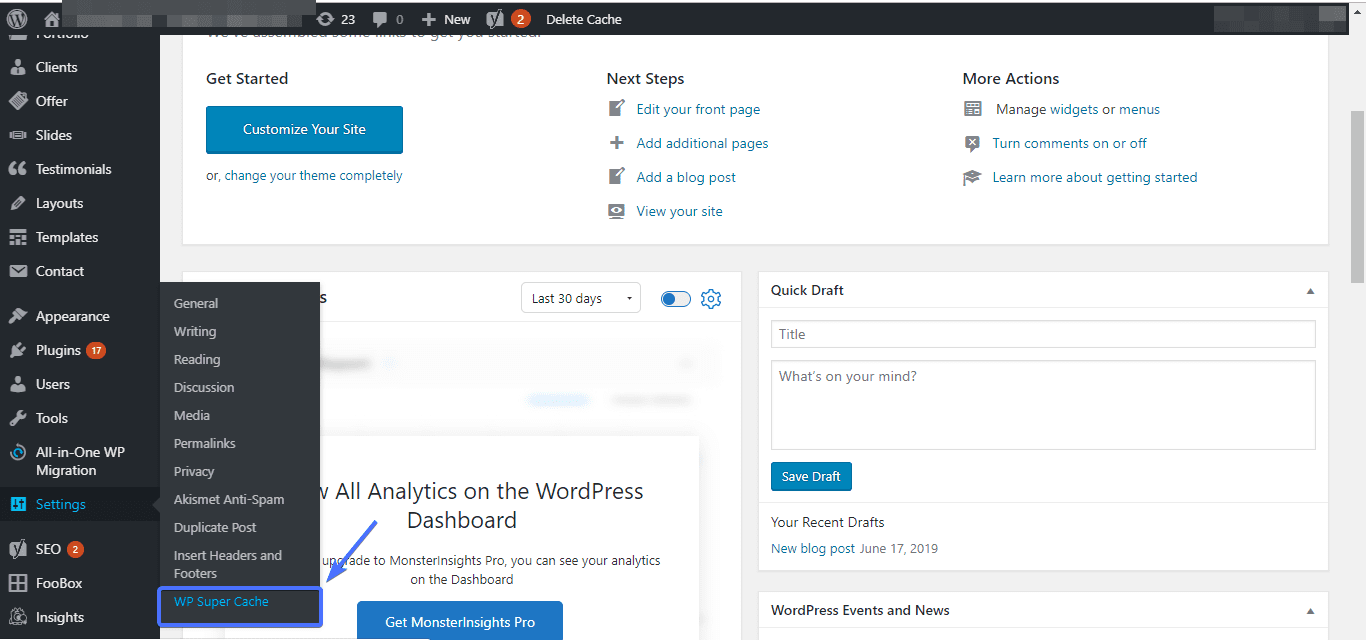
To start, first install and activate the plugin. Next, navigate to Settings >> WP Super Cache.
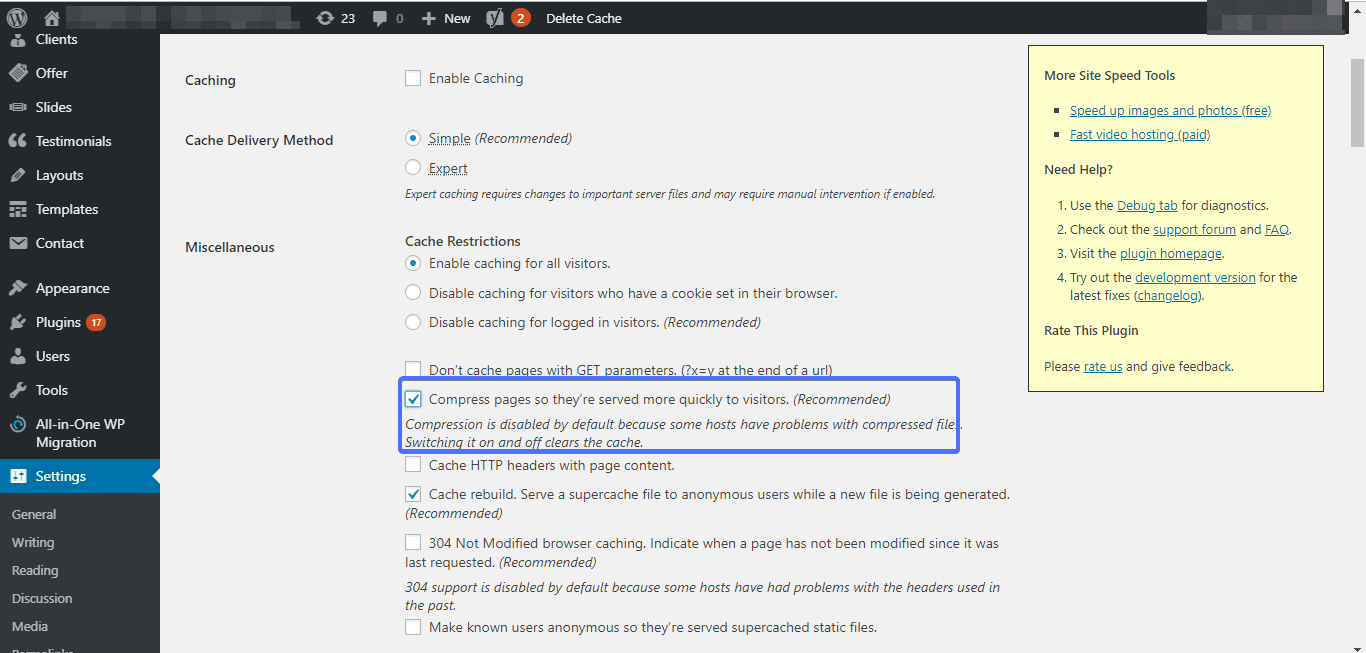
In the WP Super Cache page, click the Advanced tab. Then check the Compress pages so they are served more quickly to visitors option.
When you are done, scroll down and Update Status.
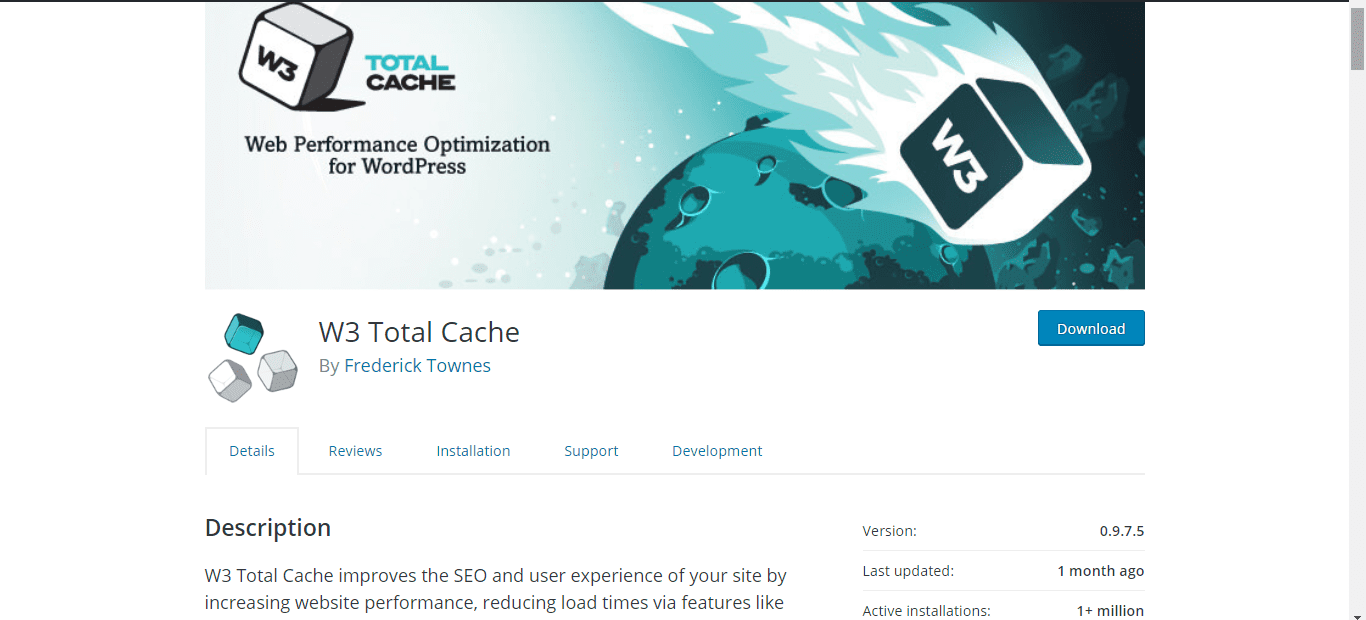
W3 Cache is popular for its caching functionality. What you might not know is that with it, you can compress your web pages by as much as 80%.
There’s a video tutorial on the WordPress directory page of W3 Cache you can follow to enable file compression.
Method #3 Edit the .htaccess files
This technique is somewhat technical, and if you are not careful you might break your website. Nonetheless, if you are confident in your abilities, by all means, give it a shot.
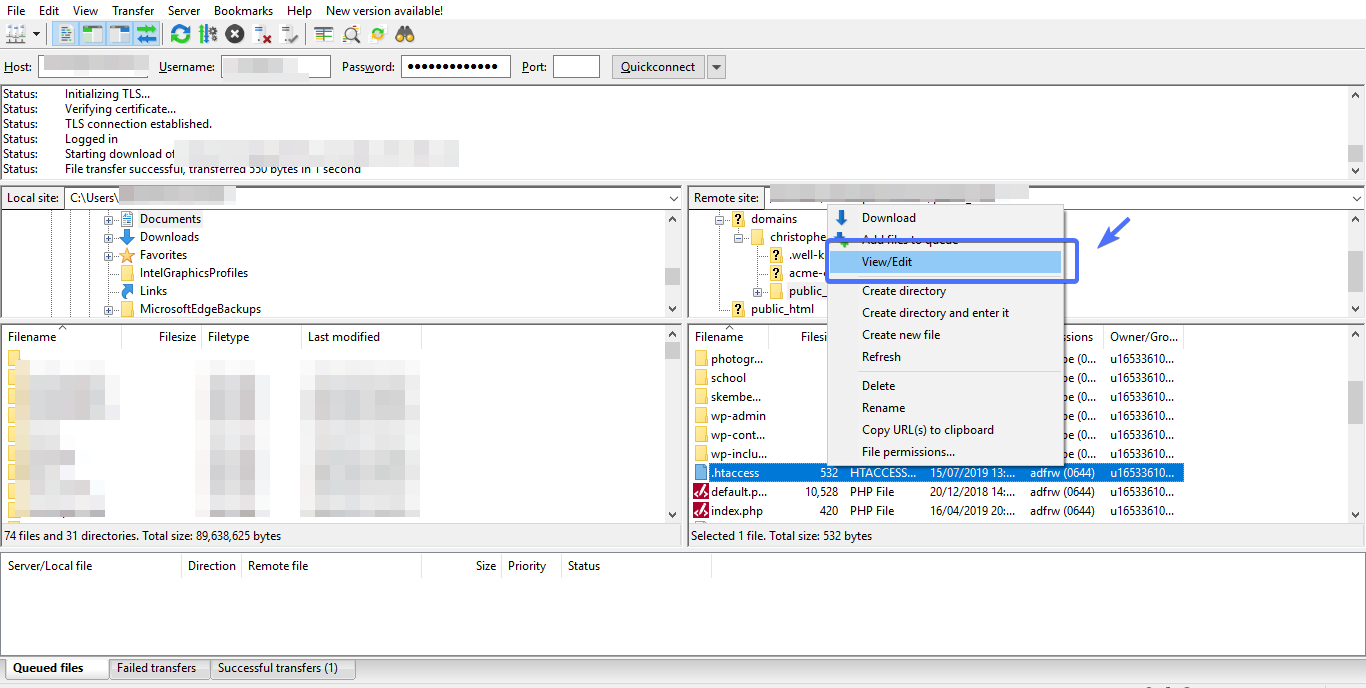
To start, access your site using FTP. Once a connection has been established, click the public_html link at the top right section. Then at the bottom, scroll down until you locate the .htaccess file.
Right-click on the file, then click the View/Edit option.
Copy and paste the following lines of code into the bottom section of the Notepad editor:
<IfModule mod_deflate.c>
# Compress HTML, CSS, JavaScript, Text, XML and fonts
AddOutputFilterByType DEFLATE application/javascript
AddOutputFilterByType DEFLATE application/rss+xml
AddOutputFilterByType DEFLATE application/vnd.ms-fontobject
AddOutputFilterByType DEFLATE application/x-font
AddOutputFilterByType DEFLATE application/x-font-opentype
AddOutputFilterByType DEFLATE application/x-font-otf
AddOutputFilterByType DEFLATE application/x-font-truetype
AddOutputFilterByType DEFLATE application/x-font-ttf
AddOutputFilterByType DEFLATE application/x-javascript
AddOutputFilterByType DEFLATE application/xhtml+xml
AddOutputFilterByType DEFLATE application/xml
AddOutputFilterByType DEFLATE font/opentype
AddOutputFilterByType DEFLATE font/otf
AddOutputFilterByType DEFLATE font/ttf
AddOutputFilterByType DEFLATE image/svg+xml
AddOutputFilterByType DEFLATE image/x-icon
AddOutputFilterByType DEFLATE text/css
AddOutputFilterByType DEFLATE text/html
AddOutputFilterByType DEFLATE text/javascript
AddOutputFilterByType DEFLATE text/plain
AddOutputFilterByType DEFLATE text/xml

# Remove browser bugs (only needed for really old browsers)
BrowserMatch ^Mozilla/4 gzip-only-text/html
BrowserMatch ^Mozilla/4\.0[678] no-gzip
BrowserMatch \bMSIE !no-gzip !gzip-only-text/html
Header append Vary User-Agent
</IfModule>
When you are done pasting, save the file by hitting Ctrl (Cmd for Mac) + S.
Server-Specific Instructions for Enabling GZIP Compression
When optimizing your WordPress site with GZIP compression, it’s crucial to tailor the approach to your specific server environment.
Different web servers have unique configurations, and understanding how to enable GZIP compression on your server can significantly enhance your website’s performance.
Below, we provide guidance for the most common server types: Apache and Nginx.
For Apache Servers
Apache is widely used and known for its flexibility and power. To enable GZIP compression on an Apache server, you’ll typically use the mod_deflate module, which handles the compression and decompression of data on the fly.
- Access Your .htaccess File: The .htaccess file in your WordPress root directory is where you’ll add the necessary directives. You can access this file via FTP or your hosting provider’s file manager.
- Modify .htaccess: Add the following lines to your .htaccess file. This code instructs Apache to compress text, HTML, JavaScript, CSS, and XML files before sending them to the browser.
<IfModule mod_deflate.c>
AddOutputFilterByType DEFLATE text/plain
AddOutputFilterByType DEFLATE text/html
AddOutputFilterByType DEFLATE text/xml
AddOutputFilterByType DEFLATE text/css
AddOutputFilterByType DEFLATE application/xml
AddOutputFilterByType DEFLATE application/xhtml+xml
AddOutputFilterByType DEFLATE application/rss+xml
AddOutputFilterByType DEFLATE application/javascript
AddOutputFilterByType DEFLATE application/x-javascript
</IfModule>
- Test Your Configuration: After saving the changes, it’s important to test your website to ensure GZIP compression is active. You can use online tools like GTmetrix or Google PageSpeed Insights to verify the compression.
For Nginx Servers
Nginx is renowned for its high performance and low resource consumption. Enabling GZIP compression in Nginx involves editing the nginx.conf file, which is typically found in the /etc/nginx directory.
- Access nginx.conf: Use a text editor to open your nginx.conf file. You might need root access to edit this file, depending on your server’s setup.
- Add GZIP Directives: Inside the http block of your nginx.conf, add or modify the following directives to enable GZIP compression:
gzip on;
gzip_disable "msie6";
gzip_vary on;
gzip_proxied any;
gzip_comp_level 6;
gzip_buffers 16 8k;
gzip_http_version 1.1;
gzip_types text/plain text/css application/json application/javascript text/xml application/xml application/xml+rss text/javascript;
These settings enable GZIP compression for various file types and ensure compatibility with different proxies and browsers.
- Reload Nginx: After saving your changes, reload Nginx to apply the new configuration. You can do this by running sudo systemctl reload nginx or sudo service nginx reload, depending on your system.
- Verify Compression: As with Apache, use online tools or browser developer tools to confirm that GZIP compression is working correctly on your Nginx server.
Troubleshooting and Common Issues with GZIP Compression
Implementing GZIP compression can significantly enhance your website’s performance, but like any technical optimization, it might come with its set of challenges.
Understanding how to troubleshoot common issues will ensure a smooth implementation process and help you reap the full benefits of GZIP compression.
Here are some potential problems you might encounter and how to address them.
GZIP Compression Not Working
After setting up GZIP compression, you might find that your website’s files are still not compressed. This could be due to several reasons.
- Server Configuration: Ensure that your server supports GZIP compression and that the necessary modules (mod_deflate for Apache, for example) are enabled. You might need to contact your hosting provider for assistance.
- Incorrect .htaccess or nginx.conf Entries: Typos or incorrect syntax in your configuration files can prevent GZIP from working. Double-check your entries against reliable sources or documentation to ensure accuracy.
- Caching Issues: If you’re using a caching plugin or service, your changes might not reflect immediately. Clear your site’s cache and, if possible, your browser’s cache to see if the issue resolves.
Performance Not Improving
If you’ve successfully enabled GZIP compression but don’t see a significant improvement in your site’s loading speed, consider the following:
- File Types Being Compressed: GZIP works best with text-based files. Ensure you’re targeting the correct file types (HTML, CSS, JavaScript, etc.) in your configuration.
- Large Images and Videos: GZIP does not compress images and videos effectively. Use dedicated optimization techniques for these file types, such as choosing the right format, resizing, and using image compression tools.
- External Scripts: External resources, like third-party JavaScript, are not affected by your site’s GZIP settings. Minimize the use of such resources or ensure they’re optimized separately.
Errors After Configuration
Implementing GZIP compression can sometimes lead to errors, especially if there’s a mistake in the configuration.
- 500 Internal Server Error: This can occur if there’s a syntax error in your .htaccess or nginx.conf file. Review your changes carefully and revert to a backup if necessary.
- Content Encoding Error: This browser error can appear if the content is double-compressed or not decompressed properly by the browser. Ensure that your server is configured to compress content only once and that the Vary: Accept-Encoding header is correctly set.
Compatibility Issues
While most modern browsers support GZIP compression, there might be compatibility issues with older versions.
- Older Browsers: Ensure that your website still serves uncompressed files to older browsers that don’t support GZIP. This can usually be managed through proper server configuration.
- Mobile Browsers: Test your website on various mobile browsers to ensure that GZIP compression works across devices. Some mobile browsers might have unique behaviors or limitations.
When troubleshooting, it’s crucial to approach the process systematically. Start by verifying your server’s capability to use GZIP compression, then move on to checking your configuration files for errors. Use online tools to test for GZIP compression, and don’t hesitate to consult your hosting provider’s support team for assistance.
Remember, the goal is to enhance your website’s performance without compromising functionality, so thorough testing on various devices and browsers is essential to ensure a seamless user experience.
Conclusion
The loading speed of your website can make or mark your site success, and so should be taken seriously. Enabling GZIP compression in WordPress will really go a long way in making your website load faster.
In this article, we discussed three methods you could use to enable file compression on your website. Should you encounter any technical challenges along the way, do reach out to us.
More Resources:
- How To Easily Clean Up Your WordPress Database
- The Fastest WordPress Themes Of 2019
- WordPress Meta Description

