How to Serve Scaled Images in WordPress

Introduction
Images play a major role in making your site informative, user-friendly, and exciting. So, it is very important that your WordPress site Serve Scaled Images. The images you use on your site have to be sized properly according to the rules set by your active theme. After all, a picture says a thousand words.
If an image is too small, the browser will scale it up (i.e. make it bigger), and it will become blurry and unattractive. Likewise, if an image is too big, the browser will shrink it to the right size.
When an image shrinks, it will not affect how the image looks. But it will add to the file size of the page, and cause it to load sluggishly. Thus the efficient thing to do is to size images properly so that the browser doesn’t have to download and resize images.
In this tutorial, we’re going to explore what scaled images are and how you can serve scaled images on your WordPress site. Also, we will examine good WordPress plugins you can use for image optimization on your site.
Content
What does Serve Scaled Images Mean?
What does Serve Scaled Images Mean?
A scaled image is an image that is adjusted to match (scaled to) the exact size dimensions of images required for a site. So when you “serve scaled images”, you adjust these images to the right size before sending them to the browser.
A properly scaled image should not lose its qualities after resizing is done. This means the image will remain clear and sharp, but should only be smaller or larger as the case may be.
Here is Why you Need to do it
Serving scaled images on your website improves your site’s performance. Scaled images could save resources that would be used in image download as they do not take up a lot of space on your site. Because of this, your website becomes significantly faster.
Further, fast page loading time and minimal use of resources makes your site perform better in the most important ways.
Firstly, the speed of your site improves your SEO and helps you rank higher. This means more people will find your site.
Secondly, more people who find your site will stay longer and will return and reuse it. You see, internet users are a very impatient bunch. This means a slow loading site will cause many users to abandon your site. Conversely, a fast site is a pleasure to navigate, and you will see more users viewing multiple pages and coming back.
How to Serve Scaled Images
When you upload images to your WordPress site using the Add Media button, the images are added without shrinking the size. To serve properly sized images, you can either edit images manually or, you guessed right, use an image plugin. The plugins would optimize and serve scaled images on your site effortlessly.
Manually Scaling Images
Analyze your website
To manually scale images, you need to know which images need to be scaled, and the recommended dimension.
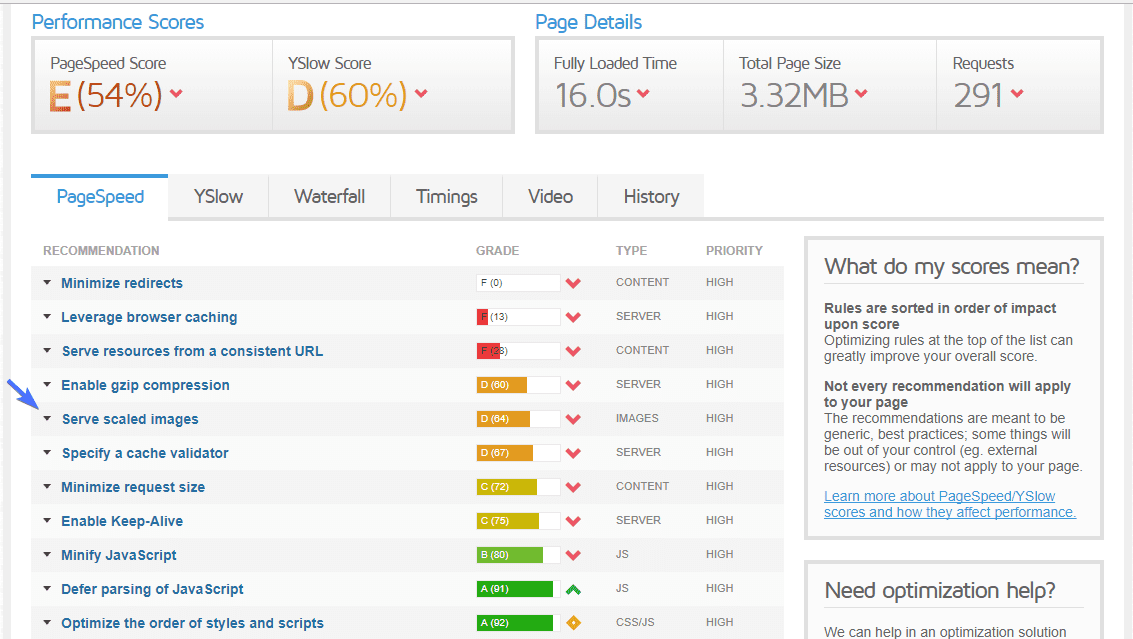
You can analyze the size of images you serve using site speed optimizer tools like GTMetrix or Google pagespeed insights. For this tutorial, we’re using GTMetrix because it displays the images that need to be scaled. More so, it recommends ideal image dimensions for the images.
-
-
- Go to GTmetrix .
- Type your site’s URL into the textbox provided.
- Click Test your site button.
-
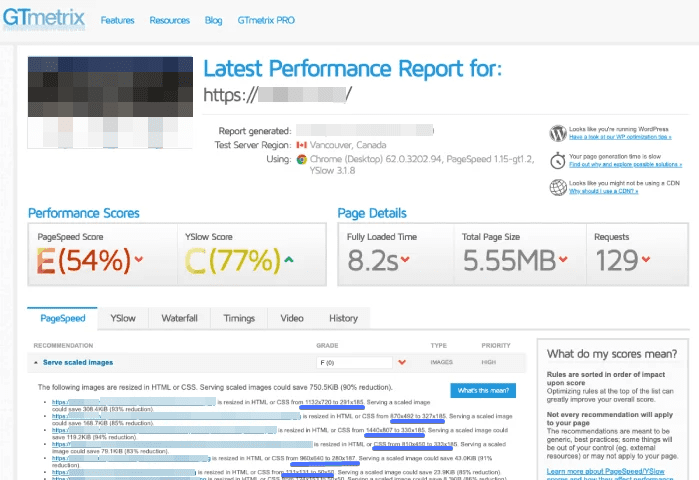
Your website’s pagespeed result displays. Next, click on the Serve scaled images drop down button.
A list of incorrectly sized images that needs to be scaled will display along with the dimensions. The recommended scale will display as well.
Locate and Resize images on WordPress site
Having done the analysis on your site, you now know the images you should resize, and the recommended size as well. The next step to take is to locate the target images on your site. And scale down the images as well.
Edit Images in the Media Library
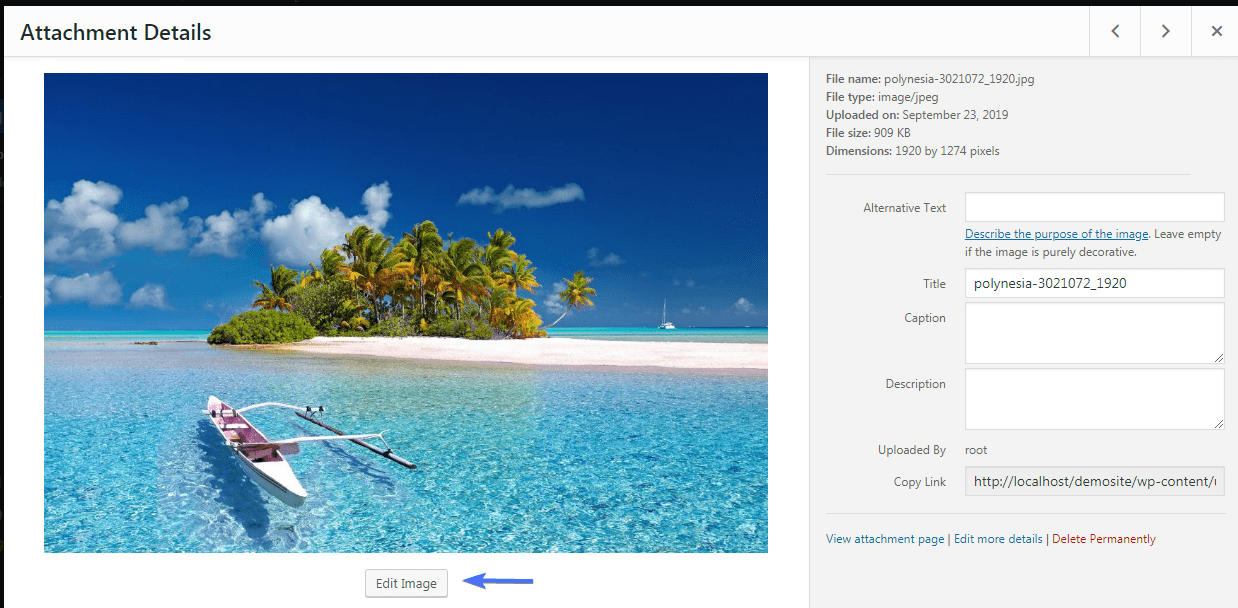
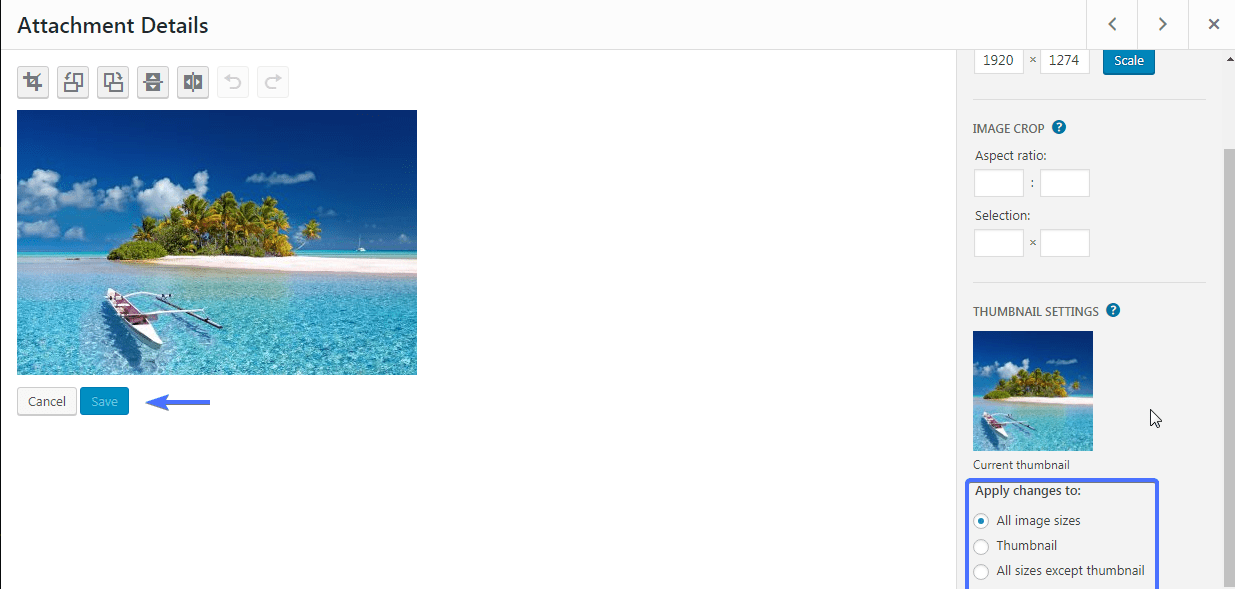
On the admin area of your site, go to Media> Library> Select image
Click Edit Image
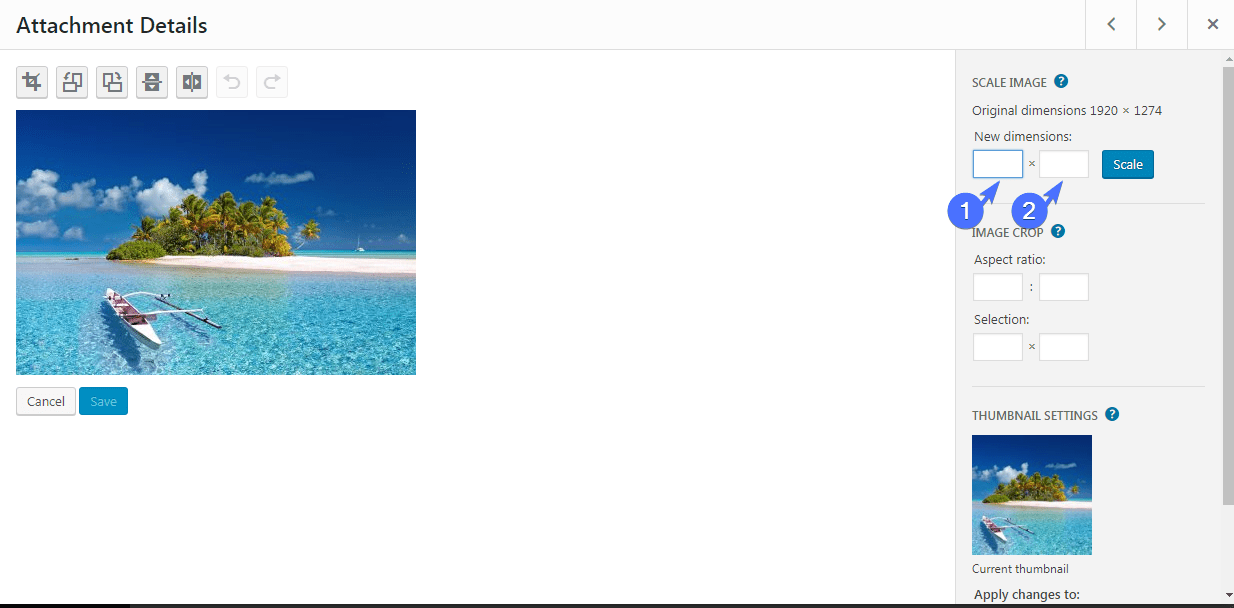
The original dimension of the image displays.
-
-
- Input the new dimension for width.
- Do the same for height as well.
-
Under Thumbnail Settings, choose where you’d like to apply your changes to. Click Save.
You can resize images while editing a recent post or a page on your site. Click the Add Media button, next click the Media Library tab. Choose an image from the library and click on the Edit Image link. You will then go through the same process as seen above to resize the image.
Edit Images in Paint
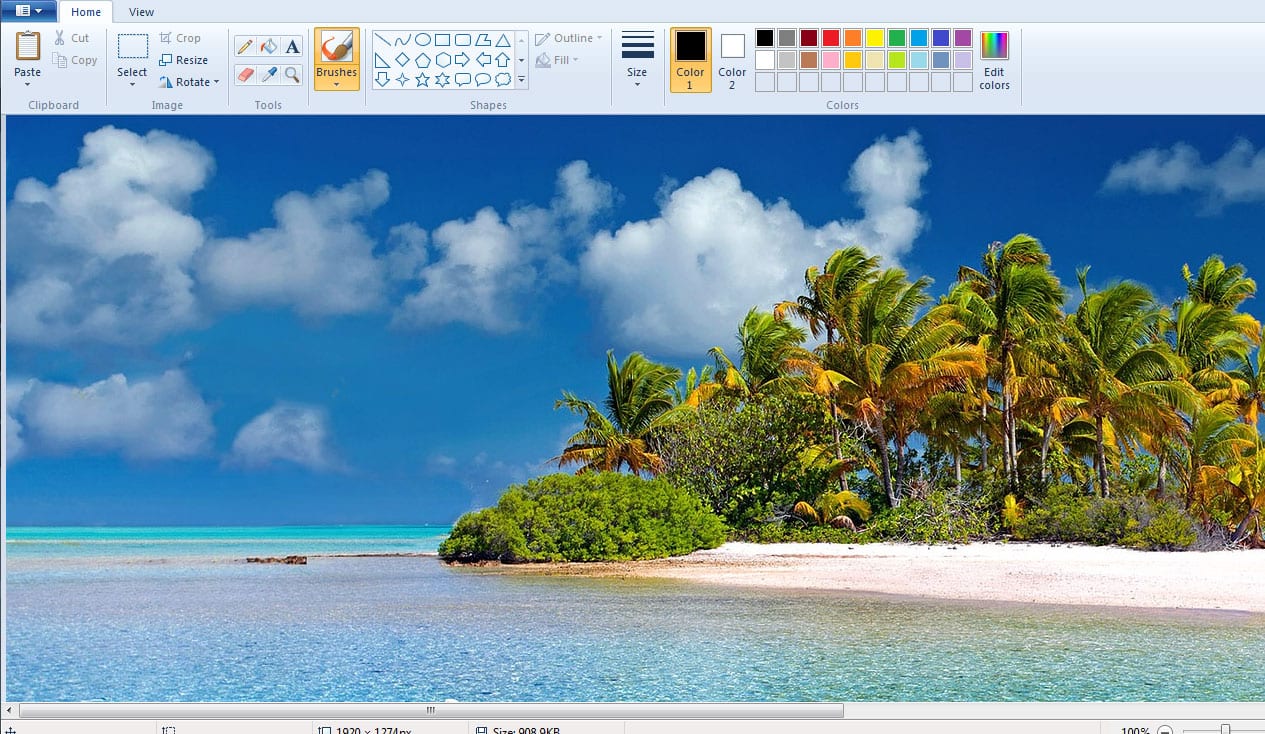
Open up the image you want to scale with Paint photo editor. You can use any other graphics design or image editor of your choice.
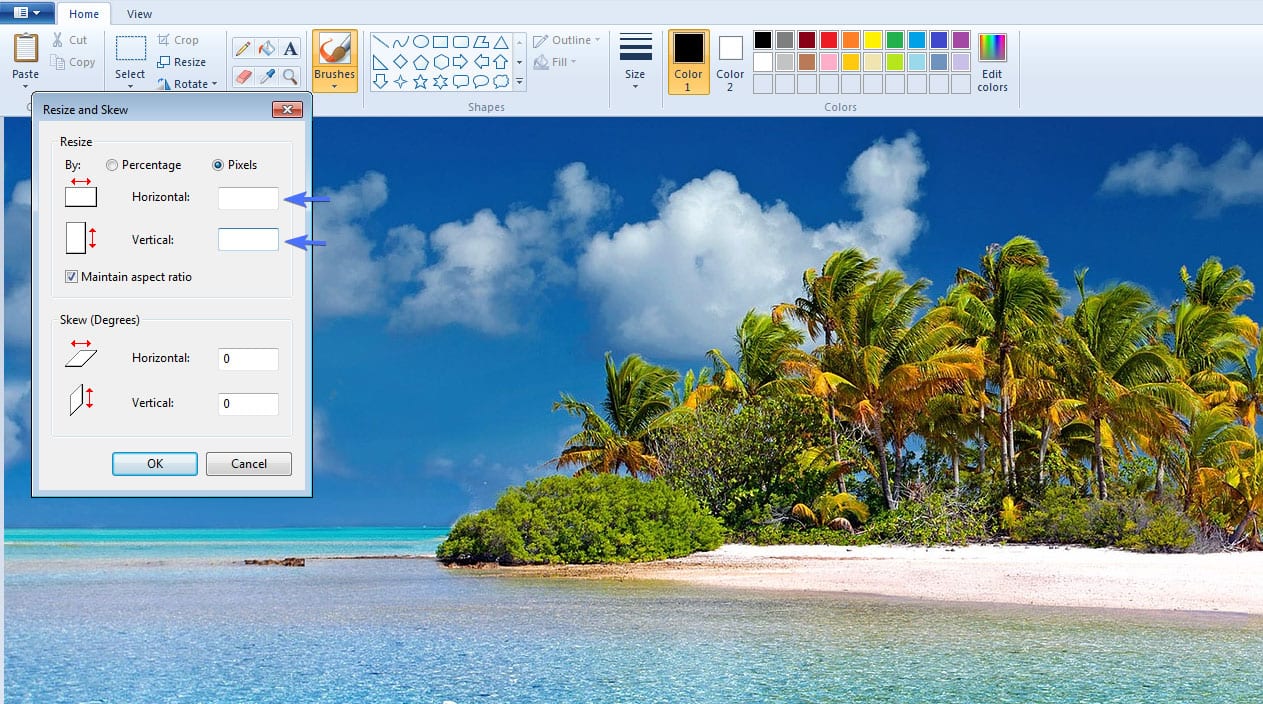
Click Resize under the Home tab
A popup box will appear. Next, select the Pixels radio button.
Edit the horizontal dimensions. So, if you check the Maintain aspect ratio box, then the vertical dimensions will resize automatically.
After making your adjustments, click OK.
Save your newly scaled image file in Paint, and name it accordingly. Then upload the new image to replace the original image on your WordPress site.
Serve Scaled images with WordPress Media Setting
You can edit images through WordPress Media settings on your site’s admin dashboard.
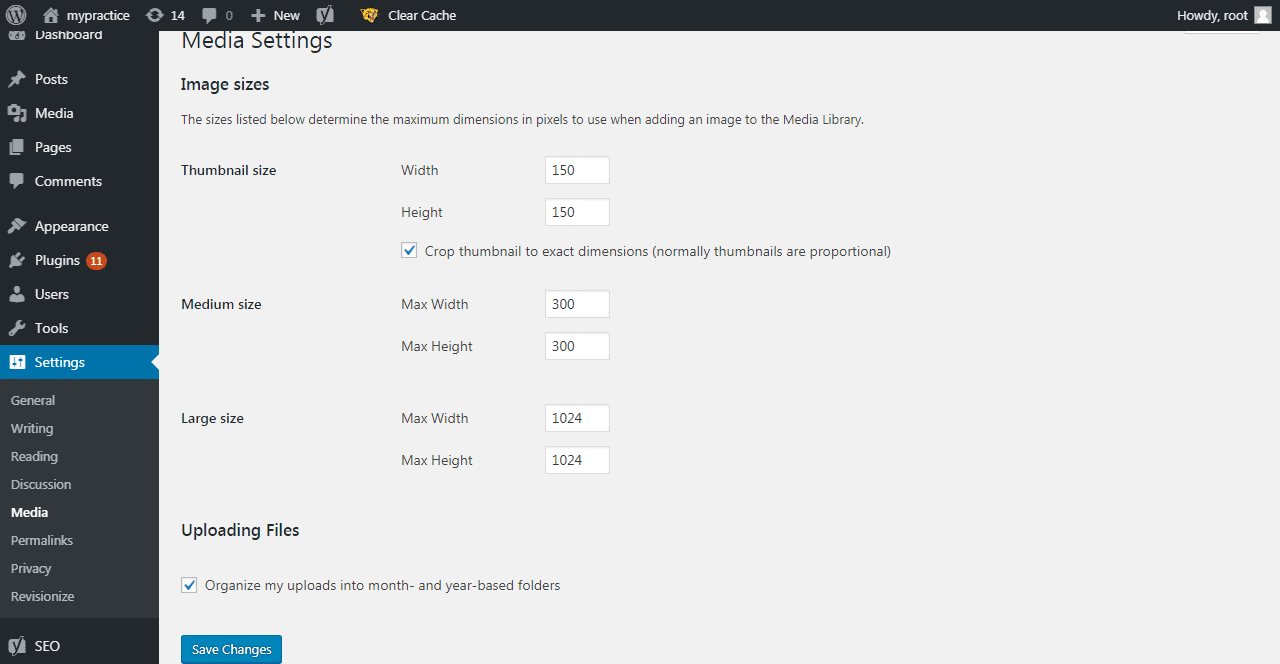
Default images sizes for WordPress images are Thumbnail size, Medium size, Large size. Large size dimensions in media settings are the dimension of which the images would be uploaded to the site. You cannot make changes for these kinds of images in the Media settings.
To resize the other default image sizes, go to Settings > Media.
Enter the maximum width and max height you need for the image size category you want to change. Put these values in the corresponding fields as applicable.
To change the thumbnail size, check the box under the thumbnail section. Next, specify the dimensions you want. The thumbnails would be edited proportionally.
Click Save Changes.
WordPress Plugins to Serve Scaled Images
WordPress plugins for image optimization makes serving scaled images effortless. We will review three popular WordPress plugins you can use on your site.
Smush Image Optimization
Smush Image Optimization, Compression, and Lazy Load plugin compresses any image in your site’s directory and preserves its quality as well.
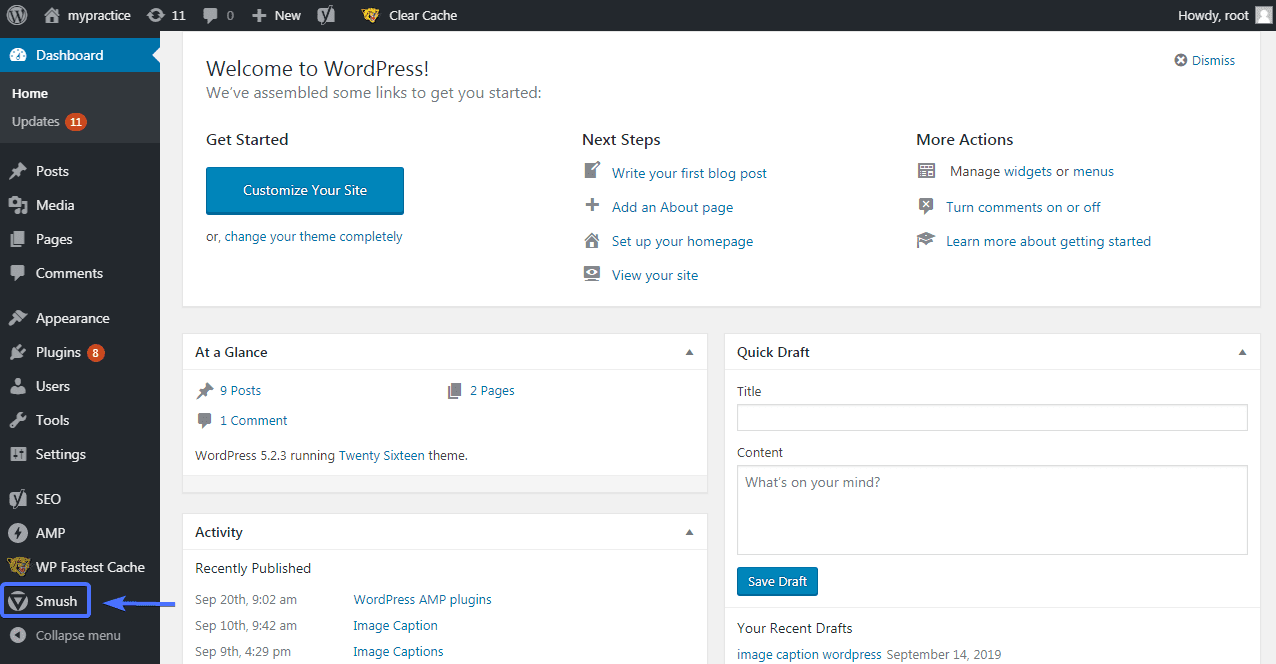
To use this wp smush plugin, first install and activate it. The Smush icon will appear on your dashboard.
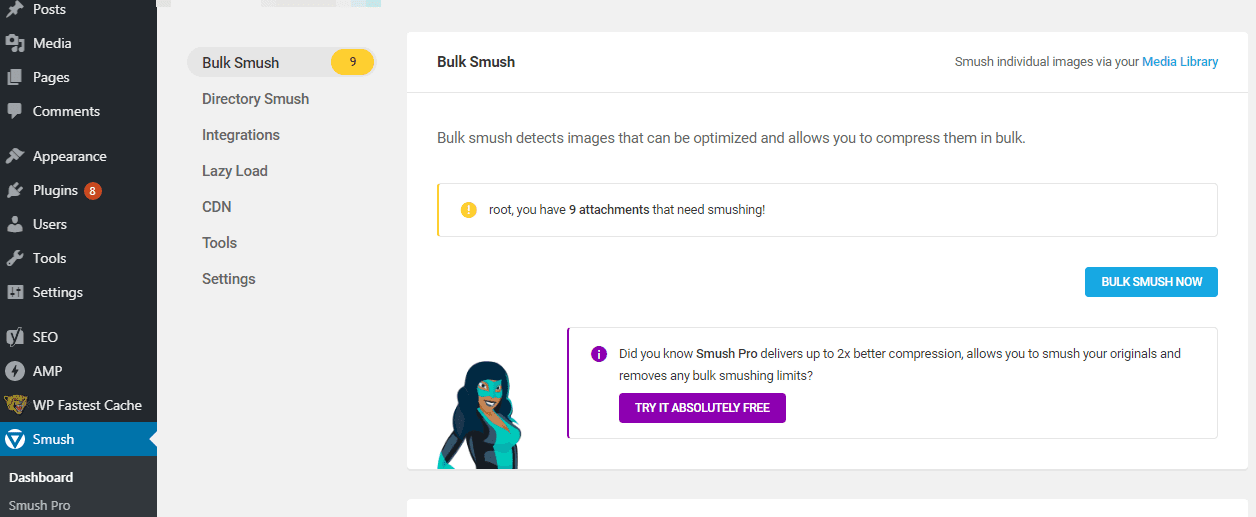
Go to Smush > Dashboard.
The Bulk Smush feature of the plugin immediately analyzes your site and detects images that should be optimized. Click BULK SMUSH NOW to automatically optimize the detected images.
In order to set the plugin for further/continuous image optimization, scroll down to the “Settings” section .
Leave Image Sizes set to All and enable Automatic Compression.
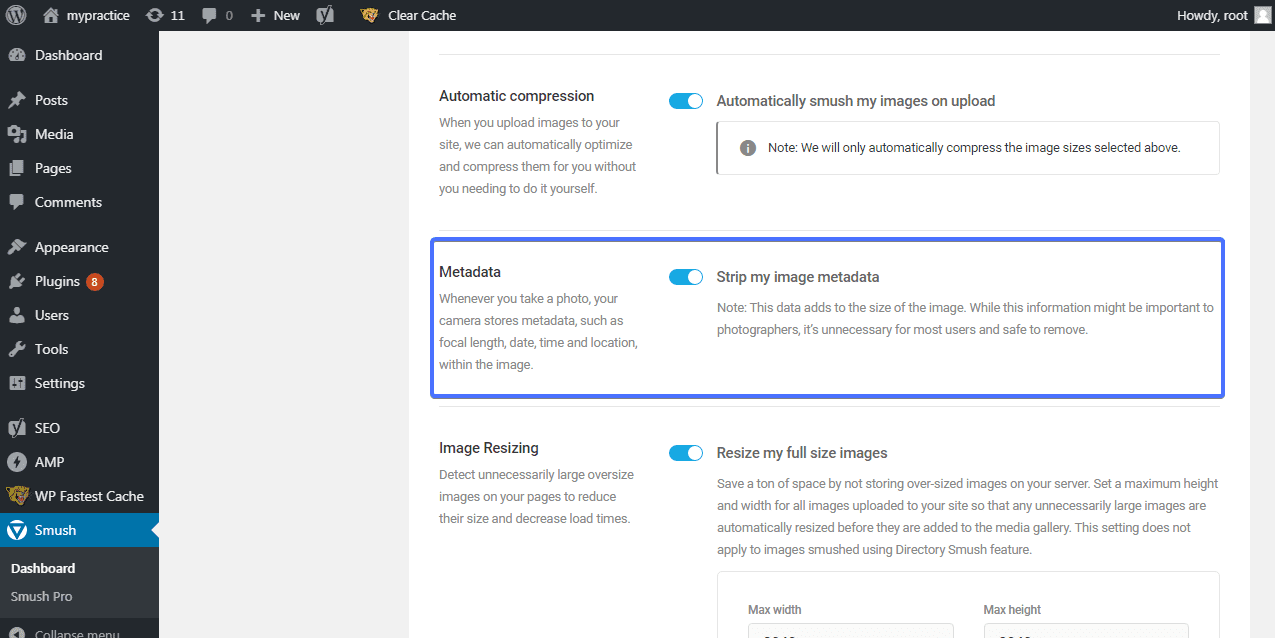
Every image upload on WordPress sites have some information that accompanies it called the Metadata. Smush gives the option of stripping images of this information. Enable the Strip my image metadata feature to remove metadata information on your site.
Next, enable Image Resizing and set the max width and height values for images on your site as you wish.
Click the SAVE CHANGES button.
Smush image optimization will automatically scale the images on your site to your site’s specification.
EWWW Image Optimizer
The EWWW Image Optimizer is a WordPress plugin that optimizes images on your site, including new uploads and existing images to the best file format. The bulk scanner feature optimizes all the images on the site. To use this plugin, Install and activate it from the admin area of your WordPress site.
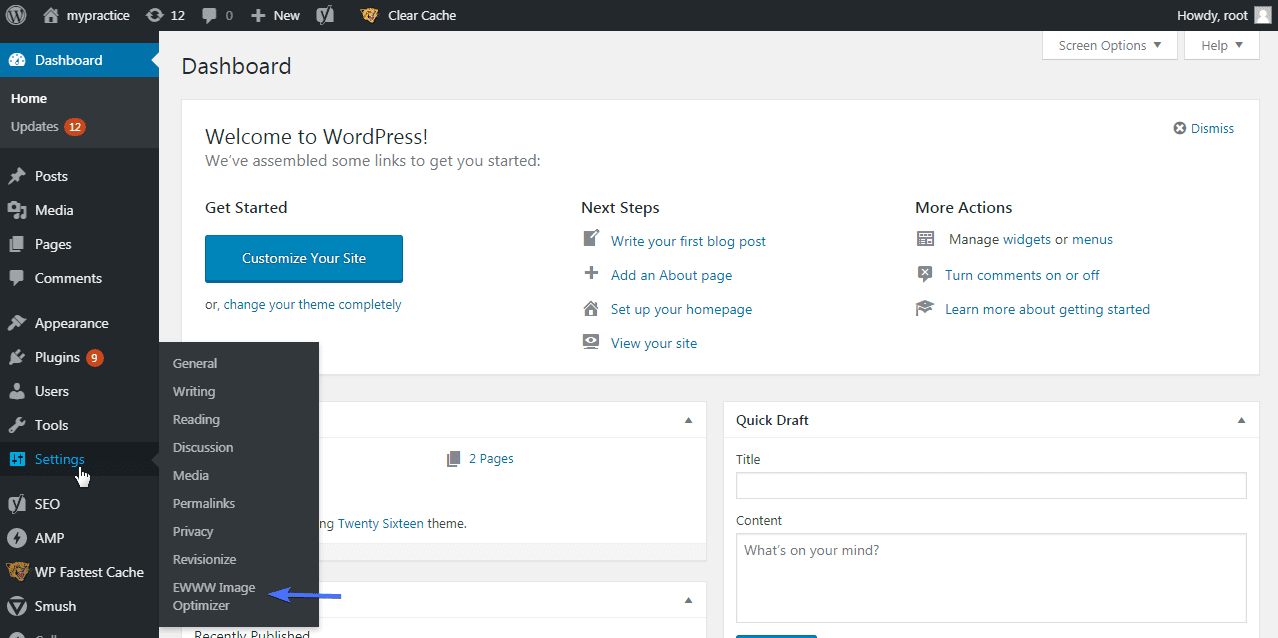
Still on your dashboard, click on Settings>EWWW Image Optimizer.
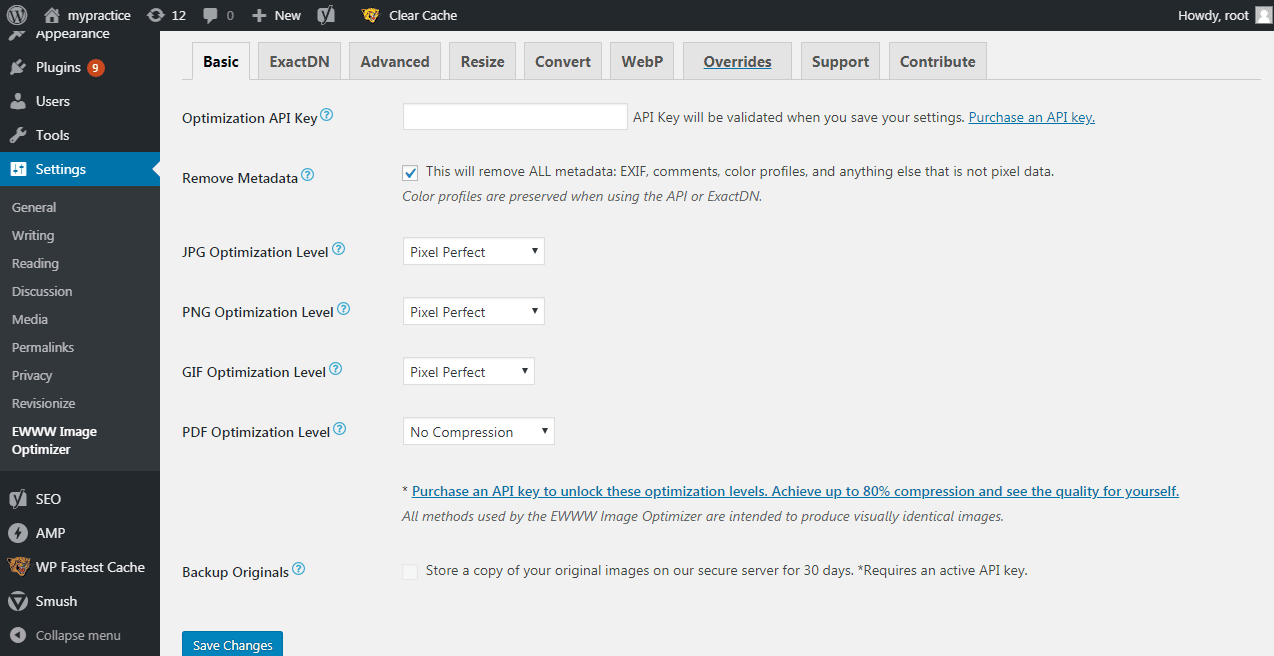
On the Basic settings page, check Remove Metadata to strip images of metadata. Set optimization level for JPG, PNG, and GIF picture formats to Pixel Perfect. The plugin’s free version doesn’t have the option to set PDF optimization level.
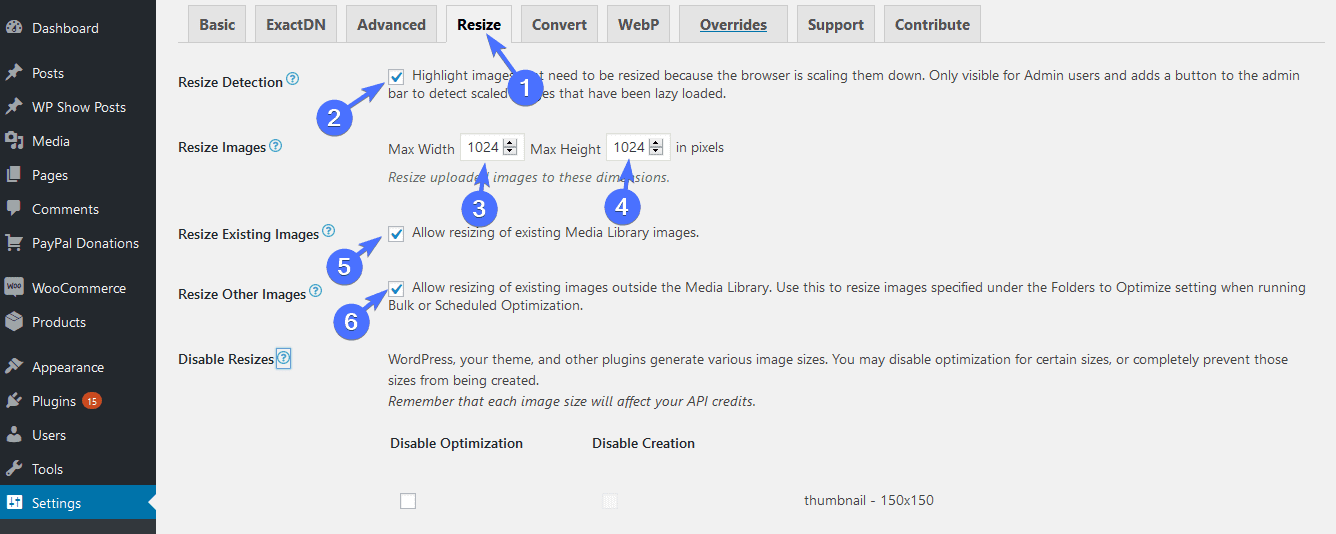
Next switch to the Resize tab.
Check the Resize Detection option.
In Resize Images, set the max width and height permitted for images on your site.
Below this, enable Resize Other Images and Resize Existing Images.
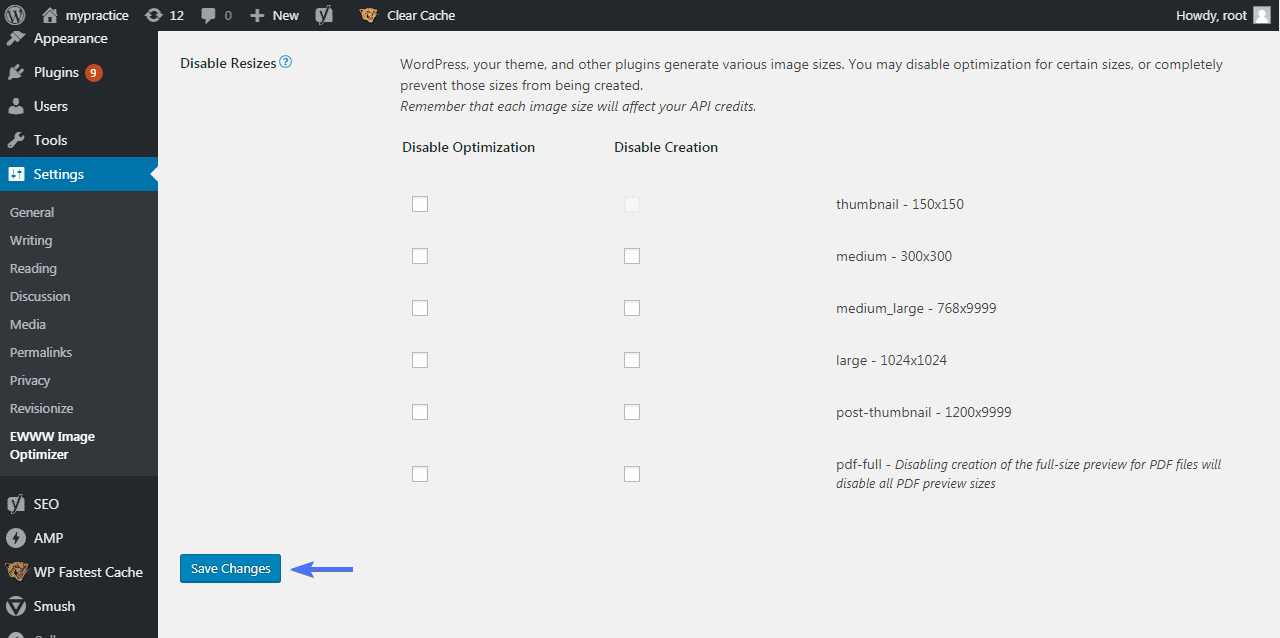
You may decide to disable image resizing for certain kinds of images, e.g. thumbnails. To achieve this, check the boxes as appropriate.
Remember to Save Changes.
EWWW Image Optimizer will resize all the image uploads on your site.
Imagify Image Optimizer – Serve Scaled Images
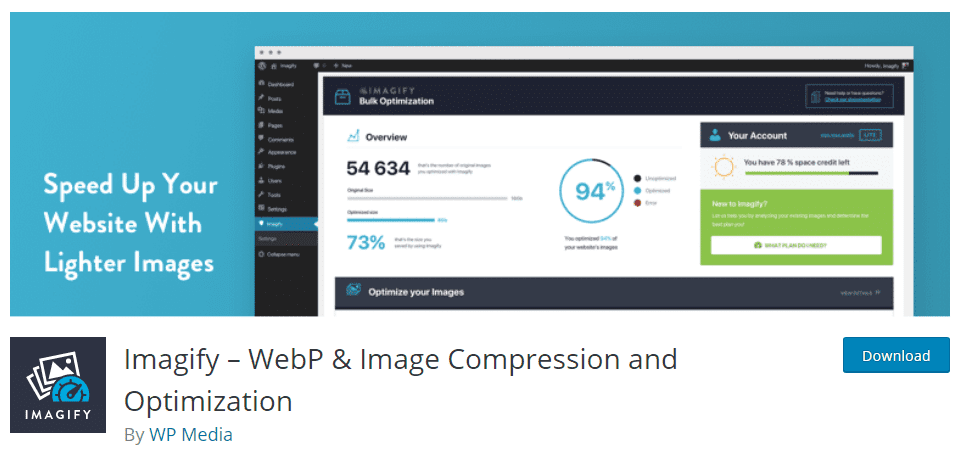
Imagify – WebP & Image Compression and Optimization plugin resizes your images using lossless compression. Images get scaled without losing their quality.
After enabling the plugin on your site, it optimizes all the images at the point of upload into WordPress. Including thumbnails as well.
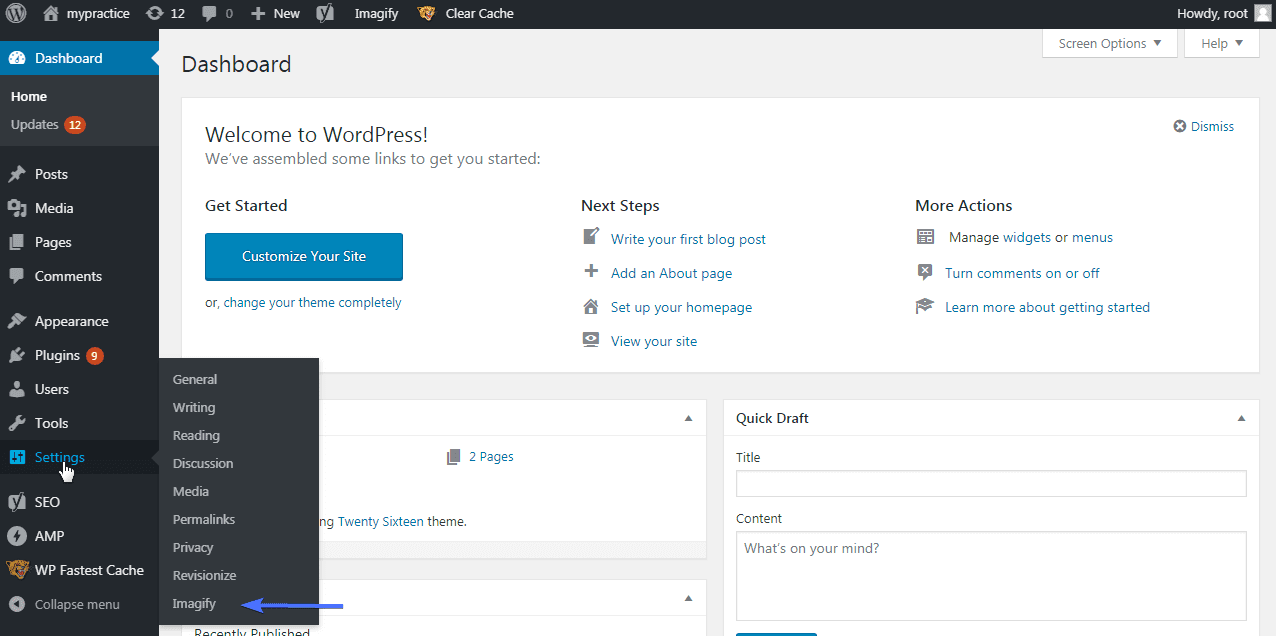
To use this plugin, install and activate it from within your WordPress admin area. After activation, and still on your dashboard, click on Settings>Imagify.
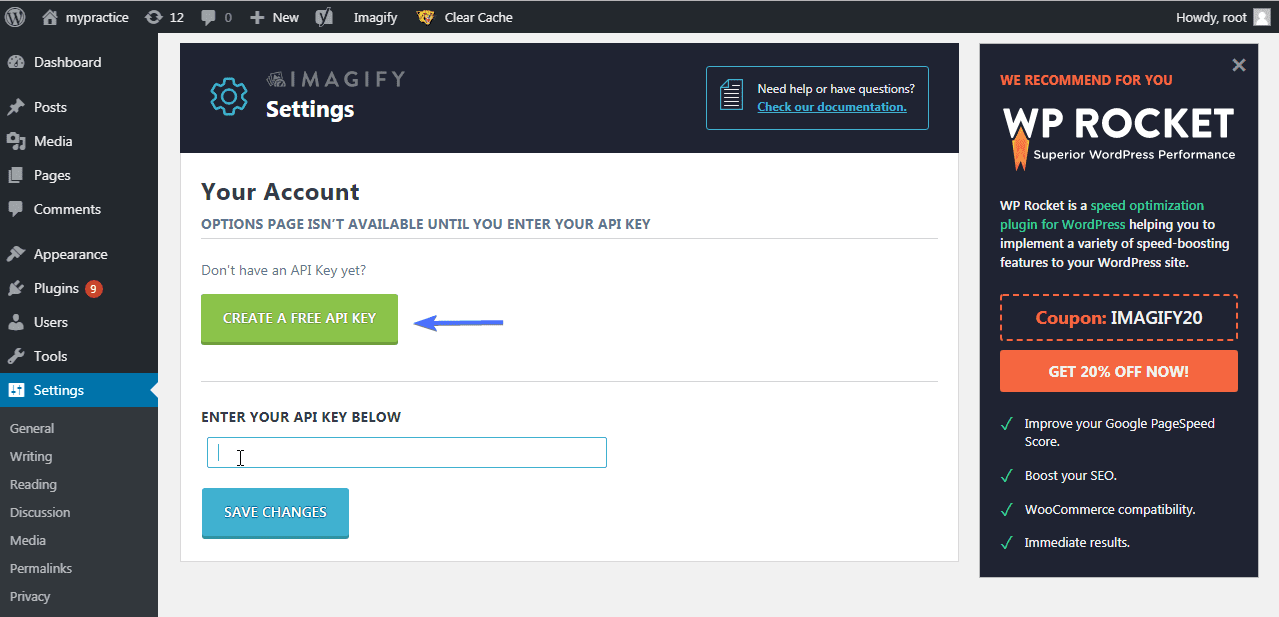
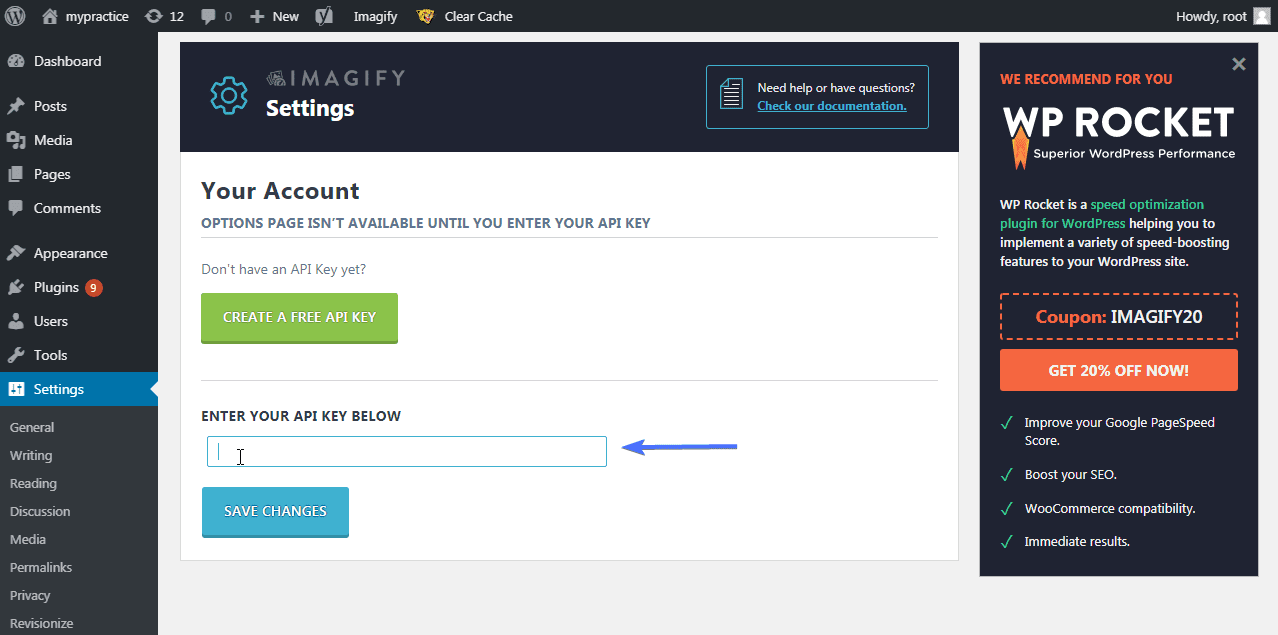
On the Imagify settings pages, enter your API key in the text box available. You can create a free API key if you do not have already.
Click on the CREATE A FREE API KEY button.
You will be prompted to enter your email address and will be directed to check your email for your free API key.
Copy the API key you received from your email, and paste it in the API key textbox.
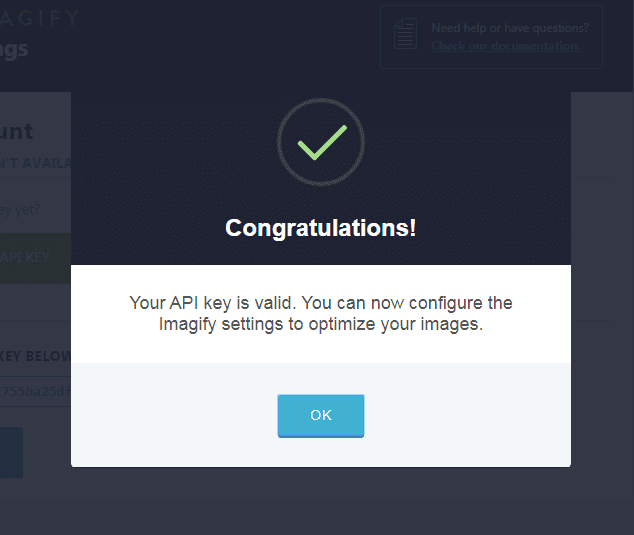
You will receive a congratulatory message of the validity of your API key. Click OK to continue with the plugin’s settings.
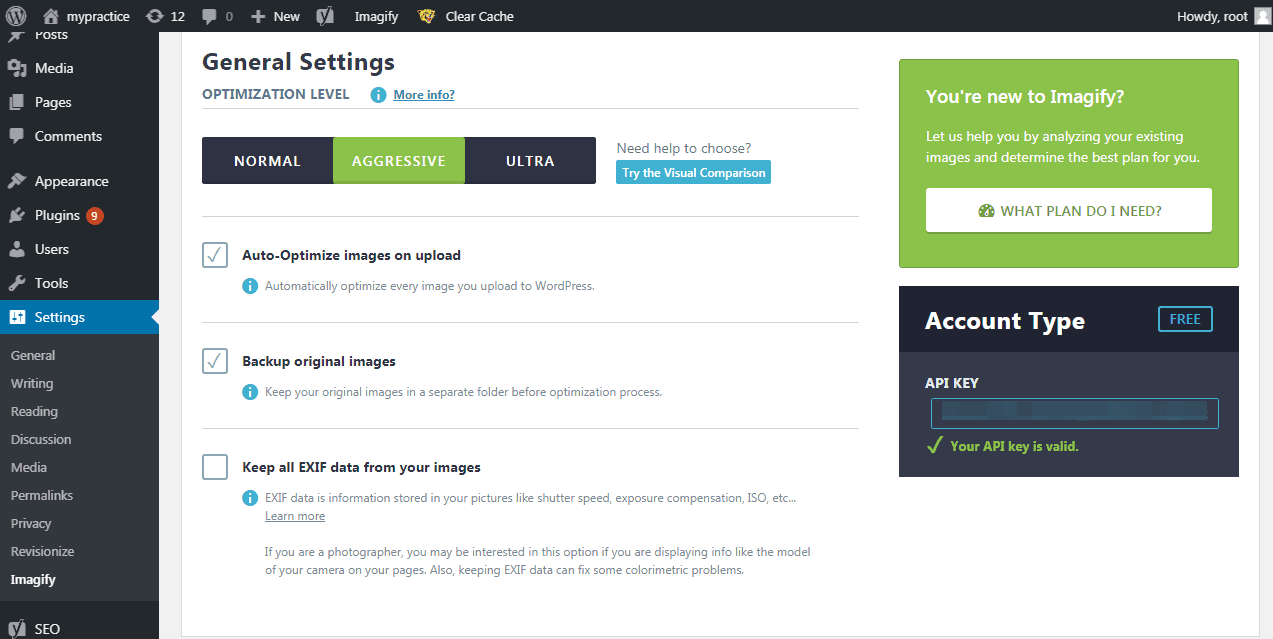
The general settings page indicates three optimization levels that the plugin offers. The normal, aggressive, and ultra levels. Choose the level of your choice. We chose the aggressive level for this tutorial.
Check the options as you deem fit for proper resizing of images on your site.
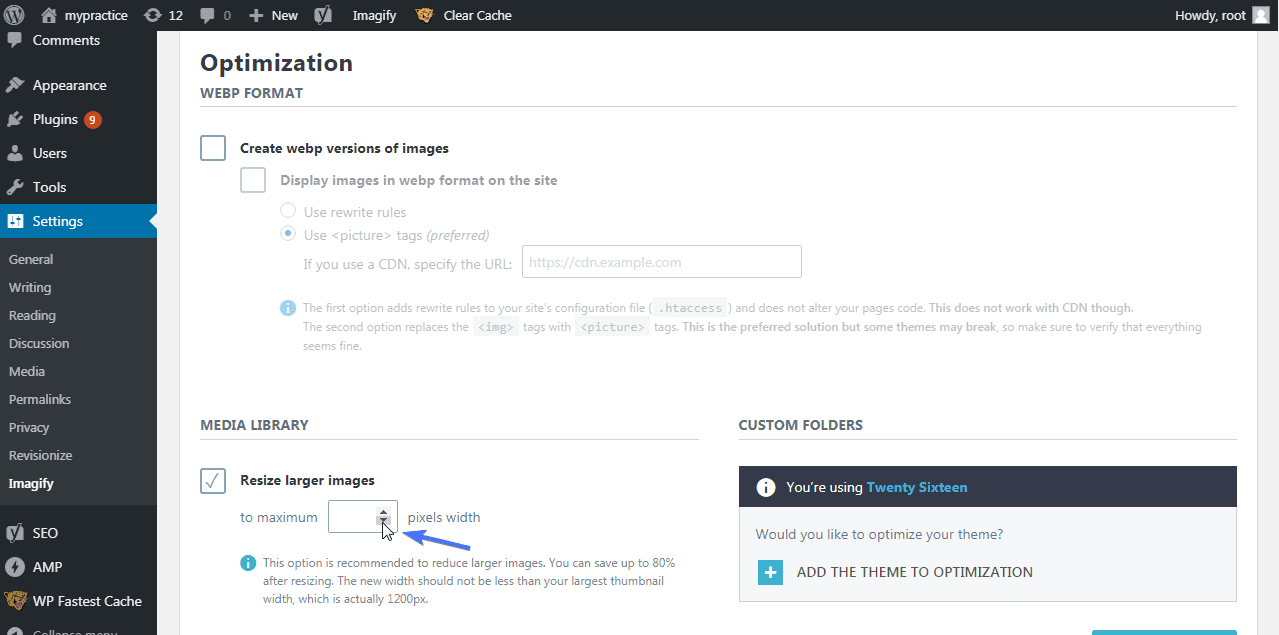
On the Optimization page, the media library section, you may check Create webp versions of images.
Also, check the Resize larger images box to resize larger images in your media library.
Place your cursor on either the upper or lower arrow image width. Continue to click until you get to the value you want your large images to resize to.
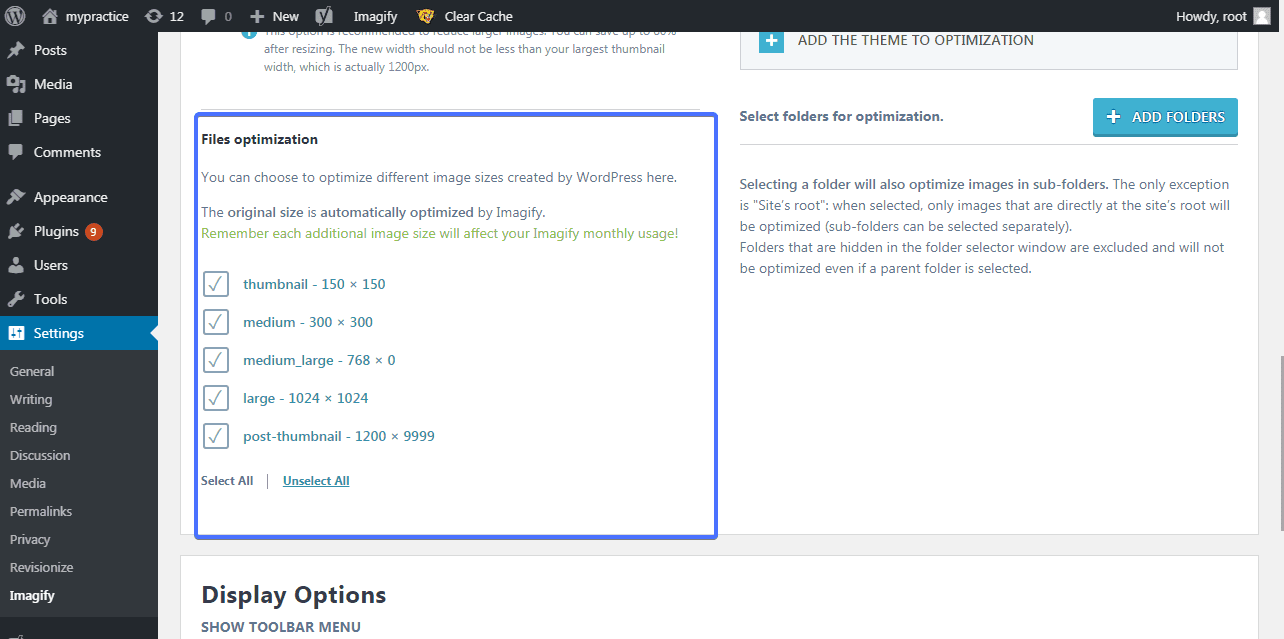
For Files optimization, check the available options that you want to be optimized (usually all).
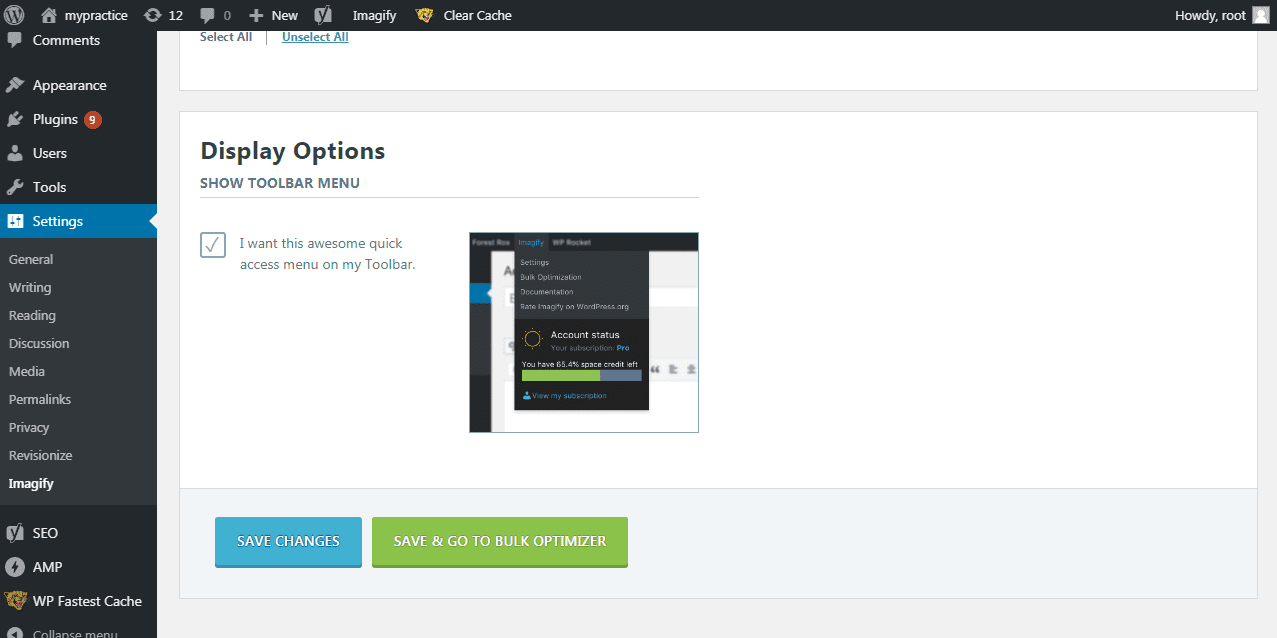
To access the plugin menu from your toolbar, you need to check the box to be able to enjoy this feature. Next, click the SAVE CHANGES button. Or you could click the SAVE & GO TO BULK OPTIMIZER button.
That’s it. The plugin will begin to optimize images in your media library, as well as fresh image uploads on your site.
Conclusion
We have shared the different ways to serve scaled images in WordPress. You can analyze the scale of images on your site, and manually adjust them to meet the site requirements. Or you can engage WordPress plugins to resize or scale images for your site without effort.
Using this guide, please go on to select an image scaling option for your site. The benefits of serving scaled images would be good gains in site speed, SEO, user experience, and your overall website performance.
Also, if you found this article helpful, kindly share it.
More Resources:

