How to Easily Setup WooCommerce Test Mode
 You’ve set up your store with WooCommerce and are expecting your first order. But since it’s a new store, you have not had real-life proof that it is set up correctly to handle customers’ orders.
You can easily simulate this by browsing your store catalog to add products to your cart. However, the tricky part is testing the checkout and payment processing without losing money. Using an actual payment requires you to pay for each transaction your payment merchant processes, which incurs fees.
The good news is that you don’t have to use real payments. Most payment processors offer a test mode where you can use dummy details to confirm that your payments are active.
In this guide, we will show you how to set up test mode, and run tests on your WooCommerce checkout.
Content:
How do I Run WooCommerce in Test Mode?
To run WooCommerce in test mode, you first need to set your website to maintenance mode or use a staging site if your website is already live. This is to prevent the loss of revenue and a bad user experience while your store is being tested.
You can enable maintenance mode by using the “WP Maintenance Mode and Coming Soon” plugin. From your WP Admin dashboard, go to Plugins >> Add New. Here, search for “WP Maintenance Mode and Coming Soon”.
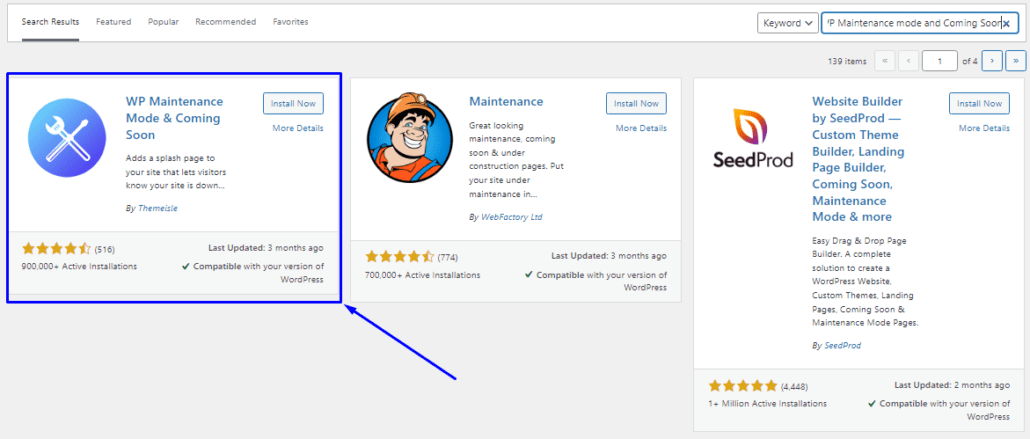
You can install and activate it by clicking on the “Install” and “Activate” buttons sequentially. Once you activate it, go to Settings >> WP Maintenance Mode.

This takes you to the dashboard, where you can customize your website maintenance mode home page. Once done, check the “Activated” radio button to activate maintenance mode for your website.

If your site already receives traffic from search engines, you may need to enable the “Bypass for Search Bots” option. When enabled, search engines will still have access to crawl your website. After making your changes, scroll down and click on Save Settings to effect your changes.

When a visitor goes to your website, they will be denied access as displayed below.
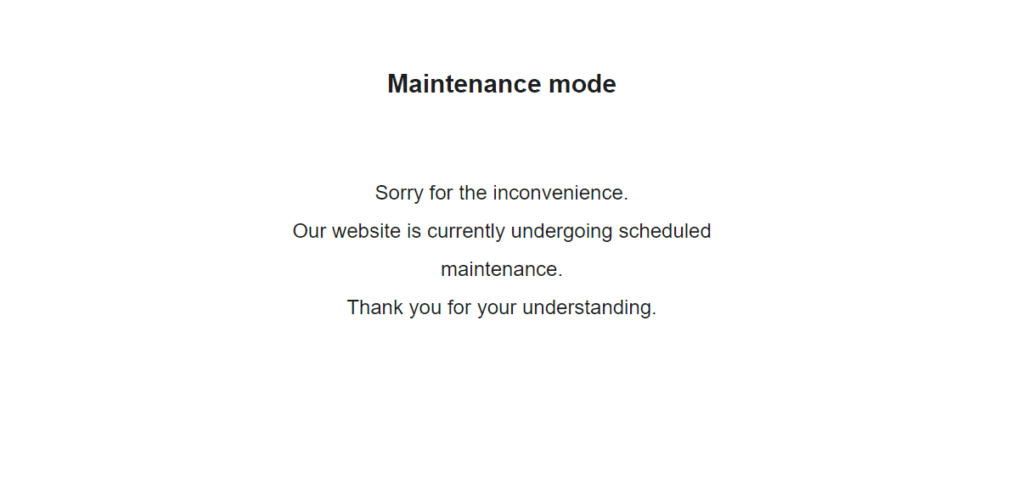
Now you can continue to test WooCommerce payments on your store.
Set Up Test Using PayPal Sandbox
If you use PayPal to process payments, you can quickly run a dummy checkout process that debits money from your card. But instead of an active credit or debit card, it will be dummy card information. You can do this by using PayPal sandbox mode.
Connect a PayPal Developer Account for Sandbox Testing
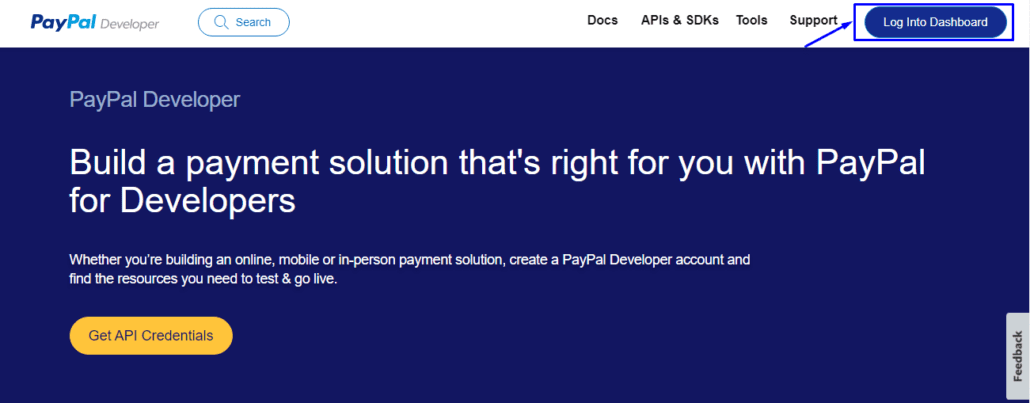
To enable PayPal Sandbox, you need a PayPal developer account. Go to the PayPal developer page to log in or create a new account.
From the upper-right part of the page, select the Log into Dashboard button to log in or create your account.
If you are creating a new developer account, you should select your country, and input your email address and password. Then hit the Create Account button.

Once you sign up for a developer account, log in to the PayPal developer dashboard using your newly-created credentials. Then scroll to the “SANDBOX” section and then select Accounts.
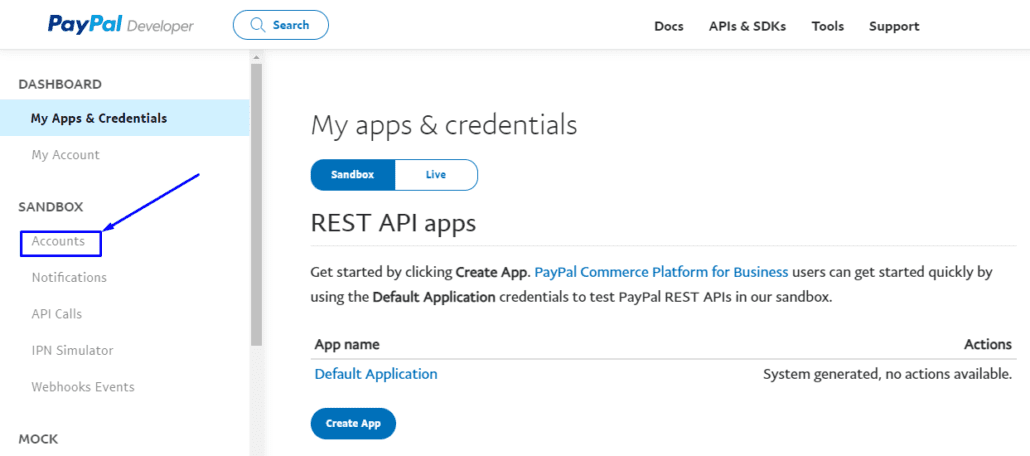
This displays a view of PayPal Sandbox accounts. By default, there are two accounts – a business account and a personal account. The default accounts don’t contain API Credentials that you can link to WooCommerce, so you need to create a new account by selecting the Create account button.

Select Account
Now, you have the option to create a Business account and a Personal account. You should select the Business account option. Select your country and click the Create button.

Next, scroll down to the list of accounts and click on the 3 dot icon “…” next to the new email address. On the dropdown menu select View/edit account.
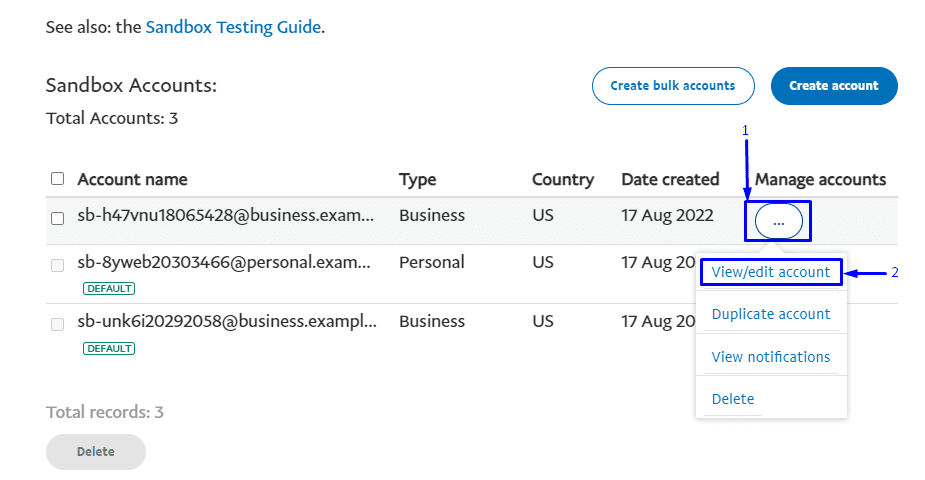
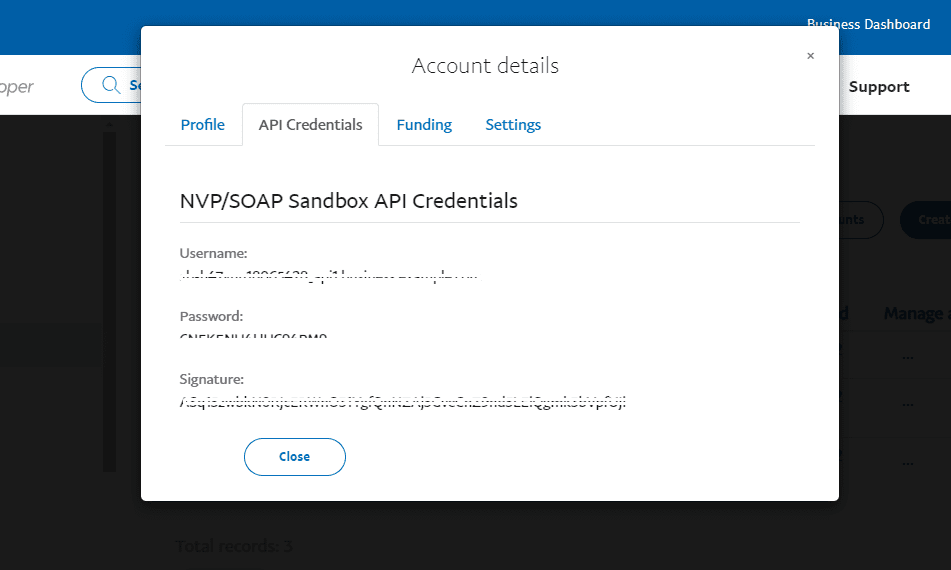
It will popup a menu containing your account information. To access the API KEYS, navigate to the API Credentials tab. These are what you need to connect your WooCommerce Store.
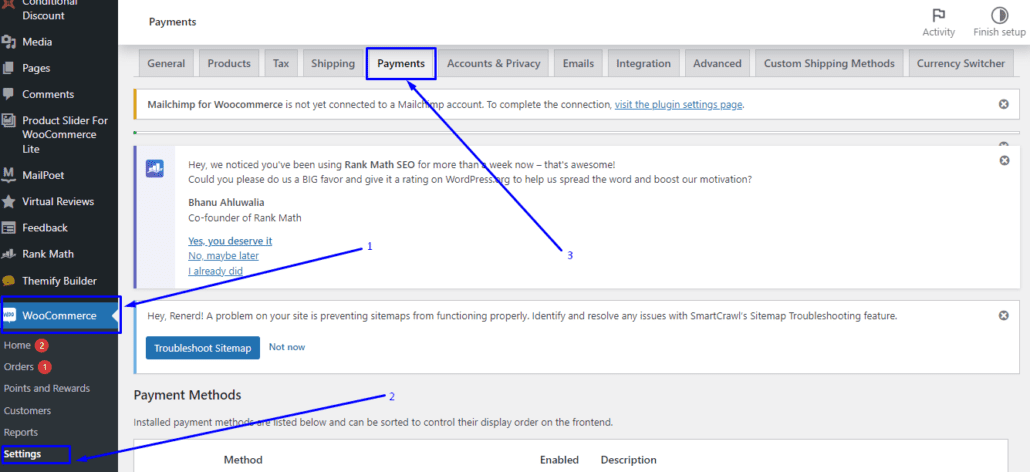
Now, head back to your WooCommerce store and navigate to the settings page via WooCommerce >> Settings. From there, click on the Payments tab.
After that, click on Manage next to the “PayPal Standard” option.
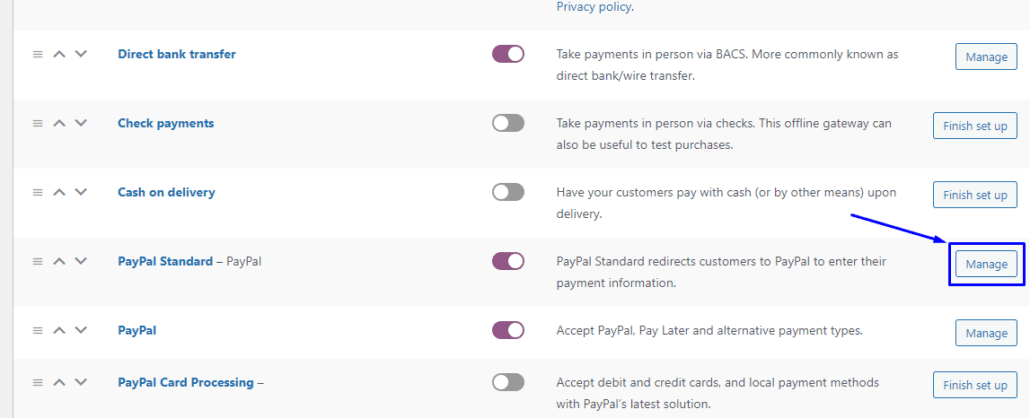
Next, input your PayPal details, and check the box for PayPal Sandbox to enable it.
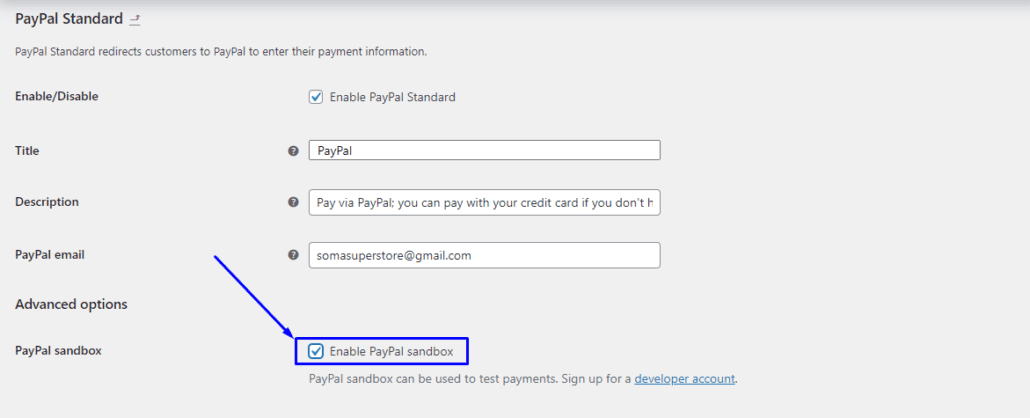
After that, scroll down to the input fields for API Credentials.

Return to your PayPal developer dashboard to copy and paste your API credentials into the form field. Once done, click the Save Changes button.

This enables test mode by authenticating your WooCommerce store with your PayPal developer account.
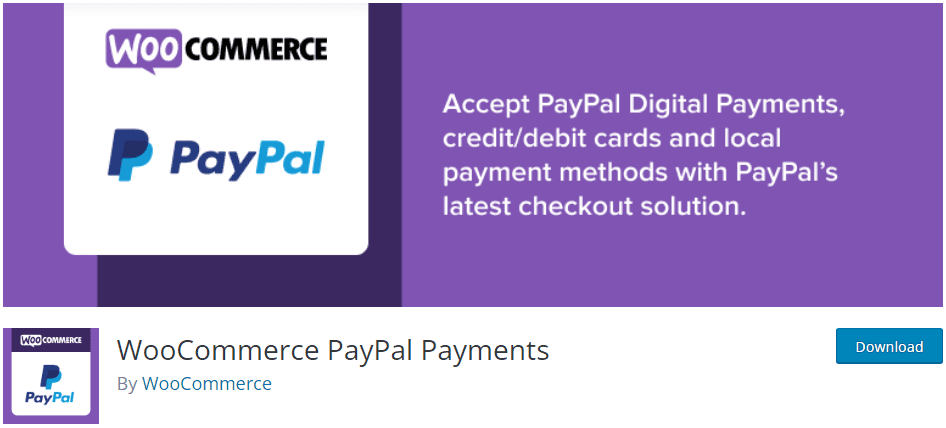
Side note: If you can’t find the PayPal option, you need to install the PayPal Payments extension on your WooCommerce store. After installing the extension, you will have the option to configure PayPal payment on your store.
Test WooCommerce Checkout Process
To complete WooCommerce testing, you will need a PayPal test account. For this, return back to your developer dashboard and go to SANDBOX >> Accounts to create a new personal Sandbox account as we described in the preceding section.
Open the View/edit tab to view your newly created account information.
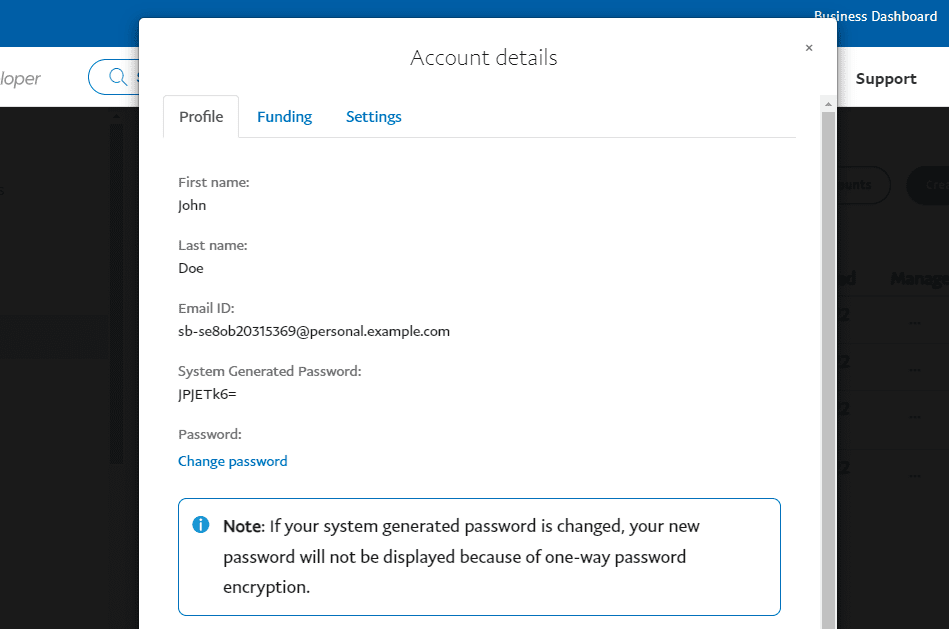
After that, scroll down to view the complete information. To see your credit card details, and your account balance, navigate to the Funding tab. You will need this information for testing.
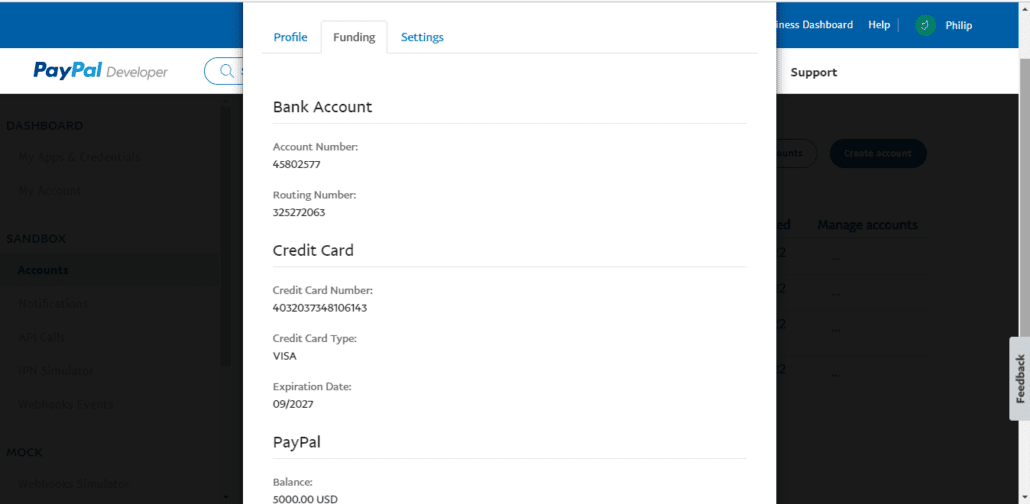
Now head back to your store and proceed to the checkout page, select “PayPal” as a payment option. You can see in the notification that you are in Sandbox mode, and you will need your Sandbox account to complete the payment.
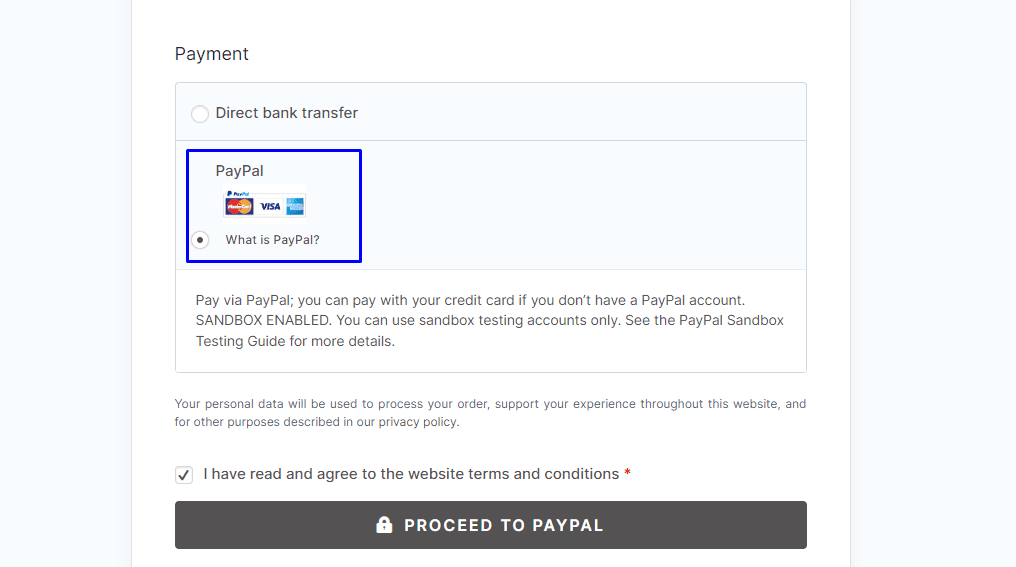
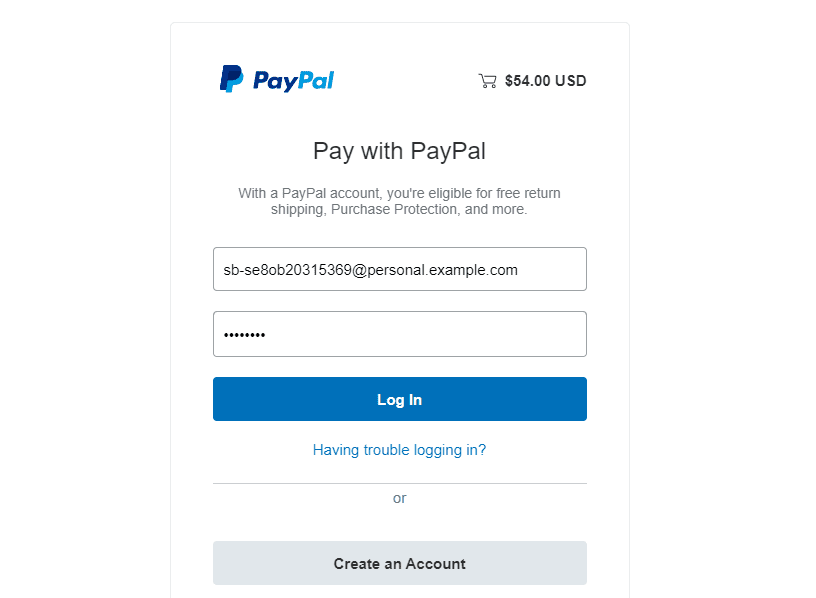
Hit the PROCEED TO PAYPAL button to complete checkout. Use your Sandbox account username and password to log in.
On the next screen, you can select a card to test credit card payment. You can also use the PayPal balance to test the checkout process. As you can see, there are saved cards, and you can add a new card by using the “Add a credit or debit card” option.
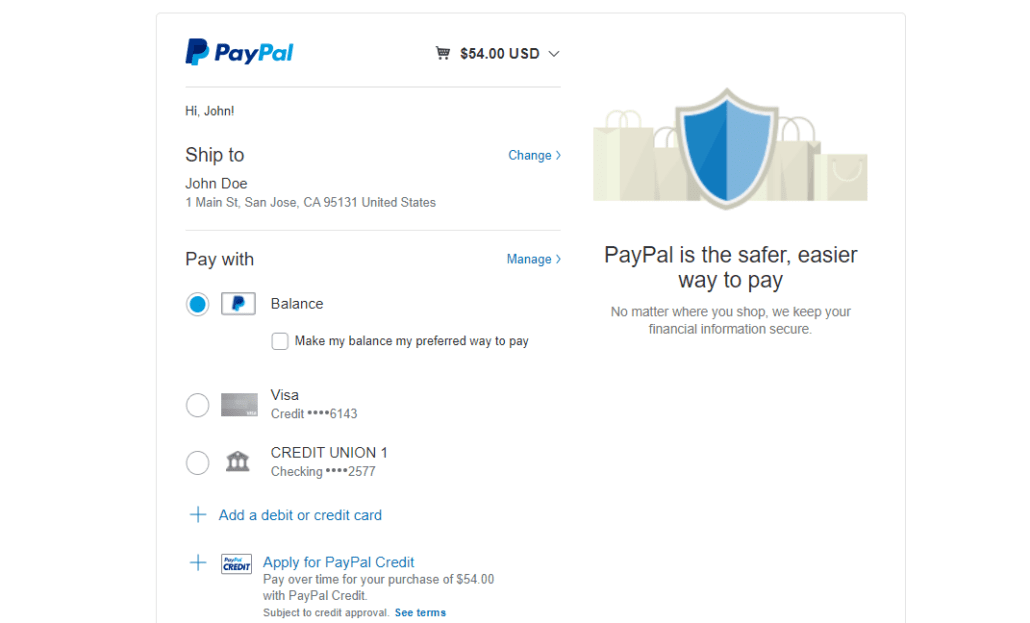
Either way, you won’t need to make a real payment when you hit the Pay Now button.
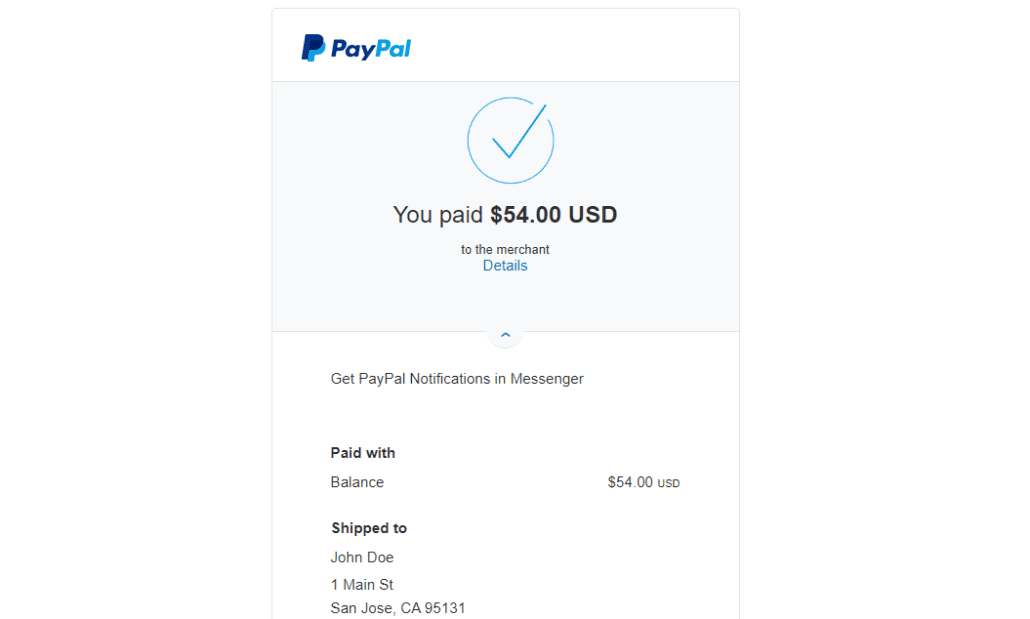
If you cannot place the order, it means there has been an error with WooCommerce Setup. You may check out our guide on fixing WooCommerce Cart not working.
When you are done, you should disconnect from PayPal Sandbox by navigating to WooCommerce >> Settings >> Payments and selecting Manage next to PayPal Standard. Here, uncheck the box for PayPal Sandbox.

Save your settings, and you can start accepting live payments on your website. For a more detailed guide, you can check our WooCommerce PayPal Integration article.
Setup Stripe Test
Stripe is one of the most widely used payment gateways. It integrates seamlessly with WooCommerce. If you plan on using Stripe to accept payment on your store, then you need to test the gateway as well. Here is how to run WooCoommerce test mode with stripe.
First, you need to install the WooCommerce Stripe plugin to your website. After installing the plugin, stripe payment will be added to your store. However, you need to configure the plugin before it will work.

To test this payment gateway, go to WooCommerce >> Settings from your admin dashboard.
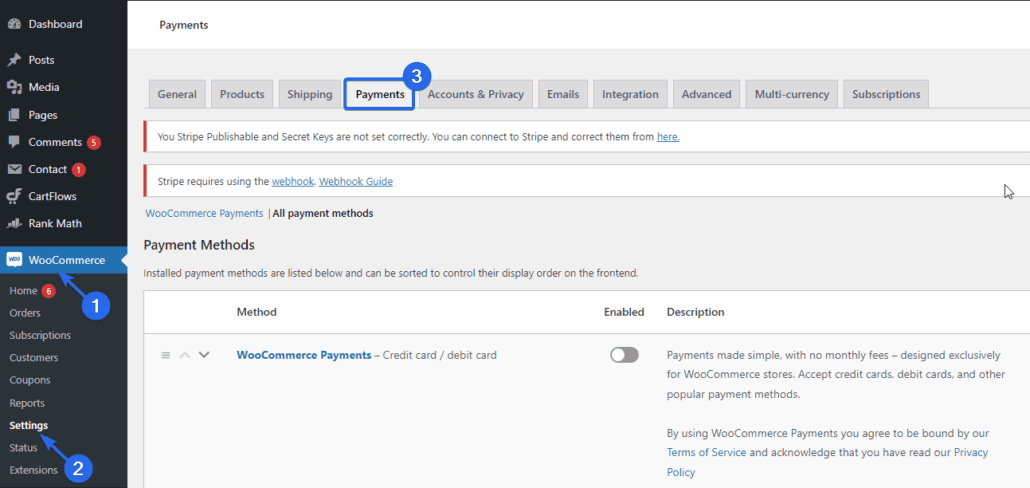
After that, click on the Payments tab and scroll to the Stripe option.
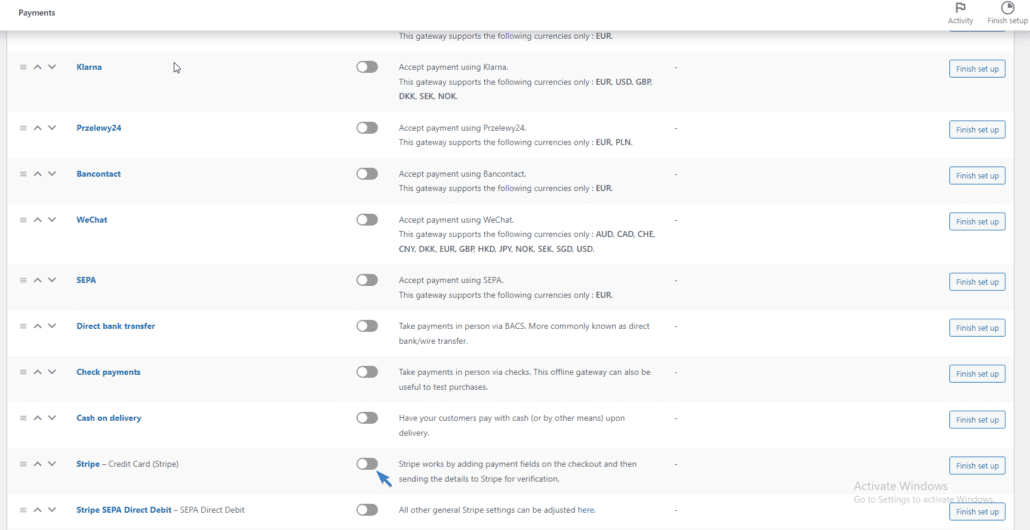
You need to enable the Stripe option. When enabled, you will be redirected to the Stripe setup page.
Configuring WooCommerce Stripe Plugin
If you do not have a Stripe account, you can click on the Create or connect an account button. However, if you are an existing user, select the Enter account keys option.
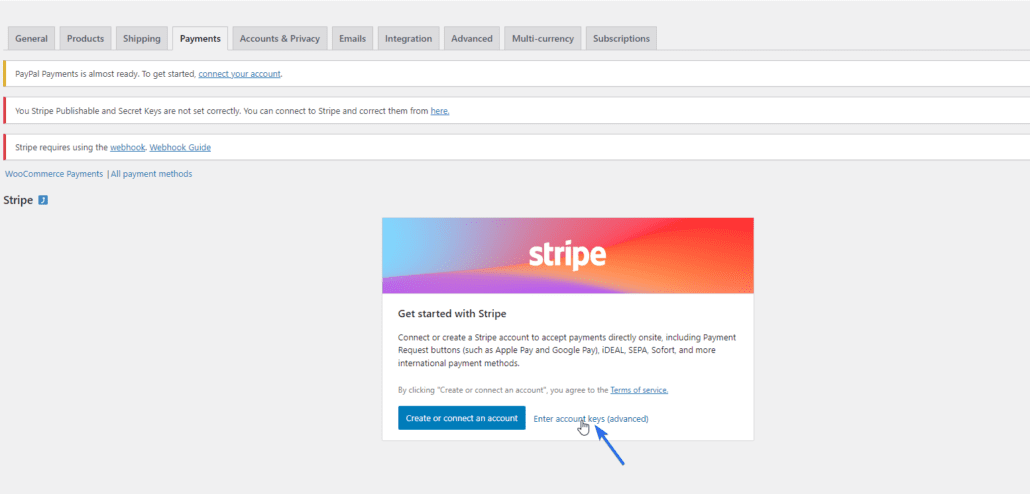
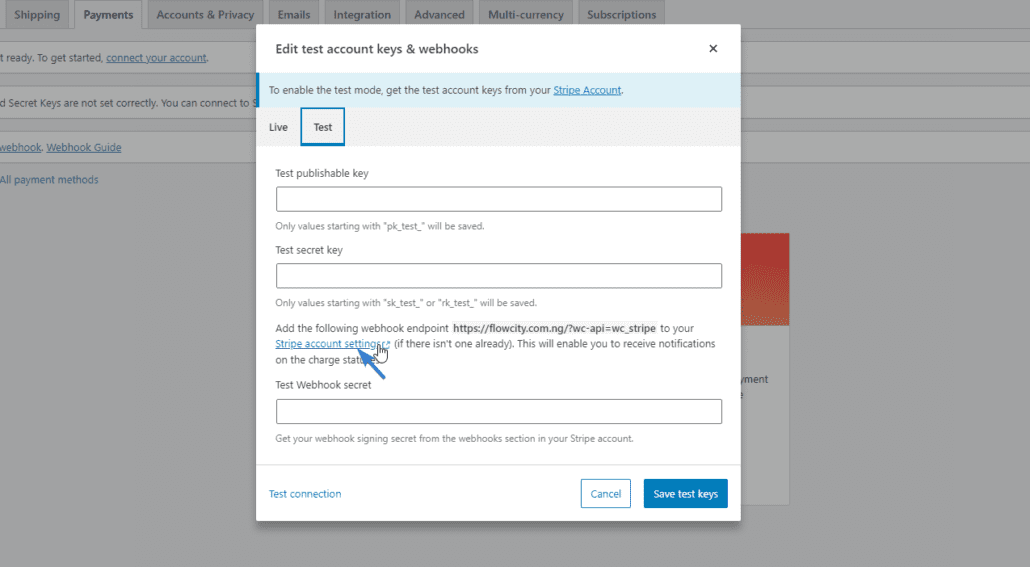
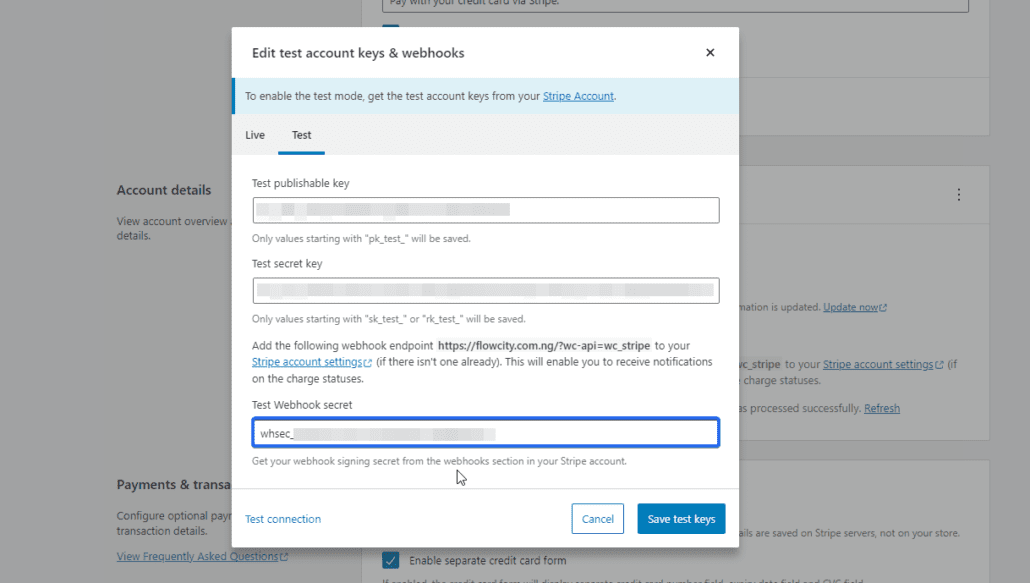
Here, switch to the Test tab. You need to enter the API keys from your Stripe account to set up test mode on your WooCommerce store. To get the keys, click on the Stripe account settings link.
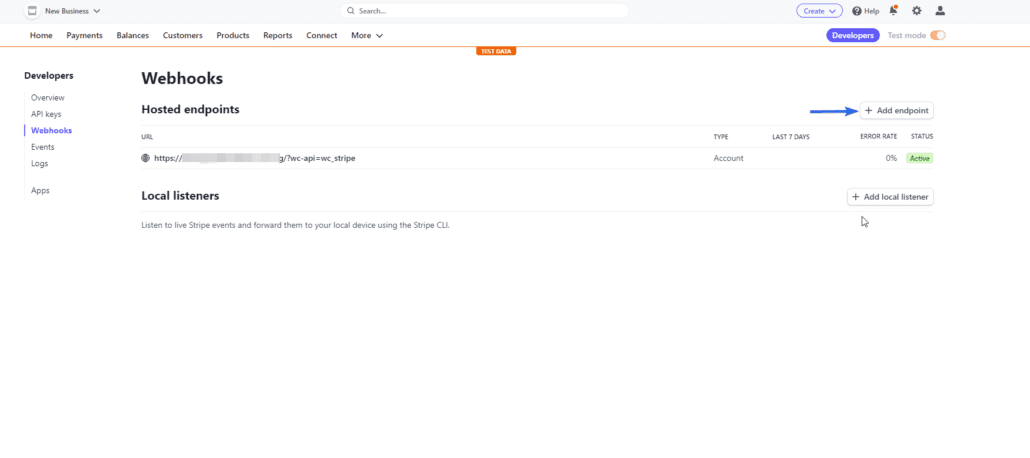
On the “Stripe settings” page, click on Add Endpoint. You can get the endpoint URL from the stripe setup page on your WooCommerce store. It should look similar to the link below.
https://mysite.com/?wc-api=wc_stripe
On the “Add Endpoint” page, enter the URL you copied from your online store. After that, add the following webhook events.
- source.chargeable
- source.canceled
- charge.succeeded
- charge.failed
- charge.captured
- charge.dispute.created
- charge.refunded
- review.opened
- review.closed
- payment_intent.succeeded
- payment_intent.payment_failed
- payment_intent.amount_capturable_updated
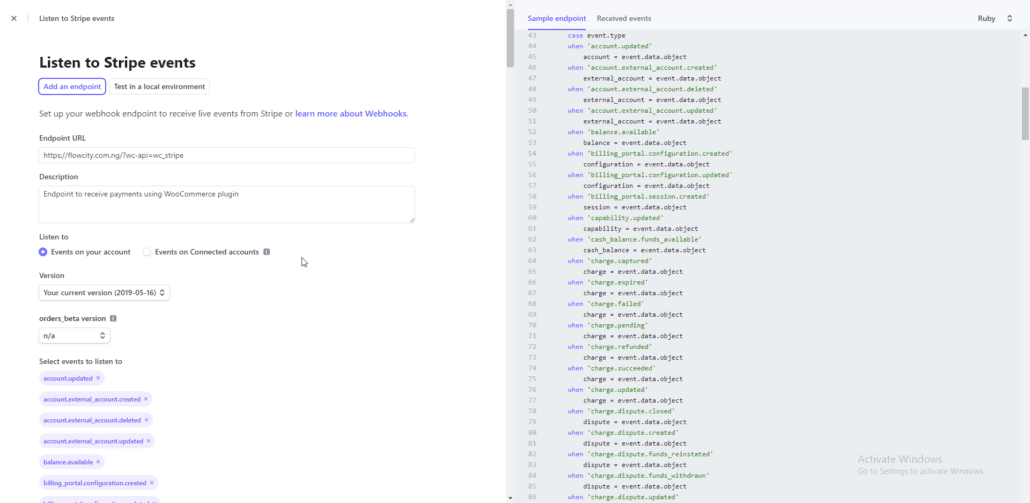
When you are done adding the details, scroll down and click on the Add endpoint button.

To get the Webhook secret key, click on Webhooks and copy the signing key value.
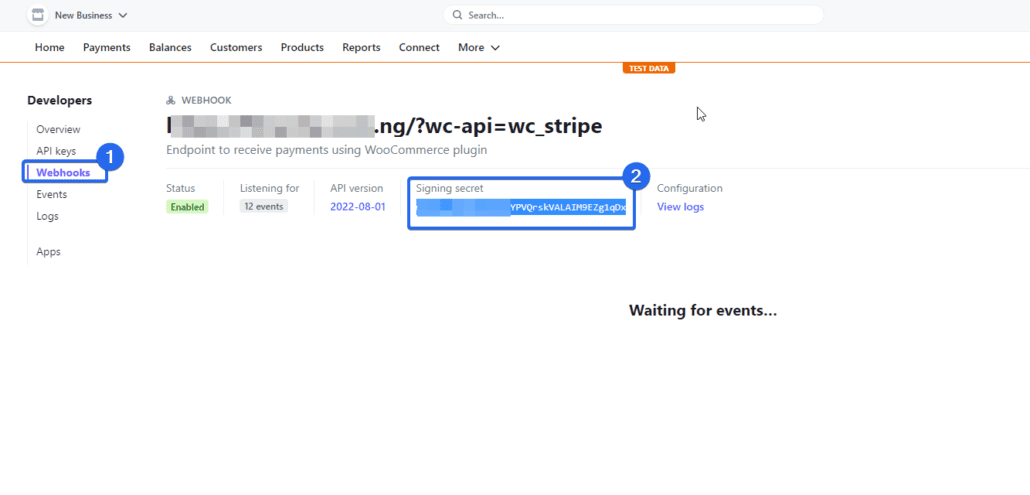
Now head back to your WordPress dashboard and paste the key into the “test webhook secret” box.
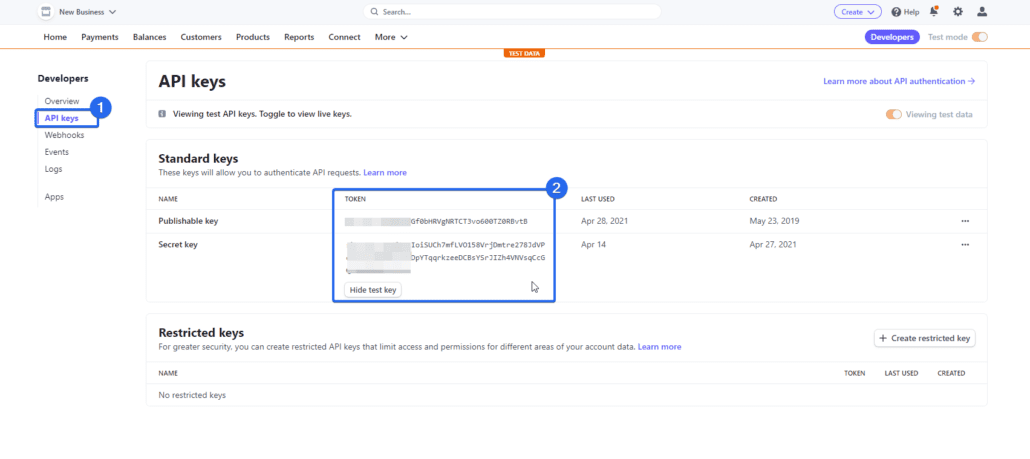
After that, go back to your stripe account and click on the API keys menu. Here copy the “publishable key” and “secret key” values and paste them into their respective boxes on the Stripe configuration page.
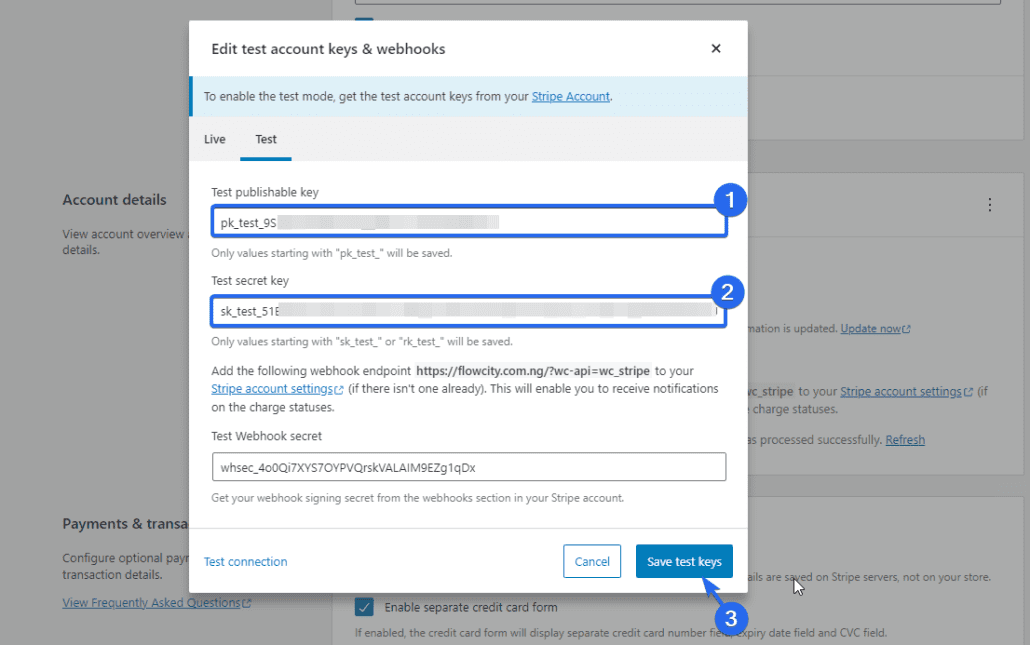
When you are done adding the values, click on the Save test keys button to save your changes. You will be redirected to the Stripe settings page.
To use a test credit card, click on test card numbers.
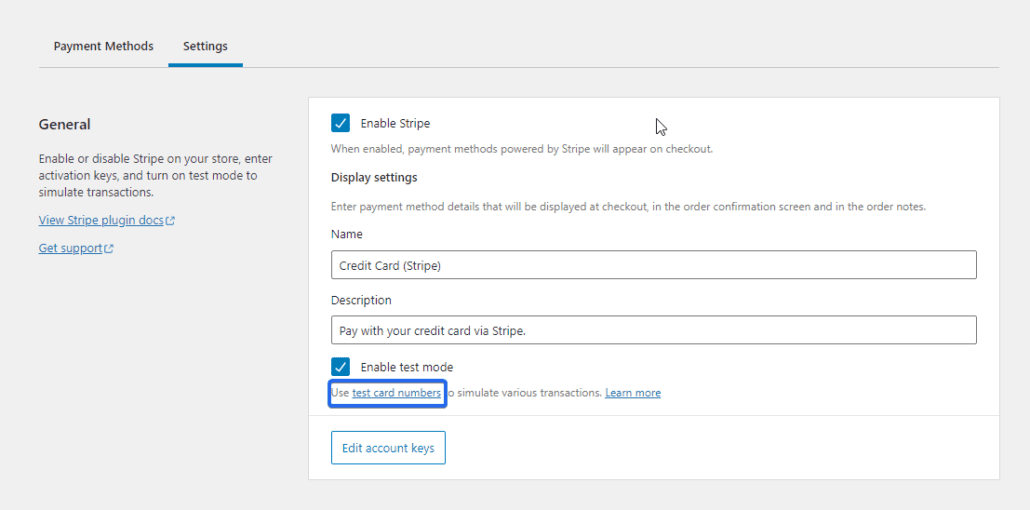
You will see a list of card details you can use to test Stripe checkout on your website.
Testing WooCommerce Stripe Integration
To test the payment, visit your website and checkout using the test card details you copied from Stripe.
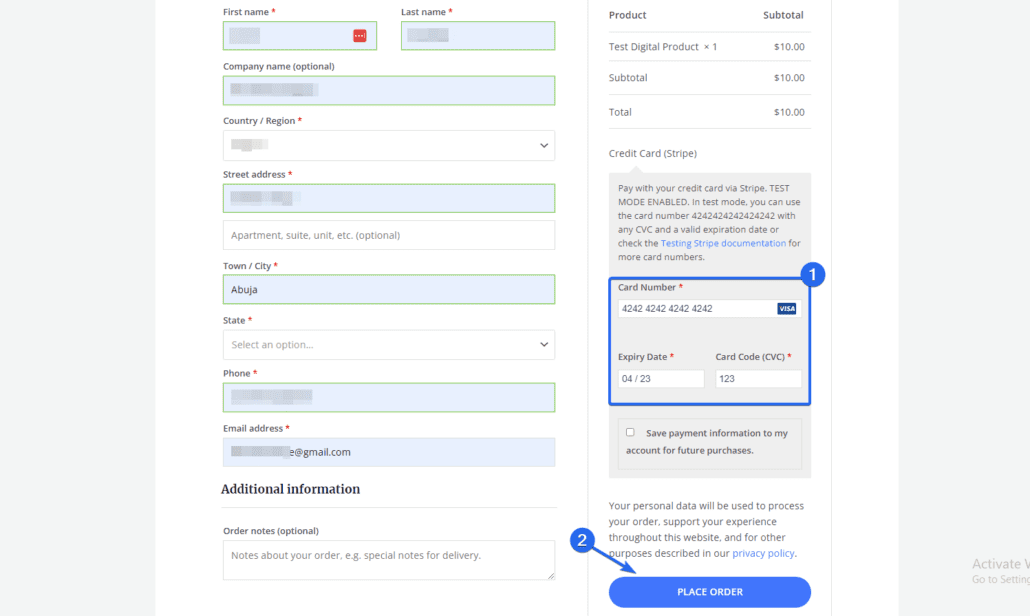
If the payment is successful, it means stripe is working properly on your WooCommerce store.

Now you can disable test mode on your WooCommerce website by switching to live mode. For this, head back to the WooCommerce payments page and click on Manage next to the Stripe option.
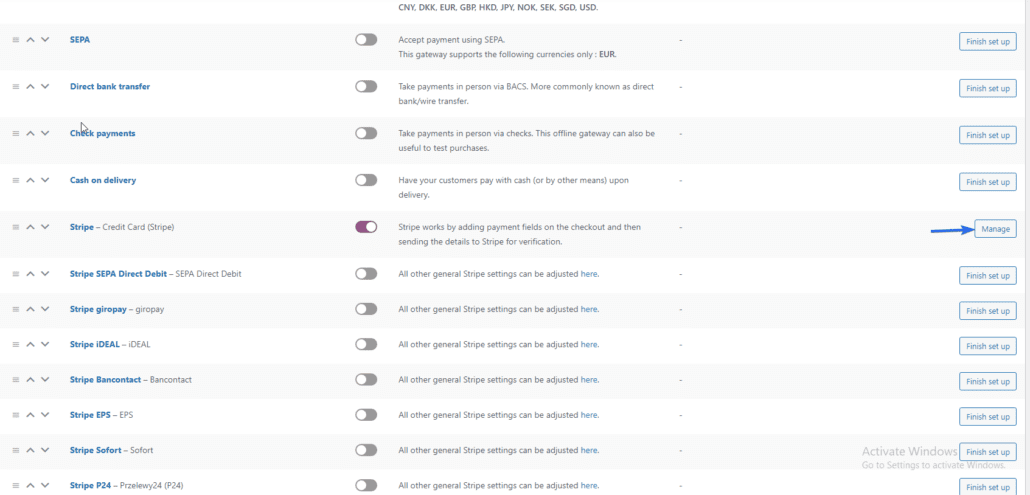
After that, untick the “Enable test mode” option. Then click on Edit account keys to change from test mode to live mode.
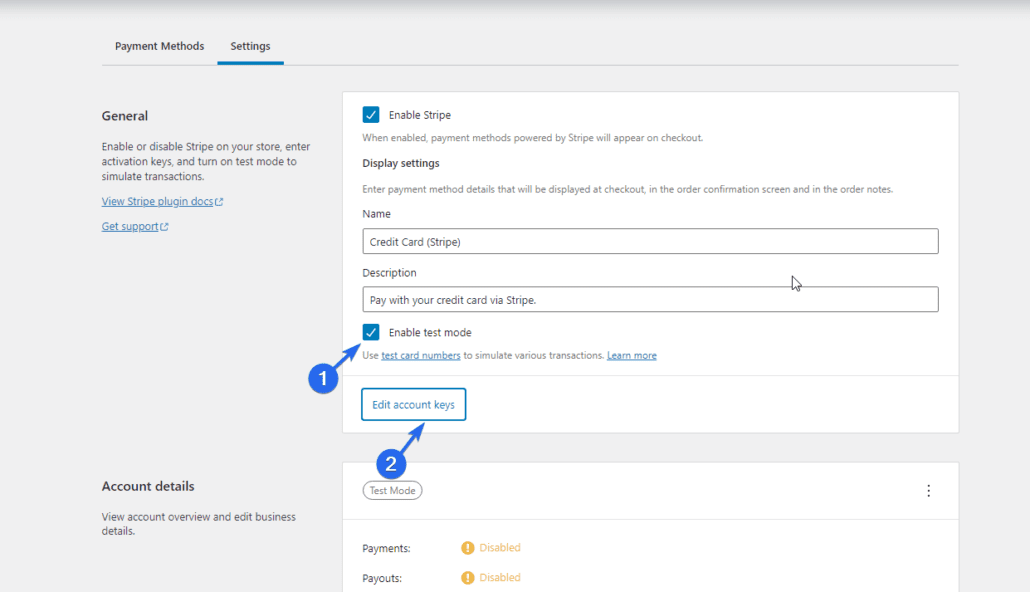
You can get the live keys from your stripe account. We have a detailed guide on how to integrate stripe in WooCommerce.
Using a WooCommerce Order Test Plugin
If you are using another payment processor, you can easily enable WooCommerce tests by using a WooCommerce Test Plugin.
To get started, log in to your WooCommerce dashboard and then go to Plugins >> Add New. On the Search box, type in “WooCommerce Order Test”. After that, click on the Install Now button next to the plugin name.
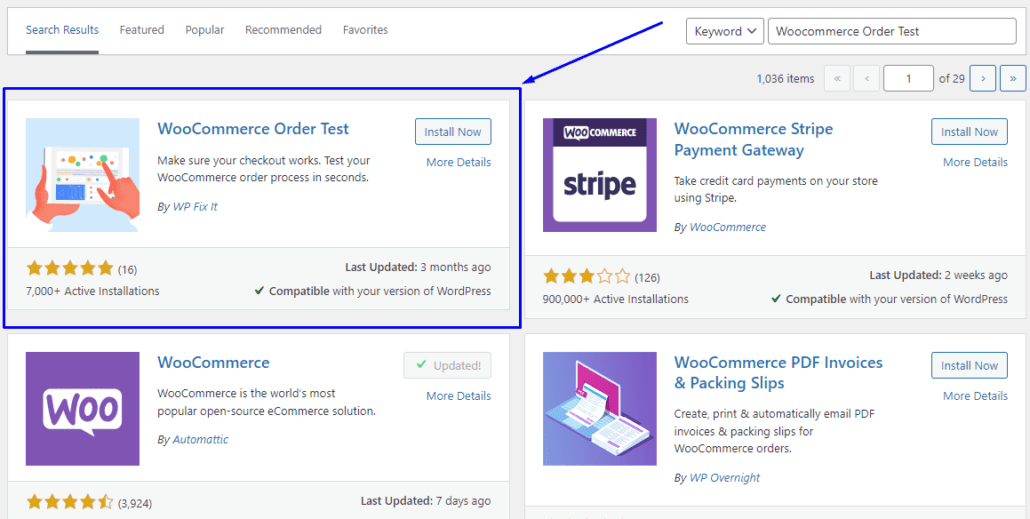
After installing and activating the plugin, go to WooCommerce >> Settings. Then navigate to the Payments tab. Here scroll down and enable the “Test Mode” gateway by flipping on the switch and selecting Save changes.
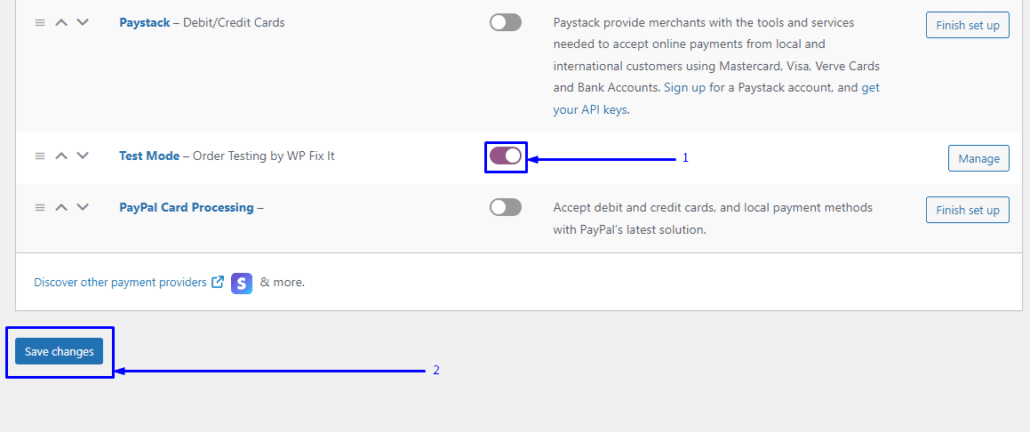
This should be visible on your checkout page. To use this payment option, visit your online store and add new products/services to your cart. Then fill in your billing details and proceed to checkout to use the “WC Order Test” plugin to checkout in WooCommerce Test Mode.

If you have set up your WooCommerce correctly, you should be able to place a test order successfully.

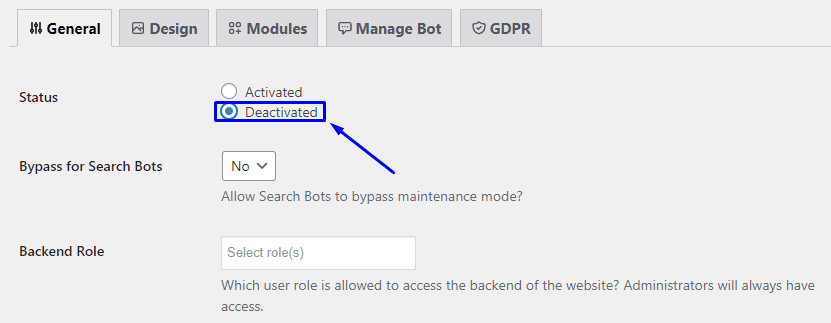
Don’t forget to disable maintenance mode after the test. You can do this by returning to Settings >> WP maintenance mode. Then select the “Deactivated” Option.
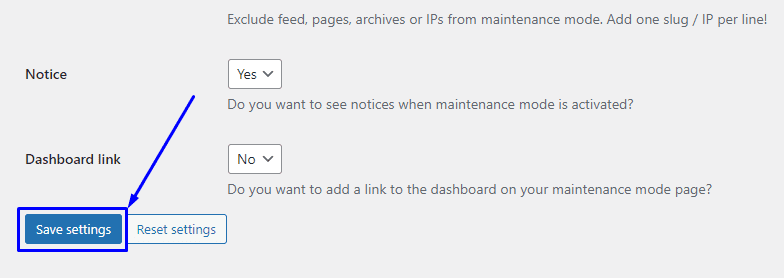
Hit the Save settings option to effect your change.
When Do You Need to Perform a WooCommerce Test?
It is crucial to ensure your WooCommerce checkout process is working efficiently to maintain a functioning online store. You will need to make sure WooCommerce is set up properly when creating a new online store and after a few months of usage.
It is especially important if you notice an increase in Cart abandonment. When customers encounter difficulty during checkout, they are more likely to abandon their carts.
We advise that you regularly perform a WooCommerce order test mode to keep your store running smoothly. You should do this at least once a month. This way, you can notice any error as quickly as possible.
You should also run WooCommerce tests whenever you update a plugin on your website. Plugin updates can cause compatibility issues with WooCommerce which can affect your website checkout flow.
Conclusion
Regular WooCommerce Test is necessary to ensure you have a functioning website, and that your customers are not stranded when making a purchase.
In this guide, we have shown you how to enable WooCommerce test mode by using the PayPal Sandbox for PayPal users. We have also shown you how to enable WooCommerce payment test mode using a WooCommerce payment plugin. This also works if you use another payment gateway, such as Stripe.
When managing your WooCommerce store, you may run into errors. To help with that, we have a complete guide on common WooCommerce errors and how to resolve them.


