How To Easily Integrate Apple Pay To Your Woocommerce Store: A Step-by-Step Guide

Do you want to add Apple Pay as a payment option on your WooCommerce store? We’ll show you how in this article.
WooCommerce is one of the most popular eCommerce software for WordPress.
It provides business owners with all the tools they need to set up a successful eCommerce business including integrations with popular payment gateways such as Google Pay and Apple Pay.
In this article, we’ll explain what Apple Pay means and how to integrate it easily into your WooCommerce store. By the end of this article, your customers will be able to complete your store’s checkout process using Apple Pay.
Content:
- What is Apple Pay for WooCommerce?
- Benefits of Adding Apple Pay to Your Woocommerce Store
- How to Add Apple Pay to Your WooCommerce Store
What Is Apple Pay for WooCommerce?
Apple Pay is a digital payment system introduced by Apple and is available on all Apple devices, such as the iPhone, MacBook, and iPad. Apple Pay is built on the Near Field Communication protocol.
The protocol allows contactless payments between a device and a payment terminal. That eliminates the need for customers to enter their credit and debit card on the payment form on Woocommerce sites.
NFC payment technologies like Apple Pay make it easy for users to complete their online purchases. Once set up, users won’t need to re-enter their payment and billing information on the eCommerce store. This way, their information is not stored on the vendor’s server, rather it is handled by Apple.
Apple also offers a secure payment solution that requires customers to confirm payments using Touch ID or Face Recognition.
Benefits of Adding Apple Pay on Woocommerce Store
Integrating Apple Pay as one of your options for WooCommerce payments will benefit your business and customers. Below are some of the benefits.
Secure and safe transactions: The Apple ecosystem is reliable and secure. This is evident in how they treat their customers’ data. Therefore, adding Apple Pay to your store gives customers confidence, since all transactions are validated using Apple’s biometric technologies.
Seamless checkout: Integrating Apple Pay will improve the ease of making payments. This is because customers will no longer have to re-enter shipping and payment information before checkout. In turn, it will improve user experience and increase conversion on your store.
Less prone to hacking: NFC technology is less prone to hacking because it requires the hacker to first gain access to the victim’s physical device.
How to Add Apple Pay to Your WooCommerce Store
Enabling Apple Pay on your Woocommerce store is not a straightforward process. That’s because WooCommerce does not support Apple Pay by default. Finding an out-of-the-box solution becomes necessary.
One of the ways you can integrate Apple Pay into your WooCommerce store is with plugins.
Fortunately, there are payment plugins that can be used to enable Apple Pay on your store. For this tutorial, we’ll use the WooCommerce Stripe plugin because both WooCommerce and Stripe recommend it.
Apple Pay WooCommerce – Prerequisites
Before we begin this tutorial, you’ll need to ensure Woocommerce is properly set up on your WordPress website. If you need help setting up your store, we recommend checking out our tutorial on installing and setting up WooCommerce.
Secondly, you’ll need to have a valid SSL certificate on your WordPress site as it is required for Apple Pay to work on your site.
Sidenote: SSL (Secure Sockets Layer) provides an additional layer of security by encrypting data exchange between your website and your customer’s device. You can read our detailed guide on how to enable SSL on your site using Cloudflare.
Once you have all these in place, proceed to configure Stripe on your WooCommerce store.
1. Set Up a Stripe Account
To set up Apple Pay on your WooCommerce store, you’ll need to create a Stripe account. Stripe is a popular payment gateway available in many countries. It offers integration with WooCommerce using APIs.
Sidenote: API stands for Application Programming Interface. It serves as a communication medium between software applications.
If you don’t have a Stripe account, you must create and activate one before adding Apple Pay to your WooCommerce store. You can skip this step if you already have a Stripe account.
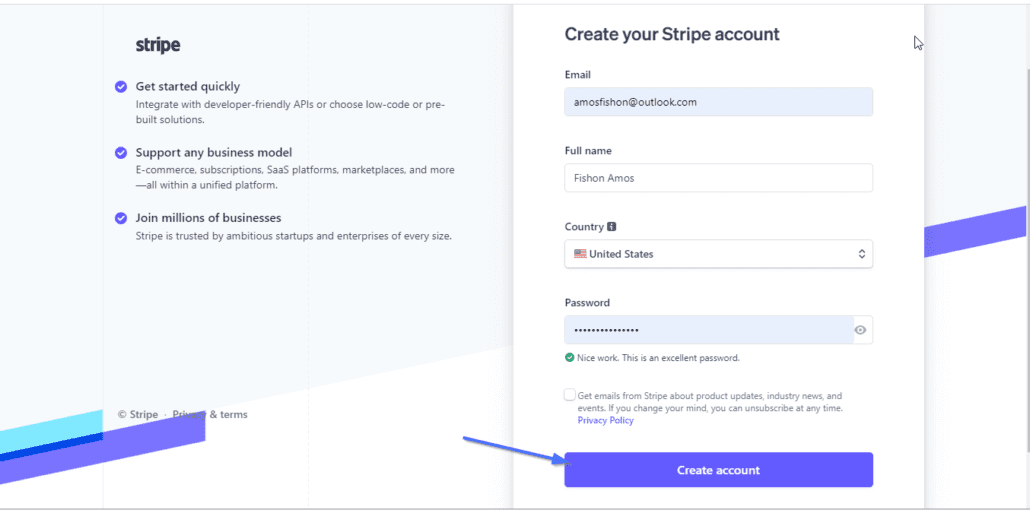
To create and activate a Stripe account, visit the Stripe Signup page. Then enter your email and full name, select your country and choose a strong password. Finally, click on Create account to complete the process.
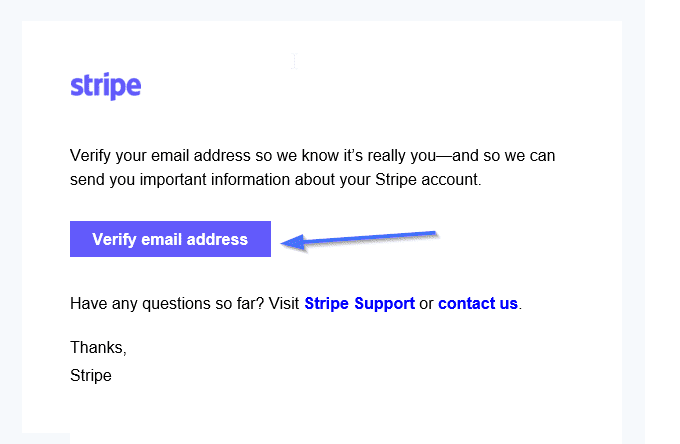
After that, you’ll receive a confirmation email. Open your email and click the Verify email address button.
Next, you’ll be prompted to activate payments by providing additional information about your business. However, you can click Skip for now, to proceed to test mode. You can always return to activate payment after testing your payments.

Your Stripe account is now successfully created, and you can use it to connect to your WooCommerce store in test mode.
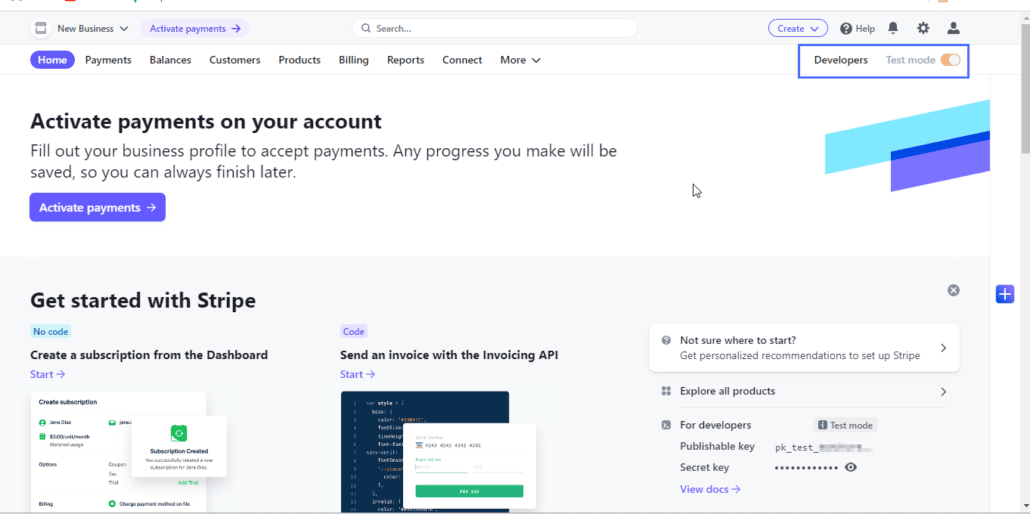
Sidenote: Stripe test mode allows you to test your Apple Pay integration using test data and values before fully going live.
2. Install and Activate the WooCommerce Stripe Payment Plugin
Once you have a Stripe account ready, the next step is to install and activate the WooCommerce Stripe plugin before you can enable Apple Pay.
For this, log in to your WordPress dashboard, and then navigate to Plugins >> Add New. Locate the search bar at the top right and type ‘WooCommerce Stripe’.
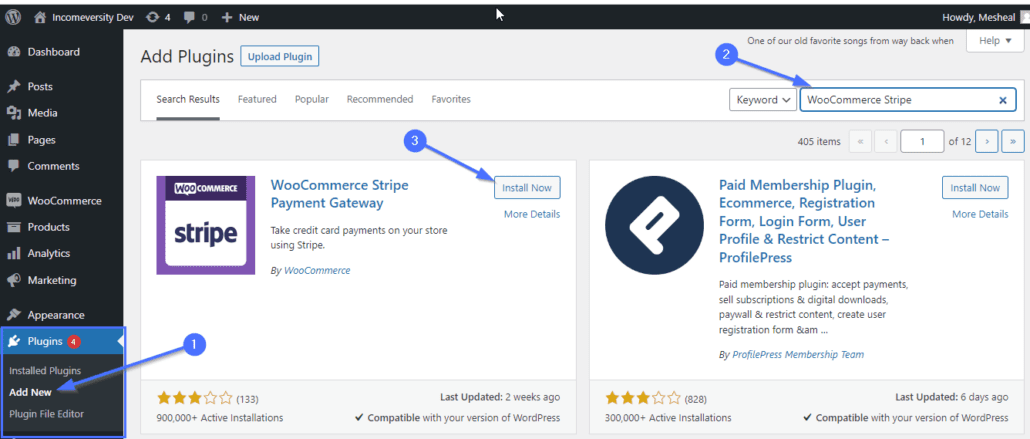
Next, the plugin should appear on the search results. Make sure you see ‘by WooCommerce’ under the plugin. Click on Install Now next to the plugin name and then activate the payment plugin once the installation completes.
3. Integrate Your Store With Stripe
To start, let’s show you how to enable Stripe payment gateway by connecting Stripe to your WooCommerce store.
For this, go to WooCommerce >> Settings, and then select the Payments tab.
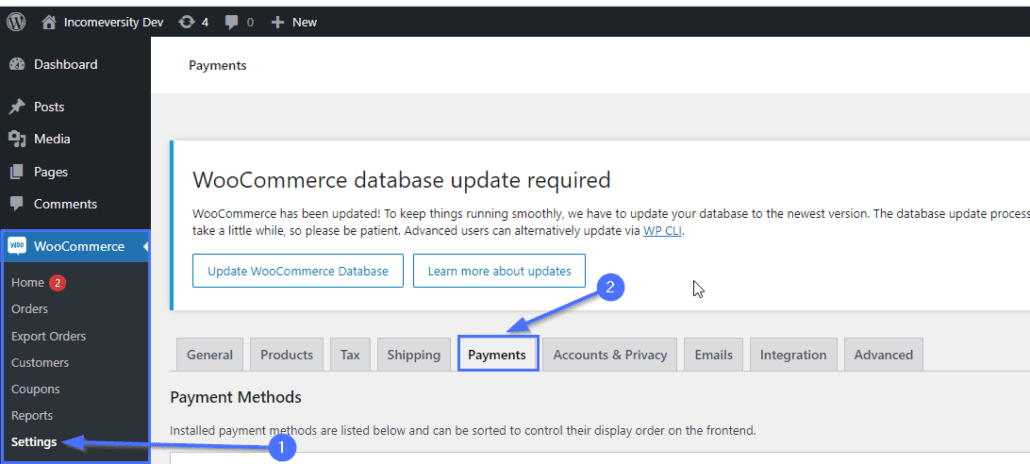
After that, scroll down and locate the Stripe – Credit Card (Stripe) option, and then toggle it to the on position. Click Finish Set Up to continue the configuration process.

Next, click on Enter account keys to enter your API keys. An overlay will appear for you to enter your API keys.

You can get this set of keys from your Stripe Dashboard. Leave this tab open and log in to your Stripe account.
To get your Stripe account keys, toggle on the test mode at the top right. Next, click on Developers.
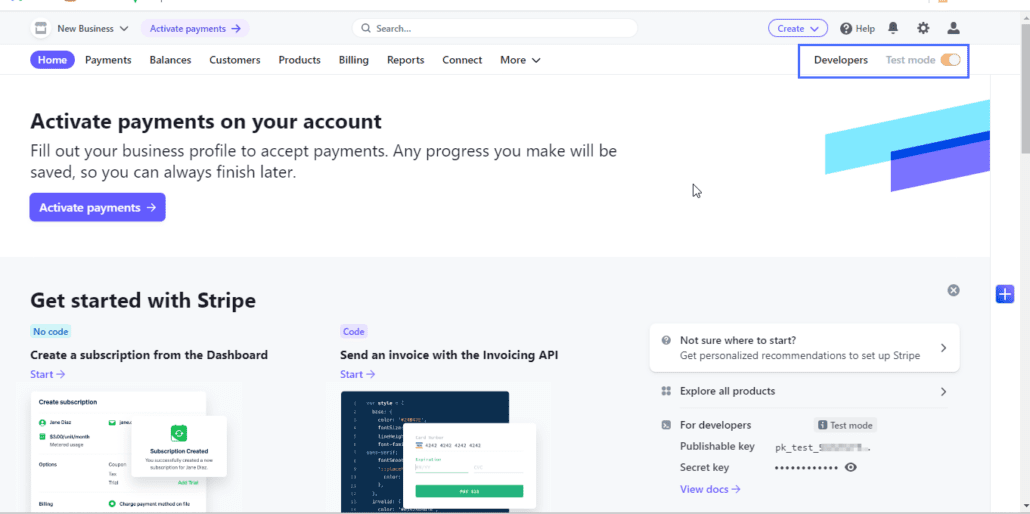
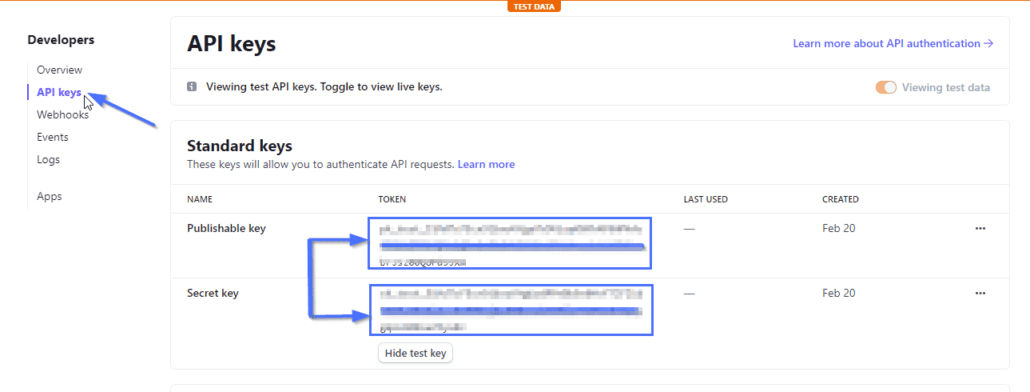
From your developer dashboard, click on API keys. You’ll see a set of API keys (publishable and secret). You will use these keys to complete your WooCommerce connections to Stripe.
Now, return to your WordPress dashboard and enter these keys into their respective fields. After that, click on Test connection to confirm your keys.
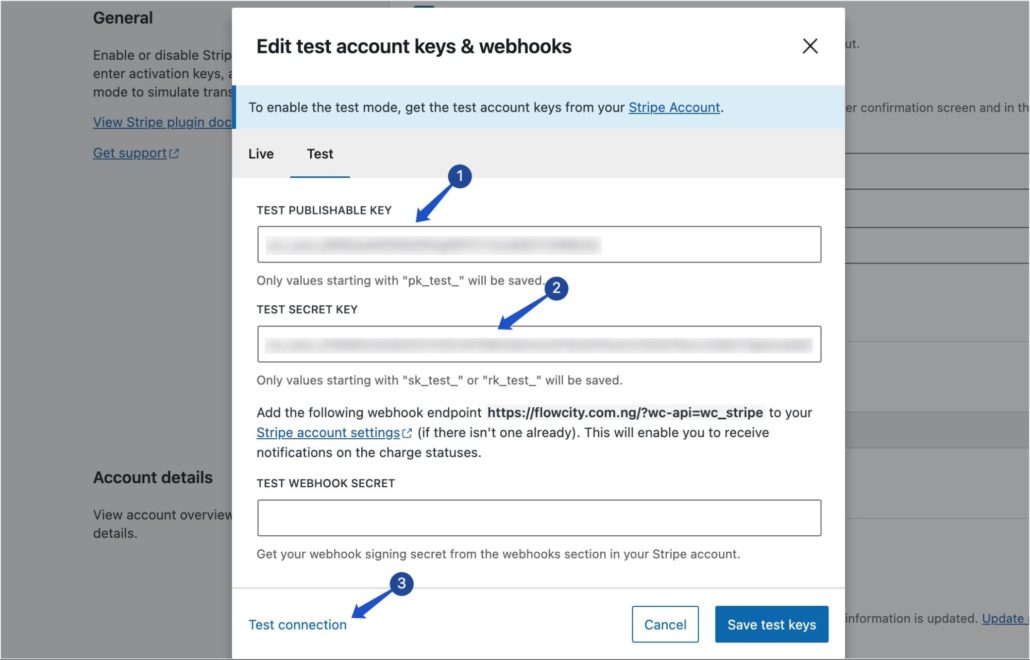
You should see a “Connection successful” notification. This shows you’re using the correct test keys.
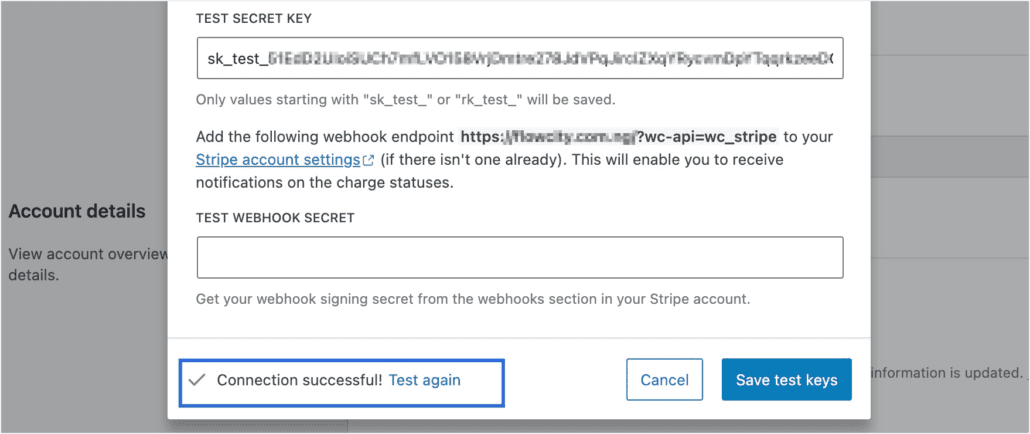
Next, you’ll need to set up webhooks on your Stripe account. To start, copy the webhook link and proceed to your Stripe dashboard.
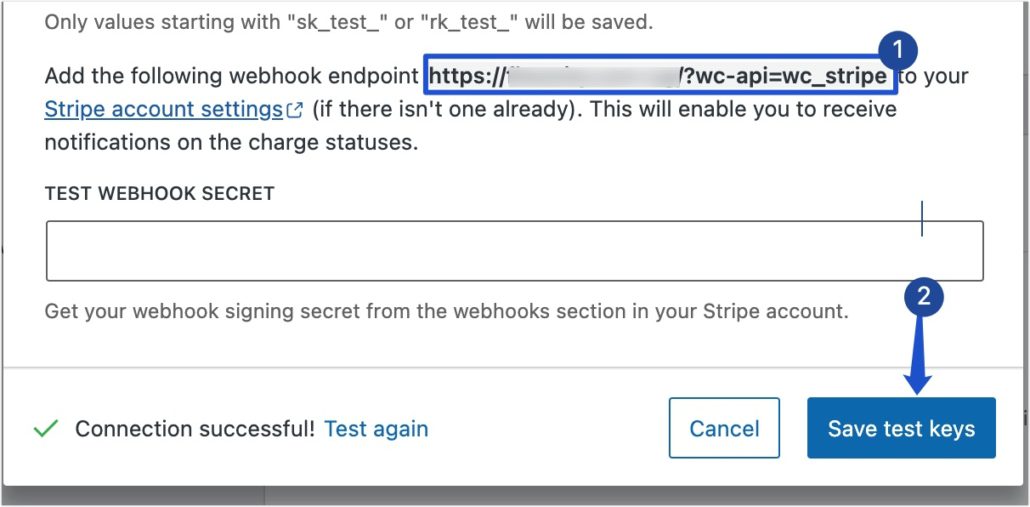
For now, click on Save test keys to save your changes.
Adding Webhooks
Webhooks help to keep a log of events in your applications. These events include payments, disputes, orders, etc.
To complete your Apple Pay on WooCommerce integration, you’ll need to add the webhook link to your Stripe account and select events to be monitored.
To add the webhook link we copied to Stripe, follow the steps below:
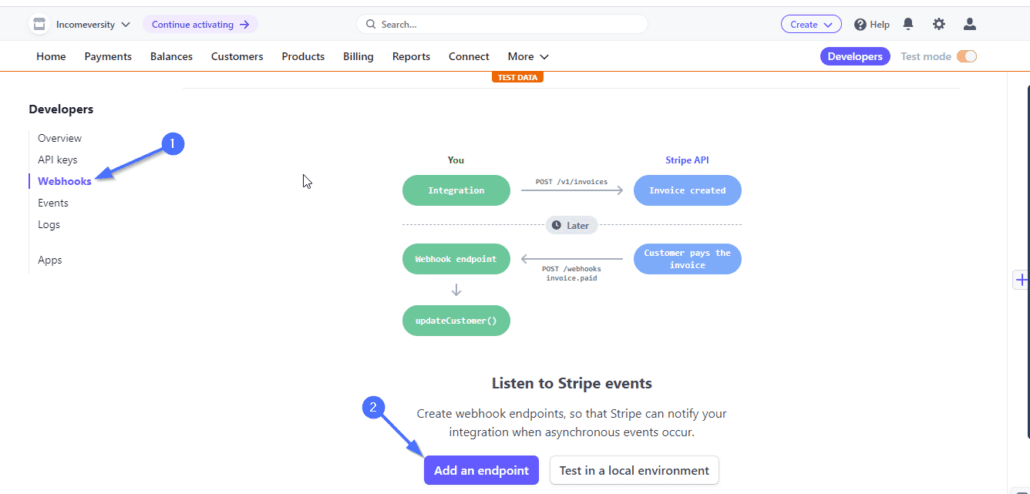
Return to your Stripe developer dashboard, click on Webhooks, and select Add an endpoint.
Next, enter the endpoint URL in the text box and then add a description to help you identify your webhooks.

Choose the option to listen to Events on your account only. After that, click the + Select events button.

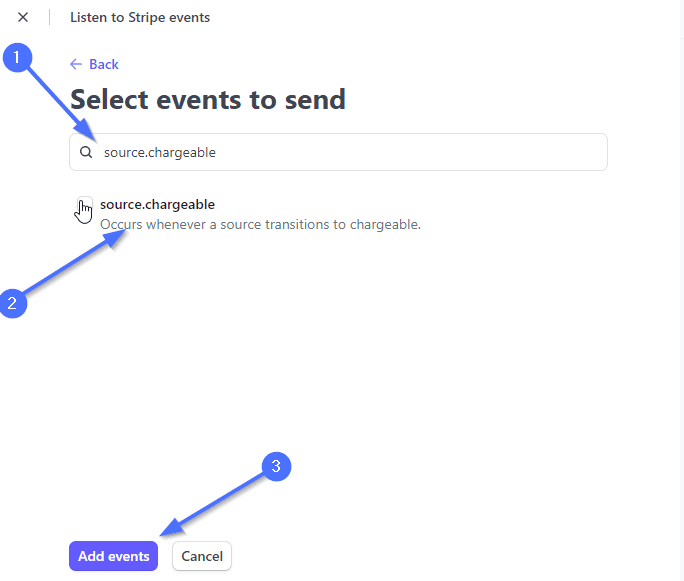
Next, you’ll need to add all the events below individually. To add an event, type the event name into the search box, and click on the Add events button to save.
- charge.failed
- charge.captured
- Payment_intent.succeeded
- source.chargeable
- source.canceled
- charge.succeeded
- payment_intent.payment_failed
- Payment_intent.amount_capturable_updated
- charge.dispute.created
- charge.refunded
- review.opened
- review.closed
Repeat the same process to add other endpoints to your Stripe account.
Your webhook is now configured on Stripe and ready to listen to events. You can view information about all events in your application from the Webhooks menu.

Now, you’ll need to copy your webhook Signing secret and add it to your WooCommerce Stripe settings.
To copy your webhook signing secrets, click on Webhooks from your developer dashboard and then click on the webhook URL you added earlier.

After that, click Reveal under Signing secret to reveal the signing key, and then copy it.

Saving Webhook Secret
After you’ve copied the signing key from Stripe, head back to your WordPress dashboard, then go to WooCommerce >> Settings. Then select the Payments tab and click on Edit account keys.

Next, enter the secret signing keys you copied from your Stripe account into the Test Webhook Secret field and click on Save test keys.

Webhooks is now fully enabled and configured on your account, as shown in the screenshot below.

4. Enable Apple Pay
Your store is now ready to accept payments through the Stripe Apple Pay gateway. However, you will need to specifically enable the Apple Pay option for the button to show on your checkout pages.
To do that, return to your WooCommerce Dashboard and navigate to Settings >> Payments. After that, tick the Apple Pay / Google Pay checkbox to activate and enable the Apple Pay payment method. Finally, click on Save changes to confirm.
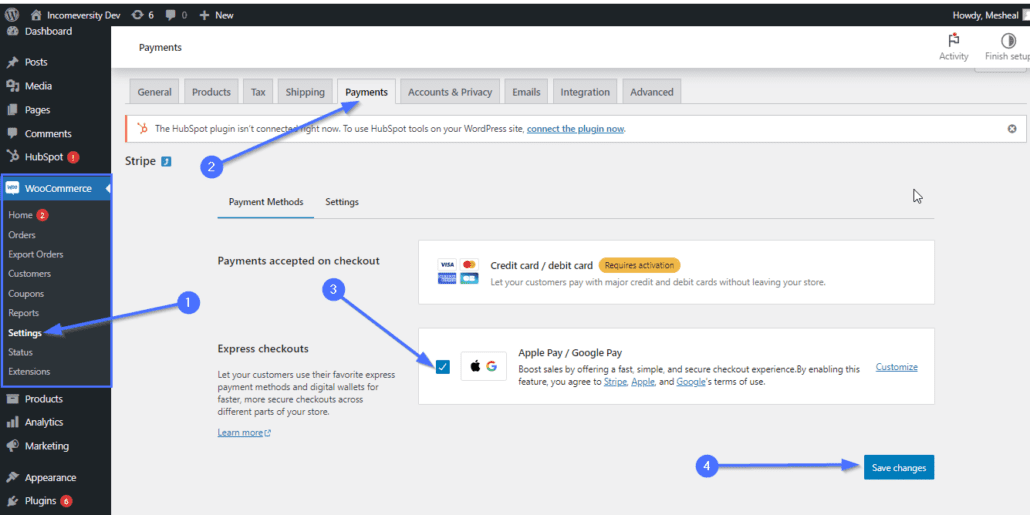
Note: This would also enable the Google Pay option for users with Android devices.
5. Make a Test Payment
Now that you’ve successfully added the Apple Pay button to your WooCommerce store, the next thing is to test your integration.
To make a test payment, log in to your store using an Apple device (or a Safari browser if you don’t own an Apple device) and try to make an order. You should see the Apple Pay button on your online payment checkout form with the Apple logo on the page. Click on it to initiate payment.
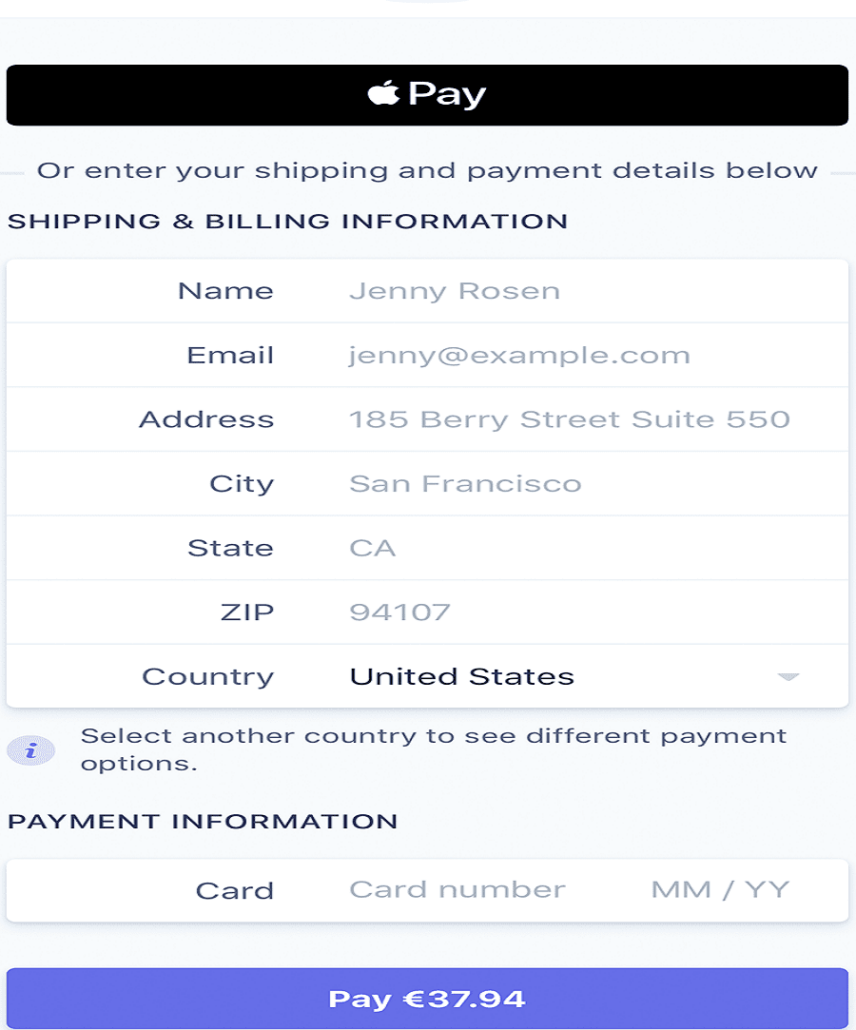
Note: Stripe test credit card doesn’t work with Apple Pay integration. This means you’ll need to complete the payment using your real card details. However, if you’re using test API keys, Stripe will automatically issue a refund after completing the test payment.
6. Enable Live Mode
Once your test payment is successful, you can return to your Stripe dashboard and disable test mode. This should automatically enable Live Payments on your store.

After you switch to live mode, copy the live publishable API keys from your Stripe developer dashboard. Then replace the test API keys on your WooCommerce payments dashboard with the live keys.

Your store can now accept customer payments using Apple Pay with live mode now active.
Note: Stripe needs to verify your business information before you can activate live payments on your account. If you encounter issues verifying your Stripe account, please contact Stripe customer support or check out this guide provided by Stripe.
Conclusion
Integrating Apple Pay into your WooCommerce store is a good way to provide customers with a secure and convenient payment solution.
By following the steps outlined in this tutorial, you should have Apple Pay correctly set up on your website. You can start accepting payments from millions of Apple users.
Would you like to learn about other available WooCommere payment methods? Please check our review of the best WooCommerce payment gateways that offer similar convenience and security as Apple Pay.


