How To Move Your Site From WordPress.com to WordPress.org
WordPress is a beautiful platform. Whether you are on WordPress.com or WordPress.org, you are utilizing the most robust, powerful, and widely used website platform.
Although these two platforms offer you the power to manage your site with the tools, themes, plugins, and community that comes with WordPress, there are basic differences between them.
In this article, we will explain the main difference between wordpress.com and wordpress.org. Then show you why and how you can move your website from wordpress.com to WordPress.org.
Content:
- Difference Between WordPress.com and WordPress.org
- Why Choose WordPress.org over WordPress.com
- How to move from WordPress.com to WordPress.org
- Conclusion
Difference Between WordPress.com and WordPress.org
WordPress.com is a blogging service that uses the WordPress platform. This service is offered and managed by Automattic, a company founded by Matt Mullenweg (co-founder of WordPress).
On this service, you can get a free plan, or upgrade to paid plans if you need more features. You would be given a domain name (or can purchase one), hosting service, and other requirements needed to run your site.
With WordPress.org on the other hand, you download the WordPress platform software and install it on a web host you purchased. You would also need to purchase your domain name. All management of your website rests solely on you.
At Fixrunner, we believe WordPress.com is ok for newbie bloggers. But if you are aiming to grow your site and make money off of it, we advise you to switch from WordPress.com to WordPress.org, and here’s why.
Why Choose WordPress.org over WordPress.com
Perhaps the most outstanding reason is the one we already mentioned, WordPress.org is for serious bloggers and website owners. These pros/cons will help you understand why:
- WordPress.com users can only use a small set of themes and plugins: You cannot simply pick any theme or plugin you think will look good on your site. It has to be one of those permitted by the WordPress.com service. On the self-hosted WordPress.org installation, you can use any theme or plugin you like, with no restrictions whatsoever.
- You cannot customize your code: As your site grows, it may get to a point where it’s absolutely necessary to add custom features. If you are on WordPress.com, that’s not going to happen. On WordPress.org however, you are free to customize your code whichever way you like. No restrictions whatsoever.
- Ecommerce is very limited: You cannot sell goods you did not produce yourself. You can only make money from ads using the WordAds system offered by WordPress.com; all ads from major ad networks like Google and VibrantMedia are prohibited. You can only use PayPal as your payment method, etc. On WordPress.org, you are free to sell goods and services. You can also use ads from any network, no restrictions there either.
If you currently have a WordPress.com site but have decided to go for the freedom that comes with WordPress.org, this guide will show you how to migrate your site from WordPress.com to WordPress.org.
How To Move From WordPress.com To WordPress.org
The rest of this tutorial will show you how to move your site to WordPress.org using the following steps:
- Purchase your hosting and domain name (If you already had a custom domain name, you can move it instead)
- Export all content from your WordPress.com site.
- Install WordPress in your new host.
- Import your content into your new, WordPress.org install.
- Check your install.
- Redirect visitors (only if you did not have a custom URL in WordPress.com)
Step 1. Purchase your hosting and domain name
To move from WordPress.com to WordPress.org, you would need to purchase a web hosting service. There are quite a number of web hosts to choose from. For this, we recommend going through our review for the best WordPress hosting service providers for WordPress websites.
If your domain on WordPress.com is something like example.wordpress.com, then you would also need to purchase a new domain name. You can purchase one when you are buying your hosting service.
If already had a custom domain (e.g. www.yoursitename.com), there is no need to purchase another domain. When buying your web hosting service, you would be asked to input your domain if you already had one. Enter your domain at that step.
Thereafter, you can point your name servers at your new web host and continue using your domain name.
However, note that all WordPress domains use SSL (i.e. the link is https://, and not http://), if you are pointing your name servers to a web host that does not implement SSL by default (ask your web host about this). You can also check this guide to learn how to get and install a free SSL certificate in WordPress using Cloudflare.
Step 2. Export your content from WordPress.com
Thankfully, WordPress provides a super-easy way to get your content out of your WordPress.com site!
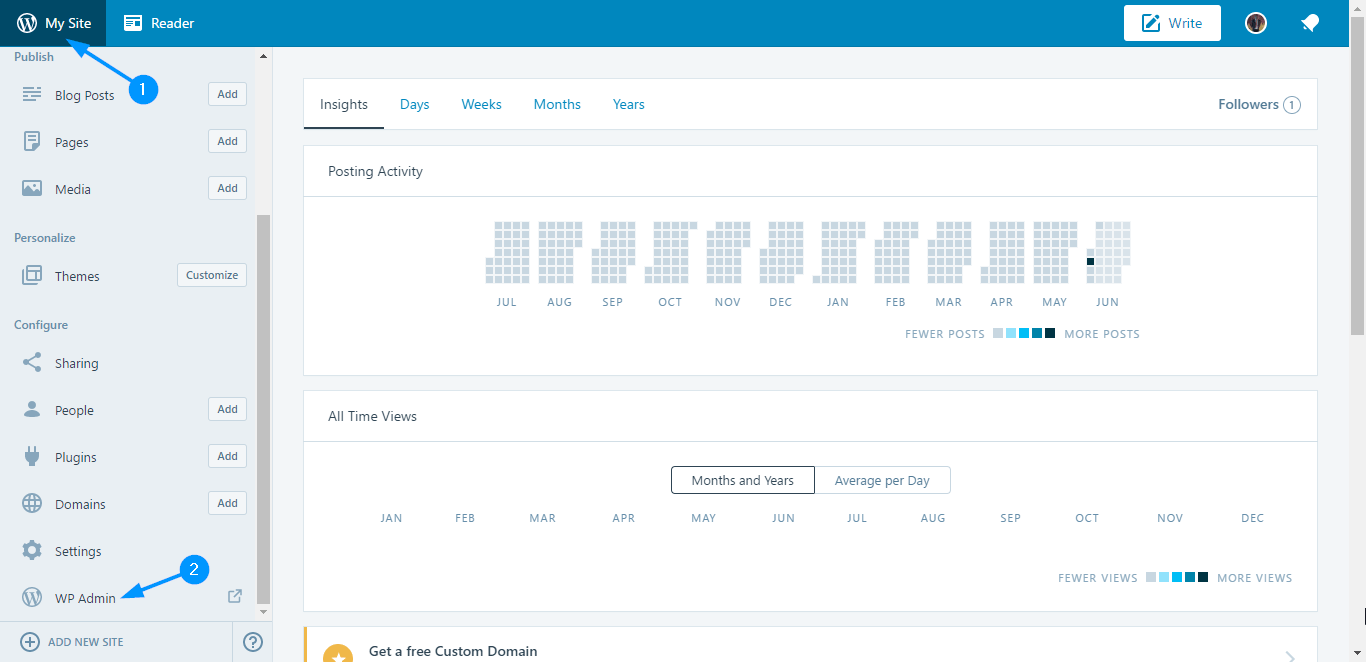
To do this, login to your WordPress.com account.
Switch to “My Site”, scroll down, and click WP Admin.
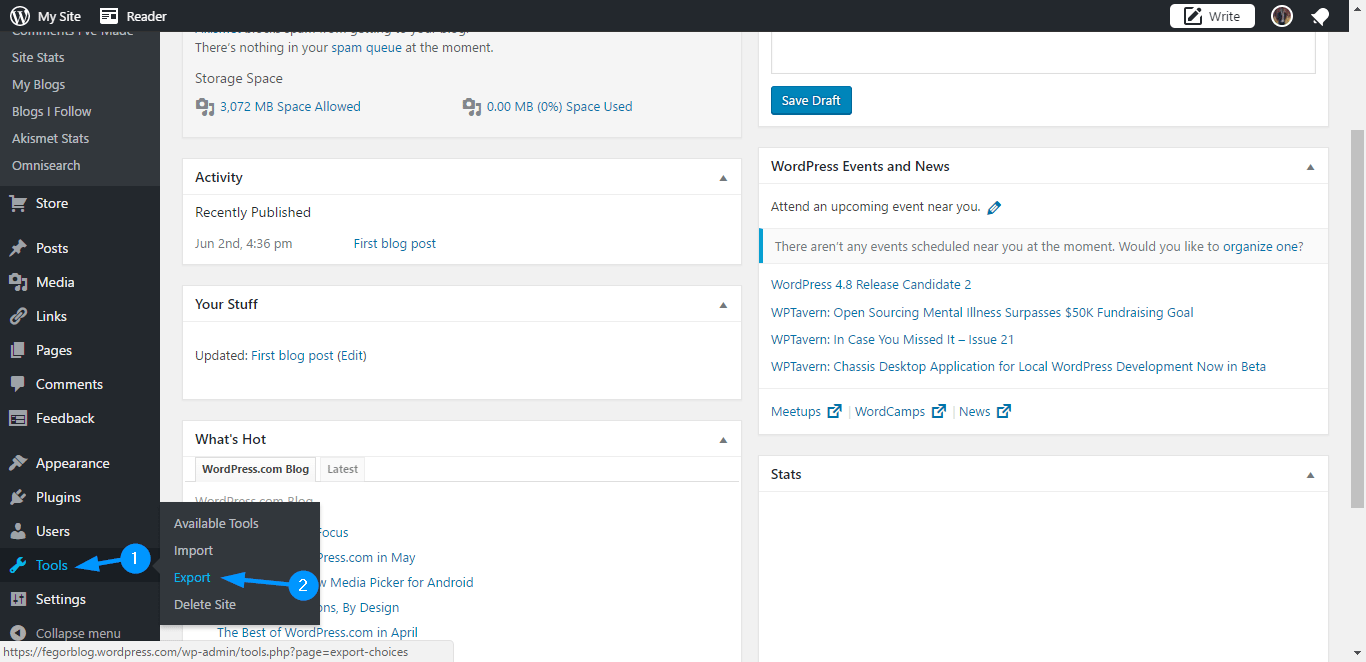
In your admin dashboard, go to Tools >> Export.
After that, click Start Export in the free export section.
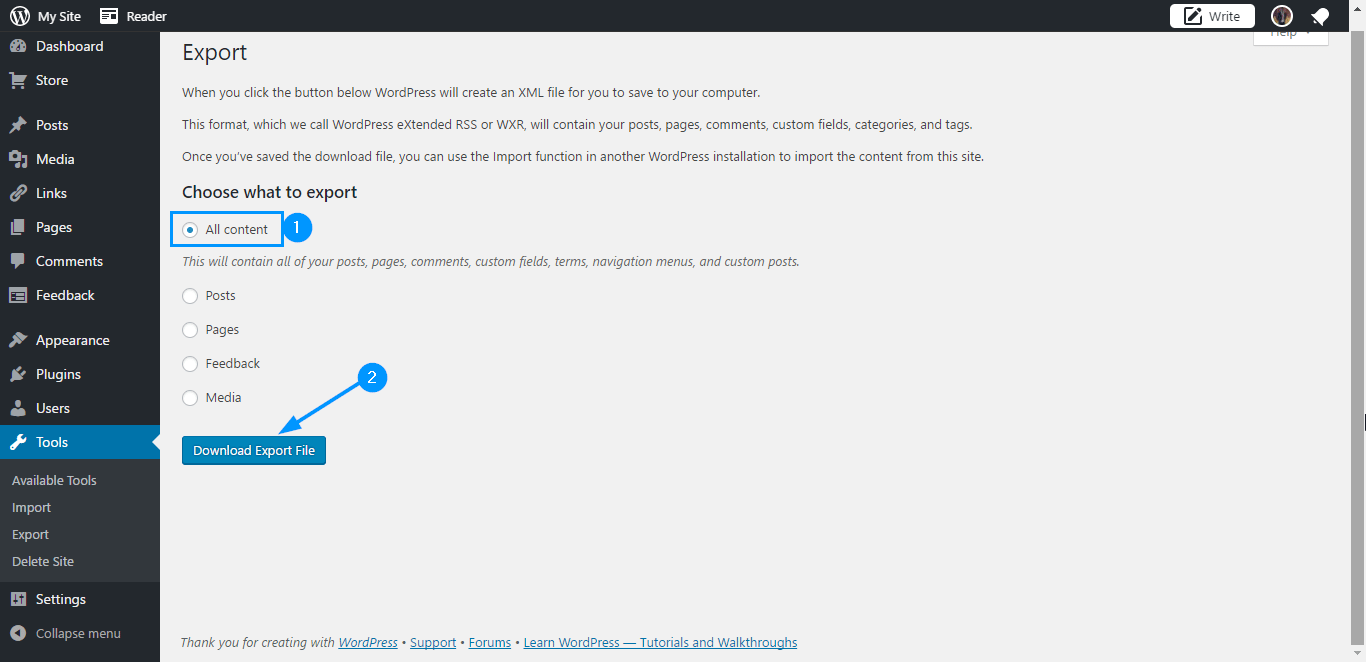
Leave it set to “All content” and click Download Export File.
Your entire website content will be downloaded as an XML file.
Step 3. Install WordPress in your new host
You can install WordPress using a software installer like Softaculous (this is easier), or by uploading the files and installing using FTP.
To do this, you need to have login access to your web host admin panel (likely cPanel). Request these access details from your web host if you do not yet have them. Next, proceed to install WordPress using one of the methods below:
- Installing WordPress Using a Package Installer (Softaculous or Fantastico).
- Downloading and Installing WordPress Using FTP.
- Install WordPress Manually.
Step 4. Import Your Content from WordPress.com to WordPress.org Installation
In step 2 above, you exported your content from your WordPress.com site. You can very easily import that file into your new WordPress install and get your entire content restored to your self-hosted site.
Here’s how to do this:
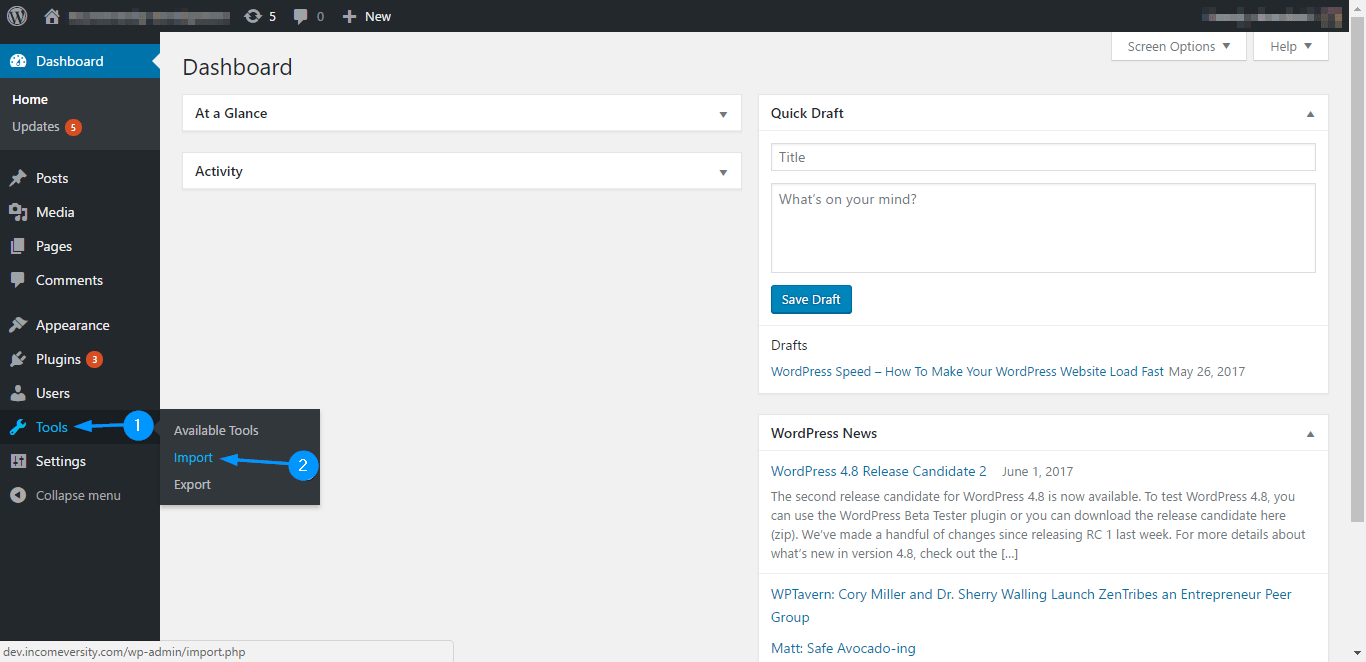
In your WordPress dashboard, go to Tools >> Import.
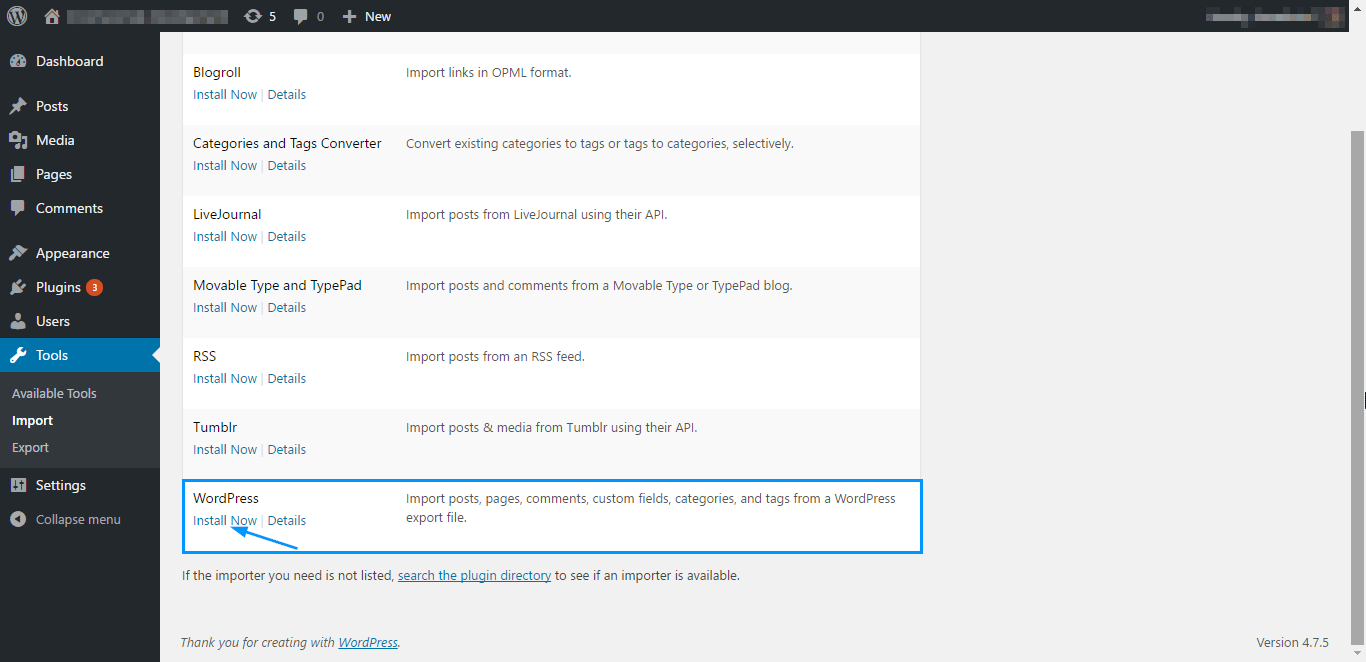
On the import page, scroll down to the WordPress section and click Install Now. Wait for the WordPress importer to be installed.
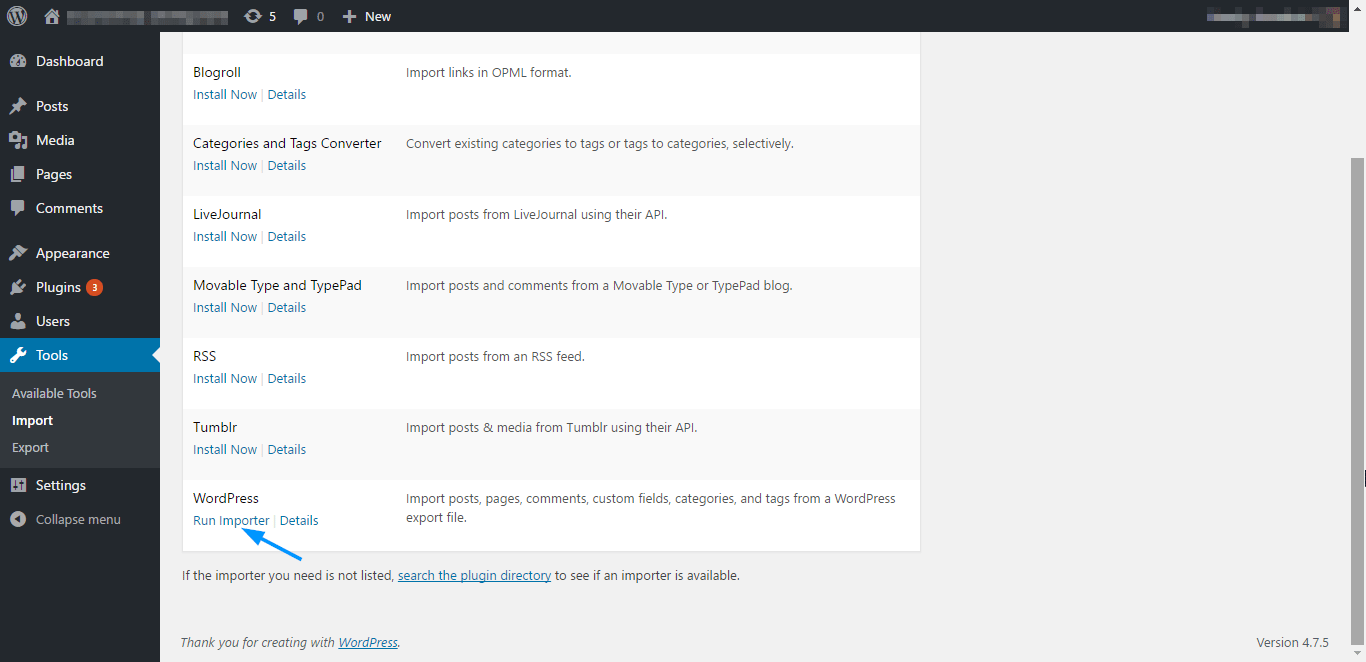
When the installation completes, the button changes to Run Importer. Click on this button.
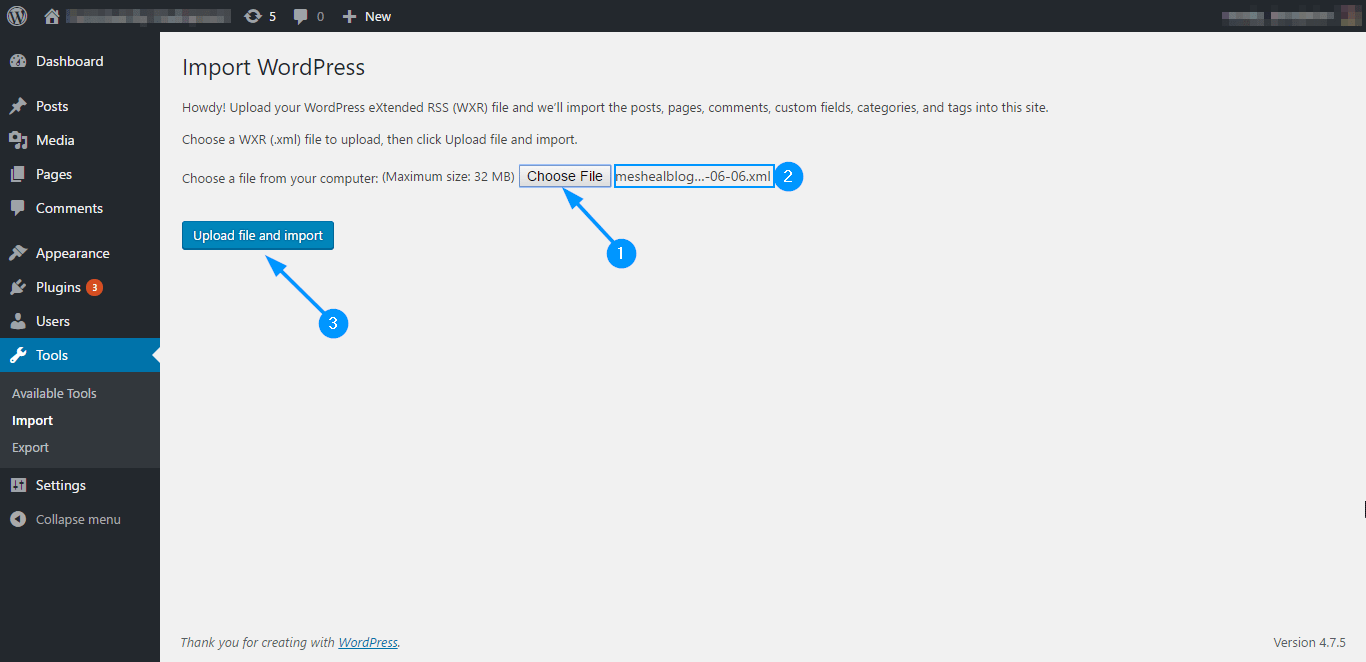
In the “Import WordPress” page, click Choose File and then select the XML file you exported from your WordPress.com site. Next, click Upload file and import.
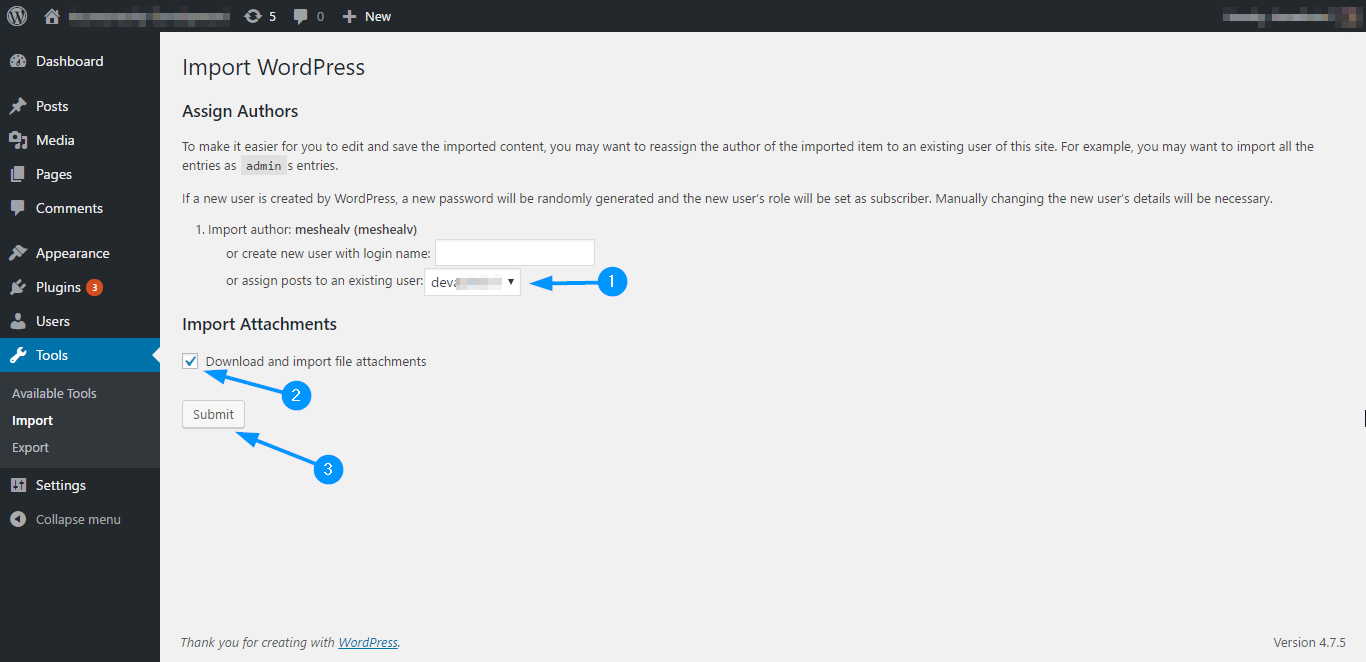
On the next page, select an existing user in the “Assign posts to an existing user” dropdown. Next, check the “Download and install file attachments” box (make sure this box is checked, otherwise, your images would not be imported).
Lastly, click Submit to start the importation process.
Note: There is a 32mb size restriction on files that can be uploaded. Most export files will be smaller than this, but in the event that yours is bigger, you can split it and install using WordPress WXR File Splitter.
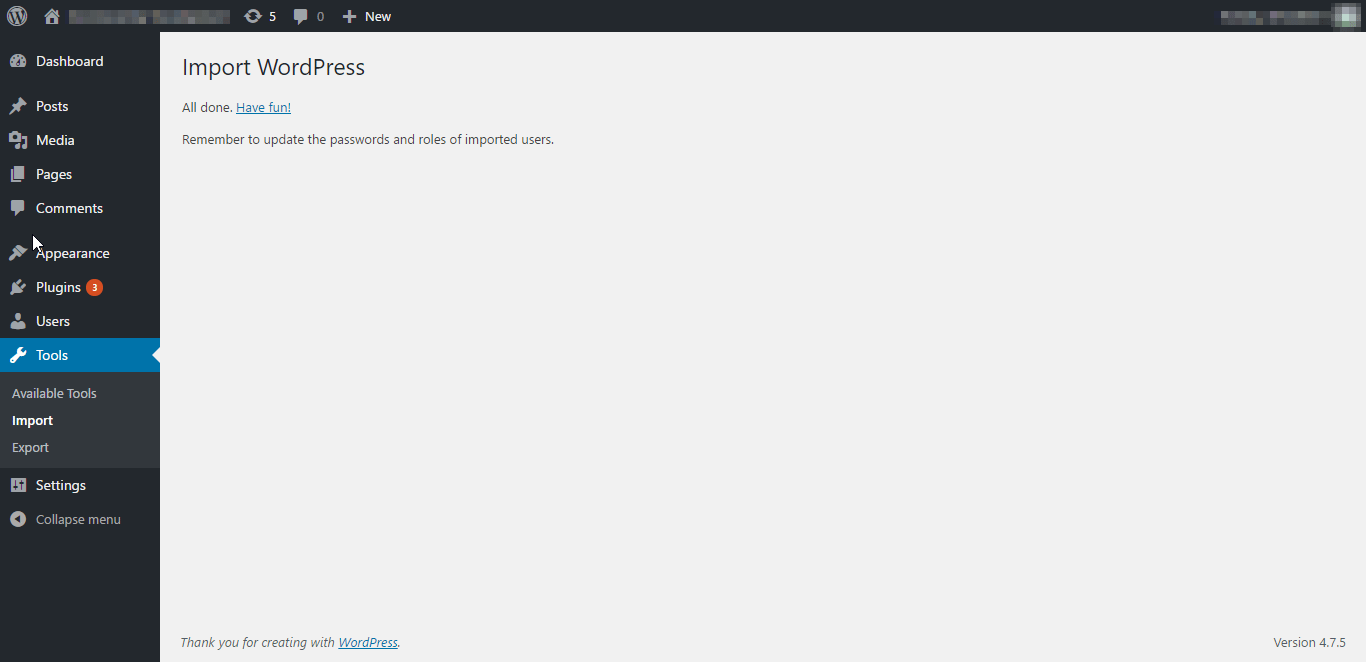
When the import completes, you would be greeted with this pleasant page.
And that’s it, you’re done moving your site from WordPress.com to WordPress.org. However, before you go on to “Have fun” as the page suggests, you want to check that everything was moved over correctly.
Step 5. Check your install.
After the import completes in the step above, you want to do a general check to make sure you don’t have any broken images. In most cases, you would have no problems with this and your tests will show that you are good to go.
However, in some instances, you may have broken images. If that happens, you can restore your images using the Import External Images plugin.
Note that this plugin only imports 50 images at a time. To import the next 50, simply redo the import process.
Step 6. Enable Redirect if you had a wordpress.com domain
If your domain was something like yoursite.wordpress.com, and you had to purchase a new custom domain, then we recommend you add a redirect from your WordPress.com URL to the domain you purchased.
This is necessary to preserve site traffic and SEO for your new site. Otherwise, your readers and search engine ranking will continue going to your old WordPress.com site.
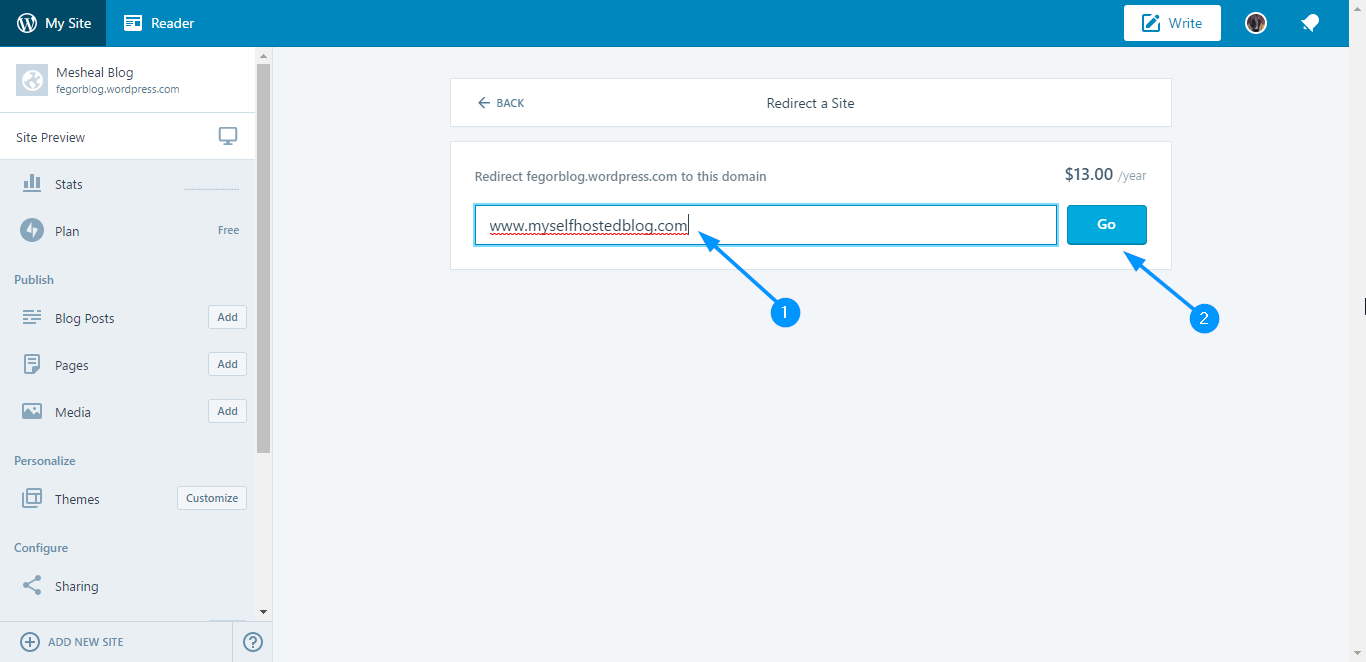
WordPress.com offers redirect services at $13/year. To enable this feature, go to the WordPress Redirect item in WP Store.
After that, enter the domain you want to redirect to and click Go.
Finally, complete the checkout process to enable redirect.
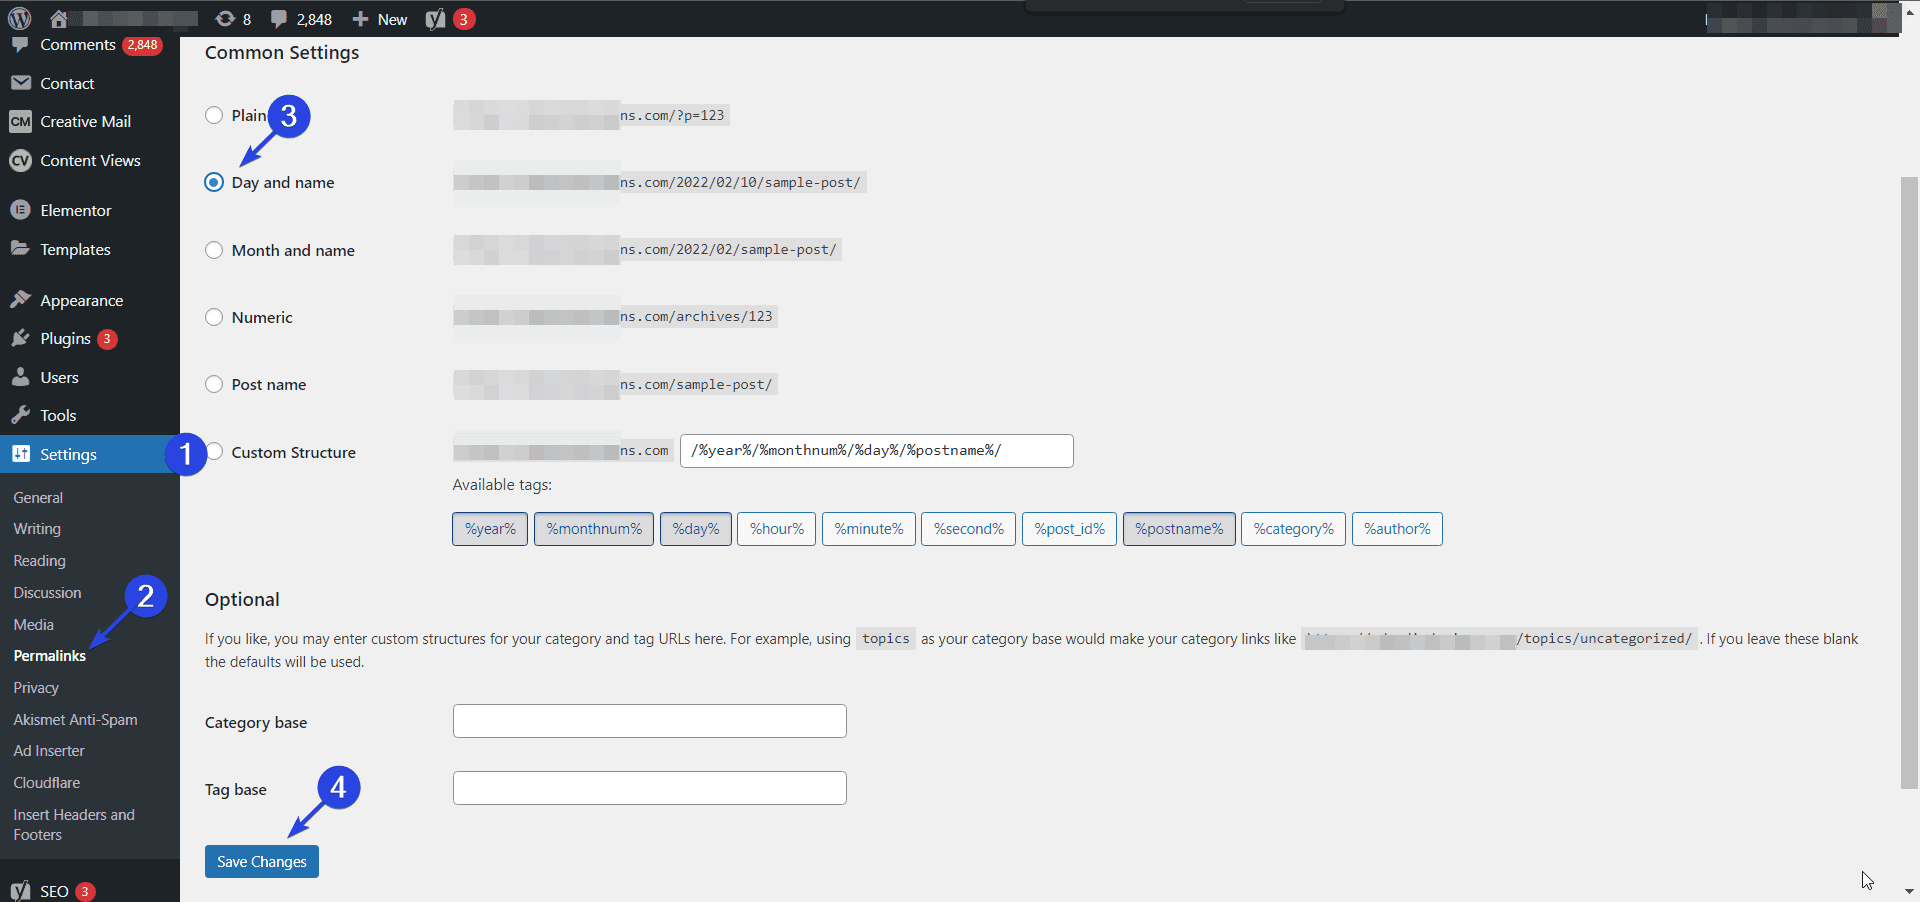
A note about Permalinks: For redirect to work, your permalink structure has to be the same as the structure at WordPress.com, which is the “Date and name” permalink.
Though we normally recommend the “Post name” permalink structure because of its simplicity (besides other benefits), in this case, you have to use the “Date and name” permalink if you want to use redirection. In your self-hosted dashboard, go to Setting > Permalink to make this change.
What if you had a custom domain with WordPress.com: If this is the case, and you only had to change your name servers to point at your new host, then you don’t need redirection. Simply go ahead and set your WordPress.com site to private.
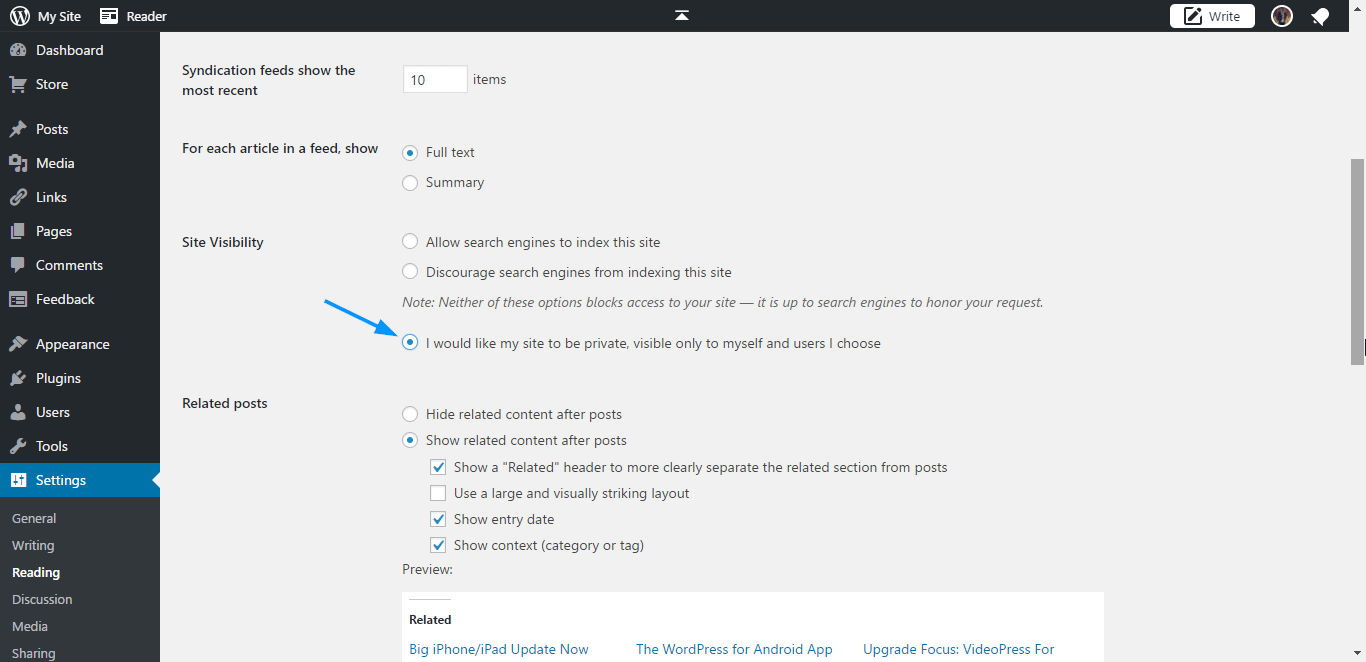
To do this, go to Settings >> Reading.
Next, scroll to the “Site visibility” section and select “I would like my site to be private”.
Lastly, click Save Changes at the bottom of the page.
How Can You Use This Information
While WordPress.com makes blogging easy for WordPress newbies, the truth is, if you want to do anything serious with your blog, you are better off moving to WordPress.org.
If you have decided to make this switch, and have successfully done this using the steps covered here, good job! Time to let WordPress off the leash and experience its full power.
One thing to note is that the migration process does not import your WordPress theme. So if you want to continue using the theme, you need to install and activate it from your self-hosted WordPress site. But you can also go through our list for the best free and premium WordPress themes for your website.
In the future, we recommend you start your blogs using WordPress.org. That way, you can avoid the extra effort needed to migrate, and the complications that sometimes come with it.
Of course, if you need a professional to help you with the migration process, you can request our service.
More Resources:
- Broken link building guide: Manually and with ahref tool
- Wix Vs WordPress – Which One Is Better? (Pros and Cons)
- WordPress Support Forums That Can Help And Provide All Answers


