Creating WordPress Custom Post Types – The Complete Guide
 WordPress comes with seven (7) built-in content types. Therefore, by default, you can create 7 types of content in WordPress. They include posts, pages, attachments, revisions, navigation menus, custom CSS, and changesets – each one is called a WordPress post type.
For most users, WordPress posts and pages are the most used post types. Posts are dynamic content, designed to be updated regularly. Pages on the other hand are more static in nature. Now there are days when you need to publish content that cannot be described as a post, page or any of the other post types. So this is where you need a custom post type – a content type created just for you.
We’ll discuss all you need to know about WP custom post types and how to create them. So let’s begin.
Content:
What are Custom Post Types
Simply put, a custom post type is a regular WordPress post with a different post_type value in the database. The post-type value for a WordPress page is set to ‘page’ in the database, a blog post uses ‘post’, an attachment uses ‘attachment’, while a custom post uses a different value to indicate which type of content it is.
So it’s safe to say custom post types allow you to create different types of content comfortably. You can create custom post types for movies, events, books, products, reviews, etc.
After creating a custom post, you’ll notice the following:
- A separate menu for the custom post type in your WP dashboard. This menu comes with its own ‘add new’ page.
- Categories and tags can be created for the custom post type. You may also create custom taxonomies in WordPress.
- You can modify several options, like where the custom post type should be located.
- This directory http://mywebsite.com/customposttype/ leads you to the custom post type archive page. This is just like opening a page listing all your blog posts from the “post” post type.
In addition to the above points, WordPress allows you to modify several options for your post type. For instance, you can decide:
- Where the custom post type should be located in the menu.
- Whether search engines can find it or not.
- Which user level can access the post type.
- If it should be hierarchical or not.
Let’s get on to how to create them in WordPress.
How to Create Custom Post Types in WordPress
There are two ways of creating post types in WordPress: by installing a WordPress custom post type plugin or using custom code.
If you aren’t comfortable with codes, there are many plugins to help you out. While this method (using a plugin) is an easy way out, it has its drawback. Your custom post type remains for as long as you activate the plugin. Once you deactivate the plugin, you lose them.
Method 1: Using a Plugin
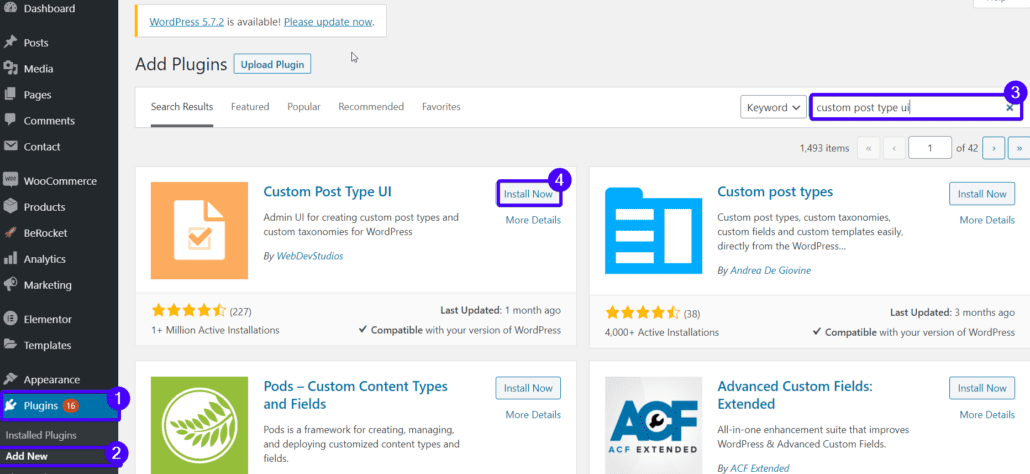
The custom post Type UI plugin is the most popular tool for creating custom posts and taxonomies. So to use this plugin, go to Plugin >> Add New and search for ‘custom post type UI’. Afterward, click Install Now to install the plugin. Finally, hit the Activate button.
Upon activation, a new menu item ‘CPT UI’ appears in your WP admin menu.
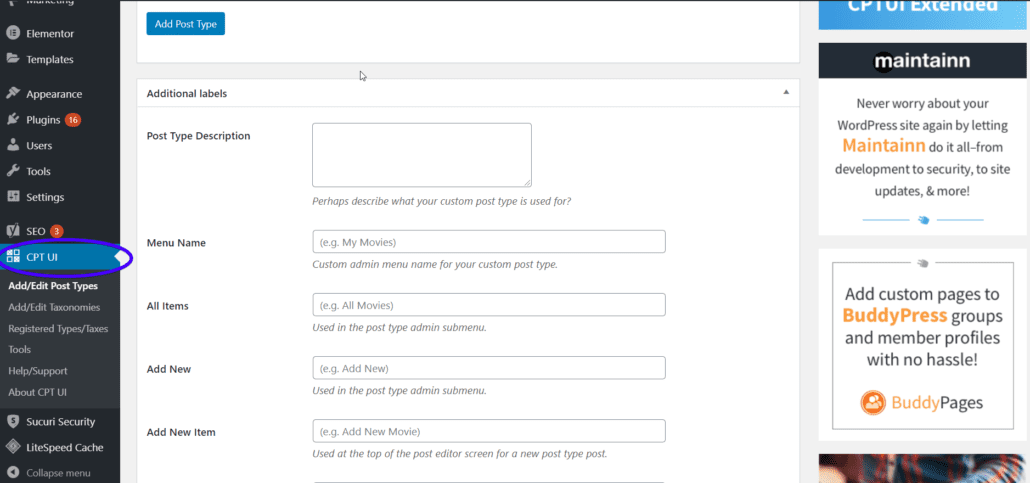
Now, to create a new custom post, go to CPT UI >> Add/Edit Post types.

Enter the following on the resulting page:
Post Type Slug: Used in the URL and WordPress queries. Ideally, it should consist of letters and numbers only.
Plural Label: This is the label used for the admin menu item (e.g. Reviews)
Singular Label: As the name implies, this is used when a singular label is needed (e.g. Review).
After adding the 3 items above, click on the ‘Populate additional labels based on chosen labels’ link. Clicking this link automatically fills up the fields in the ‘Additional Labels’ section. This saves you a couple of minutes.
Next, scroll to the ‘Additional Labels’ section.
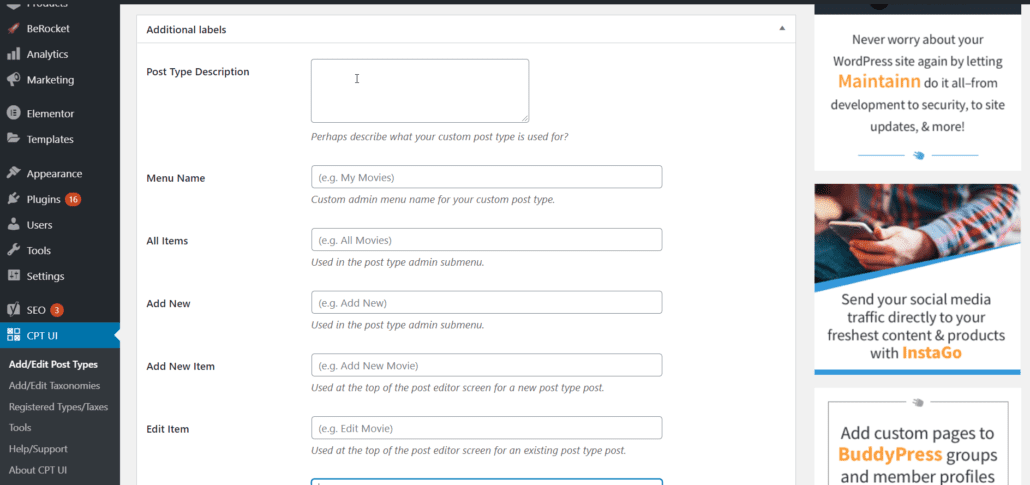
In this section, describe your post type and review the auto-populated labels.
Labels will be used throughout the WordPress user interface when you are managing content in that particular post type.
Next, scroll down to the ‘Settings’ section. This section allows you to set the features for your custom post.
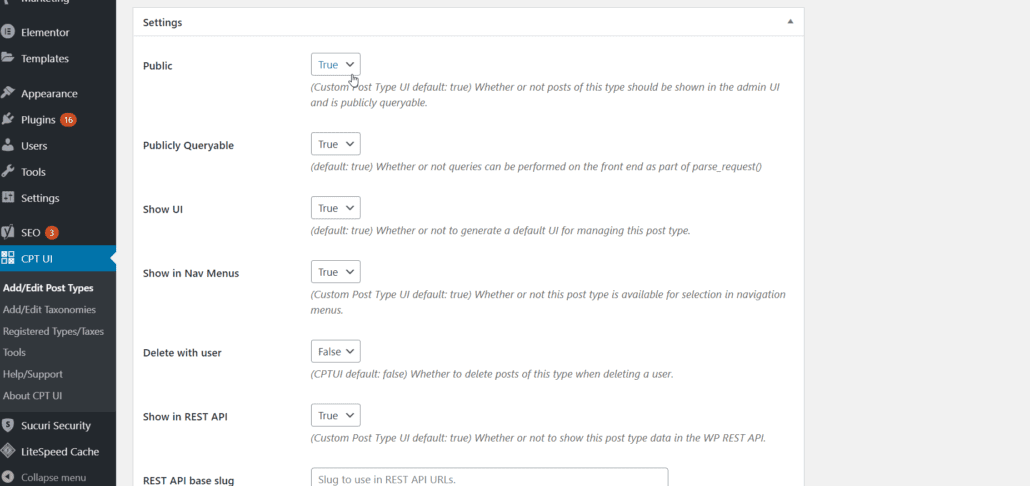
Each setting has a description to help you understand its purpose. So scroll through each option and set it as you deem fit.
Finally, hit the Add Post Type button to save your newly created WordPress post type.
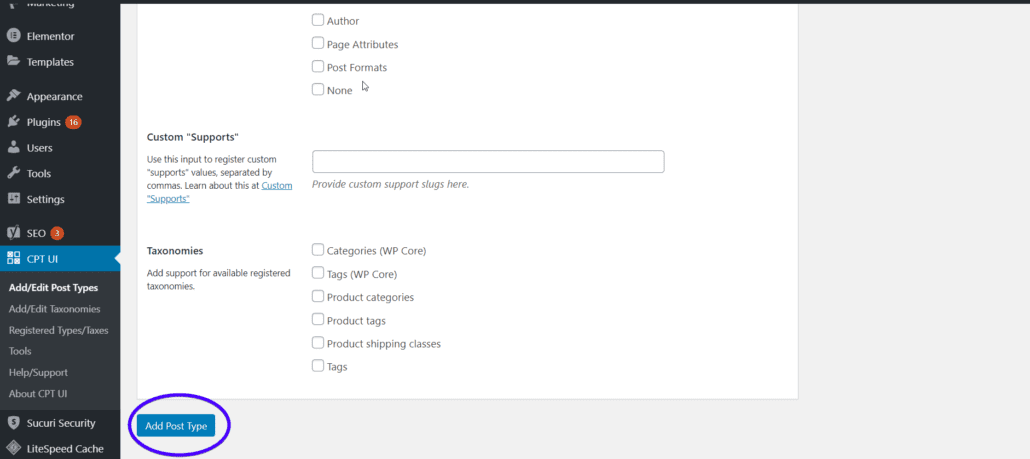
Note that your custom post type disappears when you uninstall the WP plugin and will no longer be accessible from the admin area.
Method 2: Register your own Custom Post Type
If you’re comfortable working with codes, then you can register your custom post type using the register_post_type() function.
You can put the code for the custom post type in your theme’s function.php file. However, you will lose the post type and all the posts you created when you uninstall or update the theme.
Additionally, a more efficient method is to put the code for a custom post type in a plugin.
So here are the steps:
Step 1: Create a Full Site Backup
We’re going to be playing safe. Firstly, do not make changes on your live site without having a full backup. This will help you restore your website in case you lose your content. Read this guide to learn how to create a full site backup.
You may also use a staging site as a safety measure.
A staging site is a replica of your WP site that lets you test code snippets, themes, plugins, and more without breaking your site.
A couple of WordPress hosts like Bluehost, Siteground offer built-in staging sites as part of their plan. However if your host does not provide this, you can install and activate the WP Staging site plugin.
Read our guide for more information on how to set up a WordPress staging site.
Step 2: Create a Plugin
If you have never created a plugin before, this can be your first. Firstly, you would need to connect to your server using FTP. After connecting, locate the folder containing your WP files and double click to open it.
Within this folder, open wp-content and then open the plugins folder. Here, create a new folder for the plugin. Creating a special folder for the plugin allows you to add more files to the plugin in the future.
Next, create a new PHP file within the folder. Any name is fine, just ensure that you use the .php extension. We’ll call ours ‘fixrunner-register-posttype.php’.
It’s time to set up our plugin information. To do that, add this opening comment in the new file:
<?php
/*
Plugin Name: WordPress Custom Post Types
Plugin URI: https://www.fixrunner.com/custom-post-type
Description: WP Plugin to register the movies post type
Version: 1.0
Author: Fixrunner
Author URI:https://www.fixrunner.com
Textdomain: fixrunner
License: GPLv2
*/
The above lines primarily give basic information about the plugin like the plugin name, URL, description, function, etc. Don’t forget to adjust the plugin information to suit your purpose.
Now your plugin is ready. You may even activate it now on your WP dashboard. However, since we haven’t created the function for our post type, the plugin does nothing.
Let’s go a step further.
Step 3: Creating A ‘Movies’ Post Type
To create a ‘movies’ post type, add the following lines below the plugin information:
// Register Custom Post Type
function custom_post_type() {
$labels = array(
'name' => _x( 'Movies', 'Post Type General Name' ),
'singular_name' => _x( 'Movie', 'Post Type Singular Name' ),
'menu_name' => __( 'Movies' ),
'parent_item_colon' => __( 'Parent Movie:' ),
'all_items' => __( 'All Movies' ),
'add_new_item' => __( 'Add New Movie' ),
'add_new' => __( 'Add New' ),
'new_item' => __( 'New Movie' ),
'edit_item' => __( 'Edit Movie' ),
'update_item' => __( 'Update Movie' ),
'view_item' => __( 'View Movie' ),
'view_items' => __( 'View Movies' ),
'search_items' => __( 'Search Movie' ),
'not_found' => __( 'Not found' ),
'not_found_in_trash' => __( 'Not found in Trash' ),
);
// Set other options for Custom Post Type
$args = array(
'label' => __( 'Movies' ),
'description' => __( 'Movie reviews' ),
'labels' => $labels,
'supports' => array( 'title', 'editor', 'excerpt', 'author', 'thumbnail', 'comments', 'revisions', 'custom-fields', ),
// You may associate this post type with a taxonomy or custom taxonomy.
'taxonomies' => array( 'genres' ),
'hierarchical' => false,
'public' => true,
'show_ui' => true,
'show_in_menu' => true,
'menu_position' => 4,
'show_in_admin_bar' => true,
'show_in_nav_menus' => true,
'can_export' => true,
'has_archive' => true,
'exclude_from_search' => false,
'publicly_queryable' => true,
'capability_type' => 'post',
);
register_post_type( 'post_type', $args );
}
add_action( 'init', 'custom_post_type', 0 );
Do not forget to replace ‘movies’ with your custom post type. Of course, this would also mean you replace other occurrences of this word in other labels.
What Each Label Does
Here is a brief rundown of what each label does for our CPT:
- ‘name’ – This is the general name for our custom post type.
- ‘singular_name’ – You may have guessed it. This is a singular name for our custom post type, such as ‘movie’ or ‘rating’
- ‘menu_name’ – This is the name that appears on the menu.
- ‘parent_item_colon’ – This is the parent item used in hierarchical post types.
- ‘add-new’ – This is the ‘add new’ text.
- ‘add_new_item’ – This is the ‘add new item’ text.
- ‘new_item’ – This is the ‘new item’ text. The default is “New Page” or “New Post”.
- ‘edit_item’ – This is the ‘edit item’ text. The default is ‘ Edit Page’ or Edit Post’.
- ‘view item’ – The default is View Page or View Post, and it is used to create a link to view the item
- ‘search_item’ – This is the ‘search items’ text. The default is ‘Search Pages’ or ‘Search Posts’
- ‘not-found’ – This is the ‘not found text’. The default is ‘No posts found’ or ‘No pages found’
- ‘not_found_in _trash’ – This is the ‘not found in trash’ text. It defaults to ‘No posts found in trash’ or ‘No pages found in trash’ when it isn’t declared.
Below the $labels array and before the ‘register_post_type’ line, we have the arguments that define the variable for our CPT.
What we Included in the Variables
Here is a quick rundown of what we have included in our variables.
- ‘labels’ – This ensures all of the labels are included.
- ‘supports’ – This defines the features you want your post type to support.
- ‘hierarchical’ – If this is set as true, your CPT will behave like a page with parent-child items.
- ‘public’ – If you set this to ‘true’, your post type will appear in search results and custom queries. The default is ‘false’
- ‘show_ui’ – This is what determines whether to generate a default UI for your CPT in the admin.
- ‘menu_position’ – This is the position your CPT appears in the menu
- ‘publicly_queryable’ – This is what determines whether queries will be done on the front-end as part of parse_request().
After adding this code, save your file. Subsequently, you will be prompted to upload the new file by your FTP client, hit Yes.
Now on your WP dashboard, go to Plugins >> Installed Plugins. Locate the plugin you just created and click Activate.
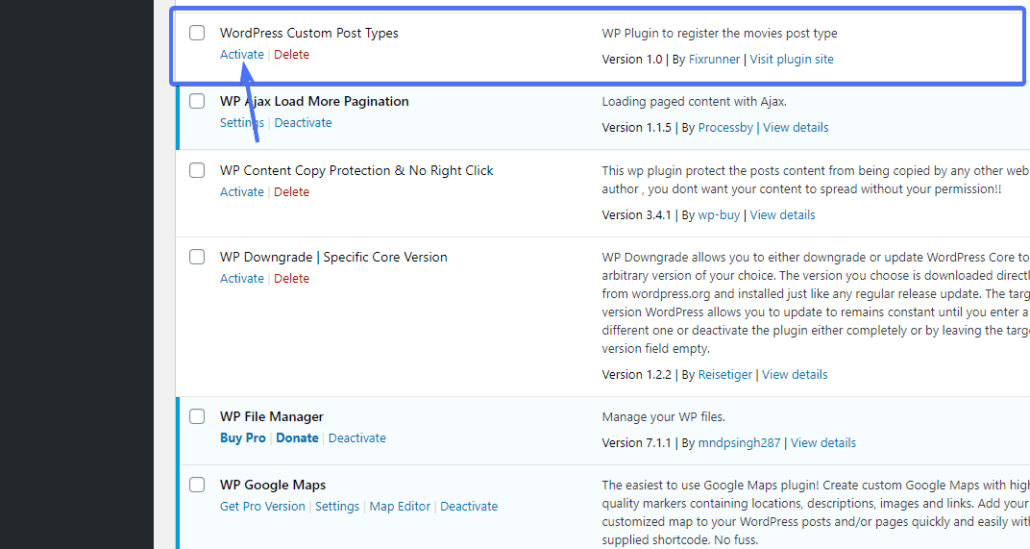
If you have done things right, you should see your new custom post type on your dashboard menu as seen in the screenshot below.
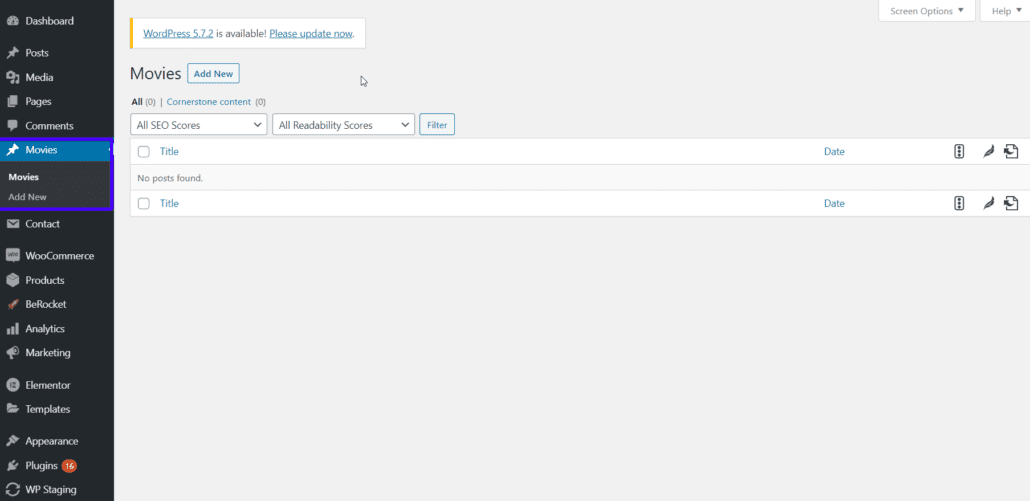
Congratulations! You have created and registered a WordPress custom post type. Now, take some time to add some posts to it. In the next section, we’ll see how to display the custom posts on the front-end.
Displaying Custom Post Type on Your WordPress Site
To display your new post type, go to Appearance » Menus and create a custom link. This will be the link to your custom post type.
It may look like this:
http://domainname.com/movies
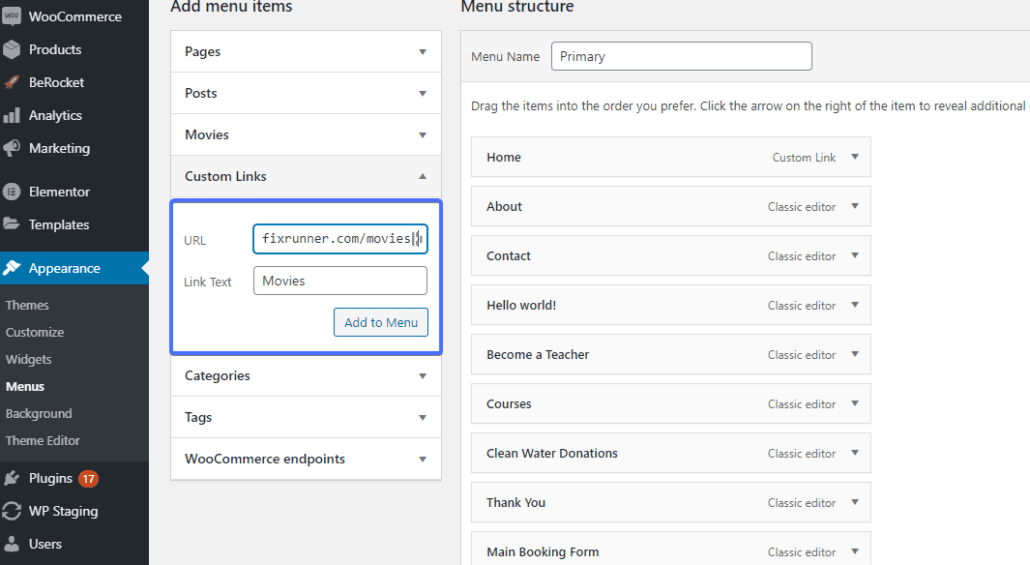
Replace ‘domainname’ with the name of your website and movies with your own custom post type name.
Finally, save your menu and then visit the front-end of your website.
Conclusion
To sum up, WordPress custom post types help to transform WordPress from being a mere blogging platform to a full Content Management System. They let you create any kind of website – from a simple media site to a complex eCommerce store.
We already discussed 2 ways of adding custom post types to your website. You can use a plugin like the custom post type UI plugin. Likewise, you can create your own plugin and use the register_post_type() function to register the WordPress post type. For more helpful articles, please go through our blog.


