Complete WordPress Multisite Network Guide
If you are looking to have several WordPress sites or blogs under one WordPress installation, WordPress Multisite is your answer. This is much different from a standalone site where you have just one website or blog in one installation. In this guide, you’ll learn all you need to know about WordPress Multisite setup, subdomains, domain mappings, etc.
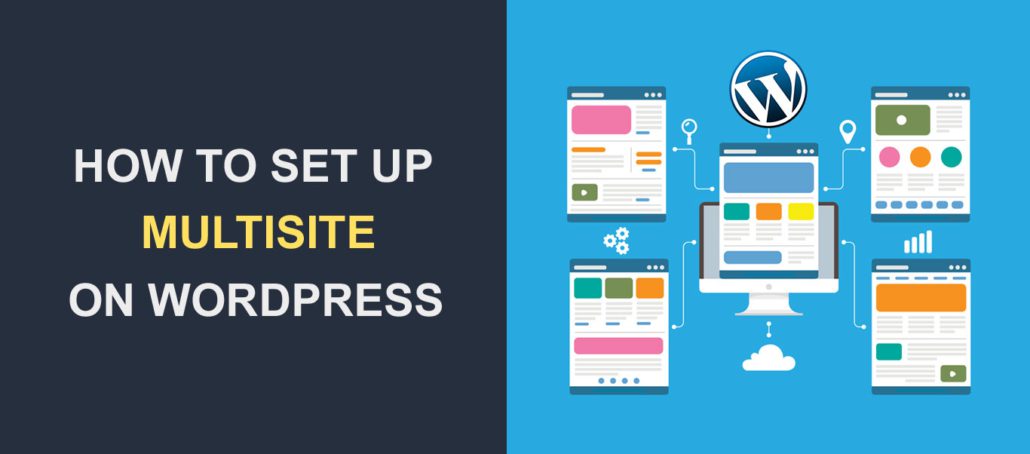
Not only can WordPress Multisite make managing multiple sites easier, but it can also be a cost-effective solution for businesses and organizations that need to create multiple websites. With shared themes and plugins, centralized user management, and the ability to assign different user roles and permissions for each site, WordPress Multisite can save you time and resources while providing a seamless user experience for your audience.
WordPress Multisite feature lets you manage multiple websites all in one dashboard in addition to hosting them at once. Collectively, all the sites you can have in one installation is referred to as a network of sites. We are going to be using this term a lot in this article.
Note that setting up a Multisite is the same as setting up a typical standalone website. So, there is nothing too difficult about it.
In this guide:
What is WordPress Multisite?
In simple terms, WordPress Multisite, like we earlier said, is a network of blogs/websites that run on one single WordPress installations. All those websites on the network share the same domain and server resources. Each site is assigned to a subdomain or subdirectory.
The multisite feature was added to WordPress in 2010 when version 3.0 was released. The idea behind it is to let web owners that run several sites manage their websites easily, from one dashboard.
There is no limit to the number of websites you can have in a multisite network. And with one password and username, you can access them all. WordPress.com, a typical multisite, has over 30 million sites in its network.
To manage a WordPress Multisite, there has to be a super admin and a network admin. The super admin oversees the operation of the WordPress multisite network. He also determines themes and plugins to use and assigns roles. The network admin controls the activities on an individual site. We have created a tutorial for creating WordPress user roles. Do well to check it out if you don’t know how to create and assign roles yet.
When Do You Need WordPress Multisite Network Setup?
Not everybody needs a Multisite. A Multisite network will be needful if you:
-
- Intend to manage multiple WordPress blogs, with each blog hosted on a different subdomain.
- Run a company or organization split into different departments, spread across different locations and languages. An example is BBC blogs. BBC delivers its content in different languages and serves different regions.
- Operate a subscription-based business where subscribers can create their own website within the network. WordPress.Com is a good example.
Times When You Don’t Need a Multisite
WordPress Multisite feature won’t be useful if you:
-
- Plan to run one site, or a couple on different domains.
- Are creating several websites, but for different clients.
- Intend installing different themes and plugins on the sites under your management.
Pros and Cons of WordPress Multisite
Pros
-
- Saves time, thus increasing efficiency.
- Makes it easy for you to focus on the core of your business while delegating management responsibilities to others.
- All the websites in your network can be accessed in one dashboard.
Cons
-
- A Multisite is prone to a security breach. Should a hacker gain access to just one site, the rest would go down.
- Prone to heavy downtime. If a site in the network goes down the rest would follow suit.
- Not all web hosts support Multiple Sites. So if yours doesn’t support it, you have a problem there.
- Multisite installation is not supported by some WordPress plugins.
With all that said, let’s get into the core of this article: how to set up WordPress Multisite.
Note that if you want to skip the hassle of setting up multisite, you can have our developers do it for you. Simply request our service and one of our developers will get to work on it immediately.
WordPress Multisite Setup – Steps
Here are the steps involved in setting up WordPress Multisite.
Step #1: Decide your network structure
There are two options like we had earlier outlined, for setting up a Multisite. One is sub-domain, and the other is sub-directory.
A sub-domain looks something like this:
SiteA here stands for one of the individual sites in the network. Mywebsite.com is the core domain.
A subdirectory looks something like this:
Whatever option you go for, the step for setting up a Multisite is the same. Only that if you opt for a sub-domain, you will need to first set up what is known as a wildcard. We will see how to do that shortly.
Note: Sub-directory only works well for a fresh WordPress installation. Should you try it on an existent blog, you will run into problems. So, it’s recommended you go with sub-domain as against subdirectory in such a situation.
Setting up Wildcard Subdomain
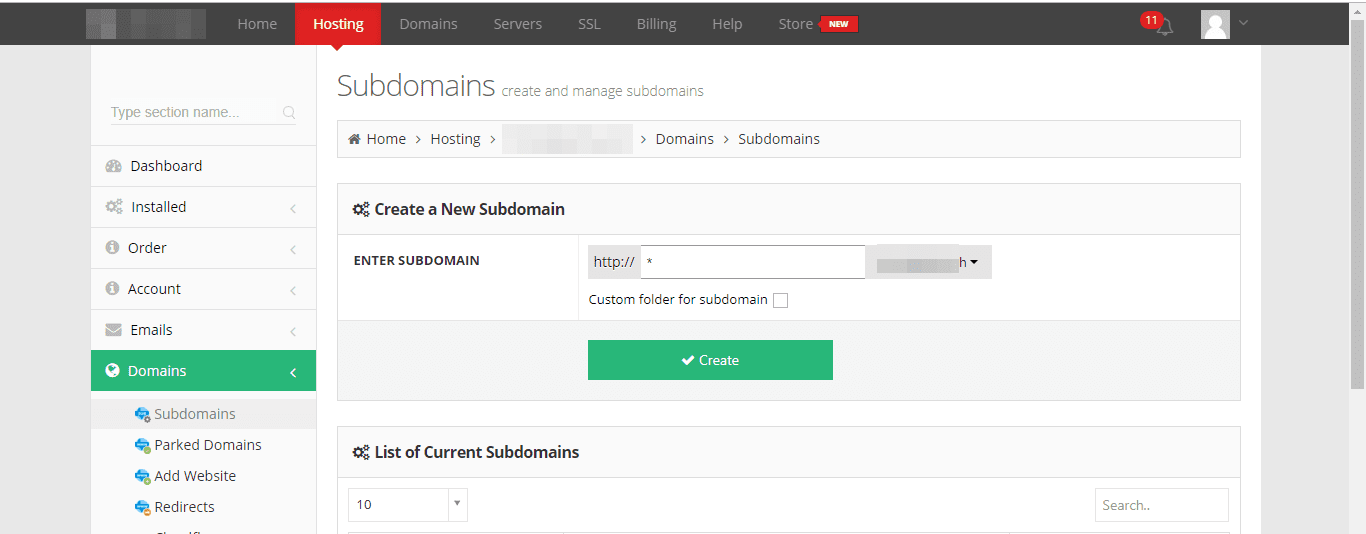
To do this, log into your cPanel, navigate to subdomains. In the subdomain field, type in “*”, and then choose the main domain for the setup.
Next, click Create.
Note: First, not all interfaces are the same. The hosting company interface might be different from the one above. If you can’t locate the subdomain tab, reach out to your host.
Second, not all hosts support wildcard. If yours doesn’t support it, also reach out and ask for help.
Step #2 Download and Install WordPress
This step is pretty forward. You just have to download and install WordPress in the same way you do for a standalone website.
Step #3 Activate Multisite on the New Installation
With WordPress installed and activated, activate the Multisite feature. To do this, you need to access WordPress ‘wp-config.php’ file and add a simple line of code.
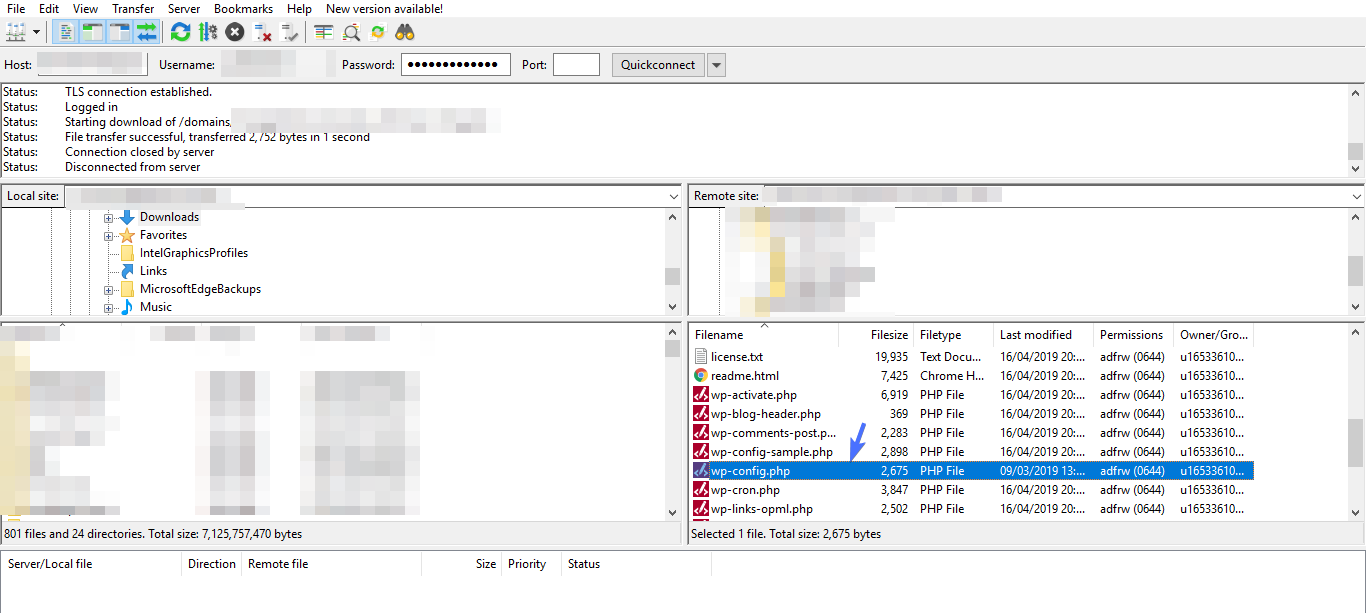
To do this, access your site via an FTP client like Filezilla. Next, locate the folder within which you installed WordPress, and in this folder, scan to find your wp-config file.
Right-click on the file, then click View/Edit. Next, add the following line of code:
define( ‘WP_ALLOW_MULTISITE’, true );
Ensure you paste it just before the line of code that reads:
/* That’s all, stop editing! Happy blogging. */
Now save, close, and allow FileZilla to upload the new file with changes. However, keep FileZilla open as you would be adding more code to this file.
Step #4 Deactivate all Plugins
To avoid technical problems, deactivate all active plugins on your website before activating Multisite. This documentation by WordPress explains why deactivating all plugins is needful.
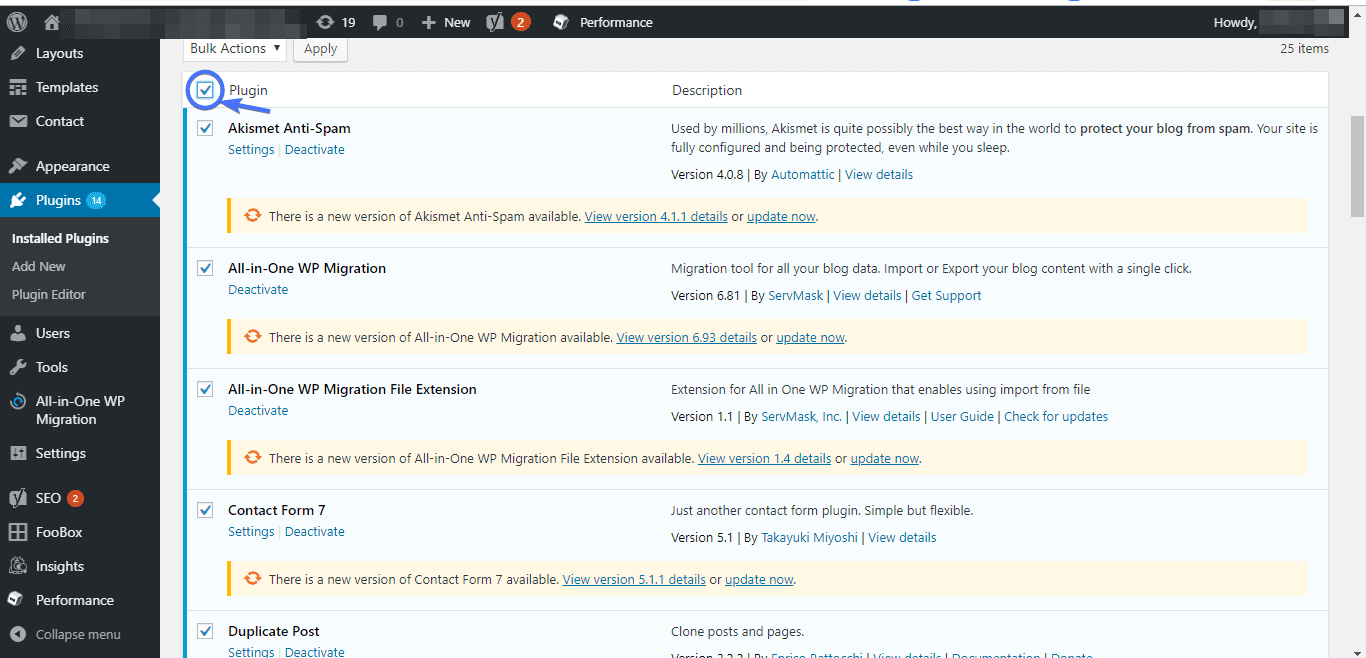
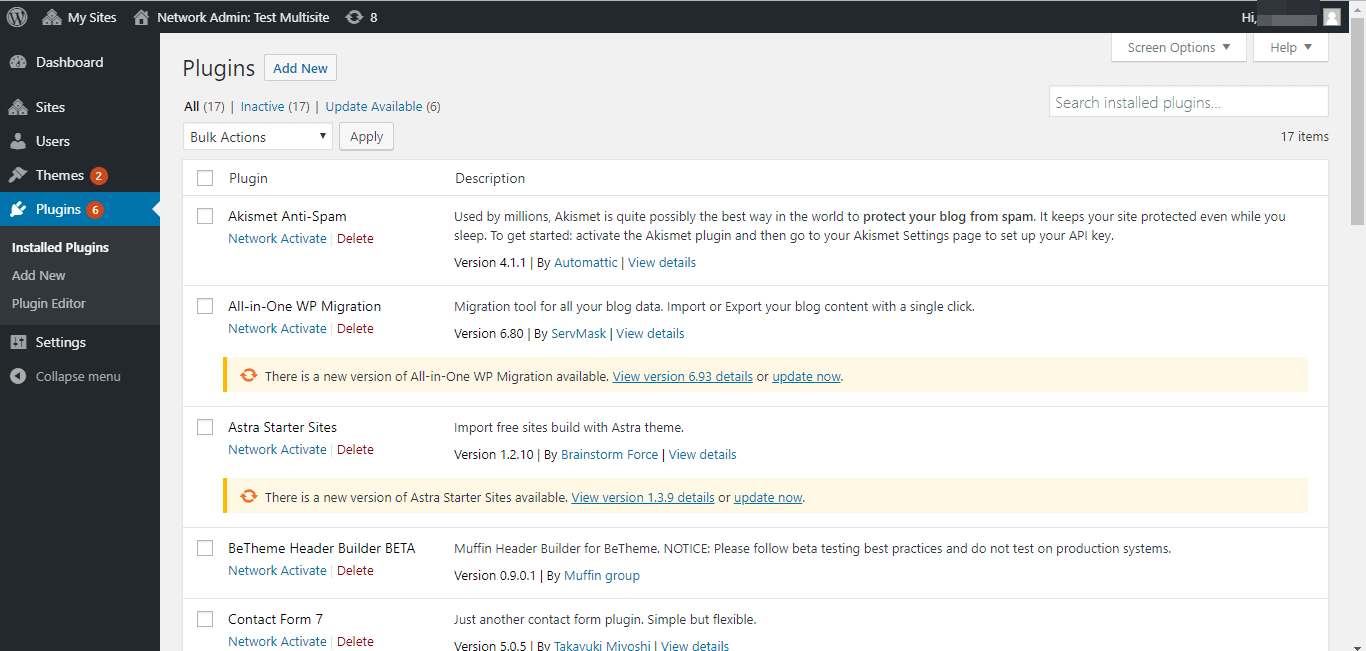
To deactivate all plugins, log into your WordPress dashboard, go to Plugins >> Installed Plugins.
Next, tick the first checkbox. Doing this will select all installed plugins.
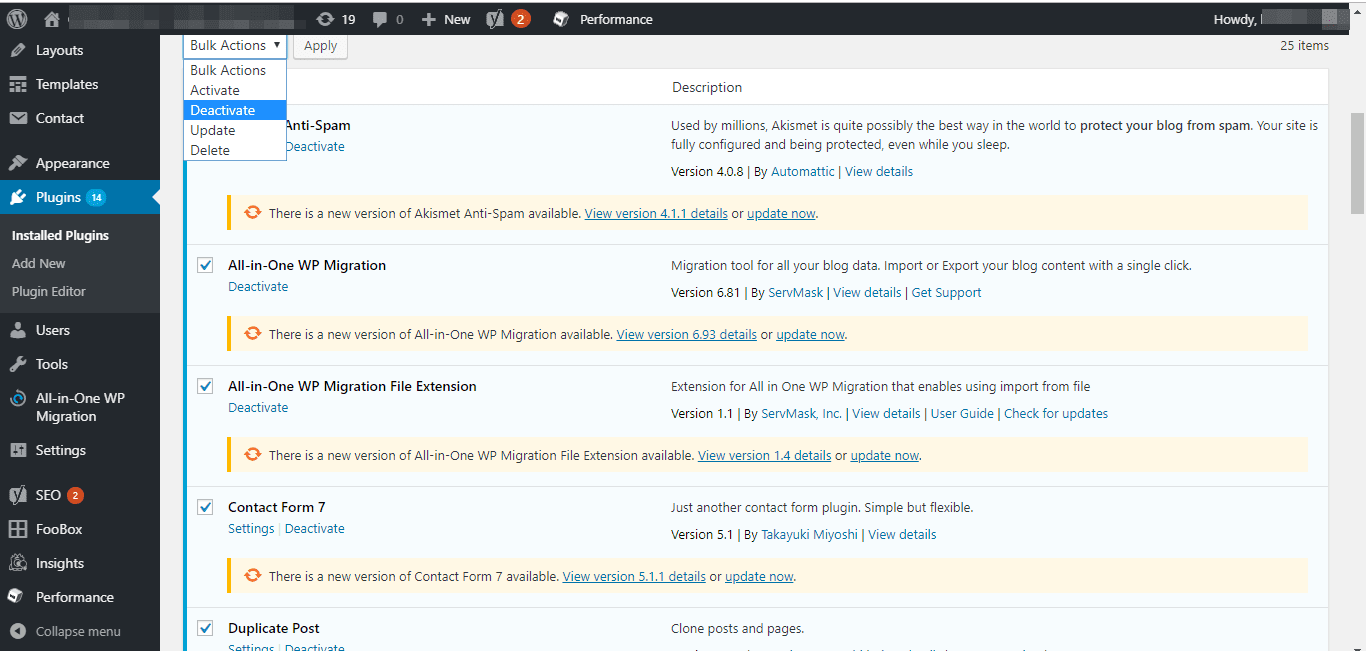
Just above the checkbox, you will see a dropdown box with “Bulk Actions”. Click it and select Deactivate.
Finally, click the Apply button.
Step #5: Configure the Multisite Network
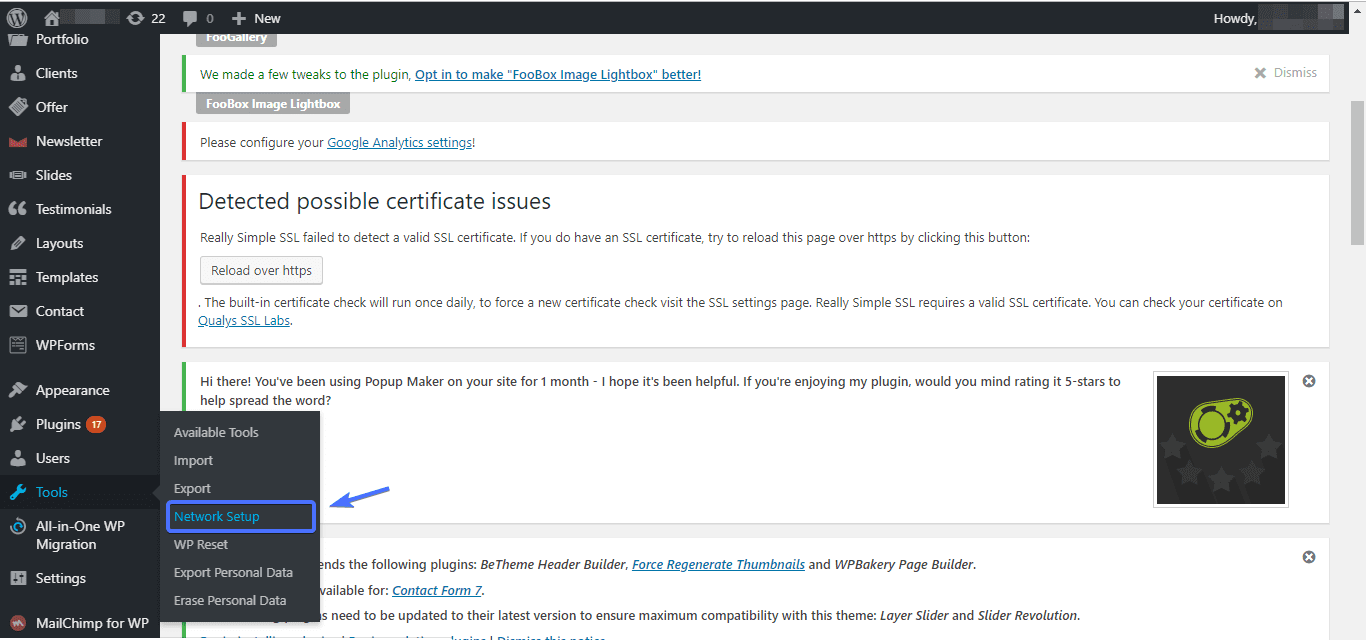
Navigate to Tools >> Network Setup.
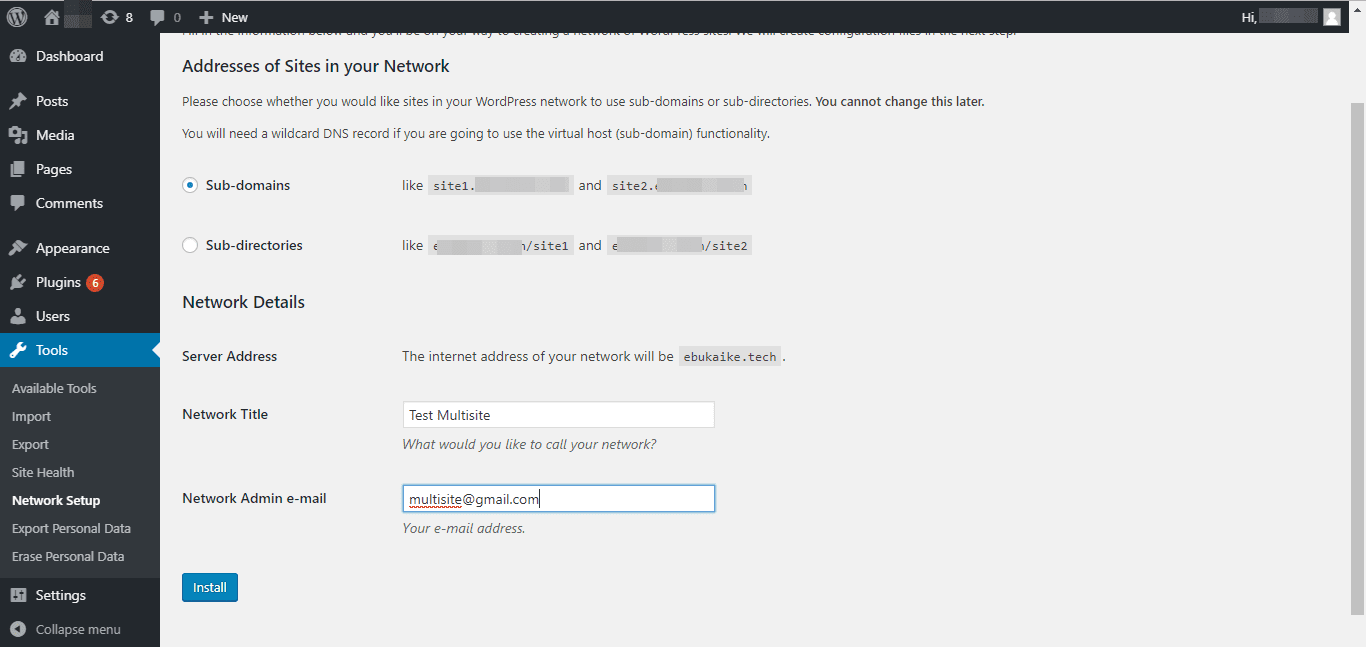
On the next screen, choose between a subdomain and subdirectory architecture. Set a title for your network, and set the Network Admin email. Click Install.
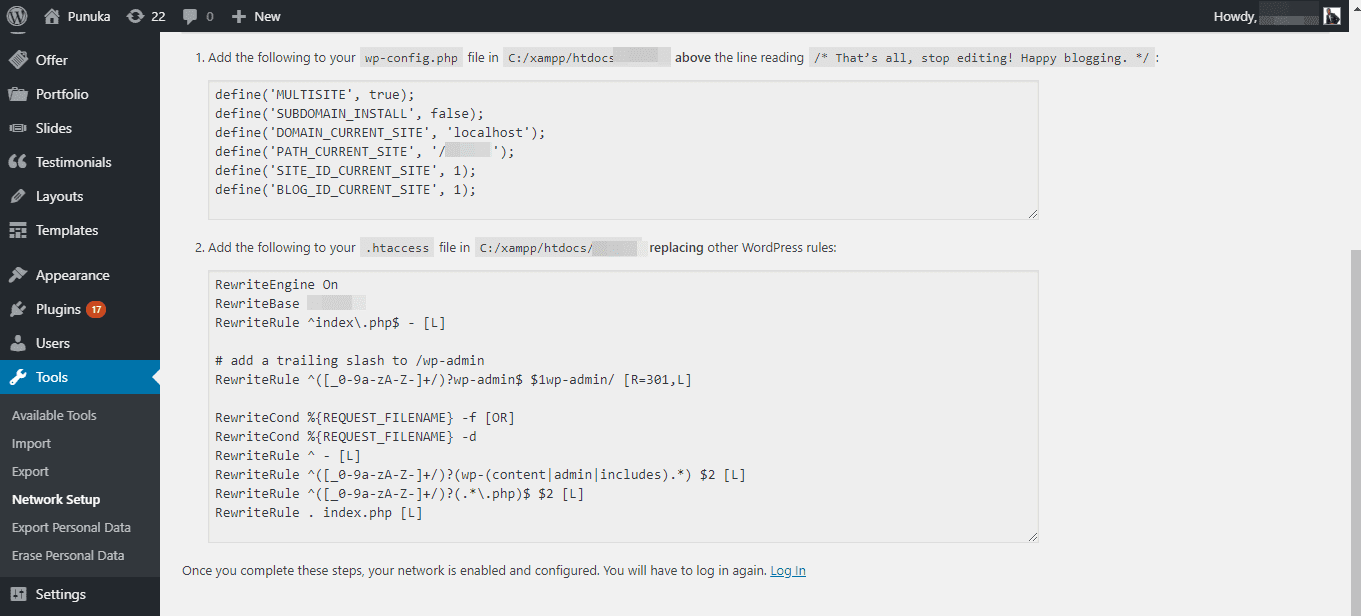
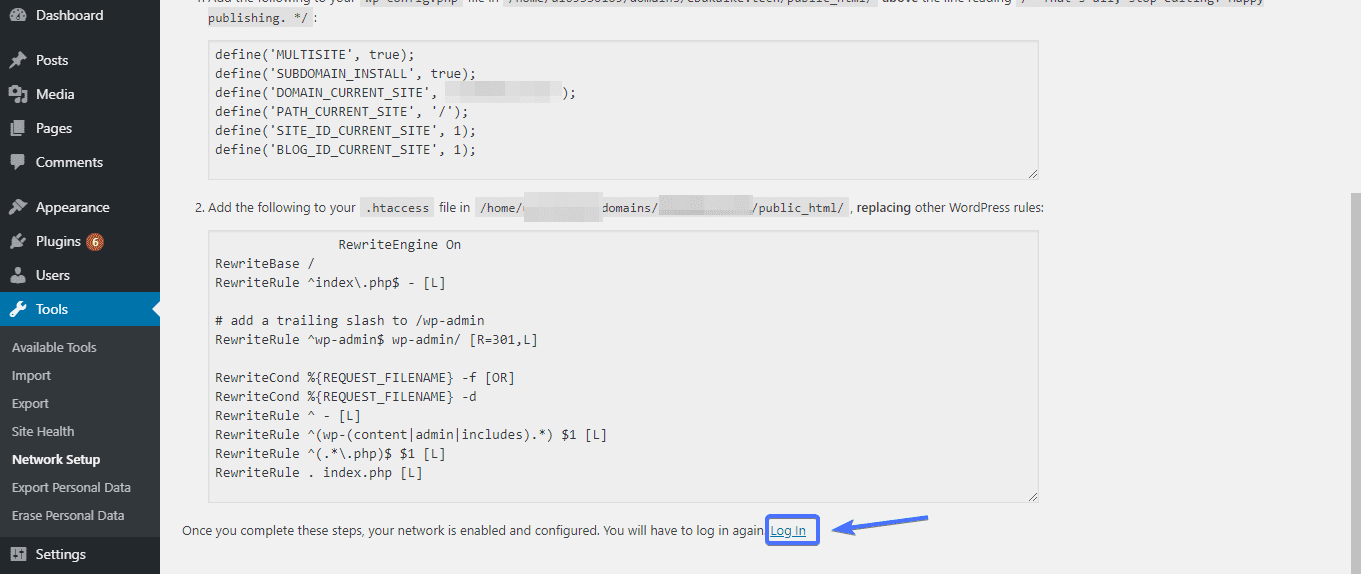
After the installation has completed, you will see the following line of code right in your dashboard.
Copy the first block of code (block 1), to the wp-config file. Ensure the code is pasted above the commented line that reads:
/* That’s all, stop editing! Happy blogging. */
Save the file and close.
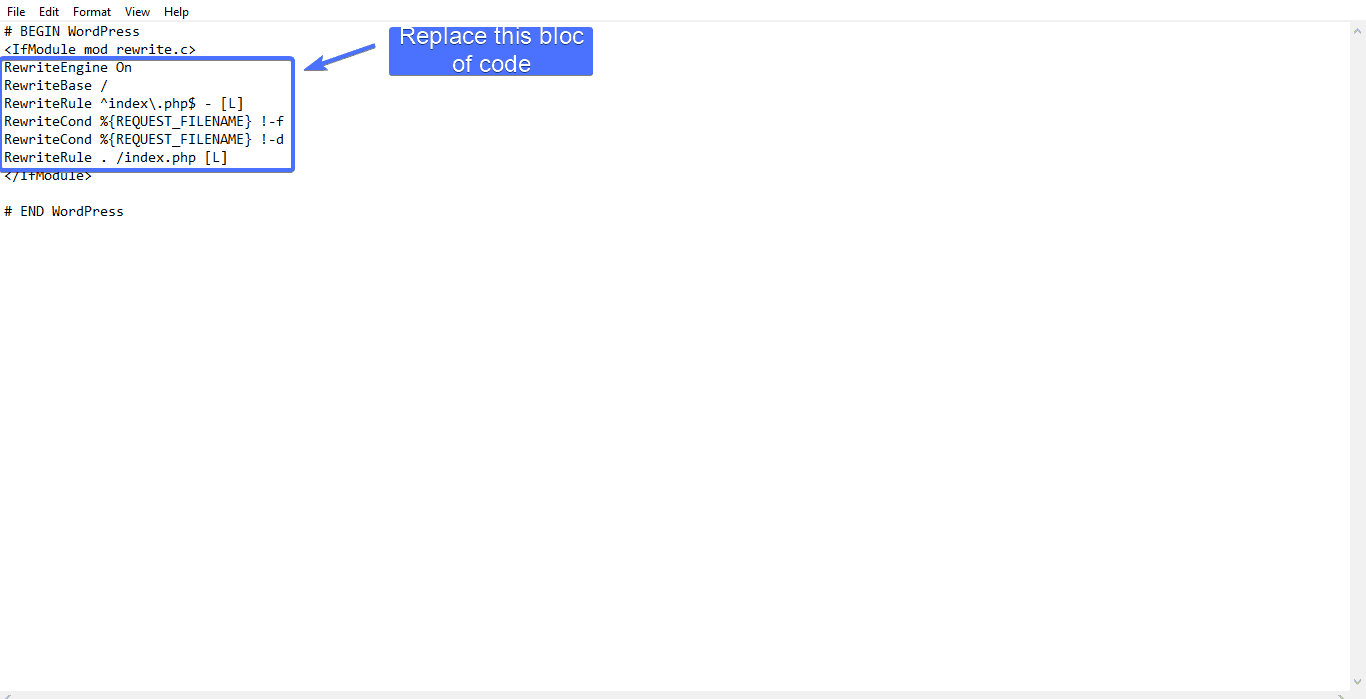
Next, copy the second block of code (block 2) to the .htaccess file. To access the .htaccess file, follow the same step we had initially discussed for wp-config file. Of course, you need FileZilla or any other FTP client of your choice. Replace this block of code in the .htaccess file with the one you copied.
Next, save and close this file. When prompted by FileZilla to upload, click “Yes”
Finally, click on the Log In link just beneath the second block.
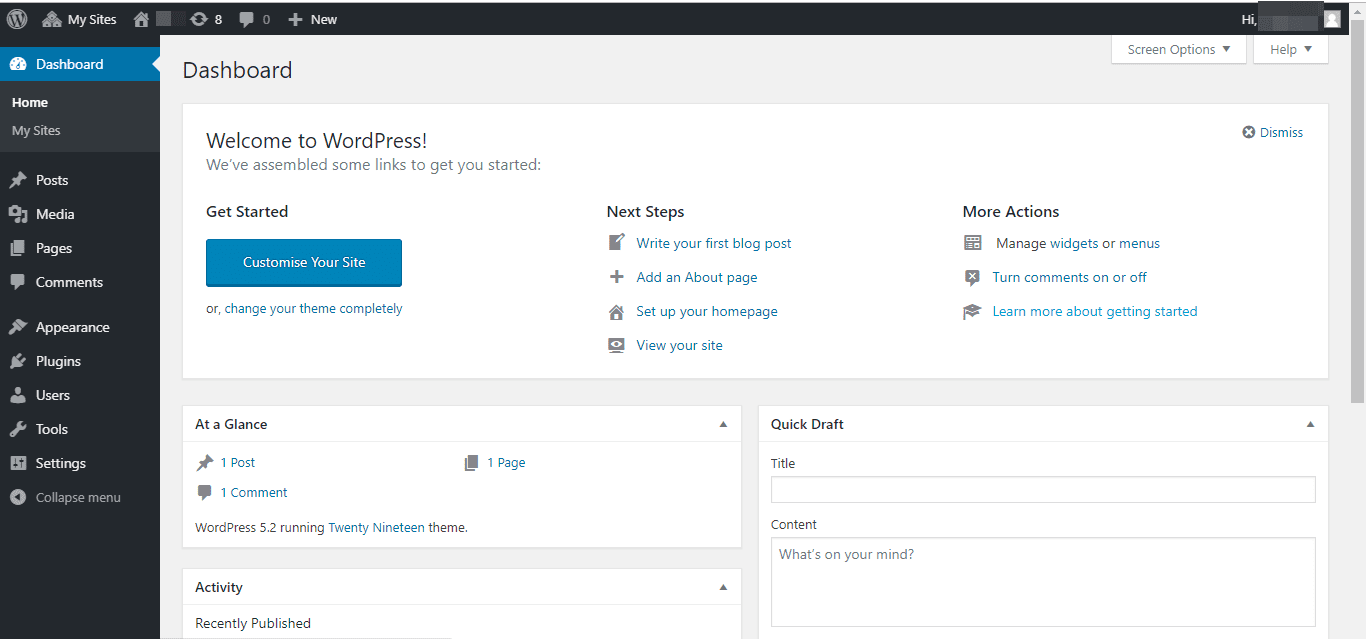
If you followed all the outlined steps so far, you would have successfully set up your Multisite. Your new dashboard should look something like this:
The next step now is to complete the Multisite you’ve just set up.
How to Complete WordPress Multisite Network Setup
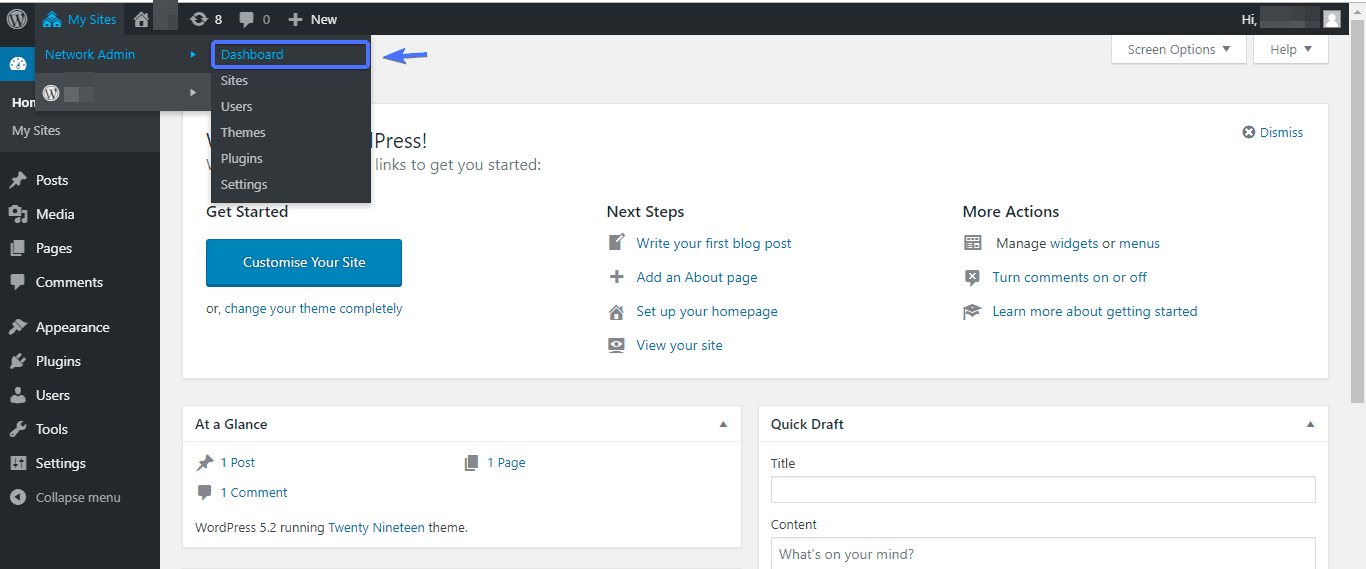
To add a new site, change themes, or install plugins for your network site, you need to visit the Multisite dashboard. To do this, hover above the My Sites link at the top of the dashboard. Next, select Network admin >> Dashboard.
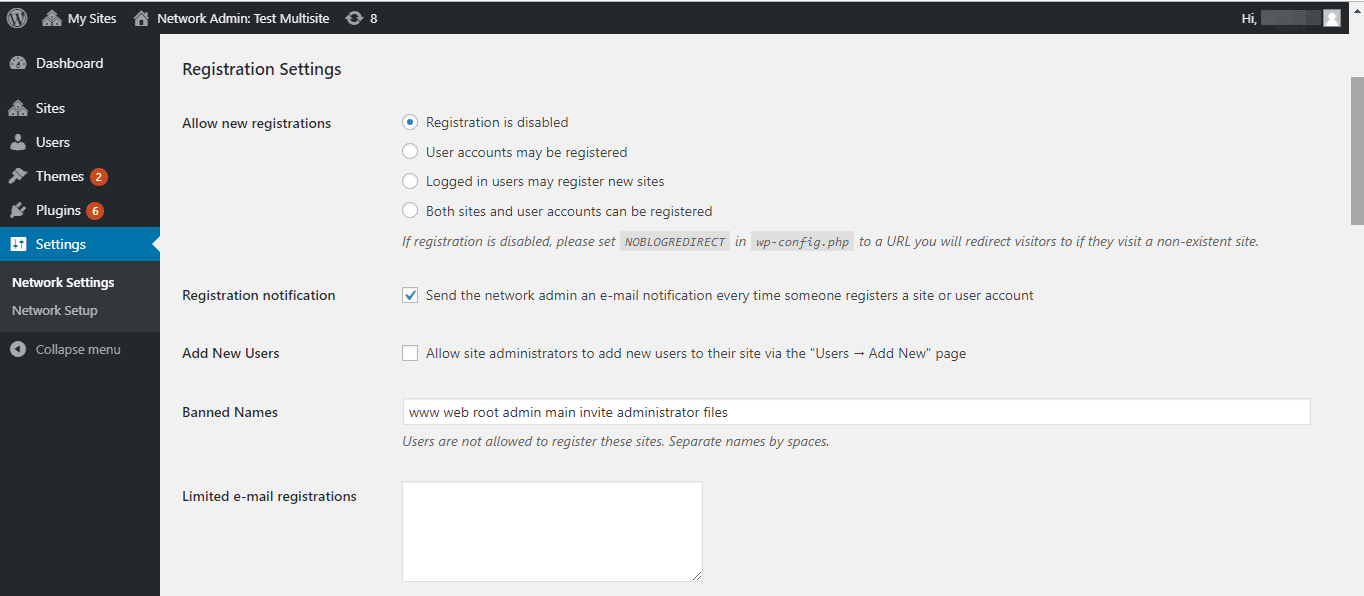
From the Multisite dashboard, you can alter the settings of your sites. To do this, navigate to Settings >> Network Settings
What you would see next is this:
From here, you can set the following settings:
- Registration Settings: Determine if subscribers can create sites in the network or not. You also get to determine how admins grant access to new users.
- New site setting: Here, you get to set a custom welcome message for new users and website owners on your network.
- Upload setting: Set limit to the maximum file size admins within your network can upload. You can also determine the allowable file type.
- Language setting: Choose the default language your Multisite would be operated in.
- Menu Settings: If you want admins to work with their preferred plugin, check the checkbox. Else, leave it unchecked.
Adding New Sites to Your Network
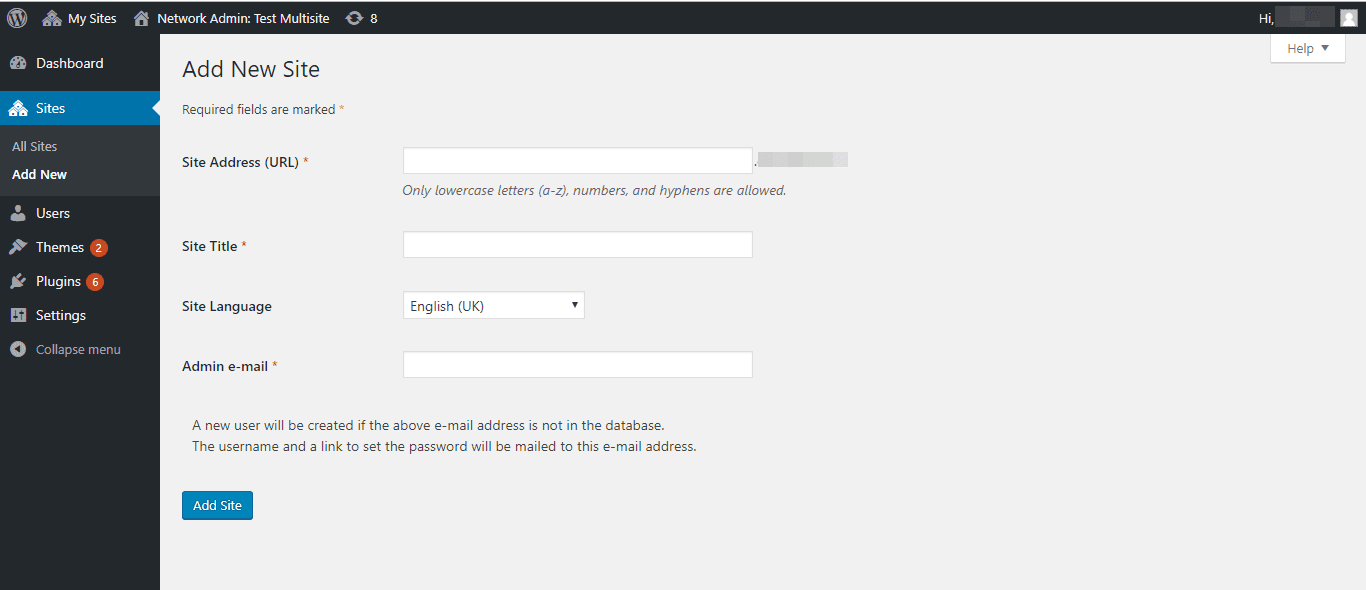
Once you are done tweaking the settings of your new Multisite, you are ready to add new sites to it. To begin with, head over to My Sites >> Network Setup >> Sites. Click the Create a New Site link. What you would see next is this:
Set the new site’s URL (e.g. siteA.mywebsite.com), choose a site title and Admin email. Click the Add Site button.
Adding Themes and Plugins
WordPress automatically assigns the Super Admin role to whoever installs WordPress first. As the Super Admin, it’s in your power to determine the plugins and themes to be used on the Multisite.
To add a theme, navigate to My Sites >> Network Admin >> Themes. Themes are installed in the same way as they are installed in conventional standalone sites.
Follow the same step as above for adding a theme to add a new plugin.
Do bear in mind, however, that the plugins you had earlier deactivated before setting up the Multisite will still be available. Choose the ones you wish to keep and activate them.
Managing Updates
WordPress never stops updating, and it doesn’t matter if you run a single blog or multisite. Updates can be done just at the click of the button whenever it’s available. Any update you make will automatically spread through all other sites in your network.
Adding Users
You add users in a Multisite, just the same way you would for a standalone website. In your Multisite dashboard, go to Users >> Add New. To assign roles to users, click All Users.
Set a username for the user, then type in their email. To access all users on your Multisite, click All Users. From here you can set a profile picture for the user, create a bio for them, and determine which user gets super admin privileges.
WordPress MultiSite – Domain Site Mapping
WordPress Multisite Domain Mapping comes to play when you want all the subsites to use a custom domain of their own. For instance, if you need subsite3.networkdomain.com to appear as domain.com, you’ll need to do a domain mapping.
This way you can reap the benefits of WordPress multisite without your visitors knowing it is a subsite. Before WordPress 4.5, multisite domain mapping required a plugin. Things changed with the WP 4.5 version. It is now a native feature.
Before you do WordPress domain mapping, ensure you have set up the multisite network correctly. Also, make sure that subsites can be created without problems.
Here’s how to do a WordPress Multisite domain mapping.
- Open your WordPress dashboard and go to Sites >> All Sites.
- Click “Edit” beneath the subsite.
- In the space provided for “Site Address (URL)”, delete the existing subsite domain and enter your live subsite domain.
- Do this for all other subsites.
Frequently Asked Questions
What is WordPress Multisite?
WordPress Multisite is a feature of WordPress that allows you to create a network of multiple websites, all under one WordPress installation. With Multisite, you can manage multiple sites from a single dashboard, share themes and plugins across sites, and assign user roles and permissions for each site.
How do I set up WordPress Multisite?
To set up WordPress Multisite, you’ll need to edit your wp-config.php and .htaccess files, and then activate Multisite in your WordPress installation. It’s important to note that Multisite can only be activated on a fresh WordPress installation or on a site without any existing content.
Can I use different themes and plugins for each site in WordPress Multisite?
Yes, you can use different themes and plugins for each site in WordPress Multisite. Each site can have its own set of themes and plugins, or you can network activate themes and plugins so they’re available across all sites.
Can I add new sites to my WordPress Multisite network after I’ve already set it up?
Yes, you can add new sites to your WordPress Multisite network at any time. Simply navigate to the “Sites” section of your network dashboard and click the “Add New” button.
How do I manage user roles and permissions in WordPress Multisite?
In WordPress Multisite, you can assign user roles and permissions for each individual site in your network. You can also assign global roles and permissions that apply to all sites in the network. To manage user roles and permissions, navigate to the “Users” section of your network dashboard.
What are the advantages of using WordPress Multisite?
Some of the advantages of using WordPress Multisite include easier management of multiple sites, shared themes and plugins, and centralized user management. Multisite can also be a cost-effective solution for organizations that need to create multiple websites.
What are the disadvantages of using WordPress Multisite?
Some of the disadvantages of using WordPress Multisite include the potential for security issues if one site is compromised, difficulty with individual site customization, and the need for more powerful hosting to support multiple sites. It’s also important to note that not all plugins and themes are compatible with Multisite.
WordPress Multisite – Conclusion
WordPress Multisite feature, as you have seen in this article, is the go-to solution for managing several websites at a time. To make effective use of this feature, you need to understand how WordPress user roles work. Not to worry, we have covered the WordPress user roles.
The performance of your Multisite setup will depend on how good your WordPress hosting is. If the bandwidth is limited, you might experience frequent downtimes. So ensure you go with a hosting provider that offers good value for money.
Setting up a Multisite is quite easy and simple – you just have to follow, meticulously, all the steps outlined here. However, if you are still not sure how to do this get professional WordPress help from our team.
At FixRunner, we believe in providing high-quality, reliable WordPress support and maintenance, and our expertise in WordPress Multisite is no exception. Whether you’re new to WordPress Multisite or you’re looking to improve an existing network, our team is here to help you achieve your goals and ensure the success of your website.
If you found this article helpful, do share.
More Resources:
- Err_ssl_version_or_cipher_mismatch Error and how to fix it
- How to Add Expires Headers in WordPress
- How To Fix Err_Too_Many_Redirects Error In WordPress

