How To Disable WordPress Plugins Using FTP
Are you trying to disable WordPress plugins on your site? If this is because you are facing an error, and you suspect they may be the cause, then you likely have no access to your admin panel at this point. In this case, you would need to disable WordPress plugins using FTP. You can also check our guide on how to disable WordPress theme using FTP.
Without access to your admin panel, this offers you an easy workaround. You can manually disable WordPress plugins by accessing your files, and if indeed one of the plugins is the cause of your issue, that would restore your site to full function.
Table of contents:
- How an FTP Client Works
- Safety Precautions and Backups
- Steps to disable WordPress Plugins using FTP
- How to Disable A Single WordPress Plugin Using FTP
- Alternative Methods for Disabling Plugins
- Troubleshooting and Identifying Problematic Plugins
- Conclusion
How an FTP Client Works
To disable WordPress plugins without access to your admin panel, you would need to be able to access your WordPress site files. That is where FTP comes in.
Using an FTP client, you can access all files in your server and make needed changes. To do this, you would need your cPanel login and password and you may need to contact your Webhost for these details if you do not already have them.
When you have them, follow the steps in this guide to see how to access your site files using FileZilla FTP client.
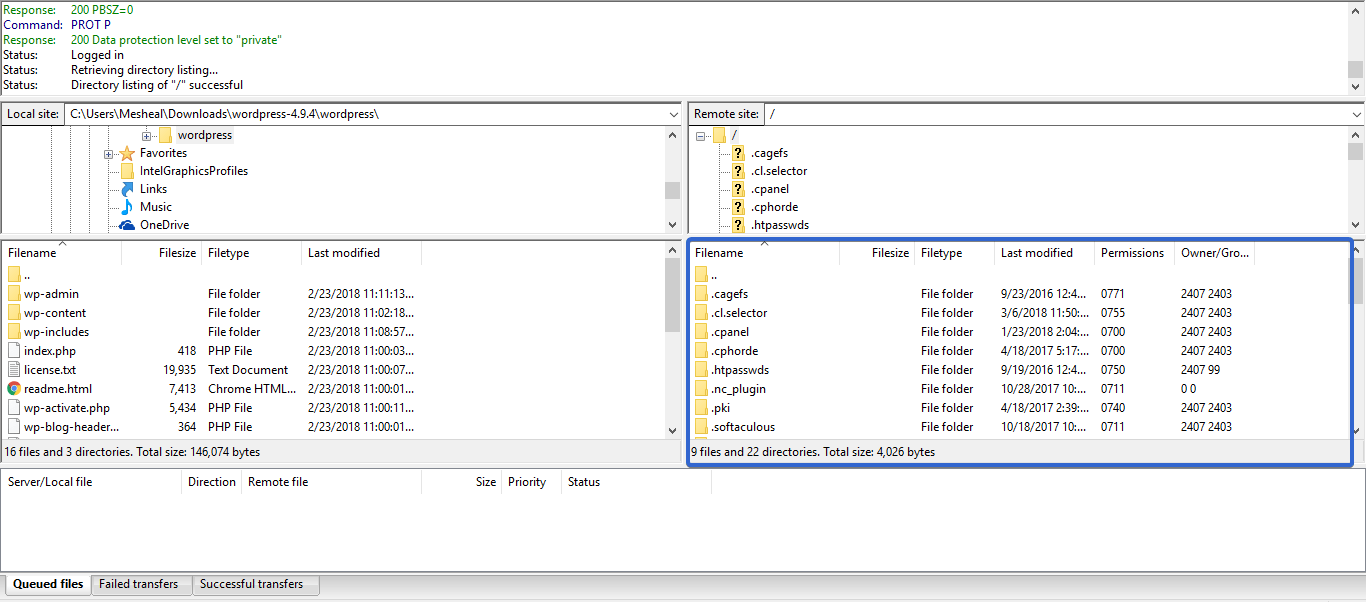
After successfully accessing your site using FileZilla, your site files will be displayed on the bottom right as seen in the picture below.
Safety Precautions and Backups
Before delving into the technical steps of disabling WordPress plugins using FTP, it’s crucial to address an often-overlooked aspect of website management. Those are safety precautions and the importance of backups.
Ensuring the safety and integrity of your website should always be a top priority, especially when making significant changes that could potentially affect its functionality.
The Importance of Backups
Backups serve as a safety net for your website. They ensure that, in the event of an error or an unintended consequence arising from changes you make, you can restore your site to its previous state without losing valuable data or content.
This peace of mind is invaluable, especially for business websites or those with significant traffic, where downtime or data loss can have real-world implications.
Before proceeding with any plugin deactivation, especially through methods that bypass the WordPress admin dashboard, creating a complete backup of your website is a wise step. This includes your website’s database, WordPress files, themes, and plugins.
Various plugins and tools are available to facilitate this process, from manual methods to automated solutions that schedule regular backups without your intervention.
Implementing Backups
While the thought of implementing backups might seem daunting, especially for non-technical users, it has been made relatively straightforward thanks to a plethora of WordPress backup solutions available.
Options range from plugins like UpdraftPlus and BackupBuddy to hosting services that offer built-in backup solutions. Choosing a method that suits your technical comfort level and the specific needs of your website is essential.
Steps to disable WordPress Plugins using FTP
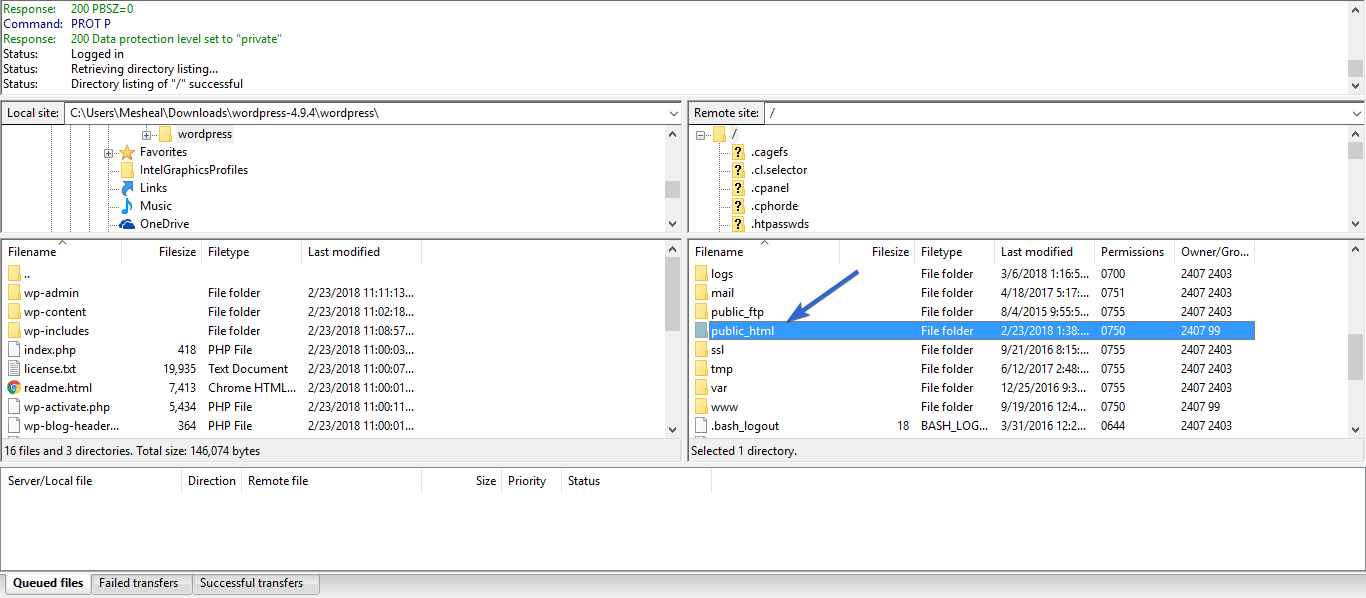
Now, you need to locate the folder containing your WordPress files. This folder is usually pubic_html when your WordPress site is located in your main domain (i.e. www.yourdomain.com). However, if your site is located in a subdomain (e.g. blog.yourdomain.com), then you should see a folder named after your subdomain, which would contain your file.
Double click on the folder containing your files to open it.
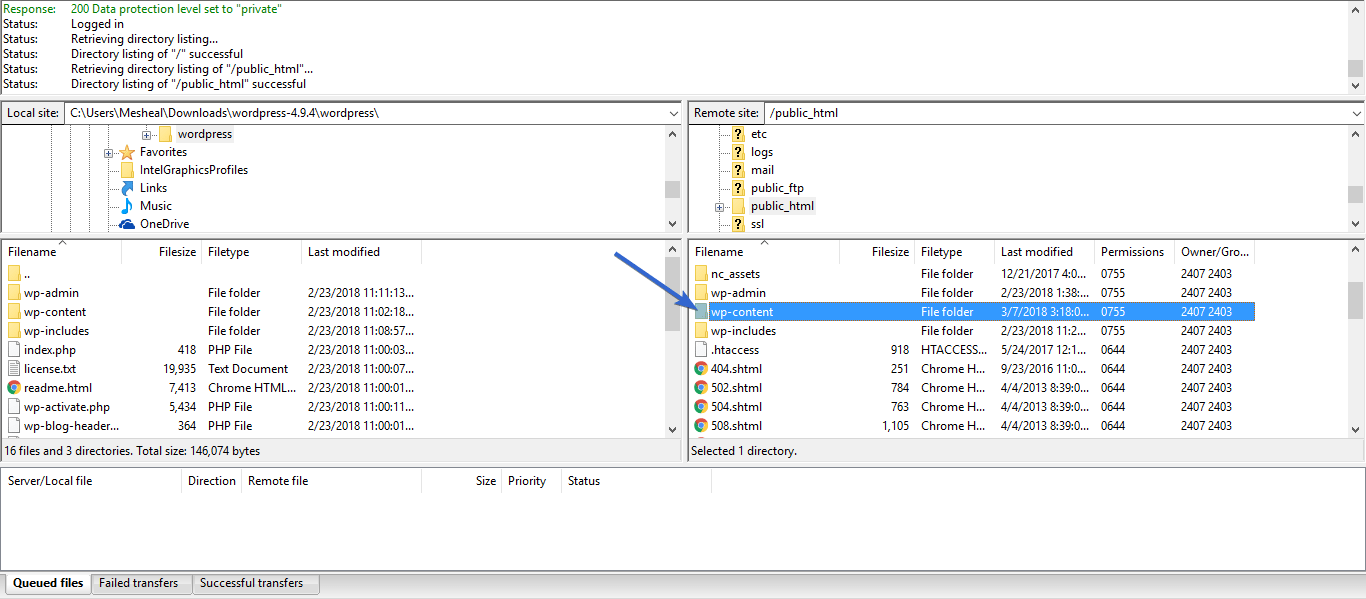
Next, to successfully disable WordPress plugins using FTP, locate the wp_content folder and double-click to open it.
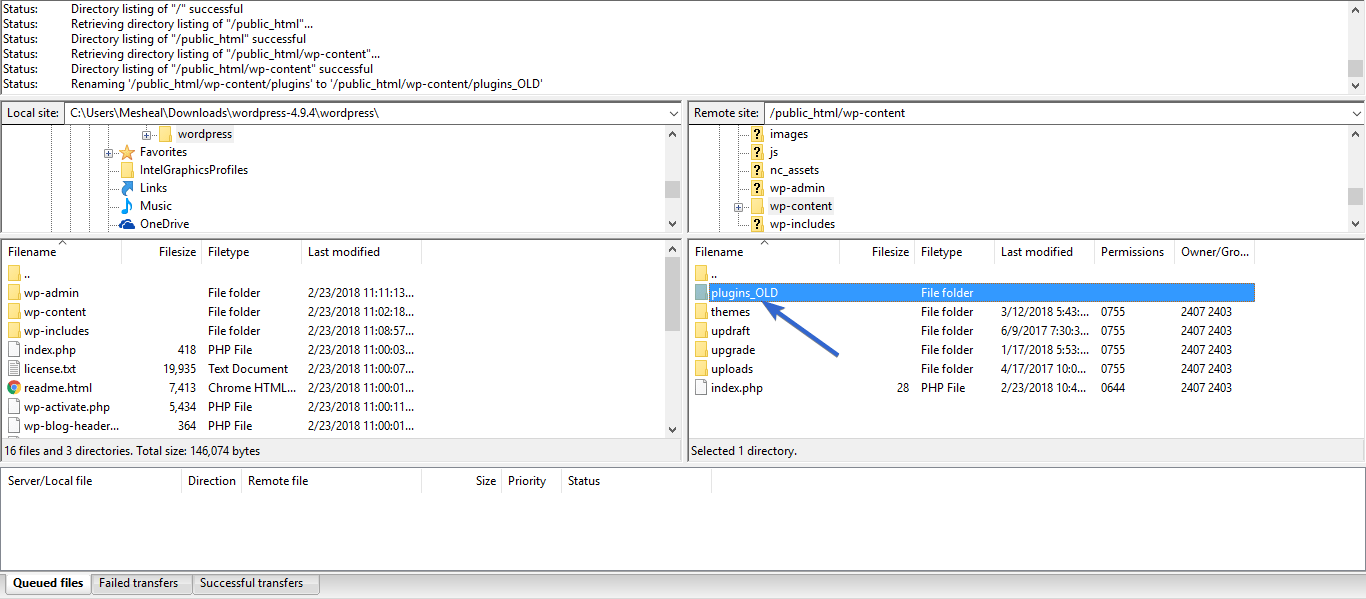
Right-click on the “plugins” folder to view the options. And then Select Rename from the options and change the name of this folder so WordPress no longer sees it.
Now reload your WordPress site to see if the error you encountered is fixed. If it is, then one of your plugins was responsible for this error.
The next step then will be to find out which plugin is causing your issue. To do this, rename the folder back to ‘Plugins’ and refresh your site.
Now go to your plugins page on your dashboard (Plugins > Installed Plugins). You would be able to see all your plugins but they are all deactivated.
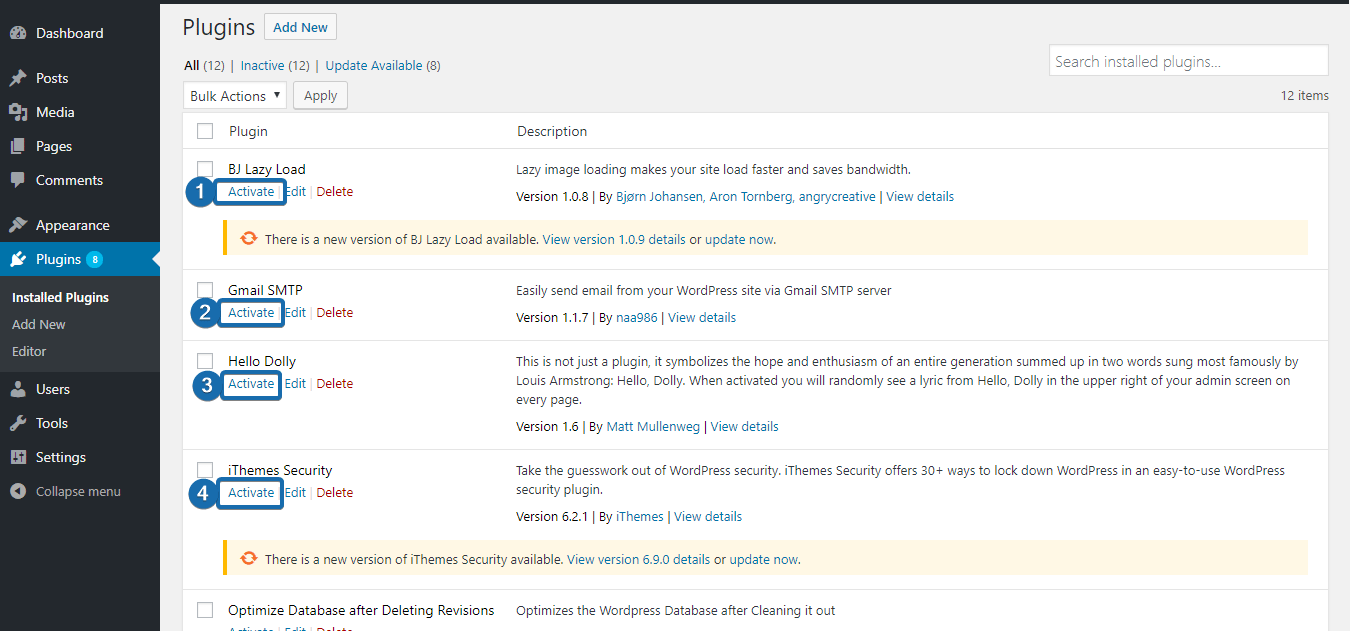
As shown in the picture above, activate the plugins one by one until you get the one that triggers the error.
When you have found the faulty plugin, you can once again deactivate all your plugins by renaming the plugins folder to something else, and then refreshing your site so it displays.
Next, rename the folder back to ‘plugins’ (to re-enable all plugins) and refresh your site. Now, go to your plugins page in your dashboard (Plugins > Installed Plugins) and delete the WordPress plugin causing this issue, before activating all others.
How to Disable A Single WordPress Plugin Using FTP
If you know the particular plugin causing your issue, then you can disable just that one using FTP. The process to fix it with FTP is very similar to the one above but with a little difference.
For this, you wouldn’t need to rename the entire plugins folder. Instead, double-click the plugins folder to open it. Then look for the particular plugin folder you want to deactivate.
Next, right-click on the folder and select Rename from the options, and change the name of the folder. When you do this, that particular plugin will be deactivated. Now, go to your plugins page in your dashboard (Plugins > Installed Plugins) and delete the WordPress plugin causing this issue.
Alternative Methods for Disabling Plugins
While disabling WordPress plugins using FTP is an effective method, especially when you’re locked out of your WordPress admin area, it’s important to recognize that it’s not the only approach available.
Depending on your situation, access level, and technical proficiency, you might find one of the following alternative methods more suitable for your needs. Exploring these alternatives can provide you with a more versatile toolkit for managing your WordPress site under various circumstances.
Disabling Plugins via WordPress Dashboard
For those who have access to their WordPress admin area, disabling plugins is straightforward and requires no additional tools.
Simply navigate to the “Plugins” section in your WordPress dashboard. Here, you’ll see a list of all installed plugins. To deactivate a single plugin, click the “Deactivate” link located below the plugin’s name. If you need to disable multiple plugins at once, use the checkboxes to select the desired plugins, choose “Deactivate” from the “Bulk Actions” dropdown menu, and click “Apply.” This method is ideal for routine plugin management and troubleshooting when admin access is available.
Using phpMyAdmin to Disable Plugins
If you’re unable to access your WordPress dashboard due to a plugin conflict or error, using phpMyAdmin to deactivate plugins is another effective method. This approach involves accessing your website’s database through phpMyAdmin, a tool available in most web hosting control panels.
Once in phpMyAdmin, navigate to the “wp_options” table (note that your table prefix may differ from “wp_”). Look for the “active_plugins” row and edit it. By changing the value in the “option_value” field to a:0:{}, you effectively deactivate all plugins.
This method is particularly useful when troubleshooting more complex issues that render the WordPress dashboard inaccessible.
WP-CLI for Developers
For developers and those comfortable with the command line, WP-CLI offers a powerful way to manage WordPress settings, including plugin management. WP-CLI is a command-line tool specifically designed for WordPress, allowing you to perform various administrative tasks directly from the command line.
To deactivate plugins using WP-CLI, simply navigate to your WordPress root directory in the terminal and use the command wp plugin deactivate <plugin-name> to deactivate a single plugin, or wp plugin deactivate –all to deactivate all plugins.
This method is highly efficient for those familiar with command-line interfaces and can be a significant time-saver in development environments.
Selecting the Right Method
Choosing the right method for disabling plugins depends on several factors. That includes your access to the WordPress admin area, the nature of the issue you’re encountering, and your comfort level with different tools and interfaces. Each method has its advantages and is suited to different scenarios.
- WordPress Dashboard: Best for routine management and when admin access is available.
- phpMyAdmin: Useful for troubleshooting when locked out of the admin area, requiring some familiarity with databases.
- WP-CLI: Ideal for developers and those comfortable with the command line, offering a fast and scriptable approach.
Troubleshooting and Identifying Problematic Plugins
After successfully disabling your WordPress plugins, especially in a scenario where you’re troubleshooting an issue with your site, the next critical step is identifying the problematic plugin(s).
This phase is essential as it allows you to isolate and address the specific cause of the issue, ensuring that your site returns to normal functionality without unnecessary disruptions.
Safely Reactivating Plugins
Once all plugins are deactivated, your site should ideally be free from the error or issue that prompted the deactivation. The process of reactivation should be approached with caution to avoid re-introducing the same problem.
Start by navigating back to the “Plugins” section within your WordPress dashboard, where you will now find all plugins deactivated.
The key here is to reactivate each plugin one at a time, checking your site’s functionality after each activation. This methodical approach helps in pinpointing exactly which plugin, when reactivated, causes the issue to recur. It’s a simple yet effective process that requires patience, especially if you have numerous plugins installed.
Monitoring Site Behavior
As you reactivate each plugin, closely monitor your site for any signs of the issue reappearing. This could involve checking for error messages, testing site speed, evaluating functionality related to the plugins, or simply ensuring that your site loads correctly.
It’s also wise to test your site in different browsers and devices to ensure that the issue is truly resolved across all user experiences.
If the problem reappears after activating a particular plugin, you’ve likely identified the culprit. At this point, it’s advisable to deactivate that specific plugin once again to maintain your site’s stability and functionality.
Next Steps After Identification
Upon identifying the problematic plugin, you have several options:
- Seek Support: Reach out to the plugin’s support team for help. Most reputable plugins offer support channels, and detailing the issue can often lead to a resolution or workaround provided by the plugin developers.
- Seek Alternatives: If the plugin is essential to your site’s operation, consider looking for alternative plugins that offer similar functionality but without the associated issues.
- Update and Maintenance: Ensure that the plugin, along with your WordPress core and other plugins, is up to date. Sometimes, compatibility issues arise due to outdated software, and updates can resolve these conflicts.
- Custom Fixes: For more advanced users or developers, delving into the plugin’s code to identify and fix the issue might be an option. However, this approach requires a deep understanding of WordPress development and should be approached with caution.
Conclusion
Very often, an error in your WordPress site can be traced to a faulty plugin. If this was so in your case, the steps in this guide would have helped you disable WordPress plugins using FTP. After that, you should now have your site back live.
As WordPress users, we usually have to install plugins every now and then. The reality is that some are written poorly and can break our sites. Thus, we highly recommend that you always run ongoing backups of your WordPress site. With this in place, in the event that any error you run into leads to data loss. You can easily restore your site files and database.
More Resources:
- WordPress Database Plugin
- MailChimp for WordPress
- Weebly vs WordPress
- How to install Gmail SMTP in WordPress to fix email issues

